Page 5 - INDICE
INDICE Avvertenze Versioni d’uso Disegno esploso Installazione Funzionamento Manutenzione 5 IT
Page 6 - AVVERTENZE
6 rete devono essere previsti nell’installazio- ne fissa. Se l’apparecchio è provvisto di cavo ali- mentazione e di spina, deve essere posto in modo che la spina sia accessibile. * Evitare l’uso di materiali che causano fiammate (flambè) nelle immediate vici- nanze dell’apparecchio. Nel caso di frit...
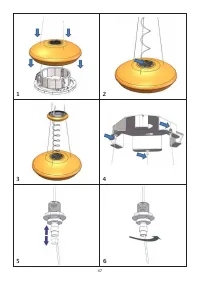
Page 7 - VERSIONI D’USO; DISEGNO ESPLOSO
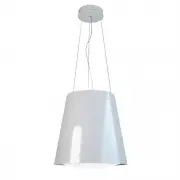
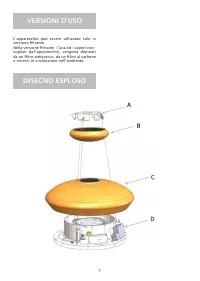
7 VERSIONI D’USO L’apparecchio può essere utilizzato solo in versione filtrante. Nella versione filtrante l’aria ed i vapori con- vogliati dall’apparecchio, vengono depurati da un filtro antigrasso, da un filtro al carbone e rimessi in circolazione nell’ambiente. DISEGNO ESPLOSO
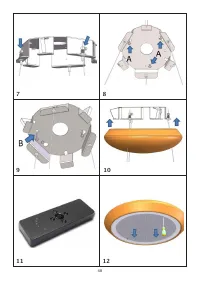
Page 8 - INSTALLAZIONE
8 Prelevare dall’imballaggio la ceramica di co- pertura della piastra a soffitto (vedi disegno esploso particolare B), posizionarla sopra la cappa e far passare i cavi in acciaio all’inter- no dei tre fori della ceramica, il cavo alimen- tazione deve passare nel foro centrale della ceramica, vedi fi...
Page 9 - FUNZIONAMENTO
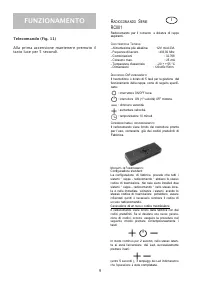
9 FUNZIONAMENTO Telecomando (Fig. 11) Alla prima accensione mantenere premuto il tasto luce per 5 secondi. R ADIOCOMANDO S ERIE I RC001 Radiocomando per il comando a distanza di cappe aspiranti. C ARAT TE RIISTIICH E T ECNIICHE - Alimentazione pila alkalina : 12V mod.23A - Frequenza di lavoro : 433,...
Page 11 - MANUTENZIONE
Un’accurata manutenzione garantisce un buon funzionamento ed un buon rendimento nel tempo. * Una cura particolare va rivolta al filtro an- tigrasso. Il filtro antigrasso è fissato mediante magneti pertanto, è sufficiente, inserire un utensile o la punta di un coltello nell’apposita apertura ovale e ...
Page 12 - CONTENTS
CONTENTS Warnings Uses Technical sketch Installation Working Maintenance 12 GB
Page 13 - WARNINGS
13 * The use of materials which can burst into flames (flambé) should be avoided in close proximity of the appliance. When frying, please pay particular attention to fire risk due to oil and grease. Being highly inflammable, fried oil is espe- cially dangerous. Do not use uncovered electric grills. ...
Page 14 - USES; TECHNICAL SKETCH
14 USES The appliance can be arranged only for filte- ring performances. In its filtering version the air and fumes conveyed by the appliance are cleaned both by a grease filter and by an ac- tive coal filter, and put again into circulation. TECHNICAL SKETCH
Page 15 - INSTALLATION
15 Adjust the height of the product scrolling the steel cables up and down inside the support, it is necessary to unscrew and push the sup- port in order to allow the scrolling of the ca- ble, see fig. 5. Check that the remaining length of ste- el cables from the supports indicated in fig. 6 is the ...
Page 16 - WORKING; ADIO
16 WORKING Remote control (Fig.11) channel radio control for cooker hood remo- te. At first ignition, keep pressed the lighting button for 5 seconds. OPERATION MODE Standard confiiguratiion: Standard configuration requires all “cooker hoods – radio control - system” to be provided with the same tran...
Page 18 - MAINTENANCE
An accurate maintenance guarantees good functioning and long-lasting performance. * Particular care is due to the grease filter The grease filter is fixed through magnets, there- fore it is sufficient to insert a hand tool or the tip of a knife in the dedicated opening and push upwards in order to p...
Page 19 - INDEX
INDEX Attention Version de l’appareil Détaillé Installation Fonctionnement Entretien 19 F
Page 20 - ATTENTION
20 d’au moins 3 mm., ces dispositif de sépa- ration du réseau doivent alors être prévus dans l’installation fixe. Si l’appareille fixé est pourvu du câble de l’alimentation et une fiche, l’appareille doit être placé de manière que la fiche soit fa- cilement accessible. * Évitez d’utiliser des matéri...
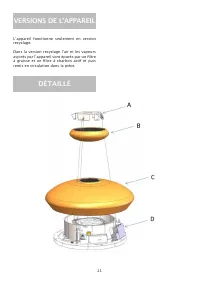
Page 21 - VERSIONS DE L’APPAREIL; DÉTAILLÉ
21 VERSIONS DE L’APPAREIL L’appareil fonctionne seulement en version recyclage. Dans la version recyclage l’air et les vapeurs aspirés par l’appareil sont épurés par un filtre à graisse et un filtre à charbon actif et puis remis en circulation dans la pièce. DÉTAILLÉ
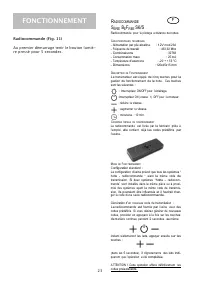
Page 23 - FONCTIONNEMENT
23 FONCTIONNEMENT Radiocommande (Fig. 11) Au premier dèmarrage tenir le bouton lumiè- re pressè pour 5 secondes. R ADIOCOMMANDE F S ÉRIE B E F REE S6/S Radiocommande pour le pilotage à distance de hottes C ARACTÉRIISTIIQUES TECHNIIQUES - Alimentation par pile alcaline : 12V mod.23A - Fréquence de tr...
Page 25 - ENTRETIEN
An accurate maintenance guarantees good functioning and long-lasting performance. * Particular care is due to the grease filter The grease filter is fixed through magnets, there- fore it is sufficient to insert a hand tool or the tip of a knife in the dedicated opening and push upwards in order to p...
Page 26 - ÍNDICE
ÍNDICE Advertencias Versiones Piezas Instalacion Funcionamiento Mantenimiento 26 E
Page 27 - ADVERTENCIAS
27 Si el aparato está provisto de cable de ali- mentación y de conector, el aparato debe ser situado de forma que la clavica resulte fácilmente aseguirle. * Evitar el uso de materiales que causen llamarada cerca de la campana. En el caso de fritos prestar atención especial al peli- gro de incendio q...
Page 29 - INSTALACION
29 Saque del embalaje la placa de metal de techo y luego pase los cables de acero en el interior de los soportes especiales, como se muestra en la figura 4. Ajuste la altura deseada del producto, mo- viendo más o menos los cables de acero en el interior del soporte, tiene que desenroscar y empujar e...
Page 30 - FUNCIONAMIENTO
30 FUNCIONAMIENTO Radiocontrol (Fig.11) A la primera ignicion mantener el buton luz apretado por 5 segundos. M ODA LIIDA D DE FUNCIIONAMIIENTO Confiiguraciión estándar: La configuración de fábrica prevé que todos los sistemas de “campana - radiomando” tengan el mismo código de transmisión. Si se ins...
Page 32 - MANTENIMIENTO
Un correcto mantenimiento es garantía de un buen funcionamiento y un buen rendimiento en el tiempo. Se debe prestar particular aten- ción al filtro anti grasa. El filtro anti grasa se fija por medio de ima- nes, por lo tanto, es suficiente insertar una herramienta o la punta de un cuchillo en la abe...
Page 33 - INHALTSVERZEICHNIS
INHALTSVERZEICHNIS Allgemeine Sicherheitshinweise Allgemeine Montagehinweise Explosions Geräteausführung Installation und Montage Schaltung des Geräts Wartung 33 D
Page 35 - EXPLOSIONS
35 ALLGEMEINE MONTAGEHINWEISE Das Gerät ist nur in Filterversion verfügbar. Die Luft und die Dämpfe der Filterversion, die vom Gerät abgesaugt werden, werden sowohl von einem Fettfilter als auch von einem Ko- hlefilter gereinigt und im Raum wieder au- sgestoßen. EXPLOSIONS
Page 36 - GERÄTEAUSFÜHRUNG
36 Die Metall-Deckenplatte aus der Verpa- ckung nehmen und die Stahlkabel durch die entsprechenden Kabelverschraubungen ziehen, siehe Abb.4. Die gewünschte Höhe der Dunstabzugshaube einstellen, indem Sie mehr oder weniger die Stahlkabel durch die Kabelverschraubungen ziehen; um das Glei- ten zu ermö...
Page 39 - WARTUNG
Nur eine sorgfältige Pflege garantiert auf Dauer eine gute Leistung und Funktion des Geräts. * Besonders wichtig ist die Reinigung der Fet- tfilter. Der Fettfilter haftet an Magneten; um den Fettfilter aus seinem Sitz zu nehmen, reicht es, ein Utensil oder die Spitze eines Messers in das entsprechen...
Page 40 - INHOUDSOPGAVE
INHOUDSOPGAVE Waarschuwingen Gebruiksversies Exploded Installatie Werking Onderhoud 40 NL
Page 41 - WAARSCHUWINGEN
41 tussen de contacten van minstens 3 mm, dienen apparaten om de stroom te onder- breken te worden aangebracht in het net. Als er een stroomsnoer met stekker aan het apparaat zit, zorg er dan voor dat het stopcontact gemakkelijk bereikbaar is. * Gebruik geen stoffen of materialen die steekvlammen ve...
Page 42 - GEBRUIKSVERSIES; EXPLODED
42 GEBRUIKSVERSIES Het apparaat kan alleen in de filterversie worden gebruikt. In de filterversie worden de lucht en dampen die in het apparaat komen, gezuiverd door een vetfilter en een koolfilter en dan weer in de ruimte gestuurd. EXPLODED
Page 43 - INSTALLATIE
43 Haal de metalen plafondplaat uit de verpak- king en haal de stalen kabels door de daarvoor bedoelde klemmen zoals op de afbeelding 4. Verstel het product in de hoogte met de stalen kabels via de klem. U moet de klem losschro- even en verduwen om de kabel erin te laten glijden, zie afb.5. Controle...
Page 44 - WERKING
44 WERKING Afstandsbediening (Fig. 11) Druk voor het 1ᵉ gebruik de verlichting scha- kelaar gedurende 5 seconden in. G EBRUIIKSAANWIIJZIING Standaardconfiiguratiie: De fabrieksconfiguratie voorziet dat alle systemen “kap - afstandsbediening” dezelfde transmissiecode hebben. Wanneer er twee systemen ...
Page 46 - ONDERHOUD
Een zorgvuldig onderhoud garandeert een al- tijd goed werkende en renderende afzuigkap. * Besteed genoeg aandacht aan de vetfilter. De vetfilter is bevestigd met magneten. U ho- eft dus slechts een gereedschap of de punt van een mes in de ovalen opening naar boven te duwen om de filter los te laten ...