Page 2 - or injury to persons:; WARNING
INSTRUCTION MANUAL This sewing machine is intended for household use.This sewing machine is not intended for use by young children or infi rmed persons without supervision. IMPORTANT SAFETY INSTRUCTIONS When using a sewing machine, basic safety precautions should always be followed, including the fo...
Page 3 - CONTENTS
3 CONTENTS IMPORTANT SAFETY INSTRUCTIONS ..................... 2 MODEL 9985 .............................. 8FOR EUROPEAN AND SIMILAR TERRITORIES: ............................. 8 MAIN PARTS ............................ 10ACCESSORIES........................ 12DUST COVER .......................... 12RE...
Page 4 - – Pour réduire les risques de décharge électrique :; machine immédiatement après l’usage et avant le nettoyage.; – Pour réduire les risques de brûlure,; débranchez la fi che électrique.; CONSERVEZ CETTE NOTICE D’UTILISATION
4 MANUEL D’INSTRUCTIONS La machine à coudre est exclusivement destinée à l’usage domestique. Cette machine à coudre n’a pas été conçue pour être utilisée par de jeunes enfants ni des personnes handicapées sans supervision. CONSIGNES DE SÉCURITÉ IMPORTANTES Il est important d’observer des précautions...
Page 5 - TABLE DES MATIÈRES
5 TABLE DES MATIÈRES CONSIGNES DE SÉCURITÉ IMPORTANTES ...................... 4 MODÈLE 9985 ........................... 9POUR LES TERRITOIRES EUROPÉENS ET ASSIMILÉS : .................................. 9 PIÈCES PRINCIPALES ............ 11ACCESSOIRES........................ 13HOUSSE DE PROTECTION SOU...
Page 6 - - Para reducir el riesgo de descarga eléctrica:; PRECAUCIONES; - Para reducir el riesgo de; CONSERVE ESTAS INSTRUCCIONES
MANUAL DE INSTRUCCIONES Esta máquina de coser está diseñada sólo para uso doméstico. Esta máquina de coser no está diseñada para ser utilizada por niños pequeños o personas enfermas sin la debida supervisión NORMAS DE SEGURIDAD IMPORTANTES Cuando utilice la máquina de coser, debe seguir siempre unas...
Page 7 - ÍNDICE
7 ÍNDICE NORMAS DE SEGURIDAD IMPORTANTES ....................... 6 MODELO 9985 ........................... 9PARA EUROPA Y TERRITORIOS EQUIPARABLES: ....................... 9 PARTES PRINCIPALES ........... 11ACCESORIOS.......................... 13CUBIERTA ................................ 13MESA DE EX...
Page 8 - FOR EUROPEAN AND
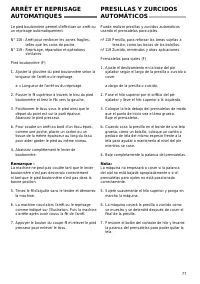
8 MODEL 9985 PREFACEThank you for your purchase of this sewing machine.This machine intended for household use will provide you with excellent performance in sewing from light to heavy material.Please refer to this booklet for proper use and optimum service. To get the most out of your sewing machin...
Page 10 - MAIN PARTS
10 MAIN PARTS 1. Face Plate 2. Thread Take-Up Lever (Inside) 3. Pressure Regulator 4. Removable Extension Table (Accessories) 5. Handle 6. Hand Wheel 7. Presser Foot Lifter 8. Stitch Balance Adjusting Screw (underneath machine) 9. Thread Cutter 10. Buttonhole Lever 11. Needle Threader 12. Needle Thr...
Page 12 - ACCESSORIES; DUST COVER
12 ACCESSORIES Accessories are provided in the accessory case.(See next page, [REMOVABLE EXTENSION TABLE]) 1. Needle Pack 2. 4 SINGER Class 15 bobbins ( 1 is in the machine) 3. Seam Ripper 4. Brush 5. Auxiliary Spool Pin with Felt Washer 6. Screw Driver 7. Screwdriver for Needle Plate 8. Thread Cap ...
Page 13 - ACCESSOIRES; HOUSSE DE PROTECTION
13 ACCESSOIRES Les accessoires sont disposés dans le compartiment pour accessoires.Voir les pages 14 et 15, (TABLE DE RALONGE AMOVIBLE) 1.Assortiment d’aiguilles2.Quatre (4) bobines SINGER de classe 15 (dont une est déjà dans la machine) 3.Découseur4.Brosse à charpie5.Tige auxiliaire de bobine avec ...
Page 14 - CHANGING THE PRESSER
14 REMOVABLE EXTENSION TABLE A. REMOVING THE EXTENSION TABLE Hook your fi nger under the left bottom side of the removable extension table and slide it to the left. To attach, push the table to the right. B. OPENING THE ACCESSORY CASE Hook your fi nger under the left side of the accessory drawer cov...
Page 18 - FOOT CONTROLLER
18 CONNECTING THE MACHINE DANGER: To reduce the risk of electric shock. Never leave unattended when plugged in. Always unplug this machine from the electric outlet immediately after using and before maintenance. WARNING: To reduce the risk of burns, fi re, electric shock, or injury to persons. Do no...
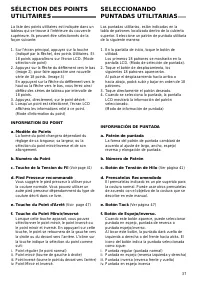
Page 21 - FUNCIONES DE CONTROL
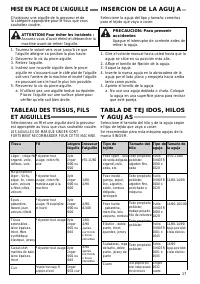
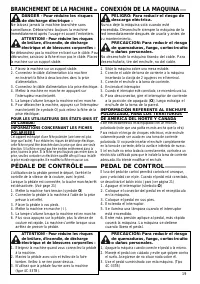
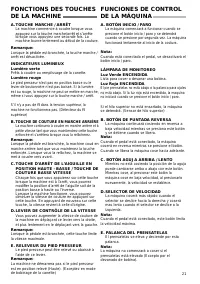
21 FONCTIONS DES TOUCHES DE LA MACHINE A. TOUCHE MARCHE / ARRÊT La machine commence à coudre lorsque vous appuyez sur la touche marche/arrêt et s’arrête lorsque vous appuyiez une seconde fois. La machine tourne lentement au début de la couture. Remarque: Lorsque la pédale est branchée, la touche mar...
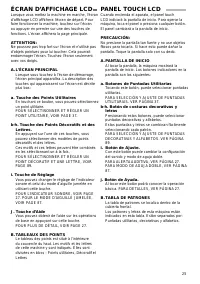
Page 24 - TOUCH PANEL LCD
24 TOUCH PANEL LCD When you turn on the power, the touch panel LCD will indicate start up screen. To operate the machine, touch this panel or press any control button fi rst. The display will change to the Home Screen. CAUTION: Do not press the screen too hard and do not use sharp objects to touch i...
Page 26 - HELP BUTTON
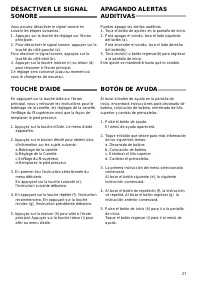
26 TURNING OFF AUDIBLE BEEP You can turn off the audible beep.1. Touch the setting button at home screen.2. To turn off the beep, touch the left side of button (a). To turn on the beep, touch the right side of button (b). 3. Touch home (c) or return (d) button to return the home screen. This setting...
Page 28 - BOBBIN SETTING
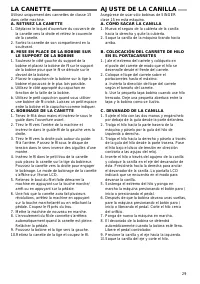
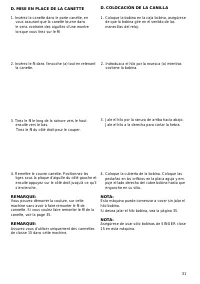
28 BOBBIN SETTING Be sure to use only SINGER Class 15 bobbins in this machine. A. REMOVING THE BOBBIN 1. Pull the bobbin cover latch to the right and remove the bobbin cover. 2. Lift up the bobbin from the machine. B. SETTING SPOOL OF THREAD ON SPOOL PIN 1. Pull up the left end of spool pin and set ...
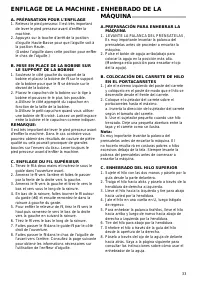
Page 32 - THREADING THE MACHINE
32 THREADING THE MACHINE A. PREPARING TO THREAD MACHINE 1. RAISE THE PRESSER FOOT LIFTER. It is very important to raise the presser foot lifter before you proceed to thread the machine. 2. Press the needle up/down button to set the needle in up position. (Keep this position for threading the eye of ...
Page 36 - ii
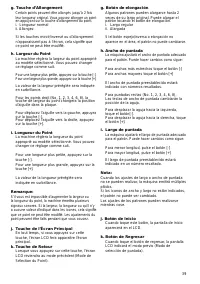
36 SELECTING UTILITY STITCH PATTERN Utility stitches are indicated in the pattern chart located inside of the top cover. Select utility stitch pattern as follows: 1. On the Home screen, touch the Utility button. First 18 patterns will be indicated on the LCD. (Stitch selection mode) 2. Touch the scr...
Page 40 - THREAD TENSION
40 THREAD TENSION This machine sets the thread tension automatically when pattern is selected. However you can change the thread tension as follows. 1. Touch the tension button. LCD changes to the thread tension mode. 2. To increase the upper thread tension, touch the [+] button. To decrease the upp...
Page 44 - STARTING TO SEW
44 STARTING TO SEW Select the straight stitch center needle positon. (No. 1) CAUTION: To prevent accidents. While sewing, special care is required around the needle.Machine automatically feeds the fabric, do not pull or push the fabric. A. START AND END OF SEAM 1. Check the presser foot (General Pur...
Page 50 - STRAIGHT STITCH SEWING
50 STRAIGHT STITCH SEWING Straight stitch patterns should be selected to suit the type of fabric being sewn. Left needle position (No.2) is most suited for sewing light weight fabrics. No. 1. Center needle positionNo. 2. Left needle positionNo. 3. Center needle with built-in reverse stitchNo. 4. Lef...
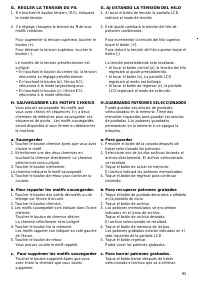
Page 51 - COUTURE AU POINT DROIT; PUNTADA RECTA
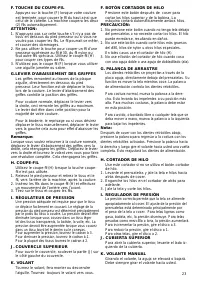
51 COUTURE AU POINT DROIT Les motifs au point droit doivent être sélectionnés en fonction du type de tissu à coudre. La position de l’aiguille à gauche (n°2) est la meilleur adaptée pour la couture des tissus légers. N°1 : Point droit (Position centrale de l’aiguille)N°2 : Point droit (Position de l...
Page 52 - BASTING
52 BASTING Basting is temporary stitching, used for fi tting garments, and for gathering and marking fabric. No. 5 Basting Stitch Dar ning/Embroidery Foot A. ATTACHING THE DARNING/ EMBROIDERY FOOT 1. Lower the feed dogs by moving the drop feed lever to the left. 2. Remove the presser foot and holder...
Page 53 - FAUFILAGE; HILVANADO
53 FAUFILAGE Le faufi lage est un point temporaire pour vérifi er la taille d’un vêtement, le fronçage et pour marquer le tissu. N°5 Fil de bâti Pied broderie et reprisage A.MISE EN PLACE DU PIED BRODERIE ET REPRISAGE 1. Abaissez les griffes en déplaçant le levier des griffes sur la gauche. 2. Retir...
Page 54 - QUILTING; ELASTIC STITCH SEWING
54 QUILTING A quilt consists of three layers:The topper, batting, and backing fabric. The top layer is formed by shaped pieces of fabrics joined together, creating the quilt topper.No. 1 Straight Stitch (Center Needle Position)No. 8 Hand Look Quilting Stitch Straight Stitch / Patchwork Quilting Foot...
Page 55 - ACOLCHADO
55 COUTURE DE POINTS EXTENSIBLES Les points extensibles sont plus fort et permet une couture qui donne avec le tissu. Recommander pour les tissus extensibles ainsi que le denim et les toiles. N°6 Point droit élastiqueN°7 Point de tige pour tissus extensiblesN°17 Point ric rac Pied universel (A) Il e...
Page 56 - ZIGZAG STITCH SEWING; FREE ARM SEWING
56 ZIGZAG STITCH SEWING Your machine can sew zigzag stitches of various widths and lengths by changing the settings of the stitch width and stitch length. No. 9 Zigzag Stitch General Purpose Foot or Satin Foot (A, B) Zigzag stitches are very good for applique and decorative sewing. SATIN STITCHING T...
Page 58 - OVERLOCKING
58 OVERCASTING- OVERLOCKING A. USING THE OVERCASTING FOOT No. 9 (Stitch Width 5.0) No. 15, 16, 30 (Stitch Width 5.0 - 7.0) Overcasting Foot (C) Line up the fabric against the guide plate of the overcasting foot so that the needle falls near the edge of the fabric. a. No. 9 (Width=5.0) is used for pr...
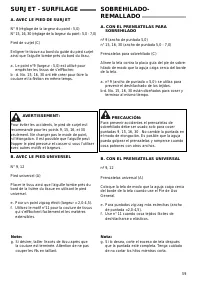
Page 59 - REMALLADO
59 SURJET - SURFILAGE A. AVEC LE PIED DE SURJET N° 9 (réglage de la largeur du point : 5,0)N° 15, 16, 30 (réglage de la largeur du point : 5,0 - 7,0) Pied de surjet (C) Enligner le tissue au bord du guide du pied surjet ainsi que l’aiguille tombe près du bord du tissu. a. Le point n°9 (largeur : 5,0...
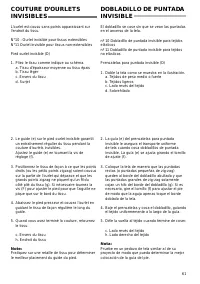
Page 60 - BLIND HEM STITCHING
60 5mm 1cm 5mm BLIND HEM STITCHING The hem is sewn without stitches showing on right side of fabric. No. 10 Blind hemming for stretch fabricNo. 11 Blind hem for non-stretch fabric Blind Hem Foot (D) 1. Fold the fabric as shown in the illustration. a. Medium, Heavy weight fabric b. Light weight fabri...
Page 63 - APLICACIONES
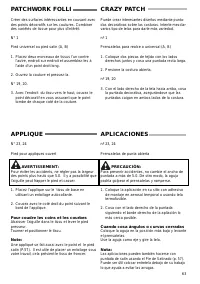
63 PATCHWORK FOLLI Créer des surfaces intéressantes en cousant avec des points décoratifs sur les coutures. Combiner des variétés de tissue pour plus d’intérêt. N° 1 Pied universel ou pied satin (A, B) 1. Placez deux morceaux de tissus l’un contre l’autre, endroit sur endroit et assemblez-les à l’ai...
Page 68 - BUTTONHOLE SEWING
68 BUTTONHOLE SEWING Select the buttonhole style you want to sew.This machine can sew 13 types of buttonholes. 120. Bar-tack Buttonhole (Narrow) for light to medium weight fabrics 121. Bar-tack Buttonhole (Wide) for large buttons122. Keyhole Buttonhole for heavy weight fabrics123. Keyhole Buttonhole...
Page 72 - BOUND BUTTONHOLE
72 BOUND BUTTONHOLE A bound buttonhole provides a professional touch to tailored garments like suits, coats and jackets. 132. Bound Buttonhole Buttonhole Foot (F) 1. Cut a patch of fabric 2.5 cm (1”) wide, 1 cm (1/3”) longer than the fi nished buttonhole. Baste a patch so that the center line of pat...
Page 74 - EYELET
74 10.Fold the fabric and stitch along the seams on each side, just a needle width from the original stitching line. Remove the basting. c. Wrong side of fabric 11. Fold the fabric along the buttonhole end and stitch triangular ends on the original stitching line. 12. Press and trim the patch to wit...
Page 76 - AND DARNING
76 AUTOMATIC BAR-TACK AND DARNING You can sew automatic bar-tack and darning using the buttonhole foot. No. 118 Bar-tack, to reinforce areas that will be subject to strain, such as pocket corners. No. 119 Darning, mending and other applications. Buttonhole Foot (F) 1. Adjust slide on base of buttonh...
Page 78 - SEWING ON BUTTONS
78 SEWING ON BUTTONS No. 13 Button Sewing Foot 1. Lower the feed dogs by moving the drop feed lever to the left. 2. Attach the button sewing foot. Align two holes of the button with slot of presser foot and lower foot to hold the button securely. 3. Adjust the stitch width so that the needle enters ...
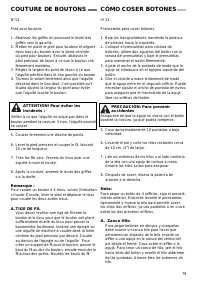
Page 79 - COUTURE DE BOUTONS; CÓMO COSER BOTONES
79 COUTURE DE BOUTONS N°13 Pied pour boutons 1. Abaissez les griffes en poussant le levier des griffes vers la gauche. 2. Mettez en place le pied pour boutons et alignez deux trous du bouton avec la barre centrale du pied pour boutons. Ensuite, abaissez le pied presseur de façon à ce que le bouton s...
Page 82 - FOOT; CONTINUOUS DECORATIVE
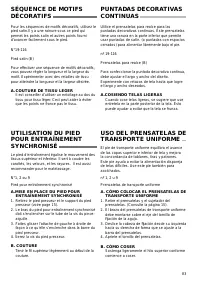
82 USING THE EVEN-FEED FOOT The Even-feed Foot equalizes the feeding of the upper and lower layers of fabric and improves the matching of plaids, stripes, and patterns. This foot helps to prevent uneven feeding of very diffi cult fabrics. Use this foot also for sewing quilts. No. 1, 2, or 9 Even-fee...
Page 84 - EMBROIDERY
84 DARNING/FREE-HAND EMBROIDERY No. 1.Center needle position Darning/Embroidery Foot A. ATTACHING THE DARNING/ EMBROIDERY FOOT 1. Lower the feed dogs by moving the drop feed lever to the left. 2. Remove the presser foot and holder. (See page 14) 3. The arm of darning/embroidery foot should rest on t...
Page 86 - TWIN NEEDLE SEWING
86 TWIN NEEDLE SEWING Interesting effects can be produced by sewing decorative stitches using a twin needle. Try using two different colors of thread for even more variety. Always make a test sample fi rst to help you determine the best settings for the stitch you are sewing. All patterns except No....
Page 87 - CÓMO COSER CON AGUJA
87 COUTURE AVEC AIGUILLE JUMELÉE Des effets très intéressants sont possibles avec une aiguille jumelée. Vous pouvez utilisez des points décoratifs, et des fi l contrastants. Il est toujours recommander de pratiquer sur des retailles de tissus avant d’effectuer votre projet. Tous les points sauf n°11...
Page 88 - STITCH SEWING
88 DECORATIVE & LETTER STITCH SEWING You can combine decorative & letter stitches into a sequence by selecting each pattern. A. SELECTING DECORATIVE & LETTER STITCH (selecting mode) 1. At the home screen, touch the decorative or letter button you desire. LCD wil change to selecting mode....
Page 89 - PUNTADAS DECORATIVAS
89 COUTURE DE POINTS DECORATIFS ET LETTRAGE Vous pouvez combiner les points décoratifs avec les lettres en succession. A. Sélectionner les points décoratifs et lettrage (Sélection de mode) 1. A l’écran d’accueil, touchez le bouton décoratif ou lettrage. L’ECL changera à la mode de sélection. 2. Vous...
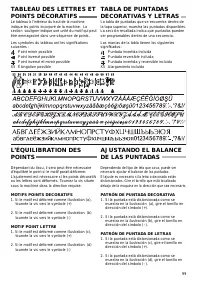
Page 98 - ADJUSTING THE BALANCE
98 DECORATIVE AND LETTER STITCH CHART The stitch chart inside the top lid of the machine displays patterns available. The highlighted section indicates one unit of the pattern that is programmable into a stitch sequence. Description of Chart Symbols: Mirror Stitch included Reverse Stitch included Mi...
Page 100 - MAINTENANCE
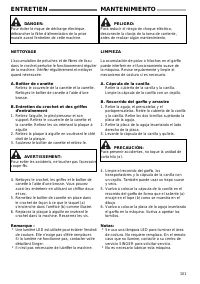
100 b c a MAINTENANCE DANGER: To reduce the risk of electric shock, disconnect the power line plug from the electric outlet before carrying out any maintenance. CLEANING If lint and bits of thread accumulate in the hook, this will interfere with the smooth operation of the machine. Check regularly a...
Page 102 - MESSAGES ON LCD
102 1. Winding the bobbin. MESSAGES ON LCD 2. Lower the buttonhole lever. 1 2 3. After sewing buttonhole, raise the presser foot lifter and set the frame of buttonhole foot to starting position. 4. Release the foot controller pedal. 5. Lower the presser foot. 6. Machine memory is full. 7. Select a p...
Page 104 - HELPFUL HINTS
104 PROBLEM Upper thread breaks Lower thread breaks Machine skips stitches Fabric puckers Machine makes loose stitches or loops Stitch pattern is distorted Threader does not thread needle eye Machine does not feed properly Needle breaks Machine runs with diffi culty Machine will not run HELPFUL HINT...
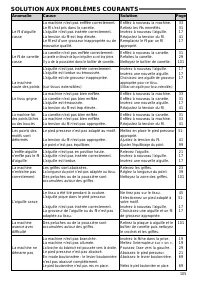
Page 105 - SOLUTION AUX PROBLÈMES COURANTS
105 Anomalie Le fi l d’aiguille casse Le fi l de canette casse La machine saute des points Le tissu grigne La machine fait des points lâches ou des boucles Les points des motifs sont déformés L’enfi le-aiguille n’enfi le pas le fi l d’aiguille La machine n’entraîne pas correctement L’aiguille casse ...
Page 106 - RECOMENDACIONES ÚTILES
106 PROBLEMA El hilo superior se rompe El hilo de la canilla se rompe La máquina salta puntadas El tejido se arruga La máquina hace puntadas fl ojas o lazos La puntada está deformada El enhebrador no enhebra el ojo de la aguja La máquina no transporta apropiadamente La aguja se rompe La máquina func...