Page 2 - SAVE THESE INSTRUCTIONS
s h a r k c l e a n . c o m s h a r k c l e a n . c o m SAVE THESE INSTRUCTIONS READ ALL INSTRUCTIONS BEFORE USE IMPORTANT SAFETY INSTRUCTIONS HOUSEHOLD USE ONLY To reduce the risk of electric shock, this vacuum cleaner has a polarized plug (one blade is wider than the other). As a safety feature, t...
Page 3 - ASSEMBLY; OFF
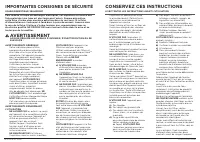
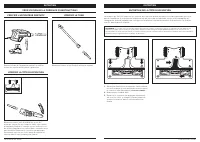
s h a r k c l e a n . c o m s h a r k c l e a n . c o m (Click) ASSEMBLY 1. Insert Wand into Zero-M® Cleaner Head . 2. Insert Handheld Vacuum into wand. Ensure all connections click securely into place. (Click) SETTINGS CLEANING MODES NOTE: For deep cleaning per ASTM F 608 (embedded dirt in carpets)...
Page 4 - STORAGE; AVAILABLE ACCESSORIES
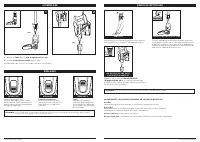
s h a r k c l e a n . c o m s h a r k c l e a n . c o m STORAGE Press the WAND RELEASE button on the top of the wand to detach the handheld vacuum. Align the catch on the bottom of the handheld vacuum with the storage hook on the wand. Slide handheld vacuum down so the catch hangs from the storage h...
Page 5 - MAINTENANCE; Unplug the vacuum before performing any maintenance.; REPLACEMENT FILTERS; OR; The pre-motor filters should be
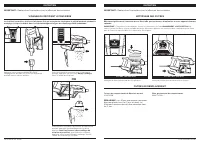
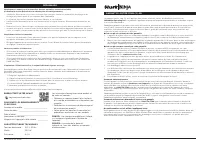
s h a r k c l e a n . c o m s h a r k c l e a n . c o m MAINTENANCE EMPT YING THE DUST CUP Press the WAND RELEASE button and lift the handheld vacuum off the wand. With the dust cup attached to the handheld vacuum, press the Empty button on the front of the dust cup. To remove the dust cup from the ...
Page 6 - CLEANER HEAD MAINTENANCE; CHECKING FOR BLOCKAGES
s h a r k c l e a n . c o m s h a r k c l e a n . c o m 1. Using a coin, turn locks counterclockwise to open, then lift off cover to access Brushroll . 2. Clear blockages from airway. 3. Replace cover, pressing down firmly on all sides, including along the front, before turning locks clockwise to cl...
Page 7 - TROUBLESHOOTING; TECHNICAL SPECIFICATIONS
s h a r k c l e a n . c o m s h a r k c l e a n . c o m TROUBLESHOOTING For all other issues, visit sharkclean.com/support. Vacuum is not picking up debris. No suction or light suction. (Refer to Maintenance section for more information.) • Check filters to see if they need cleaning. Follow instruct...
Page 8 - NOTES
s h a r k c l e a n . c o m s h a r k c l e a n . c o m NOTES NOTES
Page 9 - CONSERVEZ CES INSTRUCTIONS; IMPORTANTES CONSIGNES DE SÉCURITÉ; AVERTISSEMENT
s h a r k c l e a n . c o m s h a r k c l e a n . c o m CONSERVEZ CES INSTRUCTIONS LISEZ TOUTES LES INSTRUCTIONS AVANT L’UTILISATION IMPORTANTES CONSIGNES DE SÉCURITÉ USAGE DOMESTIQUE SEULEMENT Pour réduire le risque de décharges électriques, cet aspirateur est muni d’une fiche polarisée (une lame e...
Page 10 - ASSEMBLAGE; RÉGLAGES; DÉSACTIVÉ
s h a r k c l e a n . c o m s h a r k c l e a n . c o m (Clic) ASSEMBLAGE 1. Insérez le Tube dans la tête d’aspiration Zero-M MC . 2. Insérez L’aspirateur Portatif dans le tube. Assurez-vous que tous les raccords sont bien enclenchés. (Clic) RÉGLAGES MODES DE NETTOYAGE REMARQUE : Tous les accessoire...
Page 11 - RANGEMENT; ACCESSOIRES DISPONIBLES
s h a r k c l e a n . c o m s h a r k c l e a n . c o m RANGEMENT Appuyez sur le bouton WAND RELEASE (dégagement du tube) situé dans la partie supérieure de ce dernier pour le retirer de l’aspirateur portatif. Alignez le collecteur de la partie inférieure de l’aspirateur portatif avec le crochet de ...
Page 12 - ENTRETIEN; Débranchez l’aspirateur avant d’effectuer tout entretien.; FILTRES DE REMPLACEMENT; OU; Les filtres pré-moteur devraient
s h a r k c l e a n . c o m s h a r k c l e a n . c o m ENTRETIEN VIDANGE DU RÉCIPIENT À POUSSIÈRE Appuyez sur le bouton WAND RELEASE (dégagement du tube) et soulevez l’aspirateur portatif pour le retirer du tube. Avec le récipient à poussière fixé à l’aspirateur portatif, appuyez sur le bouton Empt...
Page 13 - ENTRETIEN DE LA TÊTE D’ASPIRATION; VÉRIFICATION DE LA PRÉSENCE D’OBSTRUCTIONS
s h a r k c l e a n . c o m s h a r k c l e a n . c o m 1. Au moyen d’une pièce de monnaie, faites tourner les verrous dans le sens antihoraire, puis soulevez le couvercle afin d’accéder à la brosse rotative . 2. Débloquez le conduit d’air. 3. Replacez le couvercle en appuyant fermement sur tous les...
Page 14 - DÉPANNAGE; CARACTÉRISTIQUES TECHNIQUES
s h a r k c l e a n . c o m s h a r k c l e a n . c o m DÉPANNAGE Si vous éprouvez toute autre difficulté, visitez sharkclean.com/support. L’aspirateur ne ramasse pas la poussière. Aucune aspiration ou aspiration faible. (Consultez la section Entretien pour obtenir plus de renseignements.) • Vérifie...
Page 15 - REMARQUES
s h a r k c l e a n . c o m s h a r k c l e a n . c o m REMARQUES REMARQUES
Page 16 - CONSERVE ESTAS INSTRUCCIONES; INSTRUCCIONES IMPORTANTES DE SEGURIDAD; ADVERTENCIA
s h a r k c l e a n . c o m s h a r k c l e a n . c o m CONSERVE ESTAS INSTRUCCIONES LEA TODAS LAS INSTRUCCIONES ANTES DE USAR INSTRUCCIONES IMPORTANTES DE SEGURIDAD PARA USO DOMÉSTICO ÚNICAMENTE Para reducir el riesgo de descarga eléctrica, esta aspiradora cuenta con un enchufe polarizado (una term...
Page 17 - MONTAJE; APAGADO
s h a r k c l e a n . c o m s h a r k c l e a n . c o m (Clic) MONTAJE 1. Inserte el Vástago en el cabezal limpiador Zero-M®. 2. Inserte la Aspiradora Portátil en el vástago. Asegúrese de que todas las conexiones estén trabadas de manera segura en su lugar. (Clic) AJUSTES MODOS DE LIMPIEZA NOTA: tod...
Page 18 - ALMACENAMIENTO; ACCESORIOS DISPONIBLES
s h a r k c l e a n . c o m s h a r k c l e a n . c o m ALMACENAMIENTO Presione el botón WAND RELEASE (liberación del vástago) que se encuentra en la parte superior del vástago para liberar la aspiradora portátil. Alinee el enganche que se encuentra en la parte inferior de la aspiradora portátil con...
Page 19 - MANTENIMIENTO; FILTROS DE REEMPLAZO; Los filtros anteriores al motor se deben
s h a r k c l e a n . c o m s h a r k c l e a n . c o m MANTENIMIENTO VACIADO DEL RECIPIENTE PARA EL POLVO Presione el botón WAND RELEASE (liberación del vástago) y retire la aspiradora portátil del vástago. Con el recipiente para el polvo acoplado a la aspiradora portátil, presione el botón Empty (...
Page 20 - MANTENIMIENTO DEL CABEZAL LIMPIADOR; CONTROL DE OBSTRUCCIONES
s h a r k c l e a n . c o m s h a r k c l e a n . c o m 1. Usando una moneda, gire los cierres en sentido contrario a las manecillas del reloj para abrirlos, luego levante la tapa para acceder al cepillo giratorio . 2. Limpie cualquier obstrucción de la vía de aire. 3. Vuelva a colocar la tapa, pres...
Page 21 - SOLUCIÓN DE PROBLEMAS; ESPECIFICACIONES TÉCNICAS
s h a r k c l e a n . c o m s h a r k c l e a n . c o m SOLUCIÓN DE PROBLEMAS Para el resto de los problemas, visite sharkclean.com/support. La aspiradora no recoge la basura. No hay succión ni succión leve. (Para obtener más información, consulte la sección Mantenimiento). • Revise los filtros para...
Page 22 - NOTAS
s h a r k c l e a n . c o m s h a r k c l e a n . c o m NOTAS NOTAS
Page 23 - PLEASE READ CAREFULLY AND KEEP FOR FUTURE REFERENCE.
© 2019 SharkNinja Operating LLC. ROCKET, ZERO-M, and SHARK are registered trademarks of SharkNinja Operating LLC. ZS350�Series�IB�E�F�S�MP�REV�Mv8 PRINTED IN CHINA © 2019 SharkNinja Operating LLC. ROCKET, ZERO-M, et SHARK sont des marques déposées de SharkNinja Operating LLC. ZS350�Series�IB�E�F�S�M...