Page 2 - WARNING; IMPORTANT SAFETY INSTRUCTIONS; FOR HOUSEHOLD USE ONLY; SAVE THESE INSTRUCTIONS
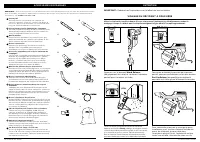
s h a r k c l e a n . c o m s h a r k c l e a n . c o m READ ALL INSTRUCTIONS BEFORE USING THIS VACUUM1. Inspect power cord and plug for any damage before use. DO NOT use vacuum cleaner with a damaged cord or plug. Turn off all controls before plugging in or unplugging the vacuum cleaner. Store your...
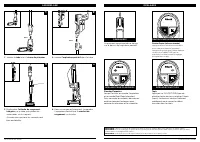
Page 3 - ASSEMBLY; CONTROLS
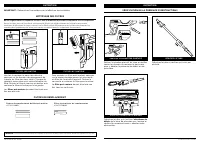
s h a r k c l e a n . c o m s h a r k c l e a n . c o m ASSEMBLY SETTINGS NOTE: Press the FLOOR TYPE button to toggle between Bare Floor and Carpet settings. NOTE: For deep cleaning per ASTM F 608 (embedded dirt in carpets) please use the Carpet setting. NOTE: Select Carpet for stuck-on dust and deb...
Page 4 - STORAGE MODE; CLEANING MODES; FLOOR MODE; Foot Pedal; ABOVE-FLOOR WITH WAND; Wand Release
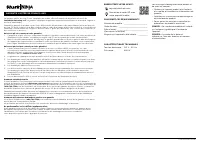
s h a r k c l e a n . c o m s h a r k c l e a n . c o m STORAGE MODE HANDHELD STOR AGE HOOK Press the Wand Release button near the top of the wand to detach the handheld vacuum. Align the Catch on the side of the handheld vacuum with the Storage Hook on the wand, then hang the handheld vacuum from t...
Page 5 - MAINTENANCE; AVAILABLE ACCESSORIES
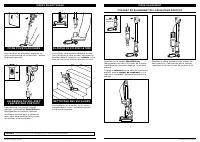
s h a r k c l e a n . c o m s h a r k c l e a n . c o m MAINTENANCE EMPT YING THE DUST CUP Press the Wand Release button and lift off the handheld vacuum. To remove the dust cup from the handheld vacuum, press the two Dust Cup Release buttons at the same time and slide out the dust cup. To reinstall...
Page 6 - CHECKING FOR BLOCKAGES; Debris Intake
s h a r k c l e a n . c o m s h a r k c l e a n . c o m CHECKING FOR BLOCKAGES MAINTENANCE Remove the handheld vacuum from the wand and check all dust cup intake openings for debris or blockages. Detach the wand and check it for blockages. CHECK HANDHELD CHECK WAND Regularly rinse and replace the fi...
Page 7 - TROUBLESHOOTING; FLOOR NOZZLE MAINTENANCE; CORD MAINTENANCE
s h a r k c l e a n . c o m s h a r k c l e a n . c o m TROUBLESHOOTING For all other issues, visit sharkclean.com/support. Power cord caught in brushroll or floor nozzle. • To minimize the risk of power cord damage, DO NOT run the vacuum over the power cord. If this occurs, immediately shut off pow...
Page 8 - TECHNICAL SPECIFICATIONS
s h a r k c l e a n . c o m s h a r k c l e a n . c o m TECHNICAL SPECIFICATIONS Voltage: 120V~, 60Hz Watts: 680W RECORD THIS INFORMATION Model Number: ������������������������Date Code: ����������������������������Date of Purchase: ���������������������� (Keep receipt)Store of Purchase: �����������...
Page 9 - AVERTISSEMENT; toujours suivre les précautions de base suivantes :; CONSIGNES DE SÉCURITÉ IMPORTANTES; POUR USAGE DOMESTIQUE SEULEMENT; CONSERVEZ CES INSTRUCTIONS
s h a r k c l e a n . c o m s h a r k c l e a n . c o m LISEZ TOUTES LES INSTRUCTIONS AVANT D'UTILISER CET ASPIRATEUR1. Inspectez le cordon d’alimentation et la fiche pour déceler d’éventuels dommages avant l’utilisation. N’UTILISEZ PAS l’aspirateur si le cordon d’alimentation ou la fiche sont endom...
Page 10 - ASSEMBLAGE; COMMANDES
s h a r k c l e a n . c o m s h a r k c l e a n . c o m ASSEMBLAGE RÉGLAGES REMARQUE : Utilisez le sélecteur de surface pour alterner entre les réglages Bare Floor (plancher) et Carpet (tapis). REMARQUE : Pour un nettoyage en profondeur conformément à la norme ASTM F 608 (saleté incrustée dans les t...
Page 11 - MODE RANGEMENT; MODES DE NETTOYAGE; MODE POUR PLANCHERS; pédale; AU-DESSUS DU SOL AVEC LE TUBE; AU-DESSUS DU SOL AVEC
s h a r k c l e a n . c o m s h a r k c l e a n . c o m MODE RANGEMENT CROCHET DE RANGEMENT DE L’ASPIRATEUR PORTATIF Appuyez sur le bouton Wand Release (dégagement du tube) situé près de la partie supérieure du tube pour dégager l’aspirateur portatif. Alignez le collecteur sur le côté de l’aspirateu...
Page 12 - ENTRETIEN; ACCESSOIRES DISPONIBLES
s h a r k c l e a n . c o m s h a r k c l e a n . c o m ENTRETIEN VIDANGE DU RÉCIPIENT À POUSSIÈRE Appuyez sur le bouton Wand Release (dégagement du tube) et soulevez l’aspirateur portatif pour le retirer du tube. Pour retirer le récipient à poussière de l’aspirateur portatif, appuyez simultanément ...
Page 13 - VÉRIFICATION DE LA PRÉSENCE D’OBSTRUCTIONS; absorbeur de
s h a r k c l e a n . c o m s h a r k c l e a n . c o m VÉRIFICATION DE LA PRÉSENCE D’OBSTRUCTIONS ENTRETIEN Retirez l’aspirateur portatif du tube et vérifiez toutes les entrées du récipient à poussière pour y déceler la présence de débris ou de poussière. Détachez le tube et vérifiez qu’il n’est pa...
Page 14 - NETTOYAGE DU ROULEAU DOUX; Eject Roller; ENTRETIEN DU CORDON; ENTRETIEN DE LA BUSE DE PLANCHER; DÉPANNAGE; brosse rotative autonettoyante
s h a r k c l e a n . c o m s h a r k c l e a n . c o m NETTOYAGE DU ROULEAU DOUX 1 Pour retirer le rouleau doux, faites glisser le bouton Eject Roller (éjecter le rouleau) sur la buse de plancher. 2 Tapotez le rouleau doux pour en retirer les débris. Utilisez une serviette sèche pour l’essuyer et p...
Page 15 - CARACTÉRISTIQUES TECHNIQUES
s h a r k c l e a n . c o m s h a r k c l e a n . c o m La garantie limitée de cinq (5) ans s’applique aux achats effectués auprès de détaillants autorisés de SharkNinja Operating LLC. La garantie s’applique uniquement au premier propriétaire et au produit original et n’est pas transférable.SharkNin...
Page 16 - LEA TODAS LAS INSTRUCCIONES ANTES; ADVERTENCIA; utilizar un aparato eléctrico:; INSTRUCCIONES IMPORTANTES DE SEGURIDAD; SOLO PARA USO DOMÉSTICO; CONSERVE ESTAS INSTRUCCIONES
s h a r k c l e a n . c o m s h a r k c l e a n . c o m LEA TODAS LAS INSTRUCCIONES ANTES DE USAR ESTA VACÍO1. Revise que el enchufe y el cable de alimentación no estén dañados antes de usar. NO use la aspiradora si tiene el enchufe o el cable dañados. Apague todos los controles antes de enchufar o ...
Page 17 - ENSAMBLADO; CONTROLES
s h a r k c l e a n . c o m s h a r k c l e a n . c o m ENSAMBLADO AJUSTES NOTA: Use el seleccionador de tipo de piso para alternar entre los ajustes Bare Floor (piso sencillo) y Carpet (alfombra). NOTA: Para una limpieza profunda según ASTM F 608 (suciedad incrustada en alfombras) use el ajuste Car...
Page 18 - MODO ALMACENAMIENTO; MODOS DE LIMPIEZA; MODO PISO; pedal; ENCIMA DEL PISO CON VÁSTAGO; ENCIMA DEL PISO CON PORTÁTIL
s h a r k c l e a n . c o m s h a r k c l e a n . c o m MODO ALMACENAMIENTO GANCHO DE ALMACENAMIENTO PARA LA PORTÁTIL Presione el botón Wand Release (liberación del vástago), en la parte superior del vástago, para separar la aspiradora portátil. Alinee el pestillo que se encuentra en el costado de l...
Page 19 - MANTENIMIENTO; ACCESORIOS DISPONIBLES
s h a r k c l e a n . c o m s h a r k c l e a n . c o m MANTENIMIENTO CÓMO VACIAR EL RECIPIENTE PARA EL POLVO Presione el botón Wand Release (liberación del vástago) y retire la aspiradora portátil. Para retirar el recipiente para el polvo de la aspiradora portátil, oprima al mismo tiempo los dos bo...
Page 20 - CÓMO VERIFICAR SI HAY OBSTRUCCIONES; entrada de escombros; FILTROS DE REPUESTO; filtros para la parte delantera del
s h a r k c l e a n . c o m s h a r k c l e a n . c o m CÓMO VERIFICAR SI HAY OBSTRUCCIONES MANTENIMIENTO Quite la aspiradora portátil del vástago y revise todas las aberturas de entrada del recipiente para el polvo para ver si hay escombros u obstrucciones. Desconecte el vástago y verifique que no ...
Page 21 - SOLUCIÓN DE PROBLEMAS; MANTENIMIENTO DE LA BOQUILLA DE PISO; MANTENIMIENTO DE CORD
s h a r k c l e a n . c o m s h a r k c l e a n . c o m SOLUCIÓN DE PROBLEMAS Para cualquier otro problema, visite sharkclean.com/support. Cable de alimentación enganchado en el cepillo giratorio o la boquilla de piso. • Para minimizar el riesgo de daños en el cable de alimentación, NO pase la aspir...
Page 22 - ESPECIFICACIONES TÉCNICAS
s h a r k c l e a n . c o m s h a r k c l e a n . c o m La garantía limitada de cinco (5) años se aplica a las compras realizadas a los vendedores minoristas autorizados de SharkNinja Operating LLC. La cobertura de garantía se aplica solo al propietario y al producto originales y no puede transferir...