Page 2 - Contents
English 2 Contents Contents Safety information 3 Important safety symbols 3 General 4Vacuum cleaner 5 Maintenance 7Clean Station 8 Battery 10 Preparation 12 Accessories 12Parts overview 13 Operation 14 Installing the Clean Station 14 Using the Clean Station 14 Charging the battery 16 Inserting the b...
Page 3 - and retain it for your reference.; Important safety symbols; Indicates that a danger of death or serious injury exists.; CAUTION
English 3 Safety information • Before operating the appliance, please read this manual thoroughly and retain it for your reference. • Because the following operating instructions cover various models, the characteristics of your vacuum cleaner may differ slightly from those described in this manua...
Page 4 - General; • This appliance can be used by children aged from 8 years and above
Safety information English 4 Safety information General For information on Samsung’s environmental commitments and product regulatory obligations, e.g. REACH, visit our sustainability page available via www.samsung.com Failure to meet these requirements could cause damage to the internal parts of th...
Page 5 - Vacuum cleaner
English 5 Safety information Vacuum cleaner • When assembling the vacuum, be careful not to catch your fingers or hands in the movement fold of the handle. • Do not use the vacuum cleaner on a wet rug or floor.• Do not use the product at the following places; – In a place where a burning candle or...
Page 7 - • Do not use Combination Tool on hard materials such as leather or; Maintenance; • While using or after using the vacuum cleaner, you should lay the
English 7 Safety information • Do not use Combination Tool on hard materials such as leather or wood while bristles are not extended. Maintenance • While using or after using the vacuum cleaner, you should lay the vacuum cleaner down or place it on the Clean Station to store. – The product may fal...
Page 8 - Clean Station
Safety information English 8 Safety information Washable Parts Dustbin, Washable Micro Filter, Fine Dust Filter, Metal Mesh Grille Filter, dry cloth Acceptable detergent Neutral Dish washing detergent Prohibited detergent Alkaline Lox, mold cleaner, etc. Acid Paraffin oil, an emulsifier, etc. Indust...
Page 10 - Battery
Safety information English 10 Safety information • Do not attempt to open the Clean Station. Repairs should be only carried out by a qualified Samsung service center. • Injury or product malfunction from incorrect installation of the Clean Station may not be compensated. • Do not bend the power cord...
Page 11 - • Leaks from battery cells can occur under extreme usage or
English 11 Safety information • Leaks from battery cells can occur under extreme usage or temperature conditions. If the liquid gets on your skin, wash the affected area quickly with water. If the liquid gets into your eyes, flush them immediately with clean water for a minimum of 10 minutes. Seek...
Page 12 - Preparation; Accessories
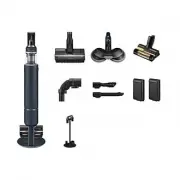
English 12 Preparation Accessories The accessories with the ' * ' mark may differ depending on the models. Telescopic pipe Pet Tool+ Combination Tool Extension Crevice Tool Flexible Tool Dust bags (1 installed, 2 extra) User manual * Charger Accessory Cradle Clean Station * Jet Dual Brush * Slim LED...
Page 13 - Parts overview
English 13 Pr epar ation Parts overview 01 03 04 05 12 15 14 22 16 19 13 06 09 07 08 10 02 17 20 18 21 11 01 Power ( ) button 02 Suction power control buttons 03 Washable Micro Filter 04 Metal Mesh Grille Filter 05 Display 06 Dustbin release button 07 Fine Dust Filter 08 Dustbin 09 Adjustable pipe...
Page 14 - Operation; Installing the Clean Station
English 14 Operation For detailed information, please refer to the QR code. Installing the Clean Station 1. Run the power cord of the Clean Station along the round groove at the bottom. - Make sure the power cord is correctly placed so that the Clean Station stands without tilting. 2. Before pluggin...
Page 16 - Charging the battery; Inserting the battery; Charging the additional battery
Operation English 16 Oper ation Charging the battery • When the battery level indicator turns red or the ‘ Low battery ’ message appears on the display, charge the battery. • You cannot use the vacuum cleaner while charging.• Make sure the back of the battery is correctly placed onto the vacuum char...
Page 17 - Using the buttons and display; Alert messages
English 17 Oper ation Using the buttons and display 8: 89 8; 01 Display - Displays the current mode (‘ MIN , MID , MAX , JET , or WET ’) or the alert message. 02 Power ( ) - Press this button to turn on or off the vacuum cleaner. - When you turn on the power, the vacuum cleaner starts in the ‘ MID...
Page 18 - Using the Accessory Cradle
Operation English 18 Oper ation Using the Accessory Cradle ; 9 : < W ; 9 < : [Accessory Cradle] [Accessory Cradle + Accessory Cradle Holder] • Before charging the additional battery, plug in the charger.• Dust that remains in the accessory may fall when you detach it from the vacuum cleaner. -...
Page 19 - Using the accessories; Detaching the accessories; Combination Tool
English 19 Oper ation Using the accessories Detaching the accessories • To detach the accessories, press the release button on the back of each accessory. • Before detaching the accessories, operate the vacuum cleaner in the ' MAX ' mode for 10 seconds to prevent any foreign matter remains inside ...
Page 20 - Spray Spinning Sweeper
Operation English 20 Oper ation Spray Spinning Sweeper Reusable wet pad Disposable wet pad Attachable pad Water tank <Front> <Back> Spin disk Velcro 1 2 Use to clean a wood and linoleum floor with a wet pad.• The Spray Spinning Sweeper does not have a dust suction function. Using the reu...
Page 21 - Cleaning the Clean Station; Replacing the dust bag; Cleaning the Premotor Filter
English 21 Maintenance Cleaning the Clean Station Replacing the dust bag When the START/STOP button turns red, you should replace the dust bag. 1 2 3 4 5 6 Cleaning the Premotor Filter Use the handle to lift the filter off and shake over a bin to remove dust. Cleaning the Fine Dust Filter Shake th...
Page 22 - Cleaning the vacuum cleaner
Maintenance English 22 Maint enanc e Cleaning the vacuum cleaner For detailed information, please refer to the QR code. Dustbin/Washable Micro Filter 1 2 3 4 5 24H 6 7 ᎃ)& (ᎅ 8 9 1 2 ᎃ)& (ᎅ ᎃ)& (ᎅ CAUTION • After cleaning the dustbin and Washable Micro Filter with water, you should dry t...
Page 23 - Fine Dust Filter; Jet Dual Brush
English 23 Maint enanc e Fine Dust Filter Make sure to turn off the product before cleaning the filter. 24H • Twist and pull off the Fine Dust Filter, and tap it gently to remove the dust.• Wash the filter with running water once a month to maintain the best performance of the filter.• After clean...
Page 24 - Slim LED Brush
Maintenance English 24 Maint enanc e Slim LED Brush 9 : 1 9 : ; 2 3 4 ‘Click’ 5 CAUTION • Do not clean the brush with water. • When foreign matter remains on the brush, remove it with a wet tissue or a dry cloth. NOTE • If the spin brush does not work after cleaning the Slim LED Brush, the overheati...
Page 25 - Slim LED Brush roller wheels; Front roller wheel
English 25 Maint enanc e Slim LED Brush roller wheels Front roller wheel Rear roller wheel Use a small screwdriver to disassemble the front and rear roller wheels. NOTE Tools required for disassembly. Flat head screwdriver (3 mm or less in width), Phillips screwdriver, prying tool. CAUTION • For y...
Page 26 - Rear roller wheel
Maintenance English 26 Maint enanc e Rear roller wheel 1 Release lever 2 3 4 5 ‘Click’ Release lever 6 • Lift the release lever to detach the rear roller wheel.• Detach the rear roller wheel and remove the tangled foreign matter. Then, reassemble the wheel.• Insert the rear roller wheel into its pla...
Page 27 - Extension Crevice Tool / Telescopic Pipe
English 27 Maint enanc e Spray Spinning Sweeper NOTE If the spin disk does not work after cleaning the Spray Spinning Sweeper, the overheating prevention device of the motor may have been enabled. Wait 30 minutes or more to cool the motor and operate again. Pet Tool+ 1 2 Cut the tangled hair or fu...
Page 28 - Notes and cautions; Installation
English 28 Appendix Notes and cautions Installation CAUTION • Do not install the product near water, in an area with excessive moisture, or near window, etc. • Do not place the Clean Station in a place where people pass by frequently, in entrance way or narrow passage. – People may trip over it and ...
Page 29 - Battery usage
English 29 Appendix Battery usage NOTE • If the product does not work after you charge the battery, replace the battery. If it still does not work with the new battery, contact a Samsung service center. • Spare batteries and the Accessory Cradle chargers need to be purchased separately. CAUTION • ...
Page 34 - Troubleshooting
Appendix English 34 Appendix Troubleshooting Before calling for service, review the problems and solutions below. Note that you will be charged for any service calls in which no defects were found. Problem Solutions The vacuum cleaner does not work. • Check the battery level and charge the battery.•...
Page 36 - Product specification
Appendix English 36 Appendix Product specification Charging and cleaning time may differ depending on the brushes and the conditions of use. Model VS20B95**** Series Power consumption (Vacuum cleaner) Based on a handy vacuum cleaner: 580 W Battery specification Li-ion 25.2 V, 2200 mAh, 7 cell Weight...
Page 37 - Memo
Memo Untitled-7 37 Untitled-7 37 2024-08-09 2:13:46 2024-08-09 2:13:46