Page 3 - IMPORTANT SAFETY INSTRUCTIONS; If the door or door seals are damaged,; WARNING
2 IMPORTANT SAFETY INSTRUCTIONS READ CAREFULLY AND KEEP FOR FUTURE REFERENCE. Make sure that these safety precautions are obeyed at all times. Before using the oven, confirm that the follwing instructions are followed. WARNING: If the door or door seals are damaged, the oven must not be operated unt...
Page 4 - Only allow children to use the oven
3 reduced physical, sensory or mental capabilities or lack of experence and knwoledge if they have been given supervision or instruction concerning use of the appliance in a safe way and understand the hazards involved. Children shall not play with the appliance. Cleaning and user maintenance shall ...
Page 6 - Liquids or other foods must not be heated
5 and knowledge, unless they have been given supervision or instruction concerning use of the appliance by a person responsible for their safety. Children should be supervised to ensure that they do not play with the appliance. If the supply cord is damaged, it must be replaced by the manufacturer, ...
Page 9 - Class A equipment is intended for use in
8 means of an external timer or separate remote-control system. This product is a Group 2 Class A ISM equipment. The definition of group 2 which contains all ISM equipment in which radio-frequency energy is intentionally generated and/or used in the form of electromagnetic radiation for the treatmen...
Page 10 - INSTALLING YOUR MICROWAVE OVEN; Remove all packing materials inside the oven.
9 INSTALLING YOUR MICROWAVE OVEN Place the oven on a flat level surfact 85 cm above the floor. The surface should be strong enough to safety bear the weight of the oven. 1. When you install your oven, make sure there is adequate ventilation for your oven by leaving at least 10 cm(4 inches) of space ...
Page 12 - Clean; the microwave oven cavity right after each use
11 Clean the microwave oven cavity right after each use with a mild detergent solution, but let the microwave oven cool down before cleaning in order to avoid injury.
Page 13 - NEVER
12 STORING AND REPAIRING YOUR MICROWAVE OVEN A few simple precautions should be taken when storing or having your microwave oven serviced. The oven must not be used if the door or door seals are damaged: Broken hinge Deteriorated seals Distorted or bent oven casing Only a qualified microwave s...
Page 16 - CAUTION
15 Only use utensils that are suitable for use in microwave ovens; DO NOT use any metallic containers, Dinnerware with gold or silver trimming, skewers, fork, etc. Remove wire twist ties from paper or plastic bags. Reason: Electric arcing or sparking may occur and may damage the oven. Do not use you...
Page 17 - INSTALLATION & WIRING INSTRUCTIONS
16 INSTALLATION & WIRING INSTRUCTIONS IMPORTANT NOTE: The mains lead on this equipment is supplied with a moulded plug incorporating a fuse. The value of the fuse is indicated on the pin face of the plug and, if it requires replacing, a fuse approved to BS 1363 of the same rating must be used. N...
Page 18 - PRECAUTIONS TO AVOID POSSIBLE EXPOSURE TO EXCESSIVE
17 PRECAUTIONS TO AVOID POSSIBLE EXPOSURE TO EXCESSIVE MICROWAVE ENERGY.(MICROWAVE FUNCTION ONLY) Failure to observe the following safety precautions may result in harmful exposure to microwave energy. (a) Under no circumstances should any attempt to made to operate the oven with the door open or to...
Page 19 - CORRECT DISPOSAL OF THIS PRODUCT
18 Because these following operating instructions cover various models, the characteristics of your microwave oven many differ slightly from those described in this manual and not all waiting signs may be applicable. If you have any questions or concerns, contact your nearest service centre of fin...
Page 21 - CONTENTS
20 CONTENTS Using this instruction booklet………………………………………………………………….1 Legend for symbols and icons………………………………………………………………...1 Important safety instructions…………………………………………………………………..2 Installing your microwave oven……………………………………………………………….9 Cleaning your microwave oven……………………………………………………………...10 S...
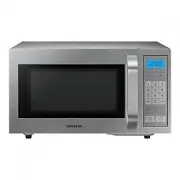
Page 23 - OVEN
22 OVEN 1. HANDLE 5.DOOR LATCHES 2. VENTILATION HOLES 6.DOOR 3. OVEN LAMP 7.CERAMIC PLATE 4. DISPLAY 8.SAFETY INTERLOCK HOLES 9.CONTROL PANEL
Page 24 - CONTROL PANEL
23 CONTROL PANEL ① ② ③ ④ ⑤ ⑥ 1. DISPLAY 7. DEFROST BUTTON 2. POWER LEVEL BUTTON 8. SOUND BUTTON 3. NUMBER 9. DOUBLE QUANTITY BUTTON 4. CHECK BUTTON 10. +30S BUTTON 5. PROGRAMME BUTTON 11. START BUTTON 6. STOP/CANCEL BUTTON. ⑦ ⑧ ⑨ ⑩ ⑪
Page 27 - SETTING COOKING TIME AND POWER LEVEL
26 To correct a mistake you have just entered,press Stop/Cancel button once,then re-enter the instructions. To cancel cooking setting during cooking,press Stop/Cancel button twice. SETTING COOKING TIME AND POWER LEVEL ONE STAGE COOKING You can stop cooking at any time to check the food. 1. Press the...
Page 28 - POWER LEVELS
27 1. Press the Power Level button to select the Power. By pressing the Power Level button repeatedly,you can select the power level-HI,MED,or LO. 2. Use the Number buttons to enter the cooking time.You can set a time from one second to 30 minutes. To set a time over one minute,enter the second as w...
Page 29 - USING RAPID DEFROST BUTTON
28 USING RAPID DEFROST BUTTON DEFROST ONLY The defrost time and power level are set automatically.You simply select the programme and the weight. Use only dishes that are microwave-safe. First,place the frozen food in the centre of the ceramic plate and close the door. 1. Press the Rapid Defrost but...
Page 30 - DEFROST COMBINE WITH MICROWAVE COOKING
29 DEFROST COMBINE WITH MICROWAVE COOKING 1. Press the Rapid Defrost button. 2. Press the Number buttons to set the defrosting time. You can set a time from one second to 30 minutes. 3. Press the Power Level button to select the cooking Power. By pressing the Power Level button repeatedly,you can se...
Page 31 - MEMORY PROGRAMMING
30 MEMORY PROGRAMMING ONE STAGE COOKING. 1. Upon pressing the Program(PROG) button,the oven will enter Program mode.The display will be cleared. 2. Using the Number buttons,enter the program Number from 1 to 20. 3. Then,press the Power Level button to select power. By pressing the Power Level button...
Page 33 - USING THE CHECK BUTTON
32 USING MEMORY PROGRAMMING. Press the Number buttons to select user-programmed memory functions (please refer to memory programming) from 1 to 20. Press the Start button. If TIME DEFROST include in STAGE COOKING,it works at first. If you want to change program,just reset MEMORY PROGRAMMING. USING T...
Page 35 - RESETTING THE MEMORY PROGRAM CYCLE COUNTER; SETTING THE SOUND
34 RESETTING THE MEMORY PROGRAM CYCLE COUNTER 1. Clear all operations by pressing the Stop/ Cancel button. The display will show ”:0” 2. Hold the Number ‘0’ and then press Rapid Defrost button. The microwave will emit a Beep sound confirming the reset operation. If you press clearing number, the dis...
Page 36 - USING THE DOUBLE QUANTITY BUTTON
35 USING THE DOUBLE QUANTITY BUTTON 1. Press the Double Quantity(X2) button. 2. By using the Number buttons, enter the Memory Program number from 1 to 20. For example,suppose you press ‘5’ button,for Memory Program 5 which is HI Power Level, I Stage cooking with a time of 6 minutes and 30 seconds, 6...
Page 37 - COOKWARE GUIDE
36 COOKWARE GUIDE To cook food in the microwave oven, the microwaves must be able to penetrate the food, without being reflected or absorbed by the dish used. Care must therefore be taken when choosing the cookware. If the cookware is marked microwave-safe, you do not need to worry. The following ta...
Page 39 - COOKING GUIDE
38 COOKING GUIDE Reheating Dish Entrees Use the power levels and times in this table as a guide lines for reheating. Food Portion Method Power Time (min) Standing time(min) Plated meal (chilled) 350 g Plate a meal of 2-3 chilled components on a ceramic dish. Reheat covered. MEDIUM 6 ½ -7 3 Chicken c...
Page 44 - Troubleshooting
43 Troubleshooting You may encounter a problem using the oven. In that case, first check the table below and try the suggetions. If a problem persists, or if any information code keeps appearing on the display, contact a local Samsung service centre. Checkpoints If you encounter a problem with the o...
Page 46 - TECHNICAL SPECIFICATIONS
45 TECHNICAL SPECIFICATIONS SAMSUNG strives to improve its products at all times. Both the design specifications and these user instructions are thus subject to change without notice. Model CM1109 Power source 230-240V/50Hz Power consumption Microwave 1500W Output Power 1000W Operating frequency 245...