Page 2 - About this unit; WARNING; Avoid exposure to moisture.; If you experience problems; Before you start
Thank you for purchasing this PIONEER product To ensure proper use, please read through thismanual before using this product. It is especiallyimportant that you read and observe WARN- ING s and CAUTION s in this manual. Please keep the manual in a safe and accessible place forfuture reference. If yo...
Page 3 - Notes
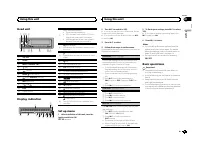
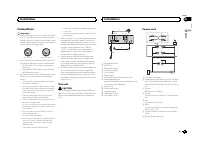
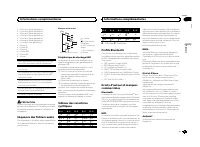
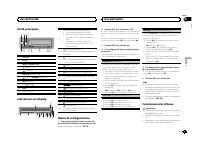
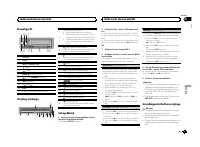
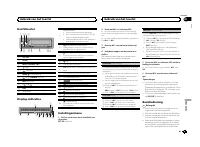
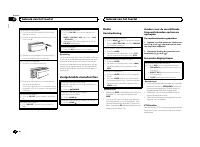
Head unit 5 9 1 23 4 6 8 7 b a 1 SRC / OFF 2 LEVER 3 MULTI-CONTROL ( M.C. ) 4 (list) 5 (phone) 6 BAND / (iPod control) 7 (back)/ DIMMER (dimmer) 8 MIX (MIXTRAX) 9 1 / to 6 / a DISP b Detach button Display indication 1 8 c a 7 9 b 6 5 2 4 d e 3 f 1 Main information section ! Tuner: band and frequency...
Page 4 - Note; Radio; Basic operations; Using preset tuning buttons; Switching the display; Using PTY functions; Function settings; Using this unit
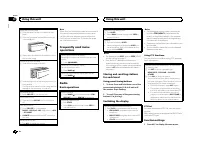
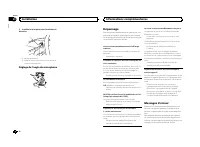
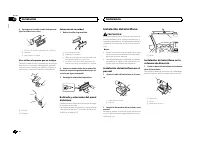
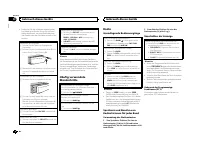
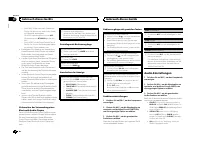
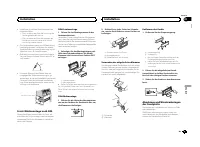
Removing the front panel 1 Press the detach button to release the frontpanel. 2 Push the front panel upward ( M ) and then pull it toward ( N ) you. 3 Always store the detached front panel in a pro-tective case or bag. Re-attaching the front panel 1 Slide the front panel to the left. 2 Press the rig...
Page 5 - and press to select FUNCTION.; USB storage device; MTP connection; Press
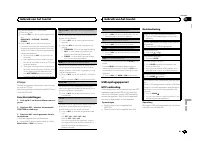
2 Turn M.C. to change the menu option and press to select FUNCTION. 3 Turn M.C. to select the function. Once selected, the following functions can beadjusted. # If MW/LW band is selected, only BSM , LOCAL and SEEK are available. FM SETTING (FM sound quality settings) The sound quality level can be s...
Page 6 - iPod
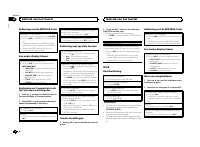
Viewing a list of the files (or folders) in the se-lected folder 1 When a folder is selected, press M.C. Playing a song in the selected folder 1 When a folder is selected, press and hold M.C. Operations using special buttons Selecting a repeat play range 1 Press 6 / to cycle between the following: !...
Page 7 - Important; For iPhone users; English
Pausing playback 1 Press 4 / f to pause or resume. Enhancing compressed audio and restoring richsound (sound retriever) 1 Press 3 / S.Rtrv to cycle between: 1 — 2 — OFF (off) 1 is effective for low compression rates, and 2 is effective for high compression rates. Playing songs related to thecurrentl...
Page 8 - Starting procedure for iPhone users; Setting up for hands-free phoning; Phone menu operation
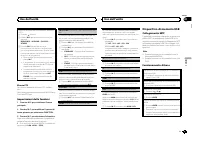
For details about Android device compatibil-ity with this unit, refer to the information onour website. Notes ! Please check our website for a list of sup-ported iPhone or smartphone applicationsfor this unit. ! Pioneer is not liable for any issues that mayarise from incorrect or flawed app-basedcon...
Page 9 - Using voice recognition; phone to input voice commands.
Using voice recognition This feature can be used on an iPhone equippedwith voice recognition that is connected byBluetooth. 1 Press and hold M.C. to switch to voice recognition mode. 2 Press M.C. and then talk into the micro- phone to input voice commands. To end voice recognition mode, press BAND /...
Page 10 - Function and operation; Refer to; Bluetooth Audio; Setting up for Bluetooth audio
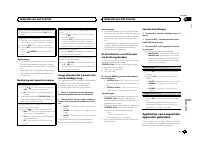
Phone menu operation 1 Press to display the phone menu. 2 Turn M.C. to select the function. Once selected, the following functions can beadjusted. MISSED (missed call history) DIALLED (dialed call history) RECEIVED (received call history) 1 Press M.C. to display the phone number list. 2 Turn M.C. to...
Page 11 - Audio adjustments; and press to select AUDIO.
Operations using special buttons Selecting a repeat play range 1 Press 6 / to select a repeat play range from one or all. ! This function may not be available dependingon the type of Bluetooth audio player con-nected. ! The repeat play range varies depending on theBluetooth audio player in use. Play...
Page 12 - System menu; Selecting the illumination color; Illumination function menu
SLA (source level adjustment) This function prevents the volume from changingtoo dramatically when the source switches. ! Settings are based on the FM volume level,which remains unchanged. ! The MW/LW volume level can also be adjustedwith this function. ! Each of the below combinations are set to th...
Page 13 - Customizing the illumination color; MIXTRAX menu
3 Turn M.C. to select the illumination func- tion. Once selected, the following audio functionscan be adjusted. KEY COLOUR (key section color setting) You can select desired colors for the keys of thisunit. 1 Press M.C. to display the setting mode. 2 Turn M.C. to select the illumination color. ! Pre...
Page 15 - Connections; This unit; CAUTION; Power cord; Installation
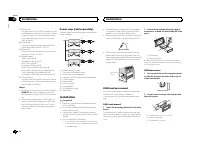
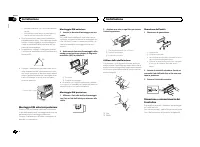
Connections Important ! When installing this unit in a vehicle withoutan ACC (accessory) position on the ignitionswitch, failure to connect the red cable to theterminal that detects operation of the ignitionkey may result in battery drain. O N S T A R T O F F ACC position No ACC position ! Use of th...
Page 16 - Insert the mounting sleeve into the dash-
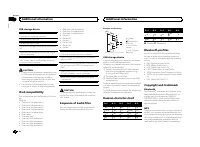
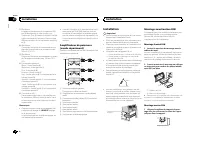
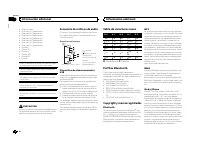
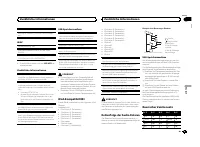
9 Blue/whiteThe pin position of the ISO connector will dif-fer depending on the type of vehicle. Connect 9 and b when Pin 5 is an antenna control type. In another type of vehicle, never con-nect 9 and b . a Blue/whiteConnect to system control terminal of thepower amp (max. 300 mA 12 V DC). b Blue/wh...
Page 17 - Using the included bracket; Screw; Removing the unit; Removing the front panel; Installing the microphone; Adjusting the microphone angle
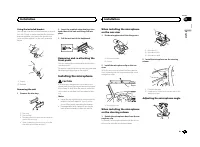
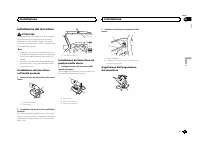
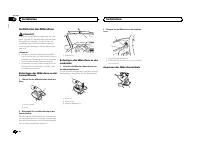
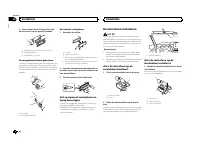
Using the included bracket You can also use the included bracket to mountthe unit. Check to make sure that the includedbracket matches your particular model of ve-hicle and then attach it to the unit as shownbelow. 2 1 1 2 1 Screw 2 Bracket Removing the unit 1 Remove the trim ring. 1 Trim ring 2 Not...
Page 18 - Common; Additional information
Troubleshooting Symptoms are written in bold and causes in reg-ular, non-indented text. Regular, indented text isused to indicate actions to be taken. The display automatically returns to the ordinarydisplay. You did not perform any operation within about 30seconds. Perform operation again. The repe...
Page 19 - Handling guidelines; You cannot use this function with; Supplemental information
ERROR-16 The iPod firmware version is old. Update the iPod version. iPod failure. Disconnect the cable from the iPod. Once theiPod ’ s main menu is displayed, reconnect the iPod and reset it. STOP There are no songs in the current list. Select a list that contains songs. NOT FOUND No related songs. ...
Page 20 - Bluetooth
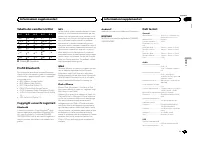
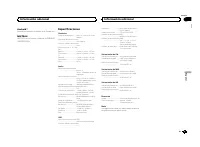
USB storage device Playable folder hierarchy: up to eight tiers (A prac-tical hierarchy is less than two tiers.) Playable folders: up to 500 Playable files: up to 15 000 Playback of copyright-protected files: Not compati-ble Partitioned USB storage device: Only the first par-tition can be played. Th...
Page 21 - WMA; Made for iPod; Android; Android is a trademark of Google Inc.; MIXTRAX; Specifications
streaming via internet, intranets and/or othernetworks or in other electronic content distribu-tion systems, such as pay-audio or audio-on-de-mand applications. An independent license forsuch use is required. For details, please visithttp://www.mp3licensing.com. WMA Windows Media is either a registe...
Page 22 - Nous vous remercions; Quelques mots sur cet appareil; ATTENTION; Avant de commencer
Nous vous remercions d ’ avoir acheté cet ap- pareil PIONEER Pour garantir une utilisation correcte, lisez bience mode d ’ emploi avant d ’ utiliser cet appareil. Il est particulièrement important que vous lisiez etrespectiez les indications ATTENTION et PRÉ- CAUTION de ce mode d ’ emploi. Conservez...
Page 23 - Remarques
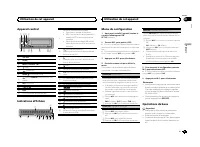
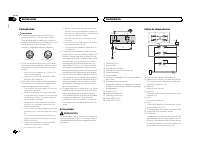
Appareil central 5 9 1 23 4 6 8 7 b a 1 SRC / OFF 2 LEVER 3 MULTI-CONTROL ( M.C. ) 4 (liste) 5 (téléphone) 6 BAND / (contrôle de l ’ iPod) 7 (retour)/ DIMMER (atténuateur de lumi- nosité) 8 MIX (MIXTRAX) 9 1 / à 6 / a DISP b Touche de retrait de la face avant Indications affichées 1 8 c a 7 9 b 6 5 ...
Page 24 - Remarque; Opérations de base; Utilisation des touches de présélection; Changement de l; Utilisation des fonctions PTY; Utilisation de cet appareil
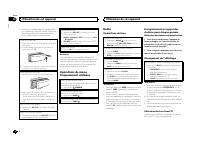
! Pour éviter d ’ endommager le périphérique ou l ’ intérieur du véhicule, retirez tous les câ- bles et périphériques connectés à la faceavant, avant d ’ enlever cette dernière. Retrait de la face avant 1 Appuyez sur la touche de retrait pour libérer laface avant. 2 Poussez la face avant vers le hau...
Page 25 - Liste des codes PTY; Réglages des fonctions; option de; Périphérique de stockage USB; Connexion MTP; Français
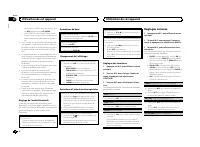
Recherche d ’ une station RDS en utilisant le code PTY 1 Appuyez sur (liste). 2 Tournez M.C. pour sélectionner le type de pro- gramme. NEWS/INFO — POPULAR — CLASSICS — OTHERS 3 Appuyez sur M.C. pour lancer la recherche. Cet appareil recherche une station qui diffusece type de programme. Quand une st...
Page 26 - Appuyez sur
Retour au dossier racine 1 Appuyez sur BAND / de façon prolongée. Changement de périphérique de mémoire de lec-tureVous pouvez basculer entre les périphériques demémoire sur les périphériques de stockage USBayant plus d ’ un périphérique de mémoire compa- tible avec la norme Mass Storage Class pour ...
Page 28 - appareil connecté; Pour les utilisateurs d; un iPhone; du mode de connexion APP)
Remarques ! La plage musicale/l ’ album sélectionné peut être annulé si vous utilisez d ’ autres fonctions que la fonction de recherche de liaison (re-tour rapide et avance rapide, par exemple). ! En fonction de la plage musicale sélection-née pour la lecture, la fin de la plage encours de lecture e...
Page 29 - Réglage pour la téléphonie mains libres
4 Démarrez l ’ application sur l ’ iPhone et lancez la lecture. Procédure de démarrage pourles utilisateurs d ’ un smartphone 1 Connectez votre smartphone à cet appa- reil via la technologie sans fil Bluetooth. Pourles détails, reportez-vous à la page 30, Utili- sation du menu de connexion . 2 Sélec...
Page 30 - BAND; Utilisation du menu de connexion
3 Appuyez sur M.C. pour effectuer un appel. Changement de l ’ affichage Sélection des informations textuelles souhaitéesVous pouvez changer l ’ affichage pendant un appel téléphonique. 1 Appuyez sur DISP pour parcourir les options disponibles : ! Durée de l ’ appel ! Nom du destinataire ! Numéro du ...
Page 31 - Utilisation du menu du téléphone; Fonction et utilisation; PHONE FUNC; Audio Bluetooth
La fonction de visibilité Bluetooth peut être activéeafin que d ’ autres périphériques puissent détecter l ’ appareil. 1 Appuyez M.C. pour activer ou désactiver la visi- bilité de cet appareil. PIN CODE (saisie du code PIN) Vous devez entrer un code PIN sur votre périphé-rique pour confirmer la conn...
Page 32 - Réglages sonores
La connexion A2DP ne peut être utilisée qu ’ a- vec APP (smartphone) et BT AUDIO . — Profil AVRCP (Audio/Video Remote ControlProfile) : Vous pouvez écouter, interrompre lalecture, sélectionner des plages musicales,etc. ! Pour utiliser un lecteur audio Bluetooth aveccet appareil, consultez ce mode d ...
Page 33 - Menu système
1 Appuyez sur M.C. pour afficher le mode de ré- glage. 2 Tournez M.C. pour sélectionner l ’ égaliseur. POWERFUL — NATURAL — VOCAL — CUS- TOM1 — CUSTOM2 — FLAT — SUPER BASS La bande et le niveau de l ’ égalisateur peuvent être personnalisés lorsque CUSTOM1 ou CUS- TOM2 est sélectionné. Si CUSTOM1 ou ...
Page 34 - éclairage; Menu des fonctions d; appuyez pour sélectionner.
1 Appuyez sur M.C. pour sélectionner le réglage souhaité. 12H (horloge 12 heures) — 24H (horloge 24 heures) INFO DISPLAY (informations secondaires) Le type d ’ informations textuelles affichées dans la section des informations secondaires peut êtrechangé. 1 Appuyez sur M.C. pour afficher le mode de ...
Page 35 - Menu MIXTRAX
Vous pouvez sélectionner les couleurs souhaitéespour l ’ afficheur de cet appareil. 1 Appuyez sur M.C. pour afficher le mode de ré- glage. 2 Tournez M.C. pour choisir la couleur d ’ éclai- rage. ! Couleurs présélectionnées (de WHITE à BLUE ) ! SCAN (parcourir de nombreuses couleurs automatiquement) ...
Page 36 - Mettez l
L ’ affichage de la couleur clignotante et des effets spéciaux MIXTRAX changent suivant l ’ évolution du niveau sonore et des graves. 1 Appuyez sur M.C. pour afficher le mode de ré- glage. 2 Tournez M.C. pour sélectionner le réglage sou- haité. ! SOUND LEVEL 1 à SOUND LEVEL 6 – le modèle de clignote...
Page 37 - Connexions; Cet appareil; PRÉCAUTION; Cordon d
Connexions Important ! Lors de l ’ installation de cet appareil dans un véhicule sans position ACC (accessoire) surle contact d ’ allumage, ne pas connecter le câble rouge à la borne qui détecte l ’ utilisa- tion de la clé de contact peut entraîner le dé-chargement de la batterie. O N S T A R T O F ...
Page 38 - Montage avant/arrière DIN; Montage frontal DIN; Insérez le manchon de montage dans le; Montage arrière DIN; Alignez les orifices du support de mon-
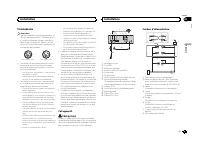
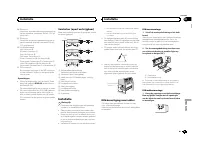
9 Bleu/blancLa position des broches du connecteur ISOest différente selon le type de véhicule.Connectez 9 et b lorsque la broche 5 est de type commande de l ’ antenne. Dans un type différent de véhicule, ne connectez jamais 9 et b . a Bleu/blancConnectez à la borne de commande du sys-tème de l ’ amp...
Page 39 - Retrait de la face; Installation du microphone
2 Vissez une vis de chaque côté pour fixer correctement l ’ appareil. 1 2 3 1 Vis taraudeuse (5 mm × 8 mm) 2 Support de montage 3 Tableau de bord ou console Utilisation du support fourni Vous pouvez aussi utiliser le support fourni pourmonter l ’ appareil. Assurez-vous que le support fourni correspo...
Page 40 - Installez le microphone sur la colonne de; Réglage de l; Dépannage; entretien agréé par Pioneer le plus; Informations complémentaires
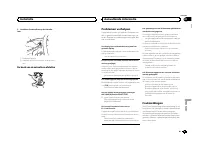
2 Installez le microphone sur la colonne de direction. 1 2 1 Bande double face 2 Installez le microphone sur la face arrière dela colonne de direction. Réglage de l ’ angle du microphone Dépannage Les symptômes apparaissent en gras et les cau-ses sous la forme de texte régulier non indenté.Le texte ...
Page 42 - Conseils sur la manipulation; USB MTP; utilisation de ce produit.; Compatibilité iPod; Conçu pour
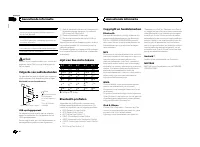
Conseils sur la manipulation Périphérique de stockage USB Les connexions via un concentrateur USB ne sontpas prises en charge. Ne connectez aucun périphérique autre qu ’ un pé- riphérique de stockage USB. Fixez fermement le périphérique de stockage USBlors de la conduite. Ne laissez pas le périphéri...
Page 44 - Caractéristiques techniques; Généralités
MIXTRAX MIXTRAX est une marque commerciale dePIONEER CORPORATION. Caractéristiques techniques Généralités Tension d ’ alimentation ..... 14,4 V CC (10,8 V à 15,1 V ac- ceptable) Mise à la masse ............... Pôle négatifConsommation maximale ................................... 10,0 A Dimensions (L...
Page 46 - Informazioni sull; AVVERTENZA; In caso di problemi; Prima di iniziare
Grazie per aver acquistato questo prodotto PIONEER Leggere attentamente questo manuale prima diutilizzare il prodotto, per assicurarne il correttoutilizzo. È particolarmente importante leggere eosservare le precauzioni contrassegnate da AV- VERTENZA e ATTENZIONE contenute in questo manuale. Conserva...
Page 48 - Funzionamento di base; Uso dei tasti di preselezione sintonia; Commutazione del display; Uso delle funzioni PTY; Uso dell
! Per evitare danni ai dispositivi o agli internidel veicolo, accertarsi di scollegare gli even-tuali cavi e i dispositivi collegati al frontalino,prima di rimuoverlo. Rimozione del frontalino 1 Premere il tasto di rimozione per sganciare ilfrontalino. 2 Spingere il frontalino verso l ’ alto ( M ) e...
Page 49 - Elenco PTY; Per ulteriori dettagli sull; Impostazioni delle funzioni; opzione di; Dispositivo di memoria USB; Collegamento MTP; Italiano
Ricerca di una stazione RDS tramite le informazio-ni PTY 1 Premere (elenco). 2 Ruotare M.C. per selezionare un tipo di pro- gramma. NEWS/INFO — POPULAR — CLASSICS — OTHERS 3 Premere M.C. per avviare la ricerca. L ’ unità ricerca una stazione che trasmette il tipo di programma selezionato. Quando vie...
Page 50 - Nota; Premere
Ritorno alla cartella principale 1 Premere e tenere premuto BAND / . Passaggio da un dispositivo di memoria per la ri-produzione ad un altroSe sono disponibili più dispositivi di memorizza-zione di massa conformi con lo standard MassStorage Class USB, è possibile alternare i disposi-tivi di memoria ...
Page 52 - Importante; Per gli utenti iPhone; Procedura per utenti di smartphone; mite il menu dei collegamenti
Impostazioni delle funzioni 1 Premere M.C. per visualizzare il menu principale. 2 Ruotare M.C. per modificare l ’ opzione di menu; premere per selezionare FUNCTION. 3 Ruotare M.C. per selezionare la funzione. Dopo aver effettuato la selezione, è possibile re-golare le funzioni descritte di seguito. ...
Page 53 - Impostazione delle chiamate in vivavoce
Impostazioni delle funzioni 1 Premere M.C. per visualizzare il menu principale. 2 Ruotare M.C. per modificare l ’ opzione di menu; premere per selezionare FUNCTION. 3 Ruotare M.C. per selezionare la funzione. Dopo aver effettuato la selezione, è possibile re-golare le funzioni descritte di seguito. ...
Page 55 - Visualizzare PHONE FUNC.; Configurazione dell; unità in modo
I contatti del telefono vengono generalmente tra-sferiti automaticamente quando il telefono vienecollegato. In caso contrario, utilizzare il menu deltelefono per trasferire i contatti. Quando si usa ilmeni del telefono la visibilità di questa unità deveessere attivata. Vedere VISIBLE (impostazione d...
Page 57 - Menu di sistema
Utilizzare questa funzione se si desidera ascoltaresolo il segnale audio ad alta frequenza. Dagli alto-parlanti verranno emesse solo le frequenze supe-riori al limite del filtro passa alto (HPF). 1 Premere M.C. per visualizzare la modalità di impostazione. 2 Premere M.C. per alternare le seguenti im...
Page 58 - illuminazione
È possibile cancellare i dati dei dispositiviBluetooth memorizzati in questa unità. Per proteg-gere i dati personali, si consiglia di cancellare lamemoria del dispositivo prima di cedere l ’ unità ad altri. Verranno eliminate i dati seguenti.Elenco dispositivi/codice PIN/registro delle chia-mate/rub...
Page 59 - impostazione
Informazioni sulle funzioniMIXTRAX La tecnologia MIXTRAX viene utilizzata per inse-rire diversi effetti sonori tra i brani e consente disperimentare la musica come un mix nonstop,completo di effetti visivi. Note ! A seconda del file/brano, gli effetti sonori po-trebbero non essere disponibili. ! Se ...
Page 60 - Uso della sorgente AUX; Collegamenti; Questa unità; ATTENZIONE; Installazione
Uso della sorgente AUX 1 Utilizzare il cavo AUX per collegare un di- spositivo ausiliario. 2 Premere SRC/OFF per selezionare AUX come sorgente. Nota Non è possibile selezionare la sorgente AUX senon viene attivata l ’ impostazione dell ’ apparec- chio ausiliario. Per ulteriori dettagli, vedere AUX (...
Page 61 - Cavo di alimentazione
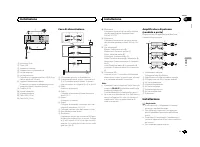
a 6 5 4 1 9 8 b 7 2 d 3 c 1 Microfono (4 m) 2 Porta USB 3 Ingresso microfono 4 Ingresso cavo di alimentazione 5 Uscita anteriore 6 Uscita posteriore 7 Connettore di ingresso ausiliario (AUX) (con-nettore stereo da 3,5 mm) 8 Ingresso telecomando cablatoÈ possibile collegare un adattatore per tele-com...
Page 62 - Montaggio DIN anteriore/posteriore; Montaggio DIN anteriore; Rimozione del fronta-
— potrebbe interferire con il funzionamento delveicolo. — potrebbe procurare lesioni al passeggero incaso di arresto improvviso del veicolo. ! Se si surriscalda il laser a semiconduttorepotrebbe subire danni. Non installare questaunità in luoghi soggetti a surriscaldamento,come in prossimità delle b...
Page 63 - Installazione del microfono; aletta parasole; Inserire il cavo del microfono nella scana-; Regolazione dell
Installazione del microfono ATTENZIONE È estremamente pericoloso se il filo di sostegnodel microfono si avvolge attorno al piantonedello sterzo o alla leva del cambio. Accertarsiquindi di installare questa unità in modo tale danon ostacolare la guida. Note ! Installare il microfono in una posizione ...
Page 64 - Problemi comuni; Informazioni supplementari
Risoluzione dei problemi In questo manuale i sintomi dei problemi sonoriportati in testo grassetto, mentre le cause sonoriportate in testo normale, non rientrato. Il testonormale, ma rientrato indica le azioni da intra-prendere. Il display torna automaticamente allavisualizzazione normale. Non è sta...
Page 65 - Linee guida per l
CHECK USB L ’ iPod funziona correttamente ma non si ricarica. Accertarsi che il cavo di collegamento dell ’ iPod non sia in cortocircuito (ad esempio, bloccato daoggetti di metallo). Dopo aver verificato, portarel ’ interruttore della chiave di avviamento su OFF e quindi su ON, oppure scollegare l ’...
Page 66 - WAV; Compatibilità iPod
Compatibilità lista di riproduzione m3u: non com-patibile Compatibilità MP3i (MP3 interattivo), mp3 PRO:non compatibile WAV Estensione file: .wav Bit di quantizzazione lineare: 8 e 16 (LPCM), 4 (MSADPCM) Frequenza di campionamento: da 16 kHz a 48 kHz(LPCM), 22,05 kHz e 44,1 kHz (MS ADPCM) ! Non è po...
Page 67 - A2DP (Advanced Audio Distribution Profile); Il marchio nominale e il logo; Android è un marchio di fabbrica di Google Inc.; Generali
Tabella dei caratteri cirillici D: C D: C D: C D: C D: C : А : Б : В : Г : Д : Е , Ё : Ж : З : И , Й : К : Л : М : Н : О : П : Р : С : Т : У : Ф : Х : Ц : Ч : Ш , Щ : Ъ : Ы : Ь : Э : Ю : Я D : Display C : Carattere Profili Bluetooth Per utilizzare la tecnologia wireless Bluetooth, idispositivi devon...
Page 68 - Sintonizzatore FM; Sintonizzatore MW
Classe USB ...................... MSC (Mass Storage Class)File system ....................... FAT12, FAT16, FAT32Formato di decodifica MP3 ................................... MPEG-1 & 2 Audio Layer 3 Formato di decodifica WMA ................................... Ver. 7, 7.1, 8, 9, 10, 11, 12 (2 c...
Page 70 - Acerca de esta unidad; ADVERTENCIA; Evite la exposición a la humedad.; Antes de comenzar
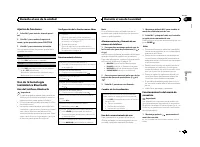
Gracias por haber adquirido este producto PIONEER Lea con detenimiento este manual antes de utili-zar el producto por primera vez para que puedadarle el mejor uso posible. Es muy importanteque lea y cumpla con la información que apare-ce bajo los mensajes de ADVERTENCIA y PRECAUCIÓN de este manual. ...
Page 71 - Aparecerá; Notas
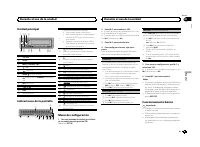
Unidad principal 5 9 1 23 4 6 8 7 b a 1 SRC / OFF 2 LEVER 3 MULTI-CONTROL ( M.C. ) 4 (lista) 5 (teléfono) 6 BAND / (control de iPod) 7 (parte posterior)/ DIMMER (reductor de luz) 8 MIX (MIXTRAX) 9 1 / a 6 / a DISP b Botón de soltar Indicaciones de la pantalla 1 8 c a 7 9 b 6 5 2 4 d e 3 f 1 Sección ...
Page 72 - Funcionamiento básico; Cambio de la visualización; Uso de las funciones PTY; Durante el uso de la unidad
! Para evitar que el dispositivo o el interior delvehículo sufran daños, retire todos los cableso dispositivos conectados al panel delanteroantes de extraerlo. Extracción del panel frontal 1 Pulse el botón de soltar para liberar el paneldelantero. 2 Empuje el panel delantero hacia arriba ( M ) y tir...
Page 73 - Lista PTY; Ajustes de funciones; menú y pulse para seleccionar FUNCTION.; Conexión MTP
Búsqueda de una emisora RDS por informaciónPTY 1 Pulse (lista). 2 Gire M.C. para seleccionar el tipo de progra- ma. NEWS/INFO — POPULAR — CLASSICS — OT- HERS 3 Pulse M.C. para comenzar la búsqueda. La unidad busca una emisora que transmitaese tipo de programa, cuando la encuentra, sevisualiza el nom...
Page 74 - Pulse; Para ir al menú superior de la búsqueda
Operaciones con el botón MIXTRAX Activación o desactivación de MIXTRAXNo puede usar esta función con USB MTP . 1 Presione MIX para activar o desactivar MIXTRAX. ! Para obtener más información sobreMIXTRAX, consulte Sobre MIXTRAX en la pági- na 82. ! Cuando se usa MIXTRAX, la función sound re-triever...
Page 75 - Operaciones con botones especiales; Español
2 Utilice M.C. para seleccionar una catego- ría/canción. Cambio del nombre de la canción o la categoría 1 Gire M.C. Listas de reproducción — artistas — álbumes — canciones — podcasts — géneros — composito- res — audiolibros Reproducción 1 Tras seleccionar una canción, pulse M.C. Visualización de una...
Page 76 - Para usuarios de iPhone; El dispositivo tiene un iOS 5.0 o superior.
AUDIO BOOK (velocidad del audiolibro) 1 Pulse M.C. para mostrar el modo de ajuste. 2 Gire M.C. para seleccionar su ajuste favorito. ! FASTER – Reproducción con velocidad su- perior a la normal ! NORMAL – Reproducción con velocidad normal ! SLOWER – Reproducción con velocidad in- ferior a la normal S...
Page 77 - Configuración de la función manos libres
Ajustes de funciones 1 Pulse M.C. para acceder al menú princi- pal. 2 Gire M.C. para cambiar la opción de menú y pulse para seleccionar FUNCTION. 3 Gire M.C. para seleccionar la función. Una vez seleccionado, se pueden ajustar las si-guientes funciones. PAUSE (pausar) 1 Pulse M.C. para pausar o rean...
Page 79 - Función y operación; Consulte; Ajuste de audio Bluetooth
Al conectar el teléfono, se deberán transferir auto-máticamente los contactos del mismo. Si no, utili-ce el menú del teléfono para transferirlos. Lavisibilidad de la unidad deberá estar activadacuando utilice el menú del teléfono. Consulte VISIBLE (ajuste de la visibilidad de esta unidad) en la pági...
Page 80 - Ajustes de audio; menú y pulse para seleccionar AUDIO.
Operaciones con botones especiales Selección de un intervalo de repetición de repro-ducción 1 Pulse 6 / para seleccionar un intervalo de repetición de reproducción de uno a todo. ! Es posible que esta función no esté disponiblesegún el tipo de reproductor de audioBluetooth conectado. ! El intervalo ...
Page 81 - Menú del sistema
SLA (ajuste del nivel de fuente) Esta función evita que el volumen cambie dema-siado drásticamente cuando se cambia de fuente. ! Los ajustes se basan en el nivel de volumen deFM, que se mantiene inalterado. ! El nivel del volumen de MW/LW también sepuede ajustar con esta función. ! Cada una de las c...
Page 82 - Menú de funciones de iluminación; Menú MIXTRAX
Selección de la iluminaciónen color Menú de funciones de iluminación 1 Pulse M.C. para acceder al menú princi- pal. 2 Gire M.C. para visualizar ILLUMI y púlselo para realizar la selección. 3 Gire M.C. para seleccionar la función de iluminación. Una vez seleccionado, se pueden ajustar las si-guientes...
Page 83 - Para obtener más información, consulte; Uso de una fuente AUX
El color parpadeante y la visualización de los efec-tos especiales de MIXTRAX cambian si se efec-túan cambios en los niveles de graves y de sonido. 1 Pulse M.C. para mostrar el modo de ajuste. 2 Gire M.C. para seleccionar el ajuste deseado. ! SOUND LEVEL 1 a SOUND LEVEL 6 – El patrón de parpadeo cam...
Page 84 - Conexiones; Esta unidad; PRECAUCIÓN; Cable de alimentación; Instalación
Conexiones Importante ! Cuando esta unidad se instale en un ve-hículo sin posición ACC (accesorio) en lallave de encendido, el cable rojo se debe co-nectar al terminal que pueda detectar la ope-ración de la llave de encendido. De locontrario, puede descargarse la batería. O N S T A R T O F F Posició...
Page 85 - Montaje delantero/posterior de DIN; Montaje delantero DIN; Inserte el manguito de montaje en el sal-; Montaje trasero DIN; Para fijar el soporte, alinee los orificios
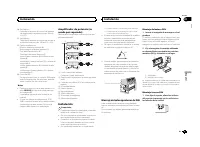
a Azul/blancoConectar al terminal de control del sistemadel amplificador de potencia (máx. 300 mA12 V CC). b Azul/blancoConectar al terminal de control del relé de laantena automática (máx. 300 mA 12 V CC). c Cables de altavocesBlanco: delantero izquierdo + Blanco/negro: delantero izquierdo * Gris: ...
Page 86 - Si se utiliza el soporte que se incluye; Tornillo; Extracción de la unidad; ción del panel frontal; Instalación del micrófono
2 Enrosque un tornillo a cada lado para su- jetar la unidad en su sitio. 1 2 3 1 Tornillo con rosca cortante (5 mm × 8 mm) 2 Carcasa 3 Salpicadero o consola Si se utiliza el soporte que se incluye También puede utilizar el soporte que se incluyepara montar la unidad. Asegúrese de que estecoincide co...
Page 87 - Instale el micrófono en la columna de di-; Ajuste del ángulo del micrófono; Solución de problemas; Mensajes de error; Información adicional
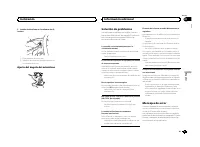
2 Instale el micrófono en la columna de di- rección. 1 2 1 Cinta adhesiva de doble cara 2 Instale el micrófono en la parte trasera de lacolumna de dirección. Ajuste del ángulo del micrófono Solución de problemas Los síntomas se escriben en negrita y las cau-sas en escritura normal sin sangría. El te...
Page 89 - Pautas para el manejo; No puede usar esta función con; Información complementaria; Compatibilidad con iPod; iPod classic
Pautas para el manejo Dispositivo de almacenamientoUSB No se admiten las conexiones a través de un con-centrador USB. No conecte ningún otro objeto que no sea un dis-positivo de almacenamiento USB. Cuando conduzca, fije el dispositivo de almacena-miento USB firmemente. No deje caer el dispositi-vo d...
Page 91 - Android es una marca comercial de Google Inc.; Especificaciones
Android ä Android es una marca comercial de Google Inc. MIXTRAX MIXTRAX es una marca comercial de PIONEERCORPORATION. Especificaciones Generales Fuente de alimentación .... 14,4 V cc (10,8 V a 15,1 V per- misible) Sistema de derivación a tierra ................................... Tipo negativo Consu...
Page 92 - Zu diesem Gerät; Wichtig; WARNUNG; Im Problemfall; Bevor Sie beginnen
Vielen Dank , dass Sie sich für dieses PIONEER-Produkt entschieden haben Bitte lesen Sie diese Anleitung vor der Verwen-dung dieses Produkts zur Gewährleistung seinerordnungsgemäßen Verwendung durch. Lesenund befolgen Sie dabei insbesondere die Hin-weise WARNUNG und VORSICHT . Bewahren Sie die Anlei...
Page 93 - Hauptgerät; Die Angabe; Hinweise; Grundlegende Bedienvorgänge; Gebrauch dieses Geräts
Hauptgerät 5 9 1 23 4 6 8 7 b a 1 SRC / OFF 2 LEVER 3 MULTI-CONTROL ( M.C. ) 4 (Liste) 5 (Telefon) 6 BAND / (iPod-Steuerung) 7 (Zurück)/ DIMMER (Dimmer) 8 MIX (MIXTRAX) 9 1 / bis 6 / a DISP b Taste zum Entriegeln der Frontplatte Display-Anzeige 1 8 c a 7 9 b 6 5 2 4 d e 3 f 1 Hauptinformationsbereic...
Page 94 - Hinweis; Verwendung der Stationstasten; Umschalten der Anzeige
! Entfernen Sie alle etwaigen angeschlosse-nen Kabel und Geräte, bevor Sie die Front-platte abnehmen, um eine Beschädigungdes Geräts oder des Fahrzeuginneren zu ver-meiden. Abnehmen der Frontplatte 1 Drücken Sie die Taste zum Entriegeln derFrontplatte. 2 Drücken Sie die Frontplatte nach oben ( M ) u...
Page 95 - Funktionseinstellungen; Deutsch
Suchen nach RDS-Stationen anhand eines Pro-grammtyps 1 Drücken Sie auf (Liste). 2 Drehen Sie M.C. , um einen Programmtyp zu wählen. NEWS/INFO — POPULAR — CLASSICS — OTHERS 3 Drücken Sie M.C. , um die Suche zu starten. Das Gerät sucht nach einer Station, die einProgramm des gewählten Typs ausstrahlt....
Page 96 - Drücken Sie
Rückkehr zum Stammordner 1 Drücken und halten Sie BAND / gedrückt. Umschalten zwischen Wiedergabespeichergerä-tenSie können zwischen Wiedergabespeichereinhei-ten eines USB-Speichermediums wechseln, wel-ches über mehrere Massenspeicherklassekompatible Einheiten verfügt. 1 Drücken Sie BAND / . ! Sie k...
Page 97 - Drücken und halten Sie
! Wenn die Zündung des Wagens ausgeschal-tet wird, schaltet sich der iPod nach etwazwei Minuten aus. Bedienung mithilfe derMIXTRAX-Taste MIXTRAX ein- oder ausschalten 1 Drücken Sie auf MIX , um MIXTRAX ein- oder auszuschalten. ! Für weitere Einzelheiten zu MIXTRAX siehe Über MIXTRAX auf Seite 105. U...
Page 98 - Für Smartphone-Anwender
Hinweise ! Die Wiedergabe des ausgewählten Musikti-tels/Albums wird ggf. abgebrochen, wennSie eine andere Funktion als die Verbin-dungssuche (wie z. B. Schnellvorlauf oder-rücklauf) wählen. ! Je nach dem für die Wiedergabe gewähltenMusiktitel können das Ende des momentanspielenden Musiktitels und de...
Page 99 - Bedienen des Verbindungsmenüs; Einrichten der Freisprechfunktion
4 Starten Sie die Anwendung auf dem iPhone, und beginnen Sie mit der Wiederga-be. Einrichtverfahren fürSmartphone-Anwender 1 Verbinden Sie Ihr Smartphone über die drahtlose Bluetooth-Technologie mit diesemGerät. Für detaillierte Informationen hierzusiehe Bedienen des Verbindungsmenüs auf Seite 100. ...
Page 101 - Drücken Sie auf; Funktionen und Bedienvorgänge; Bringen Sie PHONE FUNC zur Anzeige.
1 Drücken Sie M.C. , um den automatischen Ver- bindungsaufbau ein- oder auszuschalten. VISIBLE (Einstellen der Gerätesichtbarkeit) Die Bluetooth-Sichtbarkeit kann eingeschaltetwerden, damit andere Geräte diese Einheit erken-nen können. 1 Drücken Sie M.C. , um die Sichtbarkeit dieses Geräts ein- oder...
Page 104 - Systemmenü
Systemmenü Wichtig Die Funktion PW SAVE (Energiesparmodus) wird deaktiviert, wenn die Fahrzeugbatterie ab-geklemmt wird und muss neu aktiviert werden,sobald die Batterie wieder angeschlossen wird.Wenn PW SAVE (Energiesparmodus) deaktiviert ist, kann das Gerät je nach Anschlussart Batte-rieleistung i...
Page 105 - Wählen der Beleuchtungsfarbe; Beleuchtungsfunktionsmenü
Wählen der Beleuchtungsfarbe Beleuchtungsfunktionsmenü 1 Drücken Sie auf M.C., um das Hauptmenü anzuzeigen. 2 Drehen Sie M.C., um die Option ILLUMI zur Anzeige zu bringen, und drücken Siedann darauf, um Ihre Auswahl zu bestäti-gen. 3 Drehen Sie M.C., um die Beleuchtungs- funktion zu wählen. Nach der...
Page 106 - Für detaillierte Informationen hierzu siehe
3 Drehen Sie M.C., um die MIXTRAX-Funk- tion zu wählen. Nach der Auswahl können die folgendenMIXTRAX-Funktionen angepasst werden. DieseFunktion ist aktiviert, wenn MIXTRAX einge-schaltet ist. SHORT PLAYBCK (Kurzwiedergabemodus) Sie können die Länge der Wiedergabedauer wäh-len. 1 Drücken Sie auf M.C....
Page 107 - Anschlüsse
Hinweis AUX kann nur gewählt werden, wenn die AUX-Einstellung eingeschaltet wurde. Für weitereEinzelheiten siehe AUX (Zusatzeingang) auf Seite 104. Umschalten der Anzeige Wählen der gewünschten Textinformationen 1 Drücken Sie auf DISP , um zwischen den fol- genden Optionen umzuschalten: ! Programmqu...
Page 108 - Dieses Gerät; VORSICHT; Netzkabel
! Das schwarze Kabel gewährleistet die Er-dung. Dieses Kabel wie auch die Erdungska-bel anderer Produkte (insbesondere vonHochstromprodukten wie Leistungsverstär-ker) müssen separat verdrahtet werden. An-derenfalls kann es zu einem Brand odereiner Funktionsstörung kommen, wenn sichdie Kabel versehen...
Page 109 - Verwenden der mitgelieferten Klammer; Schraube; Entfernen des Geräts; Abnehmen der Frontplatte
! Installieren Sie dieses Gerät keinesfalls anfolgenden Orten: — Orte, an denen das Gerät die Steuerung desFahrzeugs behindern könnte. — Orte, an denen das Gerät die Insassen desFahrzeugs im Anschluss an eine Schnell-bremsung verletzen könnte. ! Der Halbleiterlaser kann durch Überhitzungbeschädigt w...
Page 110 - Installieren des Mikrofons; Anpassen des Mikrofonwinkels
Installieren des Mikrofons VORSICHT Eine Führung des Mikrofonkabels um die Lenk-säule oder den Schalthebel kann sich als über-aus gefährlich erweisen. Achten Sie bei derInstallation des Geräts stets darauf, dass dieLenkung des Fahrzeugs in keiner Weise behin-dert wird. Hinweise ! Wählen Sie für die ...
Page 111 - Allgemeines; Zusätzliche Informationen
Fehlerbehebung Symptome sind in Fett, Ursachen in normalem,nicht eingerückten Text und Abhilfemaßnahmenin normalem, eingerückten Text geschrieben. Das Display schaltet automatisch in die normaleAnzeige um. Sie haben keinen Bedienvorgang innerhalb von 30Sekunden durchgeführt. Wiederholen Sie den Vorg...
Page 112 - Anwendung; Handhabungsrichtlinien
ERROR-19 Kommunikation gestört. Führen Sie einen der folgenden Bedienvorgängedurch: – Schalten Sie die Zündung aus (OFF) und wieder ein (ON). – Trennen Sie das USB-Speichermedium vom Gerät. – Schalten Sie auf eine andere Programmquelle um.Kehren Sie anschließend wieder zurProgrammquelle USB zurück. ...
Page 113 - Reihenfolge der Audio-Dateien; Russischer Zeichensatz
M3u-Spielliste: Nicht kompatibel MP3i (MP3 interaktiv), mp3 PRO: Nicht kompati-bel WAV Dateierweiterung: .wav Quantisierungsbits: 8 und 16 (LPCM), 4 (MSADPCM) Abtastfrequenz: 16 kHz bis 48 kHz (LPCM);22,05 kHz und 44,1 kHz (MS ADPCM) ! Diese Funktion kann nicht mit USB MTP ver- wendet werden. Zusätz...
Page 114 - Copyrights und Marken; Technische Daten; Allgemein; USB
D: C D: C D: C D: C D: C : Х : Ц : Ч : Ш , Щ : Ъ : Ы : Ь : Э : Ю : Я D : Anzeige C : Zeichen Bluetooth-Profile Um auf die Bluetooth-Wireless-Technologie zu-rückgreifen zu können, müssen Geräte be-stimmte Profile interpretieren können. DiesesGerät ist mit den nachstehend aufgeführten Pro-filen kompat...
Page 116 - Informatie over dit toestel; WAARSCHUWING; Bij problemen; Vóór u begint
Hartelijk dank voor uw keuze voor dit Pioneer-product Lees deze handleiding voordat u het product ingebruik neemt zodat u het goed leert gebruiken.Lees vooral de gedeelten die met WAARSCHU- WING en LET OP gemarkeerd zijn aandachtig. Bewaar deze handleiding na het lezen op een vei-lige, voor de hand ...
Page 117 - Zet het contact aan na de installatie van; stelling te voltooien.; Basisbediening; Belangrijk; Gebruik van het toestel
Hoofdtoestel 5 9 1 23 4 6 8 7 b a 1 SRC / OFF 2 LEVER 3 MULTI-CONTROL ( M.C. ) 4 (lijst) 5 (telefoon) 6 BAND / (iPod-bediening) 7 (terug)/ DIMMER (dimmer) 8 MIX (MIXTRAX) 9 1 / tot 6 / a DISP b Verwijderen Display-indicaties 1 8 c a 7 9 b 6 5 2 4 d e 3 f 1 Basisinformatie ! Tuner: frequentieband en ...
Page 118 - Opmerking; Veelgebruikte menufuncties; De voorkeuzetoetsen gebruiken; mer stopt met knipperen.; Een ander display kiezen; Opmerkingen
Het voorpaneel verwijderen 1 Druk op de toets Verwijderen om het voorpa-neel los te maken. 2 Duw het voorpaneel naar boven ( M ) en trek het naar u toe ( N ). 3 Bewaar het losgemaakte voorpaneel altijd ineen beschermende tas of een doosje. Het voorpaneel terugzetten 1 Schuif het voorpaneel naar link...
Page 120 - U kunt de volgende functie aanpassen.
Bediening met de MIXTRAX-toets MIXTRAX in- of uitschakelenU kunt deze functie niet gebruiken met USB MTP . 1 Druk op MIX om MIXTRAX in of uit te schake- len. ! Raadpleeg Informatie over MIXTRAX op blad- zijde 128 voor meer informatie over MIXTRAX. ! Wanneer MIXTRAX gebruikt wordt, is desound retriev...
Page 121 - Bediening met speciale toetsen; Nederlands
Een song in de geselecteerde categorie afspelen 1 Selecteer een categorie en houd M.C. inge- drukt. Alfabetisch in een lijst zoeken 1 Geef de lijst voor de geselecteerde categorieweer en druk op om alfabetisch te zoeken. 2 Draai aan M.C. om een letter te selecteren. 3 Druk op M.C. om de alfabetische...
Page 122 - Voor iPhone; Het apparaat moet iOS 5.0 of later hebben.; Voor smartphone; Startprocedure voor iPhone; menu; U kunt de volgende functies aanpassen.; Bluetooth-technologie
Belangrijk Voor gebruik van applicaties van derden wor-den mogelijk persoonsgegevens gebruikt ofmoet u zulke gegevens verstrekken, bijvoor-beeld door het opzetten van een gebruikersac-count of op andere wijze, en voor sommigeapplicaties worden mogelijk geolocatiegege-vens gebruikt.ALLE APPLICATIES V...
Page 123 - Telefoonnummers opslaan en oproepen; Het telefoonmenu; len naar spraakherkenning.; Het verbindingsmenu
Het toestel instellen voor handenvrijtelefoneren 1 VerbindenGebruik het verbindingsmenu voor deBluetooth-telefoon. Raadpleeg Het verbin- dingsmenu op bladzijde 123. 2 Functie-instellingenGebruik het functiemenu voor de Bluetooth-te-lefoon. Raadpleeg Het telefoonmenu op blad- zijde 124. Basisbedienin...
Page 124 - Druk op
1 Druk op M.C. om het zoeken te starten. ! Om het zoeken te annuleren, drukt u op M. C. ! Als dit toestel geen beschikbare mobiele te-lefoons vindt, wordt NOT FOUND weerge- geven. 2 Draai aan M.C. om een apparaat uit de lijst met apparaten te selecteren. ! Selecteer RE-SEARCH als het gezochte ap- pa...
Page 125 - Functies en bediening; Geef PHONE FUNC weer.; FUNCTION en druk erop.
Functies en bediening 1 Geef PHONE FUNC weer. Raadpleeg PHONE FUNC (telefoonfunctie) op bladzijde 124. 2 Druk op M.C. om het functiemenu weer te geven. 3 Draai aan M.C. om de gewenste functie te selecteren. U kunt de volgende functies aanpassen. A. ANSR (automatisch antwoorden) 1 Druk op M.C. om de ...
Page 126 - U kunt de volgende audiofuncties aanpassen.; Systeemmenu
2 Draai aan M.C., selecteer de menuoptie AUDIO en druk erop. 3 Draai aan M.C. en selecteer de audiofunc- tie. U kunt de volgende audiofuncties aanpassen. ! FADER kan niet worden gebruikt als SW is geselecteerd in REAR-SP . Raadpleeg voor meer informatie REAR-SP (achteruitgang) op bladzijde 129. ! SU...
Page 127 - De verlichtingskleur selecteren; Verlichtingsfuncties
1 Druk op M.C. om het hoofdmenu weer te geven. 2 Draai aan M.C., selecteer de menuoptie SYSTEM en druk erop. 3 Draai aan M.C. en selecteer de systeem- menufunctie. U kunt de volgende functies in het systeemme-nu aanpassen. LANGUAGE (taalinstelling) 1 Druk op M.C. en selecteer de gewenste instel- lin...
Page 128 - De verlichtingskleur zelf aanpassen
U kunt de kleuren van het display van het toestelnaar wens instellen. 1 Druk op M.C. om de instellingenmodus weer te geven. 2 Draai aan M.C. en selecteer de verlichtings- kleur. ! Vooringestelde kleuren ( WHITE tot BLUE ) ! SCAN (automatisch verschillende kleuren afwisselen) ! CUSTOM (aangepaste ver...
Page 129 - Raadpleeg; Zet het ongewenste scherm als volgt uit.
De knipperende kleur en speciale effecten vanMIXTRAX veranderen mee met het geluid en debasniveaus. 1 Druk op M.C. om de instellingenmodus weer te geven. 2 Draai aan M.C. en selecteer de gewenste in- stelling. ! SOUND LEVEL 1 t/m SOUND LEVEL 6 – Het knipperpatroon verandert naargelanghet geluidsnive...
Page 130 - Verbindingen; Dit toestel; LET OP; Stroomkabel; Installatie
Verbindingen Belangrijk ! Als dit toestel wordt geïnstalleerd in een voer-tuig met een contactschakelaar zonder ACC-stand (accessoirestand), kan de accu leeglo-pen als de rode kabel niet wordt aangeslotenop de aansluiting die de bediening van decontactschakelaar herkent. O N S T A R T O F F ACC -sta...
Page 131 - Schuif de montagebehuizing in het dash-; Breng de openingen van de bevestigings-
a Blauw-witAansluiten op systeembedieningsaansluitingvan de versterker (maximaal 300 mA, 12 V ge-lijkstroom). b Blauw-witAansluiten op bedieningsaansluiting van degemotoriseerde antenne (maximaal 300 mA,12 V gelijkstroom). c LuidsprekerkabelsWit: Linksvoor + Wit-zwart: Linksvoor * Grijs: Rechtsvoor ...
Page 132 - De meegeleverde klem gebruiken; Schroef; Het toestel verwijderen; Het voorpaneel verwijderen; De microfoon installeren
2 Schroef één schroef in langs elke zijde om het toestel op zijn plaats te houden. 1 2 3 1 Zelftappende schroef (5 mm × 8 mm) 2 Bevestigingsklem 3 Dashboard of console De meegeleverde klem gebruiken U kunt de meegeleverde klem ook gebruiken omhet toestel te monteren. Controleer dat de mee-geleverde ...
Page 133 - Installeer de microfoon op de stuurko-; De hoek van de microfoon afstellen; Problemen verhelpen; Foutmeldingen; Aanvullende informatie
2 Installeer de microfoon op de stuurko- lom. 1 2 1 Dubbelzijdige tape 2 Installeer de microfoon achter op de stuurko-lom. De hoek van de microfoon afstellen Problemen verhelpen Symptomen worden vet gedrukt. Oorzaken wor-den in gewoon lettertype zonder inspringen ge-drukt. Gewone en ingesprongen tek...
Page 135 - Aanwijzingen voor het gebruik; Bijkomende informatie; Compatibiliteit met iPod
Aanwijzingen voor het gebruik USB-opslagapparaat Het maken van verbindingen via een USB-hubwordt niet ondersteund. Sluit alleen een USB-opslagapparaat aan en geenandere apparaten. Maak het USB-opslagapparaat stevig vast voordatu gaat rijden. Zorg dat het niet op de grond valtomdat het dan onder het ...
Page 136 - Volgorde van audiobestanden; Lijst van Russische tekens
Gebruikers van een iPod met Lightning-aansluitingmoeten de Lightning-naar-USB-kabel gebruiken(bij de iPod geleverd). Gebruikers van een iPod met dock-connector moe-ten CD-IU51 gebruiken. Raadpleeg uw leveranciervoor meer informatie. Raadpleeg de handleiding van de iPod voor meerinformatie over onder...
Page 137 - Technische gegevens; Algemeen
Technische gegevens Algemeen Spanningsbron ................ 14,4 V gelijkstroom (10,8 tot 15,1 V toelaatbaar) Aarding ........................... NegatiefMaximaal stroomverbruik ................................... 10,0 A Afmetingen (B × H × D):DINChassis ............................ 178 mm × 50 mm ×...
Page 138 - Благодарим Вас; PIONEER; Держите данное; Сведения об этом устройстве; RDS; ПРЕДУПРЕЖДЕНИЕ; Pioneer CarStereo-Pass; При возникновении проблем; Перед началом эксплуатации
Благодарим Вас за покупку этого изделия компании PIONEER Для обеспечения правильности эксплуата - ции внимательно прочитайте данное руко - водство перед началом использованияизделия . Особенно важно , чтобы Вы прочли и соблюдали инструкции , помеченные в дан - ном руководстве заголовками ПРЕДУПРЕ - ...
Page 139 - Установочное меню; SET UP; YES; Меню системы; SRC; Использование данного устройства
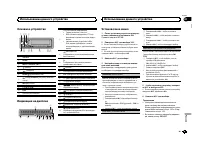
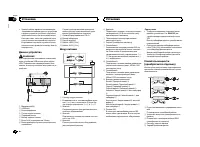
Основное устройство 5 9 1 23 4 6 8 7 b a 1 SRC / OFF 2 LEVER 3 MULTI-CONTROL ( M.C. ) 4 ( список ) 5 ( телефон ) 6 BAND / ( управление iPod) 7 ( назад )/ DIMMER ( регулятор освещен - ности ) 8 MIX (MIXTRAX) 9 С 1 / по 6 / a DISP b Кнопка снятия панели Индикация на дисплее 1 8 c a 7 9 b 6 5 2 4 d e 3...
Page 140 - Радиоприемник; Основные операции; SEEK; AF; AF; FREQUENCY; Использование функций
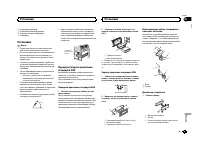
Основные операции Важно ! При отсоединении и установке переднейпанели обращайтесь с ней осторожно . ! Оберегайте переднюю панель от сильныхударов . ! Предохраняйте переднюю панель от воз - действия прямого солнечного света и вы - соких температур . ! Прежде чем снять переднюю панель , обя - зательно...
Page 141 - PTY; Настройка функций; FUNCTION; Запоминающее устройство; Подключение по протоколу
Поиск станции RDS с помощью информации PTY 1 Нажмите ( список ). 2 Кнопкой M.C. выберите тип программы . NEWS/INFO — POPULAR — CLASSICS — OT- HERS 3 Нажмите M.C. , чтобы начать поиск . Устройство начинает поиск радиостанций , передающих данный тип программ . При обнаружении радиостанции на дисплеебу...
Page 142 - Функции кнопки
Возврат к корневой папке 1 Нажмите и удерживайте кнопку BAND / . Переключение между запоминающими ус - тройствамиПри наличии нескольких запоминающих ус - тройств USB Mass Storage воспроизведение можно переключать между ними . 1 Нажмите кнопку BAND / . ! Возможно переключение между 32 различ - ными з...
Page 144 - CONTROL iPod; Для пользователей
Выбранная композиция или альбом будетвоспроизводиться после окончания вос - произведения текущей композиции . Примечания ! Возможна отмена воспроизведения вы - бранной композиции / альбома , если вы используете любые другие функции , кроме поиска по категории ( например , пе - ремотка вперед или наз...
Page 145 - Для пользователей смартфонов; iPhone; Настройки для громкой связи
Для пользователей смартфонов ! На устройстве установлена ОС Android 2.3 или выше . ! Устройство поддерживает Bluetooth SPP (Serial Port Profile) и A2DP (Advanced Audio Distribution Profile). Устройство подключено к данному ус - тройству по Bluetooth. ! Совместимость со всеми устройствами Android не ...
Page 146 - Использование меню соединения
Основные операции Выполнение вызовов 1 См . раздел Использование меню телефона на стр . 147. Ответ на входящий вызов 1 При получении входящего вызова нажмите . Завершение вызова 1 Нажмите . Отклонение входящего вызова 1 При получении входящего вызова нажмитеи удерживайте . Ответ на ожидающий вызов 1...
Page 147 - DEL DEVICE; Использование меню телефона; Нажмите
1 Нажмите M.C. , чтобы начать поиск . ! Для отмены нажмите M.C. во время по - иска . ! Если это устройство не находит доступ - ных сотовых телефонов , выводится со - общение NOT FOUND . 2 Для выбора устройства из списка повора - чивайте M.C. ! Если нужное устройство не отображает - ся , выберите RE-...
Page 148 - Функции и их назначение; аудио; Настройка
PHONE FUNC ( функции телефона ) С помощью этого меню можно настроить функ - ции A. ANSR , R.TONE и PB INVT . Подробнее см . в разделе Функции и их назначение на стр . 148. Функции и их назначение 1 Выберите PHONE FUNC . См . раздел PHONE FUNC ( функции телефо - на ) на стр . 148. 2 Нажмите M.C. , чт...
Page 149 - Регулировки параметров звука; AUDIO
2 Поворачивайте M.C. для прокрутки пунктов меню ; нажмите , чтобы выбрать FUNCTION . 3 Для выбора функции поворачивайте M.C. Следующие выбранные функции можно на - страивать . PLAY ( воспроизведение ) 1 Нажмите M.C. , чтобы начать воспроизведе - ние . STOP ( остановить ) 1 Нажмите M.C. , чтобы остан...
Page 150 - PW SAVE; DIMMER
Используйте эту функцию , если вы хотите , чтобы воспроизводились только высокие ча - стоты . На громкоговорители будут выводиться только частоты выше , чем установленные фильтром высоких частот (HPF). 1 Для отображения установочного меню на - жмите M.C. 2 Нажимайте M.C. для выбора из следующих функ...
Page 151 - Выбор цвета подсветки; Меню функции подсветки; Настройка цвета подсветки
Данные об устройстве Bluetooth, сохраненные в данном устройстве , можно удалить . Для за - щиты личной информации удалите эти дан - ные , прежде чем передать это устройство другому лицу . Будет удалена следующая ин - формация . Список устройств /PIN- код / список вызовов / те - лефонный справочник /...
Page 152 - Меню; Стартовое меню
6 Поворачивайте M.C. , чтобы отрегули - ровать уровень яркости . Диапазон настройки : от 0 до 60 # Нельзя выбрать уровень ниже 20 для всех трех цветов - R ( красный ), G ( зеленый ) и B ( голу - бой ) - одновременно . # Для других цветов можно выполнить те же операции . Примечание Когда выбрано SCAN...
Page 153 - Меню систе; AUX; Соединения; Установка
S/W UPDATE ( обновление ПО ) Данная функция служит для установки обно - влений программного обеспечения Bluetooth. Для получения информации по программномуобеспечению Bluetooth и порядку действий при его обновлении посетите наш сайт . ! Ни в коем случае не выключайте устрой - ство во время обновлени...
Page 154 - Данное устройство; ВНИМАНИЕ; Шнур питания; Примечания; на; Усилитель мощности
! Черный кабель является заземляющим . Заземляющие кабели данного устройстваи других устройств ( особенно устройств , предназначенных для эксплуатации прибольших токах , таких как усилитель мощ - ности ) должны монтироваться отдельно . В противном случае их случайное отсое - динение может привести к...
Page 155 - Переднее; DIN
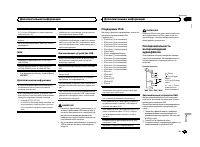
6 Кпереднему выходу 7 Передний громкоговоритель 8 Квыходу канала сабвуфера 9 Сабвуфер Установка Важно ! Перед окончательной установкой про - верьте все соединения и системы . ! Не используйте детали , не разрешенные производителем к использованию , по - скольку это может стать причиной неис - правно...
Page 156 - Установка микрофона; Регулировка угла микрофона
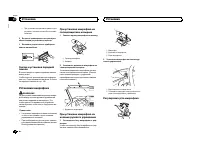
! При установке декоративной рамки сторо - на рамки с язычком должна быть направ - лена вниз . 2 Вставьте прилагаемые экстракторы с обеих сторон устройства до щелчка . 3 Вытяните устройство из приборной панели автомобиля . Снятие и установка переднейпанели В целях защиты от кражи переднюю панельможн...
Page 157 - Общие; Дополнительная информация
Устранение неисправностей Симптомы выделены жирным шрифтом ; причины показаны обычным шрифтом безотступа . Способы устранения показаны обы - чным шрифтом с отступом . Дисплей автоматически возвращается висходный режим . В течение 30 секунд не было выполнено никаких операций . Повторите операцию . Ди...
Page 159 - Поддержка
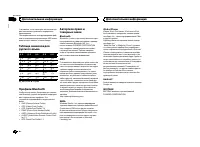
Совместимая версия тегов ID3: 1.0, 1.1, 2.2, 2.3, 2.4 ( теги ID3 версии 2.x имеют приоритет перед версией 1.x.) Списки воспроизведения M3u: не поддержи - ваются MP3i ( интерактивный MP3), mp3 PRO: не под - держиваются WAV Расширение : .wav Разрядность квантования : 8 и 16 (LPCM), 4 (MS ADPCM) Частот...
Page 160 - Профили
Учитывайте , что в некоторых системных сре - дах невозможно установить порядок вос - произведения . Последовательность воспроизведения фай - лов на портативном аудиоплеере USB может изменяться и зависит от типа плеера . Таблица символов длярусского языка Д : Б Д : Б Д : Б Д : Б Д : Б : А : Б : В : Г...
Page 162 - Примечание
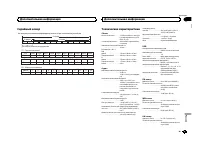
Отношение сигнал / шум ................................... 62 дБ ( сеть IEC-A) Bluetooth Версия ............................ Bluetooth 3.0 certified Выходная мощность ...... +4 дБм макс . ( Класс мощности 2) Примечание : В соответствии со статьей 5 закона Рос - сийской Федерации « О защите прав по -...
Page 164 - PIONEER CORPORATION
PIONEER CORPORATION 1-1, Shin-ogura, Saiwai-ku, Kawasaki-shi,Kanagawa 212-0031, JAPAN Корпорация Пайонир 1-1, Син - Огура , Сайвай - ку , г . Кавасаки , префектура Канагава , 212-0031, Япония Импортер ООО “ ПИОНЕР РУС ” 125040, Россия , г . Москва , ул . Правды , д .26 Тел .: +7(495) 956-89-01 PIONE...


 Pioneer MVH-S100UBG Manual
 Pioneer MVH-S300BT Manual
 Pioneer MVH-X360BT User Manual
 Pioneer MVH-X460UI Manual
 Pioneer SPH-DA100 User Manual
 Pioneer SPH-DA110 Manual
 Pioneer SPH-DA120 Manual
 Pioneer AVH-A200BT Manual
 Pioneer AVH-G110DVD Manual