Page 2 - In case of trouble; CAUTION; Avoid exposure to moisture.; Important; Before You Start
Thank you for purchasing this PIONEER product. To ensure proper use, please read through thismanual before using this product. It is espe-cially important that you read and observe WARNING s and CAUTION s in this manual. Please keep the manual in a safe and accessibleplace for future reference. If y...
Page 3 - Head unit; c d; Display indication; Note; Operating this unit
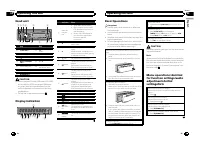
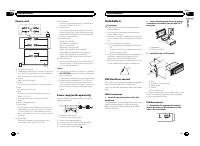
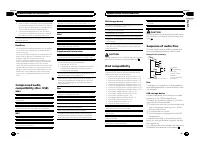
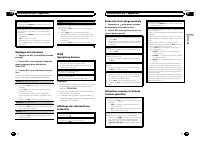
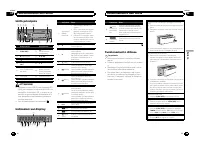
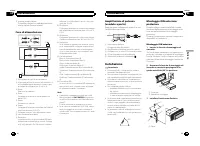
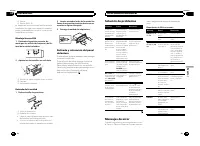
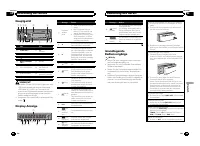
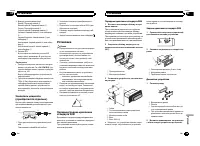
Head unit 1 2 4 5 6 3 7 8 a b c d 9 Part Part 1 S (SRC / OFF) 8 (Back/display/ scroll) 2 h (eject) 9 a / b / c / d 3 (list) a TA / NEWS 4 MULTI-CONTROL ( M.C. ) b 1 to 6 5 Disc loading slot c AUX input jack (3.5mm stereo jack) 6 USB port d Detach button 7 B (BAND / ESC) CAUTION ! Use an optional Pio...
Page 4 - Tuner; Basic Operations; Using preset tuning buttons; When you find a station that you want; Switching the RDS display; Press; PTY list; Function settings; and press to select FUNCTION.; BSM
Tuner Basic Operations Selecting a band 1 Press B (BAND / ESC) until the desired band ( F1 , F2 , F3 for FM or MW/LW ) is displayed. Manual tuning (step by step) 1 Press c or d . Seeking 1 Press and hold c or d , and then release. You can cancel seek tuning by briefly pressing c or d . While pressin...
Page 5 - iPod; Notes
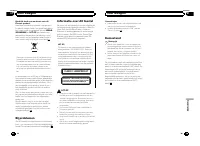
CD/CD-R/CD-RW and USBstorage devices Basic Operations Playing a CD/CD-R/CD-RW 1 Insert the disc into the disc loading slot with thelabel side up. Ejecting a CD/CD-R/CD-RW 1 Press h . Playing songs on a USB storage device 1 Open the USB connector cover and plug in theUSB storage device using a USB ca...
Page 6 - Audio Adjustments; and press to select AUDIO.
Playing songs related to the currently playing songYou can play songs from the following lists. • Album list of the currently playing artist • Song list of the currently playing album • Album list of the currently playing genre 1 Press and hold M.C. to switch to link play mode. 2 Turn M.C. to change...
Page 7 - Initial Settings; tion name appears in the display.; Customizing the illumination color; and press to select ILLUMI.
The cut-off frequency and output level can be ad-justed when the subwoofer output is on.Only frequencies lower than those in the selectedrange are outputted from the subwoofer. 1 Press M.C. to display the setting mode. 2 Press M.C. to cycle between the cut-off frequency and output level of the subwo...
Page 8 - to; Using an AUX source; Insert the stereo mini plug into the; Sound muting; Sound is muted automatically when:; This unit; Installation
5 Press M.C. to select the primary color. R (red) — G (green) — B (blue) 6 Turn M.C. to adjust the brightness level. Adjustment range: 0 to 60 # You cannot select a level below 10 for all three of R (red), G (green), and B (blue) at the same time. # You can also perform the same operation on other c...
Page 9 - Power cord; Insert the mounting sleeve into the
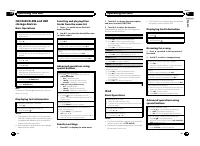
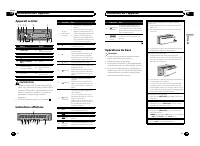
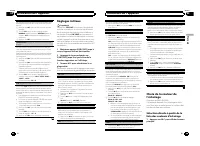
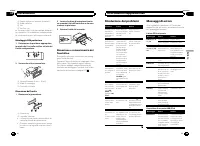
Power cord 1 3 3 2 4 4 5 5 6 6 b 8 9 7 a e d c 1 To power cord input 2 Depending on the kind of vehicle, the functionof 3 and 5 may be different. In this case, be sure to connect 4 to 5 and 6 to 3 . 3 YellowBack-up (or accessory) 4 YellowConnect to the constant 12 V supply terminal. 5 RedAccessory (...
Page 10 - Tighten two screws on each side.; Mounting bracket; Removing the unit; Remove the trim ring.; Trim ring; Insert the supplied extraction keys into; Error messages; USB storage device/iPod; Additional Information
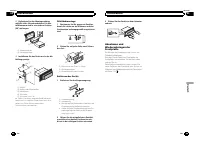
2 Tighten two screws on each side. 1 2 3 1 Tapping screw (5 mm × 8 mm) 2 Mounting bracket 3 Dashboard or console Removing the unit 1 Remove the trim ring. 1 Trim ring 2 Notched tab ! Releasing the front panel allows easier ac-cess to the trim ring. ! When reattaching the trim ring, point theside wit...
Page 11 - Discs and player
Message Cause Action NO AUDIO There are nosongs. Transfer the audiofiles to the USBstorage device andconnect. The connectedUSB storage de-vice has securityenabled Follow the USBstorage device in-structions to dis-able the security. SKIPPED The connectedUSB storage de-vice containsWMA files em-bedded...
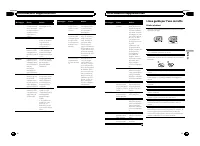
Page 12 - iPod compatibility; Sequence of audio files; Example of a hierarchy; Put those files into a folder.
About iPod settings ! When an iPod is connected, this unit changes theEQ (equalizer) setting of the iPod to off in order tooptimize the acoustics. When you disconnect theiPod, the EQ returns to the original setting. ! You cannot set Repeat to off on the iPod whenusing this unit. Repeat is automatica...
Page 13 - iTunes
Russian character chart D: C D: C D: C D: C D: C : : Б : В : Г : Д : Е , : : З : И , : К : : М : Н : О : П : Р : С : Т : У : Ф : : : Ч : , Щ : : : : : Ю : Я D : Display C : Character Copyright and trademark iTunes Apple and iTunes are trademarks of AppleInc., registered in the U.S. and other coun-tr...
Page 14 - APPAREIL À LASER DE CLASSE 1; PRÉCAUTION; Remarques; Français
Nous vous remercions d ’ avoir acheté cet appareil PIONEER. Pour garantir une utilisation correcte, lisezbien ce mode d ’ emploi avant d ’ utiliser cet ap- pareil. Il est particulièrement important quevous lisiez et respectiez les indications AT- TENTION et PRÉCAUTION de ce mode d ’ emploi. Conser v...
Page 16 - Syntoniseur; Remarque; Utilisation des touches de présélection; Utilisation de l; Liste des codes PTY; Utilisation de l
PRÉCAUTION Pour des raisons de sécurité, garez votre véhiculepour retirer la face avant. Remarque Si le fil bleu/blanc de l ’ appareil est relié à la prise de commande du relais de l ’ antenne motorisée du véhicule, celle-ci se déploie lorsque la sourceest mise en service. Pour rétracter l ’ antenne...
Page 17 - Opérations de base; Appuyez sur; Utilisation avancée à l
3 Tournez M.C. pour sélectionner la fonc- tion. Après avoir sélectionné la fonction, effectuezles procédures de paramétrage suivantes. # Si la gamme MW/LW (PO/GO) est sélection- née, seul BSM ou LOCAL est disponible. BSM (mémoire des meilleures stations) La fonction BSM (mémoire des meilleures stati...
Page 18 - option de
Pause de la lecture 1 Appuyez sur 2 / PAUSE pour mettre en pause ou reprendre la lecture. Amélioration de l ’ audio compressé et restauration d ’ un son riche (sound retriever (correcteur de son compressé)) 1 Appuyez sur 1 / S.Rtrv pour parcourir les options disponibles : OFF (hors service) — 1 — 2 ...
Page 19 - Réglages des fonctions; Réglages sonores
Utilisation de la fonction iPod de cet appareil à partirde votre iPodVous pouvez écouter l ’ audio des applications de votre iPod depuis les haut-parleurs de votre véhiculelorsque CTRL APP est sélectionné. Cette fonction n ’ est pas compatible avec les modèles d ’ iPod suivants. ! iPod nano 1ère gén...
Page 20 - ce que l; un éclairage multico-; éclairage
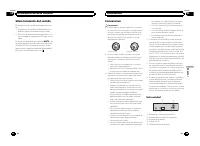
Cet appareil est équipé d ’ une sortie haut-parleur d ’ ex- trêmes graves qui peut être mise en service ou horsservice. 1 Appuyez sur M.C. pour afficher le mode de para- métrage. 2 Tournez M.C. pour choisir le réglage désiré. NORMAL (phase normale) — REVERSE (phase in- versée) — OFF (haut-parleur d ...
Page 21 - Le son est coupé automatiquement quand :; Cet appareil
2 Tournez M.C. pour changer l ’ option de menu et appuyez pour sélectionnerILLUMI. 3 Tournez M.C. pour choisir la couleur d ’ éclairage. Vous pouvez sélectionner une option dans laliste suivante. ! 30 couleurs présélectionnées ( WHITE à ROSE ) ! SCAN (parcourir les différentes couleurs) ! CUSTOM (co...
Page 22 - Réalisez ces connexions lors de l; Montage avant/arrière DIN; Montage frontal DIN; Insérez le manchon de montage dans le
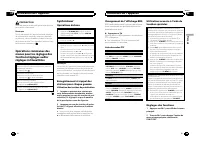
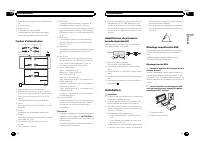
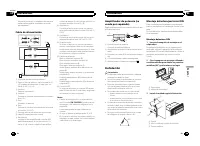
2 Sortie arrière ou haut-parleur d ’ extrêmes gra- ves 3 Entrée antenne 4 Fusible (10 A) 5 Entrée télécommande câbléeUn adaptateur de télécommande câblée(vendu séparément) peut être connecté. Cordon d ’ alimentation 1 3 3 2 4 4 5 5 6 6 b 8 9 7 a e d c 1 Vers l ’ entrée cordon d ’ alimentation 2 Selo...
Page 23 - appareil contre le vol.; Messages d; entretien agréé par Pioneer le plus; Lecteur de CD intégré; Informations complémentaires
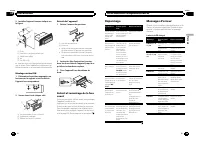
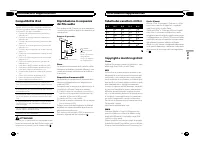
3 Installez l ’ appareil comme indiqué sur la figure. 1 2 3 4 5 1 Écrou 2 Pare-feu ou support métallique 3 Attache en métal 4 Vis 5 Vis (M4 × 8) # Assurez-vous que l ’ appareil est correctement mis en place. Toute installation instable peut en-traîner des sauts ou autres dysfonctionnements. Montage ...
Page 24 - Périphérique de stockage USB/iPod; Disques et lecteur
Périphérique de stockage USB/iPod Message Causes possi-bles Action corrective NO DEVICE Quand la fonc-tion Plug-and-Play est hors ser-vice, aucun péri-phérique destockage USB etaucun iPod n ’ est connecté. ! Mettez la fonc- tion Plug-and-Playen service. ! Connectez un pé- riphérique de stoc-kage USB...
Page 26 - Exemple de hiérarchie; Disque
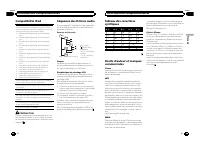
Compatibilité iPod Cet appareil prend en charge uniquement les modè-les d ’ iPod suivants. Les versions du logiciel iPod pri- ses en charge sont indiquées ci-dessous. Les versionsantérieures ne sont pas prises en charge. ! iPod nano 5ème génération (version logicielle1.0.1) ! iPod nano 4ème générati...
Page 27 - Caractéristiques techniques; Généralités
Caractéristiques techniques Généralités Tension d ’ alimentation ......... 14,4 V CC (10,8 V à 15,1 Vacceptable) Mise à la masse ....................... Pôle négatif Consommation maximale ... 10,0 A Dimensions (L × H × P) : DIN Châssis ..................... 178 mm × 50 mm × 165mm Panneau avant ........
Page 28 - PRODOTTO LASER DI CLASSE 1; ATTENZIONE; Italiano
Grazie per aver acquistato questo prodotto PIONEER. Leggere attentamente questo manuale primadi utilizzare il prodotto, per assicurarne il cor-retto utilizzo. È particolarmente importanteleggere e osservare le precauzioni contrasse-gnate da AVVERTENZA e ATTENZIONE contenute in questo manuale. Conser...
Page 29 - Non utilizzare prodotti non approvati.; Importante
Unità principale 1 2 4 5 6 3 7 8 a b c d 9 Componente Componente 1 S (SRC / OFF) 8 (Tasto indietro/ visualizzazione/scorrimento) 2 h (espulsione) 9 a / b / c / d 3 (lista) a TA / NEWS 4 MULTI-CONTROL ( M.C. ) b 1 - 6 5 Vano d ’ inserimento dei dischi c Connettore di in-gresso ausiliario(AUX) (connet...
Page 30 - Sintonizzatore; Funzionamento di base; Nota; Uso dei tasti di preselezione sintonia; Quando viene individuata una stazione; Scorrimento del display RDS; Funzionamento dell; Elenco PTY; Impostazioni delle funzioni; opzione; Funzionamento dell
ATTENZIONE Per motivi di sicurezza, parcheggiare il veicoloquando si rimuove il frontalino. Nota Quando il conduttore isolato blu/bianco di questaunità viene collegato al terminale di controllo delrelè dell ’ antenna automatica, l ’ antenna dell ’ auto- mobile si estende quando si accende l ’ unità....
Page 31 - elenco dei nomi
BSM (memorizzazione delle stazioni migliori) La funzione BSM (memorizzazione delle stazioni mi-gliori) memorizza automaticamente le sei stazioni piùforti in ordine di forza del segnale. 1 Premere M.C. per attivare la funzione BSM. Per annullare l ’ operazione, premere di nuovo M. C. REGION (regional...
Page 32 - Scorrimento dei brani; Per passare al menu superiore della ri-
Messa in pausa della riproduzione 1 Premere 2 / PAUSE per attivare o disattivare la pausa. Miglioramento dell ’ audio compresso e ripristino del suono completo (funzione Sound Retriever) 1 Premere 1 / S.Rtrv per passare in rassegna: OFF (disattivata) — 1 — 2 1 è efficace per le velocità di compressi...
Page 34 - fino a quando l; Selezione diretta dall
L ’ unità è dotata di un ’ uscita subwoofer che può esse- re attivata o disattivata. 1 Premere M.C. per visualizzare la modalità di im- postazione. 2 Ruotare M.C. per selezionare l ’ impostazione desi- derata. NORMAL (fase normale) — REVERSE (fase inver- sa) — OFF (subwoofer non attivo) 3 Premere M....
Page 35 - illuminazione; Questa unità
2 Ruotare M.C. per modificare l ’ opzione di menu; premere per selezionare ILLUMI. 3 Ruotare M.C. per selezionare il colore dell ’ illuminazione. È possibile selezionare un ’ opzione dal seguen- te elenco. ! 30 colori preselezionati (da WHITE a ROSE ) ! SCAN (passa in rassegna tutti i colori) ! CUST...
Page 36 - Cavo di alimentazione; Montaggio DIN anteriore; Inserire la fascetta di montaggio nel; Installazione
5 Ingresso remoto cablatoÈ possibile collegare un adattatore per teleco-mando cablato (venduto a parte). Cavo di alimentazione 1 3 3 2 4 4 5 5 6 6 b 8 9 7 a e d c 1 All ’ ingresso del cavo di alimentazione 2 A seconda del tipo di veicolo, la funzione di 3 e 5 potrebbe essere diversa. In questo caso,...
Page 37 - alto tirandolo verso l; Lettore CD incorporato; Informazioni supplementari
2 Paratia antifuoco o supporto in metallo 3 Staffa metallica 4 Vite 5 Vite (M4 × 8) # Accertarsi che l ’ unità sia installata saldamen- te in posizione. Un ’ installazione instabile potreb- be causare salti audio o altri malfunzionamenti. Montaggio DIN posteriore 1 Determinare la posizione appropria...
Page 38 - Dischi e lettori
Messaggio Causa Azione FRMT READ A volte si verificaritardo tra quan-do la riproduzio-ne viene avviata equando si iniziaa percepire ilsuono. Attendere che ilmessaggio scom-paia. NO AUDIO Assenza di brani. Trasferire i file audio nel dispositi-vo di memoriaUSB e stabilire ilcollegamento. Il dispositi...
Page 40 - Compatibilità iPod; eventuale perdita di dati dall; utente non può assegnare; Esempio di gerarchia; Disco; Inserire tali file in una cartella.; Tuttavia, a seconda dell
Compatibilità iPod L ’ unità è compatibile esclusivamente con i seguenti modelli di iPod. Le versioni compatibili del softwareiPod sono riportate di seguito. È possibile che le ver-sioni anteriori non siano compatibili. ! iPod nano di quinta generazione (versione delsoftware 1.0.1) ! iPod nano di qu...
Page 41 - Dati tecnici
Dati tecnici Generali Alimentazione ........................... 14,4 V di c.c. (variazioni con-sentite da 10,8 V a 15,1 V) Messa a terra ............................. Negativa Consumo massimo ................ 10,0 A Dimensioni (L × A × P): DIN Telaio ......................... 178 mm × 50 mm × 165mm ...
Page 42 - En caso de problemas; PRODUCTO LASER CLASE 1; PRECAUCIÓN; Evite la exposición a la humedad.; Español; Antes de comenzar
Gracias por haber adquirido este producto PIONEER. Lea con detenimiento este manual antes deutilizar el producto por primera vez para quepueda darle el mejor uso posible. Es muy im-portante que lea y observe la información queaparece bajo los mensajes de ADVERTEN- CIA y PRECAUCIÓN en este manual. Un...
Page 43 - Unidad principal; No utilice productos no autorizados.; Indicaciones de pantalla; Utilización de esta unidad
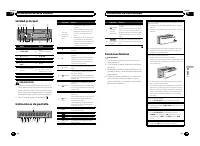
Unidad principal 1 2 4 5 6 3 7 8 a b c d 9 Parte Parte 1 S (SRC / OFF) 8 (Atrás/visualiza- ción/desplazamien-to) 2 h (expulsar) 9 a / b / c / d 3 (lista) a TA / NEWS 4 MULTI-CONTROL ( M.C. ) b 1 a 6 5 Ranura de carga dediscos c Conector de entra-da AUX (conectorestéreo de 3,5 mm) 6 Puerto USB d Botó...
Page 44 - Sintonizador; Funciones básicas; Cuando encuentre la emisora que; Cambio de la visualización RDS; Pulse; Lista PTY; Ajustes de funciones
PRECAUCIÓN Por motivos de seguridad, detenga su vehículoantes de extraer el panel delantero. Nota Si el cable azul/blanco de esta unidad está conec-tado al terminal de control del relé de la antenaautomática del vehículo, la antena se extiendecuando se enciende el equipo. Para retraer la an-tena, ap...
Page 46 - Notas; Para buscar una canción
REPEAT (repetición de reproducción) 1 Pulse M.C. para mostrar el modo de ajuste. 2 Haga girar M.C. para seleccionar una gama de re- petición de reproducción.Para obtener más información, consulte Selección de una gama de repetición de reproducción en la página anterior. 3 Pulse M.C. para confirmar l...
Page 47 - Ajustes de audio; de menú y pulse para seleccionar AUDIO.; Ajustes iniciales; que la unidad se apague.
REPEAT (repetición de reproducción) 1 Pulse M.C. para mostrar el modo de ajuste. 2 Haga girar M.C. para seleccionar una gama de re- petición de reproducción.Para obtener más información, consulte Selección de una gama de repetición de reproducción en la página anterior. 3 Pulse M.C. para confirmar l...
Page 48 - de menú y pulse para seleccionar ILLUMI.; Uso de una fuente AUX; Inserte el miniconector estéreo en el co-
2 Presione S (SRC/OFF) y mantenga pre- sionado hasta que el nombre de la funciónaparezca en el display. 3 Haga girar M.C. para seleccionar el ajus- te inicial. Una vez seleccionada, siga los siguientespasos para configurar el ajuste inicial: FM STEP (paso de sintonía de FM) Normalmente, el paso de s...
Page 49 - Silenciamiento del sonido; El sonido se desactiva, se visualiza; No acorte ningún cable.; Esta unidad; Entrada del cable de alimentación; Instalación
Silenciamiento del sonido El sonido se silencia automáticamente cuan-do: ! Se realiza o se recibe una llamada con unteléfono móvil conectado a esta unidad. ! Funciona el sistema de orientación por vozde la unidad de navegación Pioneer conec-tada. El sonido se desactiva, se visualiza MUTE y no se pue...
Page 50 - Cable de alimentación; Montaje delantero/posterior DIN; Montaje delantero DIN; Inserte el manguito de montaje en el
Es posible conectar un adaptador de mando adistancia físicamente conectado (se vendepor separado). Cable de alimentación 1 3 3 2 4 4 5 5 6 6 b 8 9 7 a e d c 1 A la toma del cable de alimentación 2 Según el tipo de vehículo, las funciones de 3 y 5 pueden ser diferentes. En este caso, co- necte 4 a 5 ...
Page 51 - Montaje trasero DIN; Determine la posición correcta, de; Retirada de la unidad; Retire el anillo de guarnición.; Mensajes de error; Reproductor de CD incorporado; Información adicional
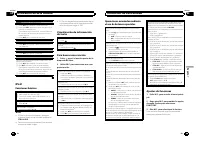
4 Tornillo 5 Tornillo (M4 × 8) # Asegúrese de que la unidad esté firmemente instalada en su lugar. Una instalación inestablepuede causar saltos en el audio o un mal funcio-namiento de la unidad. Montaje trasero DIN 1 Determine la posición correcta, de modo que los orificios del soporte y del la-tera...
Page 52 - Dispositivo de almacenamiento USB o iPod; Discos y reproductor
Dispositivo de almacenamiento USB o iPod Mensaje Causa Resolución NO DEVICE Si “ plug and play ” está desac- tivado, no hay co-nectado ningúndispositivo USBni ningún iPod. ! Active “ plug and play ” . ! Conecte un dis- positivo de almace-namiento USB oun iPod compati-ble. FRMT READ A veces se pro-du...
Page 53 - Compatibilidad con iPod
Dispositivo de almacenamiento USB No se admiten las conexiones a través de un concen-trador USB. No conecte ningún otro objeto que no sea un disposi-tivo de almacenamiento USB. Cuando conduzca, fije el dispositivo de almacena-miento USB firmemente. No deje caer el dispositivode almacenamiento USB al...
Page 54 - Ejemplo de una jerarquía; Coloque esos archivos en una carpeta.; Tabla de caracteres rusos; WMA; Especificaciones; Generales
El cable de la interfaz CD-IU50 de Pioneer tambiénestá disponible. Para obtener información, consultecon su proveedor. Si desea más información sobre la compatibilidad dearchivos y formatos, consulte los manuales del iPod. Audiolibro, podcast: compatible PRECAUCIÓN Pioneer no asume ninguna responsab...
Page 56 - Im Störungsfall; Wichtig; Bevor Sie beginnen; LASER KLASSE 1; Hinweise; Deutsch; Bevor Sie beginnen
Vielen Dank , dass Sie sich für dieses PIONEER-Produkt entschieden haben. Bitte lesen Sie diese Anleitung vor der Verwen-dung dieses Produkts zur Gewährleistung sei-ner ordnungsgemäßen Verwendung durch.Lesen und befolgen Sie dabei insbesonderedie Hinweise WARNUNG und VORSICHT . Bewahren Sie die Anle...
Page 57 - Hauptgerät; Bedienung des Geräts
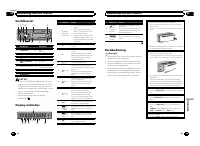
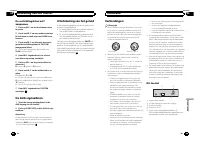
Hauptgerät 1 2 4 5 6 3 7 8 a b c d 9 Teil Teil 1 S (SRC / OFF) 8 (Zurück/Display/ Scrollen) 2 h (Auswurf) 9 a / b / c / d 3 (Liste) a TA / NEWS 4 MULTI-CONTROL ( M.C. ) b 1 bis 6 5 Disc-Ladeschacht c AUX-Eingang (3,5-mm-Stereoan-schluss) 6 USB-Anschluss d Taste zum Entrie-geln der Frontplatte 7 B (B...
Page 58 - Grundlegende Bedienvorgänge; Hinweis; Verwendung der Stationstasten; Zum Speichern eines abgestimmten; Umschalten der RDS-Anzeige; Informationen bereit, die die Suche nach be-; Funktionseinstellungen; Gehen Sie nach der Funktionswahl wie folgt
VORSICHT Parken Sie Ihr Fahrzeug aus Sicherheitsgründenzum Abnehmen der Frontplatte. Hinweis Wenn das blau/weiße Kabel dieses Geräts an dieSteuerklemme des Automatikantennenrelais desKraftfahrzeugs angeschlossen wird, wird die An-tenne ausgefahren, sobald das Gerät eingeschal-tet wird. Zum Einfahren...
Page 59 - Anzeigen von Textinformationen; Drücken Sie
BSM (Best-Sender-Memory) BSM (Best-Sender-Memory) speichert die sechsstärksten Sender automatisch in der Reihenfolgeihrer Signalstärke. 1 Drücken Sie M.C. , um BSM einzuschalten. Zum Abbrechen des Speichervorgangs drücken Sie M.C. erneut. REGION (Regional) Bei Verwendung des Alternativfrequenz-Suchl...
Page 61 - Nehmen Sie nach der Funktionswahl die fol-
REPEAT (Wiederholwiedergabe) 1 Drücken Sie M.C. , um den Einstellmodus aufzuru- fen. 2 Drehen Sie M.C. , um einen Wiederholbereich auszuwählen. Für detaillierte Informationen hierzu siehe Wählen eines Wiederholbereichs auf Seite 119. 3 Drücken Sie M.C. , um die Auswahl zu bestätigen. SHUFFLE (Zufäll...
Page 62 - Grundeinstellungen; 0 voreingestellte Farben (
SLA (Programmquellen-Pegeleinstellung) Mit der Option SLA (Programmquellen-Pegeleinstel- lung) kann der Lautstärkepegel jeder Programmquel-le eingestellt werden, um plötzlicheLautstärkeänderungen beim Umschalten von Pro-grammquellen zu vermeiden. ! Die Einstellungen basieren auf der UKW-Lautstär- ke...
Page 63 - CUSTOM angezeigt wird.; Abschalten des Tons; MUTE
4 Drücken Sie M.C., um die Auswahl zu bestätigen. Hinweise ! Bei der Auswahl von SCAN werden automa- tisch alle 30 voreingestellten Beleuchtungsfar-ben durchlaufen. ! Bei Auswahl von CUSTOM wird die gespei- cherte benutzerdefinierte Farbe verwendet. Individuelle Einstellung derBeleuchtungsfarbe 1 Dr...
Page 64 - Führen Sie den Montagerahmen in das
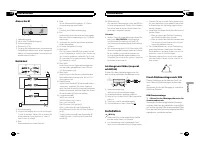
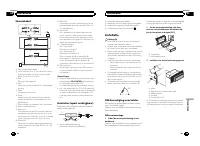
dieses Gerät 1 3 4 5 2 1 Netzkabelzugang 2 Heck- oder Subwooferausgang 3 Antenneneingang 4 Sicherung (10 A) 5 Eingang der festverdrahteten FernbedienungEs besteht die Möglichkeit, einen (separat er-hältlichen) festverdrahteten Fernbedienungs-adapter anzuschließen. Netzkabel 1 3 3 2 4 4 5 5 6 6 b 8 9...
Page 65 - Entfernen des Geräts; Entfernen der Frontplatte zum Schutz vor
2 Befestigen Sie den Montagerahmen mithilfe eines Schraubendrehers: Die Me-tallklammern sind in eine sichere Position(90°) zu biegen. 1 2 1 Armaturenbrett 2 Montagerahmen 3 Installieren Sie das Gerät wie in der Ab- bildung gezeigt. 1 2 3 4 5 1 Mutter 2 Brand- oder Metallstütze 3 Metallband 4 Schraub...
Page 66 - Eingebauter CD-Player; Zusätzliche Informationen; Zusätzliche Informationen
Fehlerbehebung Symptom Ursache Abhilfemaßnah-me Das Displayschaltet auto-matisch in dienormale Anzei-ge um. Sie haben keinenBedienvorganginnerhalb von 30Sekunden durch-geführt. Wiederholen Sieden Vorgang. Der Wiederhol-bereich ändertsich unerwar-tet. Ja nach Wieder-holbereich kannsich der ausge-wähl...
Page 67 - Handhabungsrichtlinien; Discs und Player
Meldung Ursache Abhilfemaßnah-me CHECK USB Der USB-An-schluss oder dasUSB-Kabelwurde kurzge-schlossen. Stellen Sie sicher,dass der USB-An-schluss oder dasUSB-Kabel nichteingeklemmt oderbeschädigt ist. Das angeschlos-sene USB-Spei-chermedium ver-braucht mehr als500 mA (maximalzulässiger Strom-verbrau...
Page 69 - Beispiel einer Disc-Struktur; Disc; Speichern Sie diese Dateien in einem Ordner.
iPod-Kompatibilität Dieses Gerät unterstützt nur die folgenden iPod-Mo-delle. Die unterstützten iPod-Softwareversionen sindunten stehend aufgelistet. Ältere Versionen werdenggf. nicht unterstützt. ! iPod nano der fünften Generation (Softwarever-sion 1.0.1) ! iPod nano der vierten Generation (Softwar...
Page 70 - Technische Daten; Allgemein
Technische Daten Allgemein Stromversorgung ..................... 14,4 V Gleichspannung (To-leranz 10,8 V bis 15,1 V) Erdungssystem ......................... Negativ Maximale Leistungsaufnahme ..................................................... 10,0 A Abmessungen (B × H × T): DIN Einbaugröße .........
Page 71 - Bij problemen; KLASSE 1 LASERPRODUCT; LET OP; Opmerkingen; Belangrijk; Nederlands; Vóór u begint
Hartelijk dank voor uw keuze voor dit Pioneer-product. Lees deze handleiding voordat u het productin gebruik neemt zodat u het goed leert gebrui-ken. Lees vooral de gedeelten die met WAAR- SCHUWING en LET OP gemarkeerd zijn aandachtig. Bewaar deze handleiding na het lezen op een veilige, bereikbare ...
Page 72 - Hoofdtoestel; Bediening van het toestel
Hoofdtoestel 1 2 4 5 6 3 7 8 a b c d 9 Onderdeel Onderdeel 1 S (SRC / OFF) 8 (Terug/display/ scrollen) 2 h (uitwerpen) 9 a / b / c / d 3 (lijst) a TA / NEWS 4 MULTI-CONTROL ( M.C. ) b 1 t/m 6 5 Laadsleuf voor disc c AUX-ingang(3,5mm-stereoplug) 6 USB-poort d Verwijderen 7 B (BAND / ESC) LET OP ! Ver...
Page 73 - Basisbediening; Opmerking; De voorkeuzetoetsen gebruiken; Stem af op de zender die u in het ge-; Druk op
LET OP Voor uw veiligheid en die van anderen moet u hetvoertuig eerst parkeren als u het voorpaneel wiltverwijderen. Opmerking Als de blauw-witte draad van dit toestel is aange-sloten op de bedieningsaansluiting van de auto-matische antenne van het voertuig, schuift deantenne uit wanneer er een sign...
Page 74 - Tekstinformatie weergeven
BSM (geheugen voor de sterkste zenders) Met de functie BSM (Best Stations Memory) kunt uautomatisch de zes sterkste zenders in het geheugenopslaan. Deze worden opgeslagen in volgorde vansignaalsterkte. 1 Druk op M.C. om de functie BSM in te schakelen. Druk nogmaals op M.C. om deze te annuleren. REGI...
Page 77 - Begininstellingen; functienaam op het display verschijnt.
SLA (bronniveauregeling) Met de functie SLA (bronniveauregeling) kunt u het volumeniveau van elke signaalbron afzonderlijk instel-len. Hierdoor kunt u plotselinge volumewisselingenvoorkomen wanneer naar een andere signaalbronwordt overgeschakeld. ! De instellingen zijn gebaseerd op het FM-volume-niv...
Page 78 - SCAN; voor kleuraanpassing verschijnt.; Uitschakeling van het geluid; Het geluid wordt uitgeschakeld en; Dit toestel; Installatie
De verlichtingskleur zelfaanpassen 1 Druk op M.C. om het hoofdmenu weer te geven. 2 Draai aan M.C. om een andere menuop- tie te kiezen en druk erop om ILLUMI te se-lecteren. 3 Draai aan M.C. en selecteer de voorin- gestelde verlichtingskleur of CUSTOM(aangepaste) kleur. # U kunt geen aangepaste kleu...
Page 79 - Stroomkabel; Schuif de montagebehuizing in het
Stroomkabel 1 3 3 2 4 4 5 5 6 6 b 8 9 7 a e d c 1 Naar ingang stroomkabel 2 De functie van 3 en 5 kan verschillen afhan- kelijk van het type voertuig. Verbind in datgeval 4 met 5 en 6 met 3 . 3 GeelBack-up (of accessoire) 4 GeelAansluiten op de constante 12 V-voedingsaan-sluiting. 5 RoodAccessoire (...
Page 80 - Bevestigingsklem; Het toestel verwijderen; Verwijder de sierlijst.; Sierlijst; Steek de meegeleverde uittreksleutels; Foutmeldingen; Aanvullende informatie
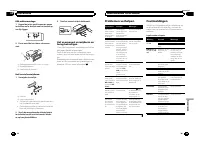
DIN-achtermontage 1 Bepaal de juiste positie waar de gaten in de klem en in de zijde van het toestel opeen lijn liggen. 2 Draai aan elke kant twee schroeven vast. 1 2 3 1 Zelftappende schroef (5 mm × 8 mm) 2 Bevestigingsklem 3 Dashboard of console Het toestel verwijderen 1 Verwijder de sierlijst. 1 ...
Page 81 - USB-opslagapparaat en iPod; Discs en de player
USB-opslagapparaat en iPod Melding Oorzaak Maatregel NO DEVICE Als Plug en Playis uitgeschakeld,kan er geenUSB-opslagappa-raat of iPod wor-den aangesloten. ! Zet Plug en Play aan. ! Sluit een compa- tibel USB-opslag-apparaat ofcompatibele iPodaan. FRMT READ Na het begin vanhet afspelenduurt het soms...
Page 82 - Compatibiliteit met iPod
Sommige discs kunnen niet worden afgespeeld af-hankelijk van het type disc, de indeling ervan, de toe-passing waarmee deze is opgenomen, de omgevingwaarin deze wordt afgespeeld, de manier waaropdeze wordt bewaard, enzovoort. Schokken tijdens het rijden van het voertuig kunnende disc laten overslaan....
Page 83 - Voorbeeld van een boomstructuur; Plaats de bestanden in een map.
Ook kan gebruik gemaakt worden van een PioneerCD-IU50 interfacekabel. Neem voor meer informatiecontact op met uw leverancier. Raadpleeg de handleiding van de iPod voor meer in-formatie over ondersteunde bestandsindelingen. Audioboek, podcast: Compatibel LET OP Pioneer is niet verantwoordelijk voor v...
Page 84 - USB
WMA-decoderingsformaat ..................................................... Versie 7, 7.1, 8, 9, 10, 11, 12(2 kan. audio)(Windows Media Player) MP3-decoderingsformaat ... MPEG-1 & 2 Audio Layer 3 WAV-signaalformaat .............. Lineaire PCM & MS ADPCM(niet gecomprimeerd) USB Specificatie ...
Page 85 - RDS; ЛАЗЕРНЫЙ ПРОДУКТ КЛАСС 1; Pioneer CarStereo-Pass; ACC
лагодарим Вас за покупку этого изде - лия компании PIONEER. Для обеспечения правильности эксплуата - ции внимательно прочитайте данное руко - водство перед началом использованияизделия . Особенно важно , чтобы Вы про - чли и соблюдали инструкции , помеченные в данном руководстве заголовками ПРЕ - УП...
Page 86 - Основное устройство; Индикация на дисплее; Основные операции; Важно; Управление данным устройством
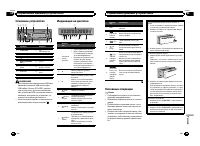
Основное устройство 1 2 4 5 6 3 7 8 a b c d 9 Элемент Элемент 1 S (SRC / OFF) 8 ( назад / пока - зать / прокрутка ) 2 h ( извлечение ) 9 a / b / c / d 3 ( список ) a TA / NEWS 4 MULTI-CONTROL ( M.C. ) b 1 до 6 5 Щель для загрузкидиска c Вход AUX ( стерео - разъем 3,5 мм ) 6 USB порт d Кнопка снятия ...
Page 87 - Примечание; PTY; писок; FUNCTION
Выбор источника сигнала 1 Нажимайте кнопку S (SRC / OFF) для выбора из следующих функций : TUNER ( тюнер ) — CD ( встроенный проигрыва - тель компакт - дисков ) — USB (USB)/ iPod (iPod) — AUX ( вспомогательное устройство (AUX)) Регулировка громкости 1 Поворачивайте M.C. , чтобы отрегулировать громко...
Page 88 - запоминаю щие устройства; ыбор и воспроизведение
# В диапазонах MW/LW можно выбрать толь - ко BSM или LOCAL . BSM ( запоминание лучших станций ) Функция BSM ( запоминание лучших станций ) по - зволяет автоматически сохранять в памяти ус - тройства шесть станций с самым мощнымсигналом в порядке мощности сигнала . 1 Нажмите M.C. , чтобы включить фун...
Page 89 - Н астройка ф ункций; Примечания; Поиск композиции
Приостановка воспроизведения 1 Нажмите кнопку 2 / PAUSE , чтобы включить паузу или возобновить воспроизведение . Улучшение качества звука сжатых аудиофайлови восстановление полноты звучания ( технология преобразования звука ) 1 Нажимайте кнопку 1 / S.Rtrv для выбора из сле - дующих функций : OFF ( в...
Page 90 - AUDIO
Управление функциями iPod с устройства iPod Можно вывести звук из приложений iPod на гром - коговорители автомобиля , если выбран режим CTRL APP . та функция несовместима со следующими мо - делями iPod. ! iPod nano первого поколения ! iPod пятого поколения Режим APP несовместим со следующими моде - ...
Page 91 - Н а альные настройки; Затем выполните следующие действия
! Отрегулированные настройки кривой эквалай - зера сохраняются в CUSTOM . 1 Для отображения установочного меню нажми - те M.C. 2 Нажмите M.C. для выбора BASS ( нижние зву - ковые частоты )/ MID ( средние звуковые часто - ты )/ TREBLE ( высокие звуковые частоты ). 3 Поворачивайте M.C. , чтобы отрегул...
Page 92 - ыбор цвета подсветки; Н астройка цвета подсветки; Приг луш ение звука
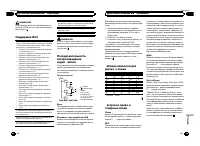
Данное устройство может отображать текстовуюинформацию сжатого аудиофайла , даже если она записана на русском или одном из западноевро - пейских языков . ! При несовместимости настроек встроенного ивыбранного языка возможны искажения привыводе текстовых сообщений . ! Некоторые символы могут отобража...
Page 93 - оединения; Данное устройство; ISO; Установка
оединения Важно ! При установке данного устройства в авто - мобиле , в котором отсутствует положение ключа зажигания СС , красный кабель должен быть подключен к клемме , которая определяет рабочее положение ключа за - жигания ; в противном случае может возни - кнуть утечка тока аккумуляторной батаре...
Page 94 - Усилитель мощности; Переднее; Переднее крепление стандарта
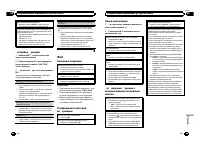
d Выводы громкоговорителейБелый : Передний левый + Белый / черный : Передний левый * Серый : Передний правый + Серый / черный : Передний правый * Зеленый : Задний левый + или сабвуфер + Зеленый / черный : Задний левый * или сабвуфер * Фиолетовый : Задний правый + или сабву - фер + Фиолетовый / черны...
Page 95 - нятие и установка передней; Снятие передней панели в; Встроенный проигрыватель компакт; Дополнительная инф ормация
3 Вытяните устройство из приборной панели автомобиля . нятие и установка передней панели В целях защиты от кражи переднюю па - нель можно снять . Нажмите на кнопку снятия панели и потя - ните панель вверх и на себя . Чтобы получить дополнительную инфор - мацию , см . Снятие передней панели в целях з...
Page 96 - Запоминающее устройство; Диски и проиг рыватель
Запоминающее устройство USB/iPod Сообщение Причина ействие NO DEVICE Если функция plug and play выключена , ус - тройство USB или iPod не рас - познается . ! Включите функ - цию plug and play. ! Подключите совместимое за - поминающее ус - тройство USB/ iPod. FRMT READ Иногда происхо - дит задержкаме...
Page 97 - компакт; WAV
Для очистки компакт - диска протрите диск мягкой тканью от центра к краю . Конденсация может временно ухудшить работупроигрывателя . Оставьте его для адаптации к более высокой температуре примерно на час . Также протрите влажные диски мягкой тканью . Воспроизведение дисков может быть невозможноиз - ...
Page 98 - Поддержка; Pioneer; Диск
ВНИМАНИЕ Не оставляйте диски или запоминающее ус - тройство USB в местах с высокой температу - рой воздуха . Поддержка iPod Данное устройство поддерживает только перечи - сленные ниже модели iPod. Совместимые версии ПО для iPod также указаны ниже . Более старые версии могут не поддерживаться . ! iPo...
Page 99 - Т ех ни еские х арактеристики
Т ех ни еские х арактеристики О бщие Источник питания ................. 14,4 В постоянного тока ( допустимый диапазон от 10,8 В до 15,1 В ) Система заземления .......... Заземление отрицатель - ного полюса Максимальный потребляемый ток ..................................................... 10,0 Разме...
Page 100 - PIONEER CORPORATION; Корпорация Пайонир; Япония; Импортер ООО “ПИОНЕР РУС”
PIONEER CORPORATION 1-1, Shin-ogura, Saiwai-ku, Kawasaki-shi,Kanagawa 212-0031, JAPAN Корпорация Пайонир 1-1, Син-Огура, Сайвай-ку, г. Кавасаки,префектура Канагава,212-0031, Япония Импортер ООО “ПИОНЕР РУС” 125040, Россия, г. Москва, ул. Правды, д.26 Тел.: +7(495) 956-89-01 PIONEER ELECTRONICS (USA)...