Philips TAM6805/10 - User Manual
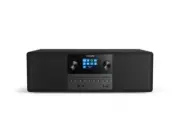
This user manual covers the Philips Micro Music System 6000 Series (model TAM6805), detailing its core functionalities like playing audio from CDs, USB drives, Bluetooth devices, internet radio, podcasts, DAB+ stations, and FM broadcasts. The guide emphasizes setup procedures–such as configuring Wi-Fi, setting time/date, and navigating menus–alongside safety warnings about electrical hazards, battery handling, and proper ventilation. It also includes troubleshooting for common issues like connectivity failures or reception problems while ensuring users follow warranty precautions.


Table of Contents:
- Page 1 – Product Identification and Support Information
- Page 2 – User Manual Table of Contents
- Page 3 – Safety Instructions and Warnings
- Page 4 – Legal and Environmental Information
- Page 5 – Product Features and Contents
- Page 6 – Main Unit Controls and Ports
- Page 7 – Remote Control Functions
- Page 8 – Initial Setup Procedures
- Page 9 – Wireless Radio Setup
- Page 10 – Wi-Fi Connection and Source Selection
- Page 11 – Internet Radio Listening Features
- Page 12 – Preset Station Management
- Page 13 – Streaming Services Integration
- Page 14 – DAB+ Radio Tuning and Storage
- Page 15 – DAB+ Menu Navigation
- Page 16 – DAB+ Configuration Settings
- Page 17 – FM Radio Tuning and Presets
- Page 18 – RDS Information Display
- Page 19 – System Settings Configuration
- Page 20 – Software and System Management
- Page 21 – Main Menu and Alarm Setup
- Page 22 – Sleep Timer Functionality
- Page 23 – External Device Connectivity
- Page 24 – Technical Specifications
- Page 25 – Troubleshooting Guidance
- Page 26 – Copyright and Trademark Notice
User manual
Micro Music System
6000
Series
TAM6805
"Loading the manual" means you need to wait until the file loads and becomes available for online reading. Some manuals are very large, and the time they take to appear depends on your internet speed.
Was this manual helpful?
About this manual
- Brand
- Philips
- Model
- TAM6805/10
- Document type
- User Manual
- Language(s)
- English
- Pages
- 26
- File size
- 3.3 MB
- Format
Other Manuals for Philips TAM6805/10
Summary
Identification details, model reference, support resources, and registration information.
Outline of the user manual sections including setup, listening options, system settings, and troubleshooting.
Precautions regarding operation, handling, environmental exposure, battery management, and electrical hazards.
Ask a question
Related manuals
Popular Philips Other


More Philips Other models
 Philips TAM3205/37 User Manual
 Philips TAM3205M2/12 User Manual
 Philips TAM3505/12 User Manual
 Philips TAM3505M2/12 User Manual
 Philips TAM4205/12 User Manual
 Philips TAM4505/12 User Manual
 Philips TAM8905/10 User Manual
 Philips TAP3705/05 Quick Guide
 Philips TAPB400/10 User Manual
 Philips TAPB405/10 User Manual
 Philips TAPB603/10 User Manual
 Philips TAPH802BK/00 User Manual