Page 6 - Important; Only connect the appliance to an earthed wall socket.; E N G L I S H
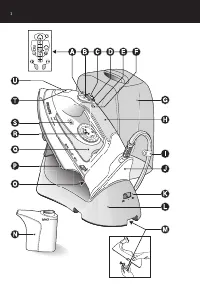
General description (fig. 1) A Turbo steam button 0 (HI575 only) B Spray button T C Shot-of-steam button 9 D Steam control0 = no steam1 = minimum steam6 = maximum steam E Auto shut-off light (HI575 only) F Temperature light G Carr y case (HI575/571 only) H Soft-touch handgrip (HI575 only) I Cord cli...
Page 7 - Before first use; Remove any sticker or protective foil from the soleplate and
◗ Do not allow the cord to come into contact with the soleplatewhen it is hot. ◗ When you have finished ironing, when you clean the appliance,when you fill or empty the water tank and also when you leavethe iron even for a short while: set the steam control to positionO, put the iron on its heel and...
Page 8 - Preparing for use; Fastening the stand clamp; The rubber feet on the bottom prevent the stand from slipping.; Filling the water tank; Do not fill the water tank beyond the MAX indication.
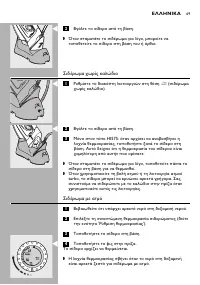
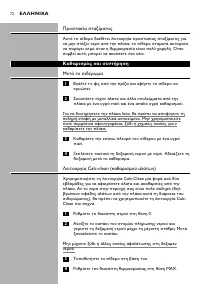
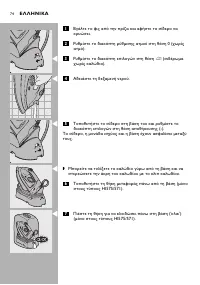
Preparing for use Fastening the stand clamp C 1 Fold out the clamp on the bottom of the stand and fix the stand clamp to the ironing board or to another stable surface,such as a tabletop. The rubber feet on the bottom prevent the stand from slipping. ◗ You can also place the stand on the ironing boa...
Page 9 - Setting the temperature; Put the iron on the iron stand.; Tips
Setting the temperature C 1 Put the iron on the iron stand. C 2 Set the required ironing temperature by turning the temperature dial to the appropriate position (see section 'Tips'for extra information). Check the laundr y care label for the required ironing temperature: C 3 Put the mains plug in an...
Page 10 - Using the appliance; Corded ironing; Cordless ironing; Set the mode switch to position
40% cotton, it should be ironed at the temperature indicated forpolyester ( 2 ) and without steam. - If you do not know what kind or kinds of fabric an ar ticle is made of, determine the right ironing temperature by ironing a par t that willnot be visible when you wear or use the ar ticle. - Silk, w...
Page 11 - Steam ironing; The iron star ts heating up.; Ironing without steam
C 2 Take the iron from the stand. 3 HI575 only: put the iron back on the stand when the temperature light starts blinking. This indicates that the ironhas cooled down below the set temperature. ◗ When you stop ironing for a while, always put the iron on thestand to allow it to heat up again. ◗ When ...
Page 12 - Features; Spray function; Make sure that there is enough water in the water tank.; Shot of steam; A powerful shot of steam helps remove stubborn creases.; Vertical shot of steam; The turbo-steam function helps remove difficult creases.
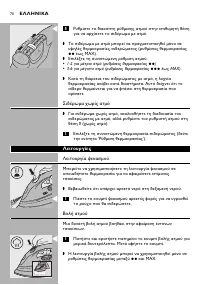
Features Spray function You can use the spray function to remove stubborn creases at anytemperature. ◗ Make sure that there is enough water in the water tank. C 1 Press the spray button several times to moisten the article to be ironed. Shot of steam A powerful shot of steam helps remove stubborn cr...
Page 13 - Drip stop; Cleaning and maintenance; After ironing; Remove the mains plug from the wall socket and let the iron
Electronic safety shut-off function (HI575 only) The electronic safety shut-off function automatically switches the ironoff if it has not been moved for a while. C ◗ To indicate that the heating element has been switched off, theauto-off light will start blinking and you will hear an audible signal....
Page 14 - Do not pour vinegar or other descaling agents into the water tank.; After the Calc-Clean process
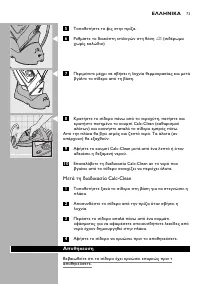
1 Set the steam control to position 0. 2 Open the cap of the filling opening and fill the water tank up to the maximum level. Then close the cap again. Do not pour vinegar or other descaling agents into the water tank. 3 Put the iron on its stand. 4 Set the temperature dial to MAX. 5 Put the mains p...
Page 15 - Storage
Storage Make sure the iron has cooled down sufficiently before you put it away. 1 Remove the mains plug from the wall socket and let the iron cool down. 2 Set the steam control to position 0 (no steam). C 3 Set the mode switch to position ∫ (cordless). C 4 Empty the water tank. C 5 Put the iron on t...
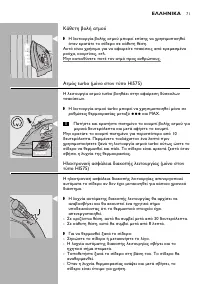
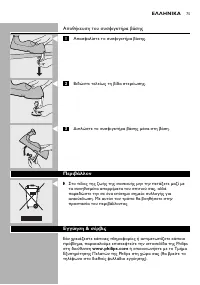
Page 16 - Storing the stand clamp; Unlock the stand clamp.; Environment; or contact the Philips Customer Care
Storing the stand clamp C 1 Unlock the stand clamp. C 2 Screw in the fixing screw completely. C 3 Fold the stand clamp into the stand. Environment C ◗ Do not throw the appliance away with the normal householdwaste at the end of its life, but hand it in at an official collectionpoint for recycling. B...
Page 17 - D E U T S C H; Wichtig; Schließen Sie das Gerät nur an eine geerdete Steckdose an.
D E U T S C H 1 7 Übersicht (Abb.1) A Turbodampf-Taste 0 (nur HI575) B Sprühtaste T C Dampfstoßtaste 9 D Dampfregler0 = kein Dampf1 = wenig Dampf6 = maximaler Dampf E Kontrollanzeige für Abschaltautomatik (nur HI575) F Temperaturkontrollanzeige G Aufbewahrungskoffer (nur HI575/571) H Soft-Touch-Hand...
Page 18 - Halten Sie das Gerät außerhalb der Reichweite von Kindern.; Vor dem ersten Gebrauch; Entfernen Sie Schutzfolie bzw. Aufkleber von der Bügelsohle,
D E U T S C H 1 8 ◗ Halten Sie das Gerät außerhalb der Reichweite von Kindern. ◗ Achten Sie beim Bügeln darauf, dass Sie die heiße Bügelsohle nichtberühren. ◗ Achten Sie darauf, dass das Netzkabel nicht mit der heißenBügelsohle in Kontakt kommt. ◗ Wenn Sie das Bügeln beenden, das Gerät reinigen, den...
Page 19 - Für den Gebrauch vorbereiten; Die Klemme der Ladestation befestigen; Die Gummifüße verhindern das Abrutschen der Ladestation.; Den Wasserbehälter füllen
D E U T S C H 1 9 Für den Gebrauch vorbereiten Die Klemme der Ladestation befestigen C 1 Klappen Sie die Klemme unten an der Ladestation aus und befestigen Sie sie am Bügelbrett oder einer anderen stabilenArbeitsfläche. Die Gummifüße verhindern das Abrutschen der Ladestation. ◗ Sie können die Ladest...
Page 20 - Stellen Sie das Bügeleisen auf die Ladestation.
D E U T S C H 2 0 Die Temperatur einstellen C 1 Stellen Sie das Bügeleisen auf die Ladestation. C 2 Stellen Sie den Temperaturregler auf die gewünschte Temperatur (siehe "Tipps" für zusätzliche Hinweise). Prüfen Sie das Etikett im Wäsche-/Kleidungsstück auf die erforderlicheBügeltemperatur :...
Page 21 - - Wenn sich das Gewebe aus verschiedenen Fasern zusammensetzt,; Das Gerät verwenden; Mit Netzkabel bügeln; Schnurlos bügeln; Stellen Sie den Wahlschalter auf Position
D E U T S C H 2 1 Tipps - Wenn sich das Gewebe aus verschiedenen Fasern zusammensetzt, sollten Sie stets die Temperatureinstellung für das empfindlichsteGewebe wählen, also die niedrigste Temperatur. Besteht das Gewebez. B. aus 60 % Polyester und 40 % Baumwolle, sollten Sie es bei derTemperatur für ...
Page 22 - Das Bügeleisen heizt sich auf.; Trockenbügeln
D E U T S C H 2 2 C 2 Nehmen Sie das Bügeleisen von der Ladestation. 3 Nur HI575: Stellen Sie das Bügeleisen auf die Ladestation zurück, sobald die Kontrollanzeige blinkt. Die Anzeige zeigt an,dass das Bügeleisen unter die eingestellte Temperatur abgekühltist. ◗ Wenn Sie das Bügeln für eine Weile un...
Page 23 - Produktmerkmale; Die Sprühfunktion; Ein kräftiger Dampfstoß hilft, har tnäckige Falten zu beseitigen.; Vertikaler Dampfstoß
D E U T S C H 2 3 Produktmerkmale Die Sprühfunktion Die Sprühfunktion steht bei jeder Temperatur zur Verfügung und eignetsich zur Beseitigung har tnäckiger Falten. ◗ Überprüfen Sie, ob sich genügend Wasser im Wasserbehälterbefindet. C 1 Betätigen Sie die Sprühtaste mehrmals, um das Wäsche- /Kleidung...
Page 24 - erlischt, ist das Bügeleisen betriebsbereit.; Reinigung und Wartung; Nach dem Bügeln
D E U T S C H 2 4 Sichere Abschaltautomatik (nur HI575) Diese Funktion schaltet das Bügeleisen automatisch aus, wenn es füreine Weile nicht bewegt wurde. C ◗ Als Hinweis, dass sich das Heizelement ausgeschaltet hat, blinktdie Abschaltanzeige und ein Signalton wird ausgegeben. - In waagerechter Posit...
Page 26 - Nach dem Entkalken
D E U T S C H 2 6 Nach dem Entkalken 1 Stellen Sie das Bügeleisen wieder auf die Ladestation, damit die Bügelsohle trocknen kann. 2 Ziehen Sie den Netzstecker, wenn die Kontrollanzeige erlischt. 3 Führen Sie die Bügelsohle einige Male leicht über ein altes Tuch, um Wasserflecken von der Bügelsohle z...
Page 27 - Klicken auf der Ladestation einrastet.; Aufbewahrung der Klemme; Entriegeln Sie die Klemme der Ladestation.; Umweltschutz
D E U T S C H 2 7 C 7 Nur HI575/571: Drücken Sie auf den Koffer, bis er mit einem Klicken auf der Ladestation einrastet. Aufbewahrung der Klemme C 1 Entriegeln Sie die Klemme der Ladestation. C 2 Drehen Sie die Befestigungsschrauben ganz hinein. C 3 Klappen Sie die Klemme in die Ladestation. Umwelts...
Page 28 - Garantie und Kundendienst
D E U T S C H 2 8 Garantie und Kundendienst Benötigen Sie weitere Informationen oder treten Probleme auf,wenden Sie sich bitte an Ihren Philips-Händler oder setzen Sie sich miteinem Philips Ser vice-Center in Ihrem Land in Verbindung (Tel. Nr.0180/5356767). Besuchen Sie auch die Philips Website( www...
Page 29 - F R A N Ç A I S
2 9 Description générale (fig. 1) A Bouton vapeur turbo 0 (HI575 uniquement) B Bouton spray T C Bouton jet de vapeur 9 D Commande de vapeur0 = pas de vapeur1 = vapeur minimale6 = vapeur maximale E Voyant d'arrêt automatique (HI575 uniquement) F Voyant de température G Mallette de transpor t (HI575/5...
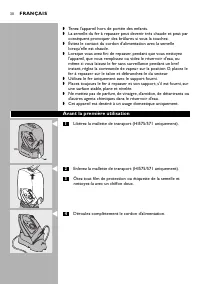
Page 30 - Avant la première utilisation; Ôtez tout film de protection ou étiquette de la semelle et
3 0 ◗ Tenez l'appareil hors de portée des enfants. ◗ La semelle du fer à repasser peut devenir très chaude et peut parconséquent provoquer des brûlures si vous la touchez. ◗ Évitez le contact du cordon d'alimentation avec la semellelorsqu'elle est chaude. ◗ Lorsque vous avez fini de repasser, pendan...
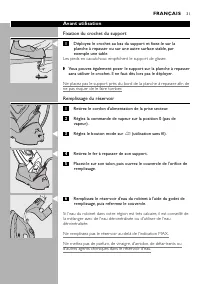
Page 31 - Avant utilisation; Fixation du crochet du support; Les pieds en caoutchouc empêchent le suppor t de glisser.; Remplissage du réservoir
3 1 Avant utilisation Fixation du crochet du support C 1 Déployez le crochet au bas du support et fixez-le sur la planche à repasser ou sur une autre surface stable, parexemple une table. Les pieds en caoutchouc empêchent le suppor t de glisser. ◗ Vous pouvez également poser le support sur la planch...
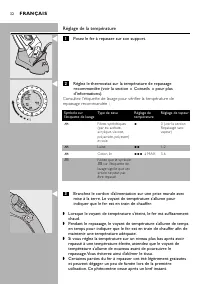
Page 32 - Réglage de la température; Posez le fer à repasser sur son support.
3 2 Réglage de la température C 1 Posez le fer à repasser sur son support. C 2 Réglez le thermostat sur la température de repassage recommandée (voir la section « Conseils » pour plusd'informations). Consultez l'étiquette de lavage pour vérifier la température derepassage recommandée : C 3 Branchez ...
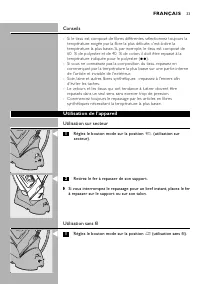
Page 33 - Conseils; - Si vous ne connaissez pas la composition du tissu, repassez en; Utilisation de l'appareil; Utilisation sur secteur; Utilisation sans fil; Réglez le bouton mode sur la position
3 3 Conseils - Si le tissu est composé de fibres différentes, sélectionnez toujours la température exigée par la fibre la plus délicate, c'est-à-dire latempérature la plus basse. Si, par exemple, le tissu est composé de60 % de polyester et de 40 % de coton, il doit être repassé à latempérature indiq...
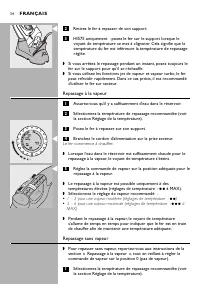
Page 34 - Repassage à la vapeur; Le fer commence à chauffer.; Repassage sans vapeur
3 4 C 2 Retirez le fer à repasser de son support. 3 HI575 uniquement : posez le fer sur le support lorsque le voyant de température se met à clignoter. Cela signifie que latempérature du fer est inférieure la température de repassageréglée. ◗ Si vous arrêtez le repassage pendant un instant, posez to...
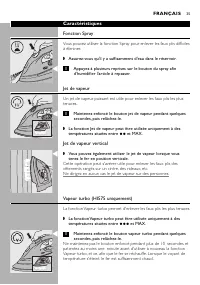
Page 35 - Caractéristiques; Fonction Spray; Appuyez à plusieurs reprises sur le bouton du spray afin; Jet de vapeur; Maintenez enfoncé le bouton jet de vapeur pendant quelques; Jet de vapeur vertical; Maintenez enfoncé le bouton vapeur turbo pendant quelques
3 5 Caractéristiques Fonction Spray Vous pouvez utiliser la fonction Spray pour enlever les faux plis difficilesà éliminer. ◗ Assurez-vous qu'il y a suffisamment d'eau dans le réservoir. C 1 Appuyez à plusieurs reprises sur le bouton du spray afin d'humidifier l'article à repasser. Jet de vapeur Un ...
Page 36 - Nettoyage et entretien; Après le repassage
3 6 Fonction d'arrêt automatique électronique (HI575uniquement) Cette fonction éteint automatiquement le fer s'il reste immobilependant quelque temps. C ◗ Lorsque l'élément chauffant est éteint, le voyant d'arrêtautomatique se met à clignoter et vous entendez un signalsonore. - En position horizonta...
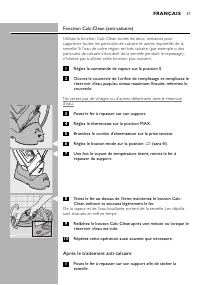
Page 37 - Après le traitement anti-calcaire
3 7 Fonction Calc-Clean (anti-calcaire) Utilisez la fonction Calc-Clean toutes les deux semaines poursupprimer toutes les par ticules de calcaire et autres impuretés de lasemelle. Si l'eau de votre région est très calcaire (par exemple si despar ticules de calcaire s'écoulent de la semelle pendant l...
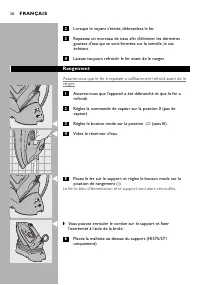
Page 38 - Rangement; Le fer, le bloc d'alimentation et le suppor t sont alors verrouillés.
3 8 2 Lorsque le voyant s'éteint, débranchez le fer. 3 Repassez un morceau de tissu afin d'éliminer les dernières gouttes d'eau qui se sont formées sur la semelle, le caséchéant. 4 Laissez toujours refroidir le fer avant de le ranger. Rangement Assurez-vous que le fer à repasser a suffisamment refro...
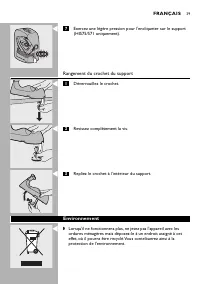
Page 39 - Exercez une légère pression pour l'encliqueter sur le support; Rangement du crochet du support; Déverrouillez le crochet.; Environnement
3 9 C 7 Exercez une légère pression pour l'encliqueter sur le support (HI575/571 uniquement). Rangement du crochet du support C 1 Déverrouillez le crochet. C 2 Revissez complètement la vis. C 3 Repliez le crochet à l'intérieur du support. Environnement C ◗ Lorsqu'il ne fonctionnera plus, ne jetez pa...
Page 40 - Garantie et service; ou contactez le Ser vice Consommateurs Philips de
4 0 Garantie et service Si vous souhaitez obtenir des informations supplémentaires ou si vousrencontrez un problème, visitez le site Web de Philips à l'adresse www.philips.com ou contactez le Ser vice Consommateurs Philips de votre pays (vous trouverez le numéro de téléphone correspondant surle dépl...
Page 41 - N E D E R L A N D S; Belangrijk; Sluit het apparaat alleen aan op een geaard stopcontact.
N E D E R L A N D S 4 1 Algemene beschrijving (fig. 1) A Turbostoomknop 0 (alleen HI575) B Sproeiknop T C Stoomstootknop 9 D Stoomregelaar0 = geen stoom1 = minimale stoomafgifte6 = maximale stoomafgifte E Lampje van automatische uitschakelfunctie (alleen HI575) F Temperatuurlampje G Draagkoffer (all...
Page 42 - Voor het eerste gebruik
N E D E R L A N D S 4 2 ◗ Houd het apparaat buiten het bereik van kinderen. ◗ De zoolplaat van het strijkijzer kan zeer heet worden en bijaanraking brandwonden veroorzaken. ◗ Voorkom dat het snoer in aanraking komt met de hete zoolplaat. ◗ Als u klaar bent met strijken, als u het strijkijzer schoonm...
Page 43 - Klaarmaken voor gebruik; De houderklem bevestigen; Vul het waterreser voir nooit tot boven het MAX-teken.
N E D E R L A N D S 4 3 Klaarmaken voor gebruik De houderklem bevestigen C 1 Klap de klem aan de onderzijde van de houder uit en zet de houderklem vast aan de strijkplank of een andere stabieleondergrond zoals een tafelblad. De rubberen voetjes aan de onderzijde voorkomen dat de houderwegglijdt. ◗ U...
Page 44 - Plaats het strijkijzer op de houder.
N E D E R L A N D S 4 4 De temperatuur instellen C 1 Plaats het strijkijzer op de houder. C 2 Stel de vereiste strijktemperatuur in door de temperatuurregelaar naar de juiste stand te draaien (zie 'Tips'voor meer informatie). Raadpleeg het wasetiket van het te strijken ar tikel voor de juistestrijkt...
Page 45 - - Als u niet zeker weet van welk materiaal het ar tikel gemaakt is,; Het apparaat gebruiken; Strijken met snoer; Snoerloos strijken; Zet de modusschakelaar op stand
N E D E R L A N D S 4 5 Tips - Als de stof uit meerdere soor ten vezels bestaat, selecteer dan altijd de temperatuur die is vereist voor de meest tere vezel, dus delaagste temperatuur. Als een stof bijvoorbeeld voor 60% uit polyesteren voor 40% uit katoen bestaat, dient deze zonder stoom te wordenge...
Page 46 - Het strijkijzer begint op te warmen.; Strijken zonder stoom
N E D E R L A N D S 4 6 C 2 Neem het strijkijzer van de houder. 3 Alleen HI575: plaats het strijkijzer terug op de houder wanneer het temperatuurlampje begint te knipperen. Het knipperendelampje geeft aan dat het strijkijzer tot onder de ingesteldetemperatuur is afgekoeld. ◗ Wanneer u even stopt met...
Page 47 - Stel de aanbevolen strijktemperatuur in (zie 'De temperatuur; Functies; Sproeifunctie; Zorg ervoor dat er voldoende water in het waterreservoir zit.; Stoomstoot; Druk de stoomstootknop in en houd deze enkele seconden; Verticale stoomstoot; De turbostoomfunctie helpt hardnekkige kreuken te verwijderen.
N E D E R L A N D S 4 7 1 Stel de aanbevolen strijktemperatuur in (zie 'De temperatuur instellen'). Functies Sproeifunctie U kunt de sproeifunctie gebruiken voor het verwijderen vanhardnekkige kreuken op elke temperatuur. ◗ Zorg ervoor dat er voldoende water in het waterreservoir zit. C 1 Druk een p...
Page 48 - Om het strijkijzer weer te laten opwarmen:; Druppelstop; Schoonmaken en onderhoud; Na het strijken; Haal de stekker uit het stopcontact en laat het strijkijzer
N E D E R L A N D S 4 8 om het strijkijzer weer te laten opwarmen. Het strijkijzer is heetgenoeg wanneer het temperatuurlampje is uitgegaan. Automatische uitschakelfunctie (alleen HI575) De automatische uitschakelfunctie zorgt er voor dat het strijkijzerautomatisch wordt uitgeschakeld als u het stri...
Page 50 - Opbergen
N E D E R L A N D S 5 0 Na het gebruik van de Calc-Clean-functie 1 Plaats het strijkijzer terug op de houder om de zoolplaat te laten drogen. 2 Haal de stekker uit het stopcontact nadat het temperatuurlampje is uitgegaan. 3 Beweeg het strijkijzer voorzichtig over een schone oude lap om eventuele wat...
Page 51 - Druk op de koffer om deze aan de houder te vergrendelen; De houderklem opbergen; Draai de schroef van de houderklem los.
N E D E R L A N D S 5 1 C ◗ U kunt het snoer rond de houder wikkelen en het uiteindevastzetten met de snoerclip. 6 Plaats de draagkoffer over de houder (alleen HI575/571). C 7 Druk op de koffer om deze aan de houder te vergrendelen ('klik') (alleen HI575/571). De houderklem opbergen C 1 Draai de sch...
Page 52 - Milieu; ) of neem contact op met het Philips
N E D E R L A N D S 5 2 Milieu C ◗ Gooi het apparaat aan het einde van zijn levensduur niet weg methet normale huisvuil, maar lever het in op een door de overheidaangewezen inzamelpunt om het te laten recyclen. Op die manierlevert u een bijdrage aan een schonere leefomgeving. Garantie & service ...
Page 53 - Importante; Non immergete mai il ferro e l'eventuale supporto nell'acqua.; I TA L I A N O
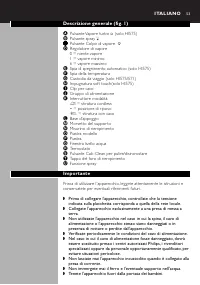
5 3 Descrizione generale (fig. 1) A Pulsante Vapore turbo 0 (solo HI575) B Pulsante spray T C Pulsante Colpo di vapore 9 D Regolatore di vapore0 = niente vapore1 = vapore minimo6 = vapore massimo E Spia di spegnimento automatico (solo HI575) F Spia della temperatura G Custodia da viaggio (solo HI575...
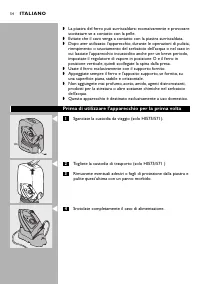
Page 54 - Prima di utilizzare l'apparecchio per la prima volta; pulite quest'ultima con un panno morbido.
5 4 ◗ La piastra del ferro può surriscaldarsi eccessivamente e provocarescottature se a contatto con la pelle. ◗ Evitate che il cavo venga a contatto con la piastra surriscaldata. ◗ Dopo aver utilizzato l'apparecchio, durante le operazioni di pulizia,riempimento o svuotamento del serbatoio dell'acqu...
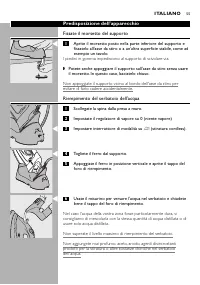
Page 55 - Predisposizione dell'apparecchio; Fissate il morsetto del supporto; I piedini in gomma impediscono al suppor to di scivolare via.; Riempimento del serbatoio dell'acqua; Non superate il livello massimo di riempimento del serbatoio.
5 5 Predisposizione dell'apparecchio Fissate il morsetto del supporto C 1 Aprite il morsetto posto nella parte inferiore del supporto e fissatelo all'asse da stiro o a un'altra superficie stabile, come adesempio un tavolo. I piedini in gomma impediscono al suppor to di scivolare via. ◗ Potete anche ...
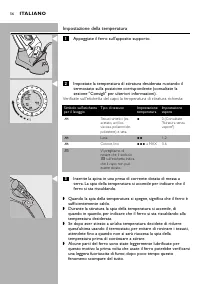
Page 56 - Impostazione della temperatura; Appoggiate il ferro sull'apposito supporto.
5 6 Impostazione della temperatura C 1 Appoggiate il ferro sull'apposito supporto. C 2 Impostate la temperatura di stiratura desiderata ruotando il termostato sulla posizione corrispondente (consultate lasezione "Consigli" per ulteriori informazioni). Verificate sull'etichetta del capo la te...
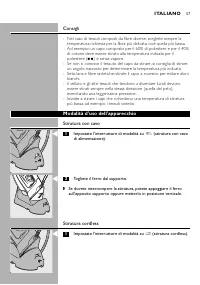
Page 57 - Consigli; - Nel caso di tessuti composti da fibre diverse, scegliete sempre la; Stiratura con cavo; Stiratura cordless; Impostate l'interruttore di modalità su
5 7 Consigli - Nel caso di tessuti composti da fibre diverse, scegliete sempre la temperatura richiesta per la fibra più delicata, cioè quella più bassa.Ad esempio: un capo composto per il 60% di poliestere e per il 40%di cotone deve essere stirato alla temperatura indicata per ilpoliestere ( 2 ) e ...
Page 58 - Stiratura a vapore; Il ferro inizia a riscaldarsi.; Stiratura senza vapore
5 8 C 2 Togliete il ferro dal supporto. 3 Solo HI575: Rimettete il ferro sul supporto quando la spia della temperatura inizia a lampeggiare. Questa spia indica che il ferroè sceso al di sotto della temperatura impostata. ◗ Ogni volta che interrompete la stiratura, mettete il ferro sulsupporto, in mo...
Page 59 - Caratteristiche; Funzione spray; Getto di vapore verticale; La funzione Vapore turbo aiuta a eliminare le pieghe più ostinate.
5 9 Caratteristiche Funzione spray È possibile utilizzare la funzione spray per eliminare le pieghe piùostinate a qualsiasi temperatura. ◗ Verificate il livello di riempimento del serbatoio dell'acqua. C 1 Premete più volte il pulsante spray per inumidire il capo da stirare. Colpo di vapore Un poten...
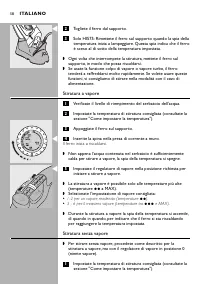
Page 60 - Funzione elettronica di spegnimento di sicurezza (solo HI575); Per riaccendere il ferro:; Sistema antisgocciolamento; Pulizia e manutenzione; Al termine della stiratura; Togliete la spina dalla presa e lasciate raffreddare il ferro.
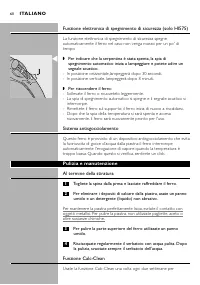
6 0 Funzione elettronica di spegnimento di sicurezza (solo HI575) La funzione elettronica di spegnimento di sicurezza spegneautomaticamente il ferro nel caso non venga mosso per un po' ditempo. C ◗ Per indicare che la serpentina è stata spenta, la spia dispegnimento automatico inizia a lampeggiare e...
Page 61 - Al termine della procedura Calc-Clean
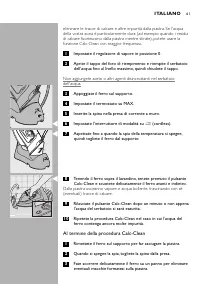
6 1 eliminare le tracce di calcare e altre impurità dalla piastra. Se l'acquadella vostra zona è par ticolarmente dura (ad esempio quando i residuidi calcare fuoriescono dalla piastra mentre stirate), potete usare lafunzione Calc-Clean con maggior frequenza. 1 Impostate il regolatore di vapore in po...
Page 62 - Lasciate raffreddare il ferro prima di riporlo.; Come riporre l'apparecchio
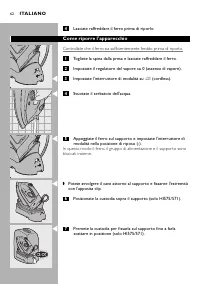
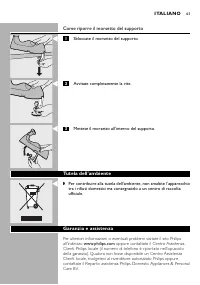
6 2 4 Lasciate raffreddare il ferro prima di riporlo. Come riporre l'apparecchio Controllate che il ferro sia sufficientemente freddo prima di riporlo. 1 Togliete la spina dalla presa e lasciate raffreddare il ferro. 2 Impostate il regolatore del vapore su 0 (assenza di vapore). C 3 Impostate l'inte...
Page 63 - Come riporre il morsetto del supporto; Sbloccate il morsetto del supporto.; Garanzia e assistenza; oppure contattate il Centro Assistenza
6 3 Come riporre il morsetto del supporto C 1 Sbloccate il morsetto del supporto. C 2 Avvitate completamente la vite. C 3 Mettete il morsetto all'interno del supporto. Tutela dell'ambiente C ◗ Per contribuire alla tutela dell'ambiente, non smaltite l'apparecchiotra i rifiuti domestici ma consegnatel...
Page 64 - turbo
6 4 (.1) A turbo 0 ( HI575) B T C 9 D ! " #$!" 0 = '(# 1 = *'! 6 = ,-! E .' " /! ! #- ( HI575) F .' $## G 0" 1#* ( HI575/571) H . 1 ( HI575) I ! (/ J 3*/ !' K ! " !-4 ∫ = !/,#( '(# 4/! π = $," $" ª = !/,#( 4/! L 5*" M 61!- # *" N #" O 7!/! !'( #8 P 7* /# Q 9# ...
Page 77 - Önemli; T Ü R K Ç E
7 7 Genel tanım (şek. 1) A Turbo buhar düğmesi 0 (sadece HI575) B Püskür tme düğmesi T C Şok Buhar düğmesi 9 D Buhar ayar düğmesi0 = buhar yok1 = minimum buhar6 = maksimum buhar E Otomatik kapanma ışığı (sadece HI575) F Sıcaklık ışığı G Taşıma çantası (sadece HI575/571) H Yumuşak tutma yeri (sadece ...
Page 78 - İlk kullanımdan önce; Tabandaki etiketleri veya koruyucu filmi sökün ve tabanı
7 8 ◗ Ütüleme işlemini bitirdikten sonra, cihazı temizlediğinizde, suhaznesini doldurduğunuzda veya boşalttığınızda ve ütülemeye kısabir süre için olsa bile ara verdiğinizde, buhar ayar düğmesini 0konumuna getirin, ütüyü dik olarak arka kısmının üzerine oturtunve elektrik fişini prizden çekin. ◗ Ütü...
Page 79 - Cihazın kullanıma hazırlanması; Stand klipsinin takılması; Alt kısımdaki kauçuk taban standın kaymasını önler.; Su haznesinin doldurulması
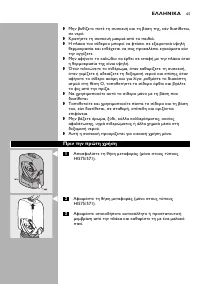
7 9 Cihazın kullanıma hazırlanması Stand klipsinin takılması C 1 Standın alt kısmındaki klipsi dışarı çekin ve stand klipsini ütü masası veya başka bir sabit yüzeye sabitleyin. Alt kısımdaki kauçuk taban standın kaymasını önler. ◗ Ayrıca standı klips kullanmadan da ütü masasına takabilirsiniz. Budur...
Page 80 - Sıcaklığın ayarlanması; Ütüyü standa yerleştirin.; İpuçları; nazik kumaşa uygun olarak en düşük ısıya ayarlayın.
8 0 Sıcaklığın ayarlanması C 1 Ütüyü standa yerleştirin. C 2 Sıcaklık kadranını uygun konuma getirerek istediğiniz ütü sıcaklığını ayarlayın (daha fazla bilgi için bkz.'İpuçları' bölümü). Kullanılması gereken ütüleme sıcaklığını öğrenmek için yıkama talimatlarıetiketini kontrol edin. C 3 Cihazın fiş...
Page 81 - elbiseleri ütüleyerek başlayın.; Cihazın Kullanımı; Kablolu ütüleme; Kablosuz ütüleme; Mod düğmesini
8 1 Örneğin; kumaş %60 polyester ve %40 pamuklu kumaş içeriyorsa, ütüsıcaklığını buharsız olarak polyester sıcaklık ayarına ( 2 ) göre ayarlamanız gerekir. - Elbisenin ne tür kumaştan yapıldığını bilmiyorsanız, elbiseyi giydiğinizde görünmeyen bir bölümünü ütüleyerek doğru ütüleme sıcaklığınıbelirle...
Page 83 - Özellikler; Sprey özelliği; Şok buhar sayesinde inatçı kırışıklıklar giderilebilir.; Dikey şok buhar
8 3 Özellikler Sprey özelliği İnatçı kırışıklıkları gidermek için sprey özelliğini tüm sıcaklıklardakullanabilirsiniz. ◗ Su haznesinde yeterince su olduğundan emin olun. C 1 Ütülenecek ürünü nemli hale getirmek için birkaç kez sprey düğmesine basın. Şok buhar Şok buhar sayesinde inatçı kırışıklıklar...
Page 84 - Temizlik ve bakım; Ütülemeden sonra
8 4 Elektronik kapanma fonksiyonu (sadece HI575) Ütü belirli bir süre hareket ettirilmezse, elektronik kapanma fonksiyonuütüyü otomatik olarak kapatır. C ◗ Isıtma elemanının kapandığını gösteren otomatik kapanma ışığıyanıp sönmeye başlar ve bir sesli sinyal sesi duyulur. - Yatay konumda bu durum 30 ...
Page 85 - Ütüyü kaldırmadan önce yeterince soğuduğundan emin olun.
8 5 2 Doldurma ağzının kapağını açın ve su tankını maksimum seviyeye kadar doldurun. Sonra kapağı kapatın. Su haznesine, sirke veya diğer kireç çözücü kimyevi maddelerdoldurmayın. 3 Ütüyü standa yerleştirin. 4 Sıcaklık kadranını MAX ayarına getirin. 5 Elektrik fişini prize takın. C 6 Mod düğmesini ∫...
Page 87 - Stand klipsinin saklanması; Stand klipsinin kilidini açın.; Çevre; adresinden ziyaret ediniz
8 7 Stand klipsinin saklanması C 1 Stand klipsinin kilidini açın. C 2 Sabitleme vidasını tamamen sıkın. C 3 Stand klipsini standın içine doğru katlayın. Çevre C ◗ Kullanım ömrü sonunda cihazı normal evsel atıklarınızla birlikteatmayın; bunun yerine, geri dönüşüm için resmi yetkililere verin. Busayed...