Page 6 - ENGLISH; Table of contents; Important
6 ENGLISH Table of contents Impor tant 6 Introduction 10 Product over view 10 Before first use 10 Using the appliance 11 Filling the water tank 11 Heating up 11 Temperature and steam setting 12 Ironing 13 Putting down the iron during ironing 13 ECO mode (specific types only) 14 Ironing tips 14 Safet...
Page 8 - Caution
8 - Do not allow children to play with the appliance. - Keep the appliance and its mains cord out of the reach of children aged 8 or under when the appliance is switched on or cooling down. - Children are not allowed to clean the appliance without super vision. - Do not let the mains cord come into ...
Page 9 - Disposal; - Do not throw away the appliance with the normal household waste
9 - The soleplate of the iron can become extremely hot and may cause burns if touched. - When you have finished ironing, when you clean the appliance, when you leave the iron even for a shor t while and also during water filling: put the iron in horizontal position or on its heel on a stable surface...
Page 10 - Remove all packaging material and stickers.
10 Introduction Thank you for buying this Philips appliance. - The new Philips PerfectCare Xpress steam iron offers you an innovative way to iron your garments. We all know the fuss with traditional irons: choosing the right temperature for your tough and delicate fabrics, waiting for the iron to wa...
Page 11 - with filtered water straight from this filter.; Heating up
11 3 Remove the hangtag from the iron. Using the appliance Filling the water tank Caution: Do not put perfume, vinegar, starch, descaling agents, ironing aids or other chemicals in the water tank, as your appliance is not designed to work with these chemicals. 1 Fill the water tank up to the MAX ind...
Page 12 - When the iron is ready for use, the Smart light lights up blue; Temperature and steam setting; fabrics such as Spandex or elastane, Spandex-mixed fabrics and; Ironing; Unfold your ironing board and set it to the appropriate height.
12 3 When the iron is ready for use, the Smart light lights up blue continuously. Temperature and steam setting The OptimalTemp technology enables you to iron all types of ironable fabrics, in any order, without adjusting the iron temperature or steam setting. - Fabrics with these symbols are ironab...
Page 13 - automatically when it is moved.; Steam Boost function (specific types only); steam output to remove stubborn wrinkles.; Vertical steam ironing; to steam the garment ver tically.
13 3 You can start ironing when the Smart light stops flashing and lights up continuously. - Thanks to the Auto Steam Sensor technology, the iron star ts steaming automatically when it is moved. Steam Boost function (specific types only) - Press the steam trigger twice. The iron delivers one single ...
Page 14 - Ironing tips; Clean the appliance with a moist cloth after every use.
14 ECO mode (specific types only) During ironing, you can use the ECO mode to save energy but still have sufficient steam to iron all your garments. Note: For the best results, we advise you to use the ‘OptimalTemp’ mode. 1 Press the ECO button when the appliance is switched on. The Smart light star...
Page 15 - Storage; Remove the plug from the wall socket.; Troubleshooting; Problem
15 Storage 1 Remove the plug from the wall socket. 2 Empty the water tank and let the iron cool down in a safe place. 3 Wind the mains cord round the heel of the appliance and fix it with the cord clip. Store the iron on its heel in a safe and dry place. Troubleshooting This chapter summarises the m...
Page 17 - Overview of models; Feature
Overview of models Feature GC5060 GC5057 GC5055 GC5050 OptimalTemp technology 3 3 3 3 Compact, powerful steam generation technology 3 3 3 3 Blue Smar t light 3 3 3 3 Constant steam output 65g/min 65g/min 65g/min 50g/min Auto Steam Sensor 3 3 3 3 Soleplate SteamGlide SteamGlide SteamGlide anodilium E...
Page 18 - Πίνακας περιεχομένων; Σημαντικό; ΕΛΛΗΝΙΚΑ
Πίνακας περιεχομένων Σημαντικό 18 Εισαγωγή 22 Επισκόπηση προϊόντος 23 Πριν την πρώτη χρήση 23 Χρήση της συσκευής 24 Γέμισμα της δεξαμενής νερού 24 Ζέσταμα 24 Ρύθμιση θερμοκρασίας και ατμού 25 Σιδέρωμα 25 Τρόπος τοποθέτησης του σίδερου κατά το σιδέρωμα 26 Λειτουργία ECO (μόνο σε συγκεκριμένους τύπους...
Page 20 - Προσοχή
20 ασφαλή χρήση της συσκευής ή τη χρησιμοποιούν υπό επιτήρηση και έχουν επίγνωση των κινδύνων που ενέχονται. - Μην αφήνετε τα παιδιά να παίζουν με τη συσκευή. - Όταν η συσκευή είναι ενεργοποιημένη ή αν την έχετε αφήσει να κρυώσει, κρατήστε τη συσκευή και το καλώδιο μακριά από παιδιά μικρότερα των 8 ...
Page 23 - Πριν την πρώτη χρήση; Αφαιρέστε όλα τα υλικά συσκευασίας και τα αυτοκόλλητα.
23 - Στο παρελθόν, μια μεγάλη ποσότητα ατμού σε αυτήν τη βέλτιστη θερμοκρασία θα οδηγούσε σε διαρροή νερού. Κατασκευάσαμε ένα μοναδικό θάλαμο ατμού, ο οποίος προσφέρει σταθερή παροχή άφθονου ατμού που διεισδύει βαθιά στο ύφασμα και κάνει γρήγορο το σιδέρωμα χωρίς τον κίνδυνο διαρροής νερού. - Το σιδ...
Page 24 - Σημείωση: Αν χρησιμοποιείτε το φίλτρο αφαλάτωσης νερού IronCare,; Ζέσταμα
24 Χρήση της συσκευής Γέμισμα της δεξαμενής νερού Προσοχή: Μην ρίχνετε στη δεξαμενή νερού άρωμα, ξύδι, κόλλα κολλαρίσματος, ουσίες αφαλάτωσης, υγρά σιδερώματος ή άλλα χημικά, καθώς η συσκευή δεν έχει σχεδιαστεί για χρήση με τα χημικά αυτά. 1 Αν το νερό βρύσης στην περιοχή σας είναι μαλακό, γεμίστε τ...
Page 25 - Σημείωση: Με την τεχνολογία OptimalTemp, μπορείτε να σιδερώσετε
25 3 Όταν το σίδερο είναι έτοιμο για χρήση, το έξυπνο φως παραμένει σταθερά αναμμένο με μπλε χρώμα. Ρύθμιση θερμοκρασίας και ατμού Η τεχνολογία OptimalTemp σάς επιτρέπει να σιδερώνετε όλα τα υφάσματα που σιδερώνονται, με όποια σειρά θέλετε, χωρίς να ρυθμίζετε τη θερμοκρασία ή τον ατμό του σίδερου. -...
Page 26 - ένα ρούχο ενώ το φοράτε. Προς αποφυγή εγκαυμάτων, μην ρίχνετε; Λειτουργία ECO (μόνο σε συγκεκριμένους τύπους); Σημείωση: Για καλύτερα αποτελέσματα, σας συμβουλεύουμε να
26 - Χάρη στην τεχνολογία αυτόματου αισθητήρα ατμού, το σίδερο αρχίζει αυτόματα να παράγει ατμό όταν κινείται. Λειτουργία βολής ατμού (μόνο σε συγκεκριμένους τύπους) - Πιέστε τη σκανδάλη ατμού δύο φορές. Το σίδερο παρέχει μία δυνατή ριπή ατμού για την αφαίρεση των επίμονων τσακίσεων. - Κατά την παρο...
Page 27 - Σημείωση: Το σίδερο ατμού δεν απενεργοποιείται πλήρως όταν; Καθαρισμός και συντήρηση; Συμβουλή: Για να γλιστρά εύκολα η πλάκα, καθαρίζετέ την τακτικά.
27 1 Με τη συσκευή ενεργοποιημένη, πιέστε το κουμπί ECO. Το έξυπνο φως αρχίζει να αναβοσβήνει με πράσινο χρώμα. Μόλις το σίδερο μεταβεί στη λειτουργία ECO και είναι έτοιμο για χρήση, το έξυπνο φως σταματά να αναβοσβήνει και παραμένει σταθερά αναμμένο με πράσινο χρώμα. 2 Για να επιστρέψετε στη λειτου...
Page 28 - Συστήματα αποθήκευσης; Αποσυνδέστε το φις από την πρίζα.; Οδηγός αντιμετώπισης προβλημάτων; Αυτό το κεφάλαιο συνοψίζει τα πιο συνηθισμένα προβλήματα που
28 Συστήματα αποθήκευσης 1 Αποσυνδέστε το φις από την πρίζα. 2 Αδειάστε τη δεξαμενή νερού και αφήστε το σίδερο να κρυώσει σε ασφαλές μέρος. 3 Τυλίξτε το καλώδιο γύρω από τη βάση της συσκευής και στερεώστε το με το κλιπ καλωδίου. Αποθηκεύστε το σίδερο όρθιο σε ασφαλές μέρος χωρίς υγρασία. Οδηγός αντι...
Page 31 - Επισκόπηση μοντέλων; Χαρακτηριστικό
31 Επισκόπηση μοντέλων Χαρακτηριστικό GC5060 GC5057 GC5055 GC5050 Τεχνολογία OptimalTemp 3 3 3 3 Μικρή και πανίσχυρη γεννήτρια ατμού 3 3 3 3 Μπλε έξυπνο φως 3 3 3 3 Συνεχής παροχή ατμού 65 γρ./λεπτό 65 γρ./λεπτό 65 γρ./λεπτό 50 γρ./λεπτό Αυτόματος αισθητήρας ατμού 3 3 3 3 Πλάκα SteamGlide SteamGlide...
Page 32 - ESPAÑOL; Contenido; Importante
32 ESPAÑOL Contenido Impor tante 32 Introducción 36 Descripción del producto 37 Antes de utilizarlo por primera vez 37 Uso del aparato 37 Llenado del depósito de agua 37 Calentamiento 38 Posiciones de temperatura y de vapor 38 Planchado 39 Cómo dejar la plancha durante el planchado 40 Modo ECO (solo...
Page 34 - Precaución
34 - Mantenga el aparato y su cable de alimentación fuera del alcance de niños menores de 8 años cuando el aparato esté encendido o se esté enfriando. - Los niños no deben limpiar el aparato sin super visión. - No permita que el cable de alimentación entre en contacto con la suela caliente de la pla...
Page 35 - Este aparato Philips cumple todos los estándares sobre campos
35 de enchufarlo a la toma de corriente. - La suela de la plancha puede calentarse mucho y, si se toca, puede causar quemaduras. - Cuando haya terminado de limpiar, cuando limpie el aparato, cuando deje la plancha aunque solo se durante un momento y también cuando rellene el agua: coloque la plancha...
Page 37 - Antes de utilizarlo por primera vez; Quite todo el embalaje y las pegatinas.; Uso del aparato; con estos productos químicos.
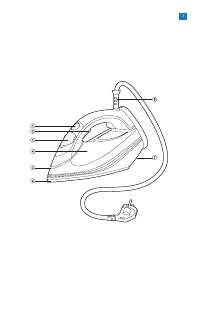
37 2 Botón de vapor para vapor ver tical y super vapor 3 Tapa de la aber tura de llenado 4 Depósito de agua con indicador de nivel de agua 5 Piloto inteligente 6 Suela 7 Placa de modelo 8 Cable de alimentación con clavija Antes de utilizarlo por primera vez Este aparato se ha diseñado para planchar ...
Page 38 - Calentamiento; Conecte el aparato a un enchufe con toma de tierra.; Posiciones de temperatura y de vapor; - Los tejidos con este símbolo no se pueden planchar. Estos tejidos
38 Calentamiento 1 Conecte el aparato a un enchufe con toma de tierra. 2 El piloto inteligente comienza a parpadear en azul para indicar que la plancha se está calentando. 3 Cuando la plancha esté lista para su uso, el piloto inteligente se iluminará en azul de forma continua. Posiciones de temperat...
Page 39 - Planchado; Despliegue la tabla de planchar y ajústela a la altura adecuada.; Función supervapor (solo en modelos específicos); - Pulse el botón de vapor dos veces. La plancha emite un solo golpe de; Planchado vertical con vapor
39 Planchado 1 Despliegue la tabla de planchar y ajústela a la altura adecuada. 2 Coloque la prenda que desee planchar con vapor sobre la tabla de planchar. Nota: Con la tecnología OptimalTemp, podrá planchar toda la ropa de forma eficaz y segura, incluso tejidos delicados como la seda. 3 Puede empe...
Page 40 - Cómo dejar la plancha durante el planchado; Pulse el botón ECO cuando el aparato esté encendido. El piloto; Consejos de planchado; Nota: La plancha de vapor no se apaga completamente cuando está en
40 Cómo dejar la plancha durante el planchado - Coloque la plancha sobre su base de apoyo en la tabla de planchar. Modo ECO (solo en modelos específicos) Durante el planchado, puede utilizar el modo ECO para ahorrar energía, además de conseguir el suficiente vapor para planchar todas sus prendas de ...
Page 42 - Guía de resolución de problemas; Problema
42 Guía de resolución de problemas En este capítulo se resumen los problemas más frecuentes que pueden surgir con el aparato. Si no puede resolver el problema con la siguiente información, visite www.philips.com/support para consultar una lista de preguntas más frecuentes o póngase en contacto con e...
Page 44 - Descripción de los modelos; Función
44 Descripción de los modelos Función GC5060 GC5057 GC5055 GC5050 Tecnología OptimalTemp 3 3 3 3 Tecnología de generación de vapor compacta y potente 3 3 3 3 Piloto inteligente azul 3 3 3 3 Salida de vapor constante 65 g/min 65 g/min 65 g/min 50 g/min El sensor de vapor automático 3 3 3 3 Suela Stea...
Page 45 - ITALIANO; Sommario
ITALIANO Sommario Impor tante 45 Introduzione 50 Panoramica del prodotto 50 Primo utilizzo 51 Modalità d’uso dell’apparecchio 51 Riempimento del serbatoio dell’acqua 51 Riscaldamento 51 Regolazione della temperatura e del vapore 52 Stiratura 52 Riposizionamento del ferro durante la stiratura 53 Moda...
Page 47 - Attenzione
47 tali individui abbiano ricevuto assistenza o formazione per l’uso dell’apparecchio in condizioni di sicurezza e siano consapevoli dei rischi connessi all’utilizzo. - Non lasciate giocare i bambini con l’apparecchio. - Tenete l’apparecchio e il cavo di alimentazione lontano dalla por tata dei bamb...
Page 49 - Smaltimento; è composto per il 90% di materiale riciclato ed è completamente; Introduzione; Grazie per aver acquistato questo prodotto Philips
49 superficie stabile e rimuovete la spina di alimentazione dalla presa di corrente a muro. - non aggiungete mai profumo, aceto, amido, agenti disincrostanti, prodotti per la stiratura o altre sostanze chimiche nel serbatoio dell’acqua. - Questo apparecchio è stato progettato esclusivamente per l’us...
Page 50 - Primo utilizzo; Rimuovete tutti i materiali e gli adesivi di imballaggio.
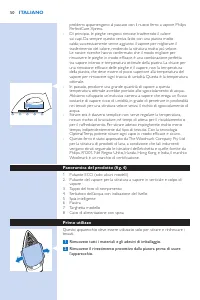
50 problemi appar tengono al passato con il nuovo ferro a vapore Philips PerfectCare Xpress. - Di principio, le pieghe vengono rimosse trasferendo il calore sui capi. Da sempre questo veniva fatto con una piastra molto calda; successivamente venne aggiunto il vapore per migliorare il trasferimento d...
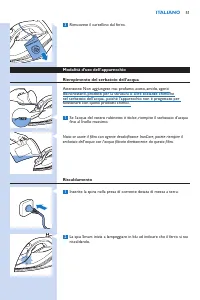
Page 51 - Rimuovete il cartellino dal ferro.; Modalità d’uso dell’apparecchio; funzionare con questi prodotti chimici.; Riscaldamento; Inserite la spina nella presa di corrente dotata di messa a terra.
51 3 Rimuovete il cartellino dal ferro. Modalità d’uso dell’apparecchio Riempimento del serbatoio dell’acqua Attenzione Non aggiungete mai profumo, aceto, amido, agenti disincrostanti, prodotti per la stiratura o altre sostanze chimiche nel serbatoio dell’acqua., poiché l’apparecchio non è progettat...
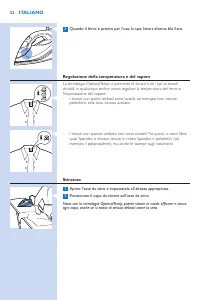
Page 52 - Quando il ferro è pronto per l’uso, la spia Smart diventa blu fisso.; Regolazione della temperatura e del vapore; l’impostazione del vapore; Stiratura; Aprite l’asse da stiro e impostatela all’altezza appropriata.
52 3 Quando il ferro è pronto per l’uso, la spia Smart diventa blu fisso. Regolazione della temperatura e del vapore La tecnologia OptimalTemp vi permette di stirare tutti i tipi di tessuti stirabili, in qualunque ordine, senza regolare la temperatura del ferro o l’impostazione del vapore - I tessut...
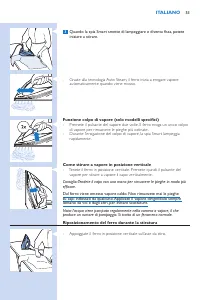
Page 53 - Funzione colpo di vapore (solo modelli specifici); di vapore per rimuovere le pieghe più ostinate.; Come stirare a vapore in posizione verticale; vapore per stirare a vapore il capo ver ticalmente.
53 3 Quando la spia Smart smette di lampeggiare e diventa fissa, potete iniziare a stirare. - Grazie alla tecnologia Auto Steam, il ferro inizia a erogare vapore automaticamente quando viene mosso. Funzione colpo di vapore (solo modelli specifici) - Premete il pulsante del vapore due volte. Il ferro...
Page 54 - stirare al meglio tutti i capi.; Consigli sulla stiratura; asciugare naturalmente con meno pieghe.; Come stirare al meglio le camicie; grinze mentre stirate le par ti che richiedono più tempo.; Auto-spegnimento di sicurezza; quando rimane fermo in posizione orizzontale per 3 minuti oppure; Pulizia e manutenzione
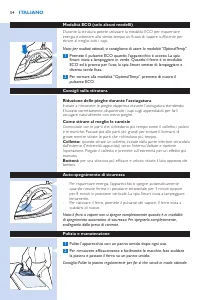
54 Modalità ECO (solo alcuni modelli) Durante la stiratura potete utilizzare la modalità ECO per risparmiare energia e ottenere allo stesso tempo un flusso di vapore sufficiente per stirare al meglio tutti i capi. Nota: per risultati ottimali, vi consigliamo di usare la modalità “OptimalTemp”. 1 Pre...
Page 55 - Conservazione; Rimuovete la spina dalla presa di corrente.; Risoluzione dei guasti
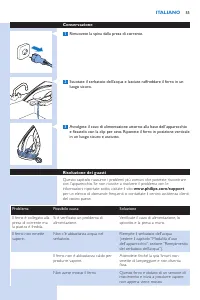
55 Conservazione 1 Rimuovete la spina dalla presa di corrente. 2 Svuotate il serbatoio dell’acqua e lasciate raffreddare il ferro in un luogo sicuro. 3 Avvolgete il cavo di alimentazione attorno alla base dell’apparecchio e fissatelo con la clip per cavo. Riponete il ferro in posizione verticale in ...
Page 57 - Panoramica sui modelli; Funzionalità
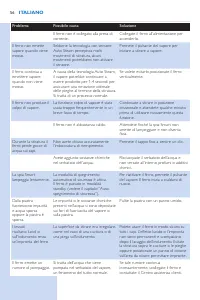
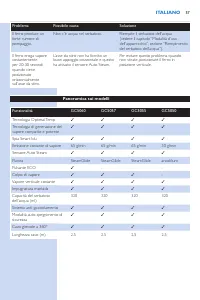
57 Problema Possibile causa Soluzione Il ferro produce un for te rumore di pompaggio. Non c’è acqua nel serbatoio. Riempite il serbatoio dell’acqua (vedere il capitolo “Modalità d’uso dell’apparecchio”, sezione “Riempimento del serbatoio dell’acqua”). Il ferro eroga vapore costantemente per 20-30 se...
Page 58 - Índice; PORTUGUÊS
58 Índice Impor tante 58 Introdução 62 Descrição do produto 63 Antes da primeira utilização 63 Utilizar o aparelho 64 Encher o depósito da água 64 Aquecimento 64 Regulação de temperatura e vapor 65 Passar a ferro 65 Pousar o ferro durante o engomar 66 Modo ECO (apenas em modelos específicos) 66 Suge...
Page 61 - Cuidado
61 Cuidado - Ligue o aparelho apenas a uma tomada com ligação à terra. - Coloque e utilize sempre o aparelho sobre uma superfície estável, plana e horizontal. Se preferir colocar o ferro na posição de descanso, assegure-se de que o coloca numa superfície estável. - Verifique regularmente se o fio de...
Page 63 - Antes da primeira utilização; Retire todos os materiais de embalagem e autocolantes.
63 - A remoção dos vincos é efectuada através da transferência de calor para o tecido. No início, isto era efectuado com uma base muito quente. Mais tarde, foi adicionado vapor para aumentar a transferência de calor, tornando o engomar muito mais rápido. A nossa pesquisa confirmou que a melhor forma...
Page 64 - com água filtrada directamente do filtro.; Aquecimento
64 Utilizar o aparelho Encher o depósito da água Atenção: Não coloque perfume, vinagre, goma, agentes descalcificadores, produtos para ajudar a engomar ou outros produtos químicos no depósito da água, visto que o seu aparelho não foi concebido para funcionar com estes químicos. 1 Encha o depósito da...
Page 65 - Regulação de temperatura e vapor; - Os tecidos com estes símbolos podem ser passados a ferro, por; Passar a ferro; Abra a sua tábua de passar e regule-a para a altura apropriada.
65 Regulação de temperatura e vapor A tecnologia OptimalTemp permite-lhe passar a ferro todos os tipos de tecidos que podem ser engomados, sem ajustar a temperatura ou o vapor do ferro. - Os tecidos com estes símbolos podem ser passados a ferro, por exemplo, linho, algodão, poliéster, seda, lã, visc...
Page 66 - Prima o botão ECO quando o aparelho estiver ligado. A luz
66 Função de jacto de vapor (apenas em modelos específicos) - Prima o botão de vapor duas vezes. O ferro fornece um único jacto de emissão elevada de vapor para eliminar vincos persistentes. - Durante a liber tação do jacto de vapor, a luz inteligente apresenta uma intermitência rápida. Engomar a va...
Page 67 - tomada para o desligar.; Limpeza e manutenção; Limpe o aparelho com um pano húmido depois de cada utilização.; Arrumação; Retire a ficha da tomada eléctrica.
67 Sugestões sobre engomar Reduzir vincos ao secar Comece a eliminar os vincos logo no processo de secagem, estendendo a sua roupa correctamente depois da lavagem através da colocação das peças de roupa em cabides para estas secarem naturalmente com menos vincos. A melhor forma para passar camisas a...
Page 68 - Resolução de problemas
68 2 Esvazie o depósito da água e deixe o ferro arrefecer num local seguro. 3 Enrole o cabo de alimentação à volta do descanso do aparelho e fixe-o com a mola para o fio. Guarde o ferro na sua posição de descanso num local seguro e seco. Resolução de problemas Este capítulo resume os problemas mais ...
Page 70 - Descrição dos modelos; Funcionalidade
70 Descrição dos modelos Funcionalidade GC5060 GC5057 GC5055 GC5050 Tecnologia OptimalTemp 3 3 3 3 Compacto, tecnologia potente para geração de vapor 3 3 3 3 Luz inteligente azul 3 3 3 3 Saída de vapor constante 65 g/min 65 g/min 65 g/min 50 g/min Sensor de vapor automático 3 3 3 3 Base SteamGlide S...
Page 71 - TÜRKÇE; İçindekiler; Önemli
TÜRKÇE 71 İçindekiler Önemli 71 Giriş 75 Ürüne genel bakış 75 İlk kullanımdan önce 76 Cihazın kullanımı 76 Su haznesinin doldurulması 76 Isıtma 77 Sıcaklık ve buhar ayarı 77 Ütüleme 78 Ütü yaparken ütüyü yerleştirme 79 ECO modu (sadece belirli modellerde) 79 Ütüleme ipuçları 79 Güvenli Otomatik Kapa...
Page 73 - Dikkat
73 gelişmemiş veya tecrübe ve bilgi eksikliği olan kişiler tarafından kullanılabilir. - Çocukların cihazla oynamalarına izin vermeyin. - Cihaz çalışırken veya soğurken, cihazı ve kablosunu 8 yaşındaki veya daha küçük çocukların ulaşabilecekleri yerlerden uzak tutun. - Çocuklar, yetişkin gözetimi olm...
Page 76 - filtreden geçirilen suyla doldurabilirsiniz.
76 İlk kullanımdan önce Bu cihaz sadece kumaşları ütülemek ve havalandırmak için üretilmiştir. 1 Tüm ambalaj malzemelerini ve etiketleri çıkarın. 2 Cihazınızı kullanmadan önce tabandaki koruyucu kapağı çıkarın. 3 Bakım etiketini ütüden çıkarın. Cihazın kullanımı Su haznesinin doldurulması Dikkat: Ci...
Page 77 - Isıtma; Fişi topraklı duvar prizine takın.; Sıcaklık ve buhar ayarı; - Bu simgeyi taşıyan kumaşlar ütülenmez. Bu kumaşlara, spandeks
77 Isıtma 1 Fişi topraklı duvar prizine takın. 2 Akıllı ışık mavi renkte yanıp sönmeye başlayarak ütünün ısınmakta olduğunu gösterir. 3 Ütü kullanıma hazır olduğunda, akıllı ışık sürekli olarak mavi yanar. Sıcaklık ve buhar ayarı OptimalTemp teknolojisi, sıcaklık ya da buhar ayarını değiştirmenize g...
Page 78 - Ütüleme; Ütü masasını açın ve uygun yüksekliğe ayarlayın.; Buhar Püskürtme fonksiyonu (sadece belirli modellerde); yüksek yoğunluklu buhar çıkışı sağlar.; Dikey buharlı ütüleme; - Ütüyü dikey konumda tutun. Ardından giysiye dikey olarak buhar
78 Ütüleme 1 Ütü masasını açın ve uygun yüksekliğe ayarlayın. 2 Buharlı ütülemek istediğiniz giysiyi ütü masasının üzerine yerleştirin. Dikkat: OptimalTemp teknolojisiyle, ipek gibi narin kumaşlar dahil olmak üzere tüm giysiler etkili ve güvenli bir şekilde ütülenebilir. 3 Akıllı ışık yanıp sönmeyi ...
Page 79 - Ütü yaparken ütüyü yerleştirme; - Ütüyü ütü masasına arka kısmının üzerine otur tun.; Ütüleme ipuçları; kısımlarla uğraşırken bu büyük kısımlar kırışmaz.; Güvenli Otomatik Kapanma; kapatılmaz. Kapatmak için ütüyü prizden çıkarın.
79 Ütü yaparken ütüyü yerleştirme - Ütüyü ütü masasına arka kısmının üzerine otur tun. ECO modu (sadece belirli modellerde) Ütüleme sırasında, tüm giysilerinizi gerektiği gibi ütülemek için yeterli buhar elde ederken aynı zamanda enerjiden de tasarruf etmek için ECO modunu kullanabilirsiniz. Dikkat:...
Page 80 - Temizlik ve bakım; Cihazı her kullanımdan sonra nemli bir bezle silin.; Saklama; Cihazın fişini prizden çekin.; Sorun giderme; adresini ziyaret edin veya ülkenizdeki Müşteri
Temizlik ve bakım 1 Cihazı her kullanımdan sonra nemli bir bezle silin. 2 Lekeleri kolay ve etkili bir şekilde çıkarmak için, cihazın ısınmasını bekleyin ve tabanı nemli bir bez üzerinde gezdirin. İpucu: Kolay hareket etmesini sağlamak için tabanı düzenli olarak temizleyin. Saklama 1 Cihazın fişini ...
Page 82 - Sorun; Modellere genel bakış; Özellik
82 TÜRKÇE Sorun Nedeni Çözüm Buhar bölmesine su pompalanmaktadır. Bu normaldir. Pompalama sesi kesintisiz olarak devam ederse, ütüyü prizden çekin ve Müşteri Destek Merkezi ile iletişim kurun. Su haznesinde yeterince su yoktur. Su haznesini doldurun (bkz. ‘Cihazın kullanımı’ bölümü,’Su haznesinin do...