Page 6 - Introduction; Important; Read this user manual carefully before; ENGLISH
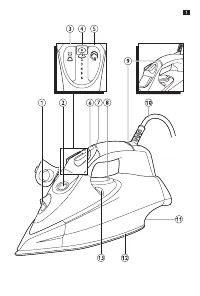
6 Introduction Congratulations on your purchase and welcome to Philips! To fully benefit from the suppor t that Philips offers, register your product at www.philips.com/welcome. General description (Fig. 1) 1 Spray nozzle 2 Filling opening 3 Spray button 4 Steam control 5 Steam boost button 6 Ionic ...
Page 8 - Caution
- Children should be supervised to ensure that they do not play with the appliance. - Do not let the mains cord come into contact with the hot soleplate of the iron. Caution - Only connect the appliance to an ear thed wall socket. - Check the mains cord regularly for possible damage. - The soleplate...
Page 9 - Before first use; Remove any sticker, protective foil or plastic; Preparing for use; Tip: If the tap water in your area is very hard, we
Electromagnetic fields (EMF) This Philips appliance complies with all standards regarding electromagnetic fields (EMF). If handled properly and according to the instructions in this user manual, the appliance is safe to use based on scientific evidence available today. Before first use 1 Remove any ...
Page 10 - agents, ironing aids or other chemicals in the water; Selecting the temperature and steam; Temperature
Do not put perfume, vinegar, starch, descaling agents, ironing aids or other chemicals in the water tank. 5 Close the cap of the filling opening (‘click’). Selecting the temperature and steam setting Temperature and steam settings Fabric type Temperature setting Steam setting Steam boost Ionic DeepS...
Page 11 - Using the appliance; Note: The iron may give off some smoke when you use
2 Put the iron on its heel. 3 To set the required ironing temperature, turn the temperature dial to the appropriate position (see the ‘Temperature and steam settings’ table above). Check the laundr y care label for the fabric type. If you do not know what kind or kinds of fabric an ar ticle is made ...
Page 12 - Ironing without steam; Set the steam control to position 0; Steam ironing; Note: The iron starts to produce steam as soon as it; Steam ironing with extra steam
Ironing without steam 1 Set the steam control to position 0 (= no steam). 2 Set the required ironing temperature (see chapter ‘Preparing for use’, section ‘Selecting the temperature and steam setting’). Steam ironing 1 Make sure that there is water in the water tank. 2 Set the required ironing tempe...
Page 13 - Ironing with Ionic DeepSteam (specific; When you use the Ionic DeepSteam function during
Ironing with Ionic DeepSteam (specific types only) When you use the Ionic DeepSteam function during steam ironing, the steam produced is finer than during regular steam ironing. Fine steam reaches deeper, especially into thick fabrics. This helps you to remove stubborn creases easily. 1 Make sure th...
Page 14 - Make sure that there is water in the water; Steam boost function; Press and release the steam boost button.
Note: The Ionic DeepSteam function is only effective when it is used in combination with a steam setting and a temperature setting between 2 and MAX. Note: Do not use the Ionic DeepSteam function when you iron without steam and/or at low temperature settings. However, ironing at low temperatures wit...
Page 15 - Vertical steam boost; Never direct the steam at people.; Drip stop; Note: If the amber temperature light does not go on
Vertical steam boost 1 You can also use the steam boost function when you hold the iron in vertical position. This is useful for removing creases from hanging clothes, cur tains etc. Never direct the steam at people. Drip stop This iron is equipped with a drip-stop function: the iron automatically s...
Page 16 - Set the steam control to position 0, remove; Double-Active Calc System; Set the steam control to position 0.
Cleaning and maintenance Cleaning 1 Set the steam control to position 0, remove the plug from the wall socket and let the iron cool down. 2 Wipe flakes and any other deposits off the soleplate with a damp cloth and a non-abrasive (liquid) cleaning agent. To keep the soleplate smooth, avoid hard cont...
Page 17 - Hold the iron over the sink, press and hold the; After the Calc-Clean process; cloth to remove any water stains that may have
Do not put vinegar or other descaling agents in the water tank. 4 Set the temperature dial to MAX. 5 Put the plug in an earthed wall socket. 6 Unplug the iron when the temperature light goes out. 7 Hold the iron over the sink, press and hold the Calc-Clean button and gently shake the iron to and fro...
Page 18 - Storage; Empty the water tank.; Heat-resistant protective cover; You can store the iron on the heat-resistant
Storage 1 Set the steam control to position 0 and unplug the iron. 2 Empty the water tank. 3 Let the iron cool down in a safe place. 4 Wind the mains cord around the cord storage facility and fix it with the cord clip. 5 Store the iron on its heel in a dry and safe place. Heat-resistant protective c...
Page 23 - Introducción; Importante; Antes de usar el aparato, lea atentamente; ESPAÑOL
23 Introducción Enhorabuena por la compra de este producto y bienvenido a Philips. Para sacar el mayor par tido de la asistencia que Philips le ofrece, registre su producto en www.philips.com/welcome. Descripción general (fig. 1) 1 Boquilla del spray 2 Aber tura de llenado 3 Botón spray 4 Control de...
Page 25 - Precaución
- Asegúrese de que los niños no jueguen con este aparato. - No permita que el cable de alimentación entre en contacto con la suela caliente de la plancha. Precaución - Conecte el aparato sólo a un enchufe con toma de tierra. - Compruebe el cable de alimentación con regularidad por si estuviera dañad...
Page 26 - Consejo: Si el agua del grifo de su zona es muy dura, le
Campos electromagnéticos (CEM) Este aparato Philips cumple todos los estándares sobre campos electromagnéticos (CEM). Si se utiliza correctamente y de acuerdo con las instrucciones de este manual, el aparato se puede usar de forma segura según los conocimientos científicos disponibles hoy en día. An...
Page 27 - Selección de las posiciones de temperatura; Posición de
No llene el depósito de agua por encima de la indicación MAX. No eche en el depósito de agua perfume, vinagre, almidón, productos desincrustantes, productos que ayuden al planchado ni otros productos químicos. 5 Cierre la tapa de la abertura de llenado (“clic”). Selección de las posiciones de temper...
Page 29 - Uso del aparato; Nota: Puede que salga un poco de humo de la plancha
5 Conecte el aparato a un enchufe con toma de tierra. , Se encenderá el piloto ámbar de temperatura. 6 Cuando el piloto ámbar de temperatura se apague, espere un momento antes de comenzar a planchar. , Durante el planchado el piloto de temperatura se ilumina de vez en cuando. Uso del aparato Nota: P...
Page 30 - Planchado con vapor; Nota: La plancha empieza a producir vapor en cuanto; Planchado con Ionic DeepSteam (sólo en
Planchado con vapor 1 Asegúrese de que haya agua en el depósito de agua. 2 Seleccione la temperatura de planchado adecuada (consulte el capítulo “Preparación para su uso”, apartado “Selección de las posiciones de temperatura y de vapor”). 3 Seleccione la posición de vapor adecuada (consulte el capít...
Page 32 - Características
Nota: La producción de Ionic DeepSteam puede variar de vez en cuando, según la temperatura de planchado. Características Función spray Puede utilizar la función spray a cualquier temperatura para humedecer la prenda que vaya a planchar. Esto le ayudará a eliminar las arrugas rebeldes. 1 Asegúrese de...
Page 33 - Nota: Si el piloto ámbar de temperatura no se ilumina
Antigoteo La plancha está equipada con una función antigoteo: la plancha deja de producir vapor automáticamente cuando la temperatura es demasiado baja, para evitar que la suela gotee. Oirá un sonido cuando ocurra esto. Función de desconexión automática (sólo modelos específicos) La función de desco...
Page 35 - Una vez realizado el proceso Calc-Clean
1 Asegúrese de que el aparato está desenchufado. 2 Ajuste el control de vapor a la posición 0. 3 Llene el depósito del agua hasta el nivel MAX. No eche vinagre ni otros agentes desincrustantes en el depósito del agua. 4 Coloque el control de temperatura en la posición MAX. 5 Conecte el aparato a un ...
Page 36 - Almacenamiento; Enrolle el cable de red alrededor del; Cubierta protectora resistente al calor (sólo; Puede guardar la plancha sobre la cubier ta
3 Para eliminar las manchas de agua que puedan haber quedado en la suela, pase suavemente la plancha caliente sobre un trozo de tela vieja. 4 Deje que la plancha se enfríe antes de guardarla. Almacenamiento 1 Ajuste el control de vapor a la posición 0 y desenchufe la plancha. 2 Vacíe el depósito de ...
Page 37 - Medio ambiente
2 Coloque la plancha sobre la cubierta protectora resistente al calor. Medio ambiente - Al final de su vida útil, no tire el aparato junto con la basura normal del hogar. Llévelo a un punto de recogida oficial para su reciclado. De esta manera ayudará a conser var el medio ambiente. Garantía y servi...
Page 42 - Introduzione; ITALIANO
42 Introduzione Congratulazioni per l’acquisto e benvenuti in Philips! Per trarre il massimo vantaggio dall’assistenza Philips, registrate il vostro prodotto su www.philips.com/welcome. Descrizione generale (fig. 1) 1 Ugello spray 2 Foro di riempimento 3 Pulsante spray 4 Regolatore di vapore 5 Tasto...
Page 44 - Attenzione
- L’apparecchio non è destinato a persone (inclusi bambini) con capacità mentali, fisiche o sensoriali ridotte, fatti salvi i casi in cui tali persone abbiano ricevuto assistenza o formazione per l’uso dell’apparecchio da una persona responsabile della loro sicurezza. - Adottate le dovute precauzion...
Page 45 - Primo utilizzo; Rimuovete gli eventuali adesivi o la pellicola di
incustodito anche per un breve periodo, impostate il regolatore di vapore in posizione 0 e il ferro in posizione ver ticale, quindi scollegate la spina dalla presa. - Posizionate e utilizzate sempre il ferro su una superficie piana, stabile e orizzontale. - non aggiungete mai profumo, aceto, amido, ...
Page 46 - Per riempire il serbatoio, utilizzate l’acqua del
Predisposizione dell’apparecchio Riempimento del serbatoio dell’acqua Tipo di acqua da utilizzare Per riempire il serbatoio, utilizzate l’acqua del rubinetto. Consiglio In caso di acqua particolarmente dura, vi consigliamo di mescolarla con la stessa quantità di acqua distillata. Non utilizzate solo...
Page 47 - tessuto
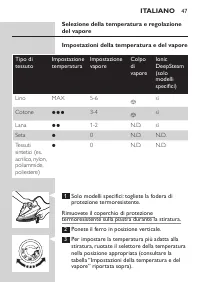
Selezione della temperatura e regolazione del vapore Impostazioni della temperatura e del vapore Tipo di tessuto Impostazione temperatura Impostazione vapore Colpo di vapore Ionic DeepSteam (solo modelli specifici) Lino MAX 5-6 \ sì Cotone 3 3-4 \ sì Lana 2 1-2 N.D. sì Seta 1 0 N.D. N.D. Tessuti sin...
Page 48 - Modalità d’uso dell’apparecchio; Nota: La prima volta che si utilizza il ferro, si potrebbe
Controllate sull’etichetta del capo il tipo di tessuto. Se non si conosce il tessuto del capo da stirare, si consiglia di stirare un angolo nascosto per determinare la temperatura più indicata. Seta, lana e materiali sintetici: stirate il capo al rovescio per evitare tracce di lucido. Per evitare di...
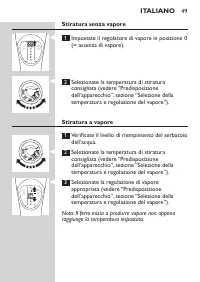
Page 49 - Nota: Il ferro inizia a produrre vapore non appena
Stiratura senza vapore 1 Impostate il regolatore di vapore in posizione 0 (= assenza di vapore). 2 Selezionate la temperatura di stiratura consigliata (vedere “Predisposizione dell’apparecchio”, sezione “Selezione della temperatura e regolazione del vapore”). Stiratura a vapore 1 Verificate il livel...
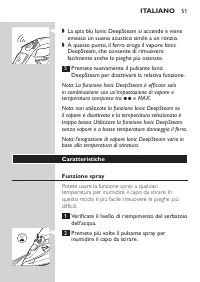
Page 51 - Potete usare la funzione spray a qualsiasi
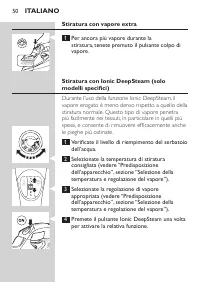
, La spia blu Ionic DeepSteam si accende e viene emesso un suono acustico simile a un ronzio. , A questo punto, il ferro eroga il vapore Ionic DeepSteam, che consente di rimuovere facilmente anche le pieghe più ostinate. 5 Premete nuovamente il pulsante Ionic DeepSteam per disattivare la relativa fu...
Page 53 - Pulizia e manutenzione; raffreddare il ferro.
1 Sollevate il ferro o muovetelo leggermente. , La spia rossa dello spegnimento automatico si spegne. , Se la temperatura della piastra è scesa sotto la temperatura impostata per il ferro, si accende la spia arancione della temperatura. 2 Se la spia arancione si accende dopo aver mosso il ferro, att...
Page 54 - Riempite completamente il serbatoio
Doppio sistema anticalcare - Le pastiglie anticalcare evitano che il calcare si depositi nei fori. Le pastiglie sono costantemente attive e non devono essere sostituite. - La funzione Calc-Clean rimuove le par ticelle di calcare dal ferro da stiro. Come usare la funzione Calc-Clean Usate la funzione...
Page 55 - Al termine della procedura Calc-Clean; Inserite la spina nella presa e fate riscaldare; Conservazione; vano portacavo e fermatelo con la relativa clip.
, In questo modo dalla piastra fuoriescono vapore e acqua bollente contenenti eventuali residui di calcare e altre impurità. 8 Rilasciate il pulsante per la funzione anticalcare non appena il serbatoio dell’acqua si svuota. 9 Ripetete la procedura Calc-Clean nel caso in cui il ferro contenga ancora ...
Page 56 - Fodera di protezione termoresistente; non utilizzate il coperchio di protezione; Tutela dell’ambiente
Fodera di protezione termoresistente (solo modelli specifici) Potete riporre il ferro sulla fodera di protezione termoresistente subito dopo la stiratura. Non è necessario far raffreddare il ferro prima. non utilizzate il coperchio di protezione termoresistente durante la stiratura. 1 Avvolgete il c...
Page 57 - Risoluzione dei guasti; Problema
Risoluzione dei guasti Se l’apparecchio non funziona o non funziona correttamente, consultate l’elenco ripor tato di seguito. Se il problema non è ripor tato in questo elenco, è probabile che l’apparecchio sia difettoso. In tal caso si consiglia di consegnare l’apparecchio presso il rivenditore o un...
Page 60 - Introdução; Leia cuidadosamente este manual do; PORTUGUÊS
60 Introdução Parabéns pela sua compra e bem-vindo à Philips! Para tirar todo o par tido da assistência fornecida pela Philips, registe o seu produto em www.philips.com/welcome. Descrição geral (fig. 1) 1 Bocal de pulverização 2 Aber tura para enchimento 3 Botão de pulverização 4 Controlo do vapor 5...
Page 62 - Cuidado
recebido super visão ou instruções sobre o uso do aparelho por alguém responsável pela sua segurança. - As crianças devem ser super visionadas para garantir que não brincam com o aparelho. - Não deixe que o fio de alimentação entre em contacto com a base quente do ferro. Cuidado - Ligue o aparelho a...
Page 63 - Antes da primeira utilização; Retire todos os autocolantes, película de; Preparar para a utilização; Sugestão: Se a água da torneira da sua área de
- Não deite perfume, vinagre, goma, produtos descalcificantes, produtos para passar a ferro ou outros agentes químicos para dentro do depósito de água. - Este aparelho destina-se apenas a uso doméstico. Campos electromagnéticos (CEM) Este aparelho da Philips respeita todas as normas relacionadas com...
Page 64 - Não encha o depósito de água acima da indicação
1 Certifique-se de que o aparelho está desligado da tomada. 2 Regule o controlo do vapor para a posição 0 (= sem vapor). 3 Abra a tampa da abertura para enchimento. 4 Incline o ferro para trás e utilize o copo de enchimento para encher o depósito com água da torneira até à indicação de enchimento má...
Page 65 - Regulação
Seleccionar a regulação de temperatura e vapor Regulações de temperatura e vapor Tipo de tecido Regulação da temperatura Regulação do vapor Jacto de vapor Ionic DeepSteam (apenas em modelos específicos) Linho MÁX 5-6 \ Sim Algodão 3 3-4 \ Sim Lã 2 1-2 N.D. Sim Seda 1 0 N.D. N.D. Tecidos sintéticos (...
Page 67 - Utilizar o aparelho; Nota: O ferro pode libertar algum fumo quando for; Engomar a vapor; Nota: O ferro começa a produzir vapor assim
Utilizar o aparelho Nota: O ferro pode libertar algum fumo quando for utilizado pela primeira vez. É normal e pára passado pouco tempo.Engomar sem vapor 1 Regule o controlo do vapor para a posição 0 (= sem vapor). 2 Defina a temperatura para engomar adequada (consulte o capítulo “Preparação”, ponto ...
Page 68 - Engomar a vapor com vapor extra; premido o botão do jacto de vapor.; Engomar com Ionic DeepSteam (apenas em
Engomar a vapor com vapor extra 1 Para vapor extra durante o engomar, mantenha premido o botão do jacto de vapor. Engomar com Ionic DeepSteam (apenas em modelos específicos) Ao utilizar a função Ionic DeepSteam (vapor ionizado profundo) enquanto passa com vapor, as par tículas de vapor produzidas sã...
Page 69 - remover mesmo os vincos mais persistentes.; Funções; Pode utilizar a função de borrifador em qualquer
, A luz da função Ionic DeepSteam acende-se e irá ouvir um zumbido. , O ferro produz vapor ionizado profundo para remover mesmo os vincos mais persistentes. 5 Prima uma vez o botão Ionic DeepSteam para desligar a função Ionic DeepSteam. Nota: A função Ionic DeepSteam só é eficaz se for utilizada em ...
Page 70 - Função de jacto de vapor; Prima e solte o botão do jacto de vapor.; Jacto de vapor vertical; Também pode utilizar a função de jacto de; Função de desligar automático (apenas tipos; se intermitente, indicando que o ferro foi desligado
Função de jacto de vapor Um jacto de vapor da base especial Steam Tip ajuda a remover os vincos persistentes. O jacto de vapor melhora a distribuição do vapor por toda a peça de roupa. A função de jacto de vapor apenas pode ser utilizada nas regulações de temperatura entre 3 e MAX. 1 Prima e solte o...
Page 71 - Limpeza e manutenção; Para conservar a base do ferro macia, deve evitar
Para que o ferro volte a aquecer : 1 Levante o ferro ou movimente-o ligeiramente. , A luz vermelha AUTO/OFF apaga-se. , Se a temperatura da base for inferior à temperatura de engomar definida, a luz laranja acende-se. 2 Se a luz âmbar da temperatura se acender depois de movimentar o ferro, aguarde q...
Page 73 - Pode guardar o ferro na capa de protecção
9 Repita o processo Calc-clean se o ferro ainda contiver muitas impurezas. Após o processo Calc-Clean 1 Ligue a ficha à tomada eléctrica e deixe o ferro aquecer para permitir que a base seque. 2 Desligue o ferro da corrente quando atingir a temperatura certa. 3 Movimente o ferro suavemente sobre um ...
Page 74 - Meio ambiente
Não utilize a capa de protecção resistente ao calor enquanto estiver a passar. 1 Enrole o cabo de alimentação à volta da arrumação do fio e fixe-o com o clipe do cabo. 2 Coloque o ferro na capa de protecção resistente ao calor. Meio ambiente - Não deite fora o aparelho junto com o lixo doméstico nor...
Page 75 - Resolução de problemas
Resolução de problemas Se o aparelho não funcionar ou se não funcionar correctamente, verifique primeiro a lista que se segue. Se o problema não estiver mencionado nessa lista, provavelmente o aparelho tem um defeito. Nesse caso, é aconselhável levar o aparelho a um revendedor ou a um centro de assi...
Page 78 - Giriş; Önemli; Cihazı kullanmadan önce bu kullanım; TÜRKÇE
78 Giriş Ürünümüzü satın aldığınız için teşekkür ederiz; Philips’e hoş geldiniz! Philips’in sunduğu destekten faydalanabilmek için lütfen ürününüzü şu adresten kaydedin: www.philips.com/welcome. Genel açıklamalar (Şek. 1) 1 Sprey başlığı 2 Doldurma ağzı 3 Sprey düğmesi 4 Buhar ayar düğmesi 5 Buhar p...
Page 80 - Dikkat; Bu Philips cihazı elektromanyetik alanlarla (EMF) ilgili
- Elektrik kablosunun sıcak ütü tabanına temas etmesine izin vermeyin. Dikkat - Cihazı sadece topraklı prize takın. - Olası hasarlara karşı elektrik kablosunu düzenli olarak kontrol edin. - Ütünün tabanı aşırı ısınabilir ve dokunulduğunda yanıklara yol açabilir. - Ütülemeyi bitirdiğinizde, ütüyü tem...
Page 81 - Su haznesini doldurmak için normal musluk suyu
İlk kullanımdan önce 1 Tabanın altında bulunan etiket, koruyucu folyo ya da plastiği çıkartın. 2 Doldurma kabını yıkayın ve kurulayın. Cihazı kullanıma hazırlama Su haznesinin doldurulması Kullanılması gereken su tipi Su haznesini doldurmak için normal musluk suyu kullanabilirsiniz. İpucu: Bulunduğu...
Page 82 - DeepSteam
Sıcaklık ve buhar ayarının seçilmesi Sıcaklık ve buhar ayarları Kumaş türü Sıcaklık ayarları Buhar ayarı Buhar püskürtme İyonik DeepSteam (sadece belirli modellerde) Keten MAKS. 5-6 \ evet Pamuklu 3 3-4 \ evet Yünlü 2 1 - 2 geçersiz evet İpekli 1 0 geçersiz geçersiz Sentetik kumaşlar (örn. akrilik, ...
Page 83 - Cihazın kullanımı; Not: Cihazı ilk kullanışınızda bir miktar duman çıkması
Elbisenin ne tür kumaştan yapıldığını bilmiyorsanız, elbiseyi giydiğinizde görünmeyen bir bölümünü ütüleyerek doğru ütüleme sıcaklığını belirleyin. İpekli, yünlü ve sentetik mater yaller : kumaşın parlamasını önlemek için ters taraftan ütüleyin. Leke söz konusu olabileceğinden püskür tme yapmayın. Ü...
Page 84 - Buharlı ütüleme; Not: Ayarlanan sıcaklığa ulaştıktan sonra ütü buhar
2 Uygun ütü sıcaklığını seçin (bkz. ‘Kullanıma hazırlama’ bölümü, ‘Sıcaklık ve buhar ayarının ayarlanması’ konusu). Buharlı ütüleme 1 Su haznesinde su olduğundan emin olun. 2 Uygun ütü sıcaklığını seçin (bkz. ‘Kullanıma hazırlama’ bölümü, ‘Sıcaklık ve buhar ayarının ayarlanması’ konusu). 3 Uygun buh...
Page 85 - İyonik DeepSteam ile ütüleme (sadece
İyonik DeepSteam ile ütüleme (sadece belirli modellerde) Buharlı ütüleme sırasında İyonik DeepSteam fonksiyonu kullanıldığında üretilen buhar, normal buharlı ütülemede üretilenden daha ince olacaktır. İnce buhar, özellikle kalın kumaşa daha derinlemesine nüfuz eder. Bu da inatçı kırışıklıkları kolay...
Page 87 - Not: Eğer Kehribar rengi sıcaklık ışığı ütüyü hareket
Dikey buhar püskürtme 1 Buhar püskürtme fonksiyonunu ütüyü dik olarak tutarken de kullanabilirsiniz. Bu işlem, asılan elbiseler, perdeler gibi ürünlerin kırışıklıklarını gidermek için kullanılabilir. Asla buharı insanlara yöneltmeyin.Damla tıpası Bu ütü damlama durdurucu bir özelliğe sahiptir : sıca...
Page 89 - Kireç Temizleme işleminden sonra
Su haznesine sirke veya diğer kireç çözücü maddeler koymayın. 4 Sıcaklık kadranını MAX ayarına getirin. 5 Fişi topraklı duvar prizine takın. 6 Sıcaklık ışığı söndüğünde ütüyü prizden çekin. 7 Ütüyü lavabo üzerinde tutun ve Kireç Temizleme düğmesini basılı tutarak ütüyü hafifçe aşağı yukarı sallayın....
Page 90 - Saklama; ve kablo klipsiyle sabitleyin.; Isıya dayanıklı koruyucu kapak (sadece belirli; Ütü işleminden hemen sonra ütüyü ısıya dayanıklı
Saklama 1 Buhar kontrolünü 0 konumuna getirin ve ütünün fişini çekin. 2 Su haznesini boşaltın. 3 Ütüyü güvenli bir yerde soğumaya bırakın. 4 Güç kablosunu kablo saklama bölmesine sarın ve kablo klipsiyle sabitleyin. 5 Ütüyü arka kısmının üzerinde kuru ve güvenli bir zeminde saklayın. Isıya dayanıklı...
Page 91 - Sorun
Çevre - Kullanım ömrü sonunda, cihazı normal ev atıklarınızla birlikte atmayın; bunun yerine, geri dönüşüm için resmi toplama noktalara teslim edin. Böylece, çevrenin korunmasına yardımcı olursunuz. Garanti ve servis Daha fazla bilgiye ihtiyaç duyarsanız veya bir sorunla karşılaşırsanız, www.philips...