Page 6 - PM
Page 7 - EN; Important; Safety
EN 1 Important Safety Read these instructions. • Heed all warnings. • Follow all instructions. • Do not use this clock radio near water. • Clean only with dr y cloth. • Do not block any ventilation openings. Install in accordance • with the manufacturer’s instructions. Do not install near any heat s...
Page 8 - Your clock radio; Introduction
This clock radio shall not be exposed to dripping or • splashing. Do not place any sources of danger on the clock radio (e.g. • liquid fi lled objects, lighted candles). Where the MAINS plug or an appliance coupler is used as • the disconnect device, the disconnect device shall remain readily operab...
Page 9 - Overview of the main unit
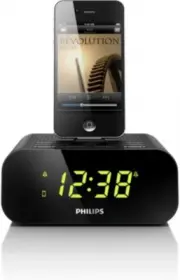
Overview of the main unit A a iPhone Select or exit iPhone/iPod mode. • b HR /TUNING +/- Set hour. • Tune to radio stations. • c MIN/PRESET +/- Set minute. • Select a preset radio station. • d Display panel Show current information. • e SLEEP Set sleep timer. • f SCAN / PROG / SET TIME Scan/store ra...
Page 10 - Get; Install battery
k DOCK for iPhone/iPod l FM ANT FM antenna. • m DC IN 5V/2A Power supply socket. • n AL1/AL2 R ADIO· BUZZ·iPhone Select alarm source. • 3 Get started Always follow the instructions in this chapter in sequence. Install battery Warning Risk of explosion! Keep bat teries away from heat, sunshine or • f...
Page 11 - Connect power; Set clock
For fi rst-time use: Remove the protective tab to activate the batter y. B To replace the battery: C Connect power D Caution Risk of product damage! Ensure that the power voltage corresponds • to the voltage printed on the back or underside of the clock radio. Risk of electric shock ! When you unplu...
Page 12 - Play from iPhone/iPod; Compatible iPhone/iPod
4 Play from iPhone/iPod You can enjoy audio from iPhone/iPod through this clock radio. Compatible iPhone/iPod The clock radio suppor ts these iPod and iPhone models: Made for. iPod touch (1st, 2nd, 3rd, and 4th generation) • iPod classic • iPod with video • iPod nano (1st, 2nd, 3rd, 4th, 5th, and 6t...
Page 13 - Listen to FM radio; Tune to FM radio stations
Remove the iPhone/iPod F Pull the iPhone/iPod out of the dock. Charge the iPhone/iPod When the clock radio is connected to power, the docked iPhone/iPod star ts charging. Adjust volume G 5 Listen to FM radio Tune to FM radio stations H Tip Position the antenna as far as possible from T V, VCR , or o...
Page 14 - Store FM radio stations automatically; Store FM radio stations manually; Select a preset radio station
Store FM radio stations automatically You can store a maximum of 20 FM radio stations. 1 Press R ADIO to turn on the radio. 2 Press and hold PROG for two seconds. The clock radio stores all the available FM radio stations » and broadcasts the fi rst available station automatically. Store FM radio st...
Page 15 - Set alarm timer; Set alarm time; Select alarm sound
6 Other features Set alarm timer I Set alarm time You can set two alarms to ring at different time. Note Make sure that you have set the clock correctly. • 1 Press and hold AL1 / AL2 for 2 seconds to enter alarm set ting mode. The hour and minute digits begin to blink. » » or is displayed accordingl...
Page 16 - Activate/deactivate alarm timer; Set sleep timer
Tip When alarm time arrives and you are listening to radio or audio • in iPhone/iPod, buzzer can only be activated as alarm sound. If you have selected iPhone/iPod source, while no iPhone/iPod is • connected, the clock radio switches to buzzer source instead. Activate/deactivate alarm timer 1 Press ...
Page 17 - Adjust display brightness; Product; Speci; Ampli
Press SLEEP repeatedly to select the sleep timer period (in minutes). When the sleep timer is activated, » appears. To deactivate the sleep timer, press SLEEP repeatedly until [OFF] (off) appears. Adjust display brightness Press BRIGHTNESS repeatedly to select different brightness level: high , mid,...
Page 19 - Troubleshooting
8 Troubleshooting Warning Never remove the casing of this apparatus. • To keep the warranty valid, never tr y to repair the system yourself. If you encounter problems when using this apparatus, check the following points before requesting ser vice. If the problem remains unsolved, go to the Philips ...
Page 20 - Notice
No response from the unit Disconnect and reconnect the AC power plug, then turn on • the unit again. Poor radio reception Increase the distance between the unit and your T V or • VCR . Fully ex tend the FM antenna. • 9 Notice This product complies with the radio interference requirements of the Euro...