Page 2 - DO NOT INSTALL OR PLACE THIS UNIT IN A BOOKCASE,; THIS UNIT IS INTENDED FOR USE IN MODERATE CLIMATES.
2 RQT7448 G e tt in g st ar te d CAUTION! THIS PRODUCT UTILIZES A LASER.USE OF CONTROLS OR ADJUSTMENTS OR PERFORMANCE OF PROCEDURES OTHER THAN THOSE SPECIFIED HEREIN MAY RESULT IN HAZARDOUS RADIATION EXPOSURE.DO NOT OPEN COVERS AND DO NOT REPAIR YOURSELF. REFER SERVICING TO QUALIFIED PERSONNEL. WARN...
Page 3 - Table of contents; STEP; Set up to match your television; Using S; Playing recorded video contents/Playing play-; Accessories; Please check and identify the supplied accessories.; Remote control; For use with this unit only. Do not; RF coaxial cable; for remote control
3 RQT7448 G e tt in g st ar te d Table of contents Accessories . . . . . . . . . . . . . . . . . . . . . . . . . . . . . . . 3Useful features . . . . . . . . . . . . . . . . . . . . . . . . . . . . . 4The remote control . . . . . . . . . . . . . . . . . . . . . . . . . . 4Control reference guide . ....
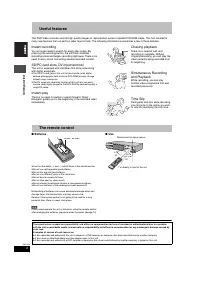
Page 4 - Useful features; Instant recording; Batteries; Chasing playback; The remote control
4 RQT7448 G e tt in g st ar te d Useful features This DVD Video recorder records high quality images to rapid random access capable DVD-RAM media. This has resulted in many new features that out perform older tape formats. The following information summarizes a few of these features. Instant recordi...
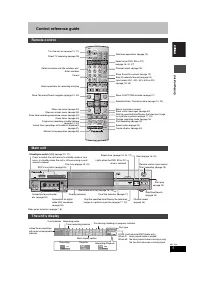
Page 5 - Control reference guide; Remote control; Main unit; The unit’s display; PLAY
5 RQT7448 G e tt in g st ar te d Control reference guide Rear panel terminals ( ➡ page 7, 8) Remote control VOLUME CH DIRECT TV REC DVD TV AV 1 2 3 4 5 6 7 8 0 9 MANUAL SKIP ShowView CH CANCEL INPUT SELECT SKIP STOP PAUSE PLAY/x1.3 SLOW/SEARCH FUNCTIONS ENTER DIRECT NAVIGATOR TOP MENU RETURN SUB MEN...
Page 6 - Connection; Recommended connection for your television; Q Link functions; Examples of equipment you can connect to this unit’s terminals; What kind of input terminal does your television have?; VCR
6 RQT7448 G e tt in g st ar te d STEP 1 Connection ≥ The equipment connections described are examples. ≥ Before connection, turn off all equipment and read the appropriate operating instructions. ≥ Peripheral equipment and optional cables sold separately unless otherwise indicated. ∫ Recommended con...
Page 7 - RGB; Connecting a television with 21-pin Scart terminal and VCR; AV1 terminal
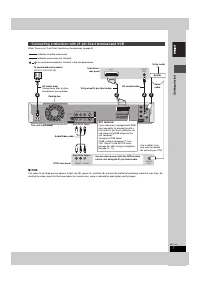
7 RQT7448 G e tt in g st ar te d When there is no 21-pin Scart terminal on the television ( ➡ page 8) ∫ RGB This refers to the three primary colours of light, red (R), green (G), and blue (B) and also the method of producing video that uses them. By dividing the video signal into the three colours f...
Page 8 - Component video output; COMPONENT VIDEO OUT terminal
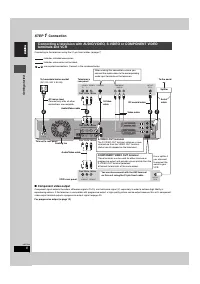
8 RQT7448 G e tt in g st ar te d STEP 1 Connection Connecting to the television using the 21-pin Scart cables ( ➡ page 7) ∫ Component video output Component signal outputs the colour difference signals (P B /P R ) and luminance signal (Y) separately in order to achieve high fidelity in reproducing c...
Page 9 - Connection to a stereo amplifier; Connecting a satellite receiver, digital receiver or decoder; Connecting an amplifier or system component; OPTICAL IN; AUDIO IN
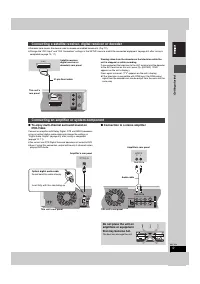
9 RQT7448 G e tt in g st ar te d ≥ Decoder here means the device used to decode scrambled broadcasts (Pay TV). ≥ Change the “AV2 Input” and “AV2 Connection” settings in the SETUP menu to match the connected equipment ( ➡ page 44) after tuning is completed ( ➡ page 10, 11). Viewing video from the dec...
Page 10 - Channel reception settings; page 50) with a fully wired 21-pin Scart; Downloading from the television starts.; To stop partway; If the clock setting menu appears; Set the clock manually (; To restart Preset Download (; Download from TV
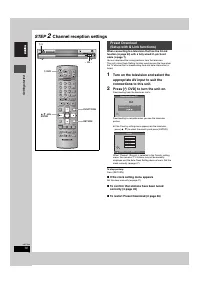
10 RQT7448 G e tt in g st ar te d STEP 2 Channel reception settings When connecting to a television that has the Q Link function ( ➡ page 50) with a fully wired 21-pin Scart cable ( ➡ page 7). You can download the tuning positions from the television.This unit’s Auto Clock Setting function synchroni...
Page 11 - When connecting to a television with the VIDEO OUT,; The Country setting menu appears.; ] on the main unit until the; Автонастройки
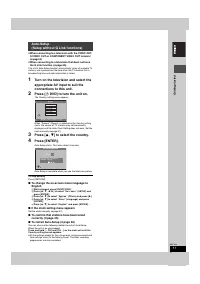
11 RQT7448 G e tt in g st ar te d ≥ When connecting to a television with the VIDEO OUT, S-VIDEO OUT or COMPONENT VIDEO OUT terminal ( ➡ page 8). ≥ When connecting to a television that does not have the Q Link function ( ➡ page 50). This unit’s Auto-Setup function automatically tunes all available TV...
Page 12 - Set up to match your television and remote control; While stopped; Selecting television type and aspect; To enjoy progressive video
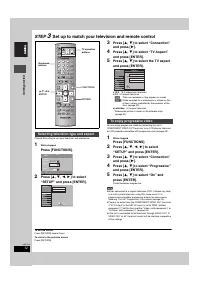
12 RQT7448 G e tt in g st ar te d STEP 3 Set up to match your television and remote control Choose the setting to suit your television and preference. 1 While stopped Press [FUNCTIONS]. 2 Press [ 3 , 4 , 2 , 1 ] to select “SETUP” and press [ENTER]. 3 Press [ 3 , 4 ] to select “Connection” and press ...
Page 13 - with the numbered buttons.
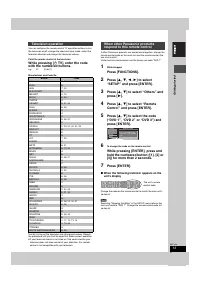
13 RQT7448 G e tt in g st ar te d You can configure the remote control TV operation buttons to turn the television on/off, change the television input mode, select the television channel and change the television volume. Point the remote control at the television While pressing [ Í TV], enter the co...
Page 14 - Disc and card information; One time recording discs (recordable until the disc is full); Discs that cannot be played
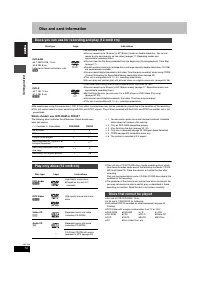
14 RQT7448 G e tt in g st ar te d Disc and card information ≥ We recommend using Panasonic discs. DVD-R from other manufacturers may not be recorded or played due to the condition of the recording. ≥ This unit cannot record to discs containing both PAL and NTSC signals. Play of discs recorded with b...
Page 15 - Cards useable on this unit; II; Structure of folders displayed by this unit; Accessory discs
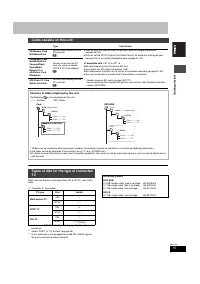
15 RQT7448 G e tt in g st ar te d When you use the discs recorded either PAL or NTSC, refer to this table. ( Y : Possible, t : Impossible) § 1 If you select “NTSC” in “TV System” ( ➡ page 46), the picture may be clearer. § 2 Select “NTSC” in “TV System” ( ➡ page 46). § 3 If your television is not eq...
Page 16 - Recording television programmes; unit to open the tray and insert a disc.; W X; To stop recording; When recording to DVD-R; DVD indicator
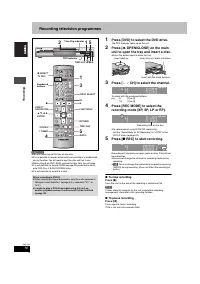
16 RQT7448 Reco rd in g Recording television programmes [RAM] [DVD-R] ≥ You can record up to 99 titles on one disc. ≥ It is not possible to record continuously from one side of a double sided disc to the other. You will need to eject the disc and turn it over. ≥ When using 8 cm DVD-RAM, remove the d...
Page 17 - During recording; REC] on the main unit to select the recording; To stop recording partway; If a station broadcasts Teletext information; To exit the DIRECT NAVIGATOR screen; ] to select the time and; To stop play; Mode; LP; Pic; Playing while you are recording
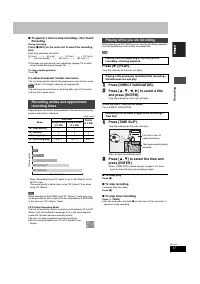
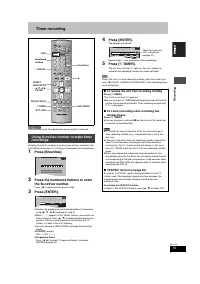
17 RQT7448 Reco rd in g ∫ To specify a time to stop recording—One Touch Recording During recording Press [ ¥ REC] on the main unit to select the recording time. Each time you press the button: ≥ This does not work during timer recordings ( ➡ page 19) or while using Flexible Recording ( ➡ page 18). T...
Page 18 - Refer to the control reference on page 16.; ] to select “Hour” and; Direct TV Recording
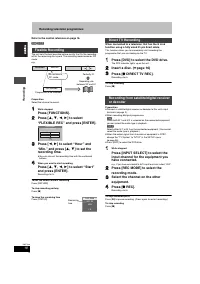
18 RQT7448 Reco rd in g Recording television programmes Refer to the control reference on page 16. [RAM] [DVD-R] The unit sets the best possible picture quality that fits the recording within the remaining disc space. The recording mode becomes FR mode.e.g., Preparation Select the channel to record....
Page 19 - Timer recording; Programme Name; number to make timer; To release the unit from recording standby; To activate the VPS/PDC function
19 RQT7448 Reco rd in g Timer recording [RAM] [DVD-R] You can enter up to 16 programmes up to a month in advance. Entering S HOW V IEW numbers is an easy way of timer recording. You can find these numbers in TV listings in newspapers and magazines. 1 Press [ShowView]. 2 Press the numbered buttons to...
Page 20 - Refer to the control reference on page 19.; ] to select “New Timer; Date
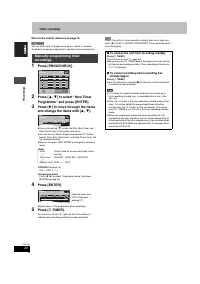
20 RQT7448 Reco rd in g Timer recording Refer to the control reference on page 19. [RAM] [DVD-R] You can enter up to 16 programmes up to a month in advance. (Each daily or weekly programme is counted as one programme.) 1 Press [PROG/CHECK]. 2 Press [ 3 , 4 ] to select “New Timer Programme” and press...
Page 21 - To change a programme; Preparation; Check, change or delete a programme; Icons
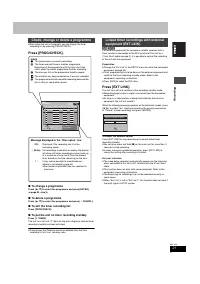
21 RQT7448 Reco rd in g ≥ Even when the unit is turned off, you can display the timer recording list by pressing [PROG/CHECK]. Press [PROG/CHECK]. ∫ To change a programme Press [ 3 , 4 ] to select the programme and press [ENTER]. ( ➡ page 20 , step 3) ∫ To delete a programme Press [ 3 , 4 ] to selec...
Page 22 - Playing recorded video contents/Playing play-only discs; ] to select “VIDEO” tab and; To show other pages; When a menu screen appears on the television; Press the numbered buttons to select the item.
22 RQT7448 P la y ing ba c k Playing recorded video contents/Playing play-only discs ≥ It is not possible to play continuously from one side of a double sided disc to the other. You will need to eject the disc and turn it over. ≥ When using 8 cm DVD-RAM, remove the disc from the cartridge. 1 Press [...
Page 23 - Operations during play; Resume play function; Press the numbered buttons.
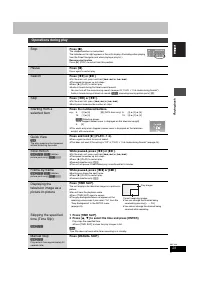
23 RQT7448 P la y ing ba c k Operations during play Stop Press [ ∫ ]. The stopped position is memorized.The indicator on the right appears in the unit’s display. (Excluding when playing from the Direct Navigator and when playing a play list.) Resume play function Press [ 1 ] (PLAY) to restart from t...
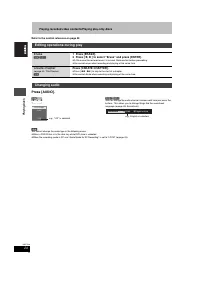
Page 24 - Refer to the control reference on page 22.; LR; You cannot change the audio type in the following cases.; Editing operations during play; Erase; You cannot erase when recording and playing at the same time.; Create chapter; You cannot divide when recording and playing at the same time.; Changing audio; Soundtrack
24 RQT7448 P la y ing ba c k Playing recorded video contents/Playing play-only discs Refer to the control reference on page 22. Press [AUDIO]. [RAM] [VCD] LR > L > R ^---------------} [DVD-V] [DVD-A] You can change the audio channel number each time you press the buttons. This allows you to ch...
Page 25 - Using menus to play MP3; ] to select the track and; Using the tree screen to find a group
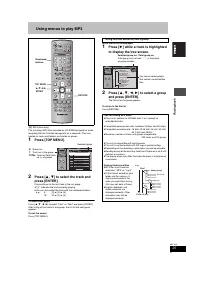
25 RQT7448 P la y ing ba c k Using menus to play MP3 [CD] (MP3 discs only) This unit plays MP3 files recorded on CD-R/RW designed for audio recording that are finalized ( ➡ page 49) on a computer. Files are treated as tracks and folders are treated as groups. 1 Press [TOP MENU]. 2 Press [ 3 , 4 ] to...
Page 26 - Playing still pictures; SD card slot
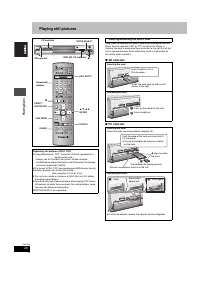
26 RQT7448 P la y ing ba c k Playing still pictures Only insert or remove the SD/PC card after turning the unit off. When the card indicator (“SD” or “PC”) on the unit’s display is flashing, the card is being read from or written to. Do not turn off the unit or remove the card. Such action may resul...
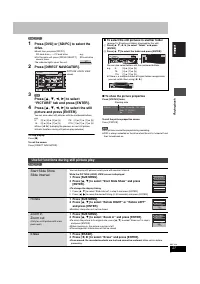
Page 27 - ] to select the still; To show the picture properties; To select the still pictures in another folder; Useful functions during still picture play; ] to select “Start Slide Show” and press; Rotate; ] to select “Rotate RIGHT” or “Rotate LEFT”
27 RQT7448 P la y ing ba c k [RAM] [SD] [PC] 1 Press [DVD] or [SD/PC] to select the drive. ≥ Each time you press [SD/PC]: SD card drive ,". PC card drive ≥ On the main unit, press [DRIVE SELECT] several times. The indicator lights up on the unit. 2 Press [DIRECT NAVIGATOR]. 3 [RAM] Press [ 3 , 4...
Page 28 - Using on-screen menus and Status messages; ] to select the menu and; Disc menu—Setting the disc content
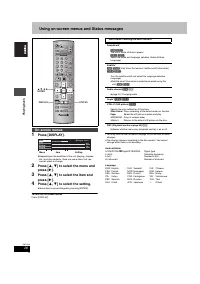
28 RQT7448 P la y ing ba c k Using on-screen menus and Status messages 1 Press [DISPLAY]. ≥ Depending on the condition of the unit (playing, stopped, etc.) and disc contents, there are some items that you cannot select or change. 2 Press [ 3 , 4 ] to select the menu and press [ 1 ]. 3 Press [ 3 , 4 ...
Page 29 - Play menu—Change the play sequence; Status messages
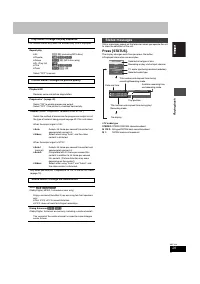
29 RQT7448 P la y ing ba c k This function works only when the elapsed play time is displayed. § Only when you have set “Progressive” to “On” in the SETUP menu ( ➡ page 12). Status messages appear on the television when you operate the unit to show the condition of the unit. Press [STATUS]. The disp...
Page 30 - Editing titles/chapters; If you select “Chapter View”
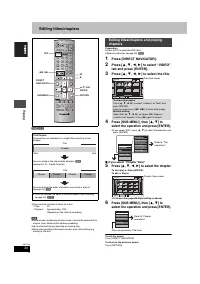
30 RQT7448 Edit ing Editing titles/chapters [RAM] [DVD-R] ≥ The maximum number of items on a disc: –Titles: 99 –Chapters: Approximately 1000(Depends on the state of recording.) [Note] ≥ Once erased, divided or partially erased, it cannot be restored to its original state. Make certain before proceed...
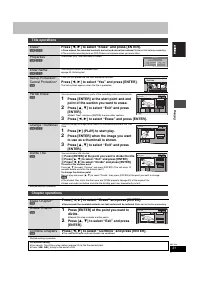
Page 31 - Title operations; ] to select “Exit” and press; Chapter operations; Once erased, the recorded contents are lost and cannot be restored.; ] to select “Exit” and press; For quicker editing
31 RQT7448 Edit ing § Multiple editing is possible. § Multiple editing is possible. Title operations Erase § [RAM] [DVD-R] Press [ 2 , 1 ] to select “Erase” and press [ENTER]. ≥ Once erased, the recorded contents are lost and cannot be restored. Make certain before proceeding. ≥ The available record...
Page 32 - Creating, editing and playing play lists; ] to select “Create”; To exit the screen; Creating play lists
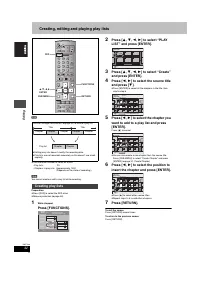
32 RQT7448 Edit ing Creating, editing and playing play lists [RAM] ≥ The maximum number of items on a disc: –Play lists: 99 –Chapters in play lists: Approximately 1000 (Depends on the state of recording.) [Note] You cannot create or edit a play list while recording. Preparation ≥ Press [DVD] to sele...
Page 33 - ] to select the play; Editing and playing play lists/chapters; Play list operations
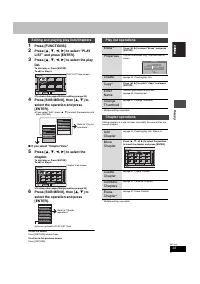
33 RQT7448 Edit ing 1 Press [FUNCTIONS]. 2 Press [ 3 , 4 , 2 , 1 ] to select “PLAY LIST” and press [ENTER]. 3 Press [ 3 , 4 , 2 , 1 ] to select the play list. To start play ➡ Press [ENTER]. To edit ➡ Step 4. ≥ To show other pages/Multiple editing ( ➡ page 30) 4 Press [SUB MENU], then [ 3 , 4 ] to se...
Page 34 - Editing still pictures; To edit still picture folders; Picture and folder operation
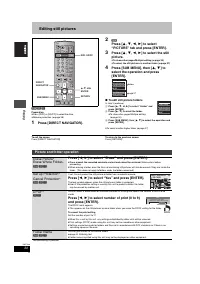
34 RQT7448 Edit ing Editing still pictures [RAM] [SD] [PC] Preparation ≥ Press [DVD] or [SD/PC] to select the drive. ≥ Release protection ( ➡ page 38). 1 Press [DIRECT NAVIGATOR]. 2 [RAM] Press [ 3 , 4 , 2 , 1 ] to select “PICTURE” tab and press [ENTER]. 3 Press [ 3 , 4 , 2 , 1 ] to select the still...
Page 35 - Recording from a video cassette recorder; Start play on the other equipment.
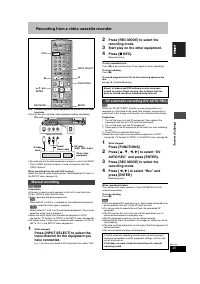
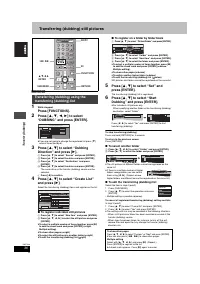
35 RQT7448 T ra n s fe r ( D ubbing) Recording from a video cassette recorder e.g., Connecting other video equipment to the AV3 or DV input terminals ≥ Turn off the unit and other video equipment before connecting. If the audio output of the other equipment is monaural, connect to L/MONO. § The S-VI...
Page 36 - ] to select “Dubbing; To register individual still pictures; ] to select “Set” and; To select another folder
36 RQT7448 T ra n s fe r ( D ubbing) Transferring (dubbing) still pictures [RAM] [SD] [PC] 1 While stopped Press [FUNCTIONS]. 2 Press [ 3 , 4 , 2 , 1 ] to select “DUBBING” and press [ENTER]. ≥ If you are not going to change the registered list press [ 4 ] several times ( ➡ step 6). 3 Press [ 3 , 4 ]...
Page 37 - ] to select “Copy from”; To return to the previous screen; FUNCTIONS window
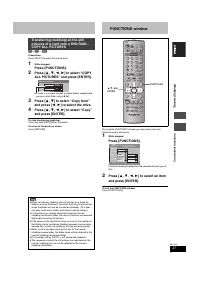
37 RQT7448 Con v e n ie nt f unc tions T ra n s fe r (Dubbing) [SD] or [PC] > [RAM] Preparation Press [SD/PC] to select the source drive. 1 While stopped Press [FUNCTIONS]. 2 Press [ 3 , 4 , 2 , 1 ] to select “COPY ALL PICTURES” and press [ENTER]. ≥ If there is a multiple number of higher folders...
Page 38 - Disc and card management; Setting the protection for the whole disc or card; ] to select “Yes” and; Disc Protection; Providing a disc with a name
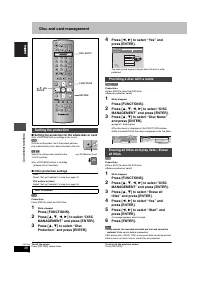
38 RQT7448 Con v e n ie nt f unc tions Disc and card management ∫ Setting the protection for the whole disc or card ≥ For a DVD-RAM with a cartridge or for a card [RAM] With the write-protect tab in the protect position, play automatically starts when inserted in the unit. [SD] [PC] Switch the write...
Page 39 - ] to select “Format Disc”
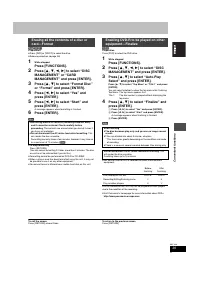
39 RQT7448 Con v e n ie nt f unc tions [RAM] [SD] [PC] Preparation ≥ Press [DVD] or [SD/PC] to select the drive. ≥ Release protection ( ➡ page 38). 1 While stopped Press [FUNCTIONS]. 2 Press [ 3 , 4 , 2 , 1 ] to select “DISC MANAGEMENT” or “CARD MANAGEMENT” and press [ENTER]. 3 Press [ 3 , 4 ] to se...
Page 40 - Entering text; Show Enter Name screen.
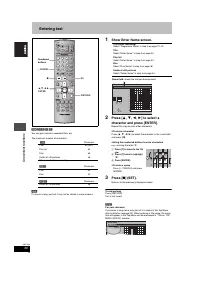
40 RQT7448 Con v e n ie nt f unc tions Entering text [RAM] [DVD-R] [SD] [PC] You can give names to recorded titles, etc. The maximum number of characters: § Title name for timer recording [Note] If a name is long, parts of it may not be shown in some screens. 1 Show Enter Name screen. 2 Press [ 3 , ...
Page 41 - Changing the unit’s settings; ] to select the tab and; Common procedures; Summary of settings; Tabs; Pycckий
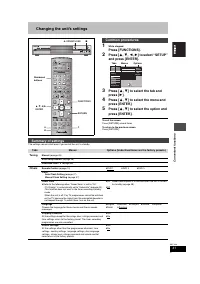
41 RQT7448 Con v e n ie nt f unc tions Changing the unit’s settings 1 While stopped Press [FUNCTIONS]. 2 Press [ 3 , 4 , 2 , 1 ] to select “SETUP” and press [ENTER]. 3 Press [ 3 , 4 ] to select the tab and press [ 1 ]. 4 Press [ 3 , 4 ] to select the menu and press [ENTER]. 5 Press [ 3 , 4 ] to sele...
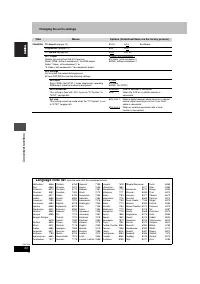
Page 44 - Language code list
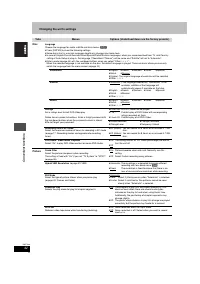
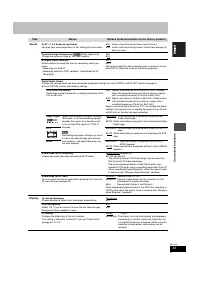
44 RQT7448 Con v e n ie nt f unc tions Changing the unit’s settings Tabs Menus Options (Underlined items are the factory presets.) Connection TV Aspect ( ➡ page 12) ≥ 16:9 ≥ 4:3 ≥ Letterbox Progressive ( ➡ page 12) ≥ On ≥ Off TV System ( ➡ page 46) ≥ PAL ≥ NTSC AV1 Output Selects the output from the...
Page 45 - Refer to the control reference on page 41.; ] to select “Tuning” and; Manual Tuning
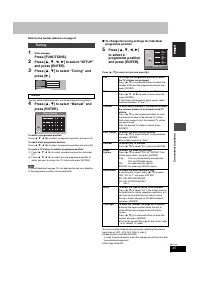
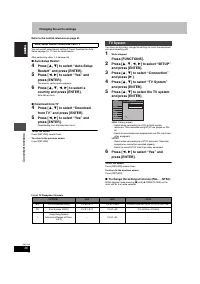
45 RQT7448 Con v e n ie nt f unc tions Refer to the control reference on page 41. 1 While stopped Press [FUNCTIONS]. 2 Press [ 3 , 4 , 2 , 1 ] to select “SETUP” and press [ENTER]. 3 Press [ 3 , 4 ] to select “Tuning” and press [ 1 ]. You can add or delete channels, or change programme positions. 4 P...
Page 47 - “Poccия; ] to select “Off” of; Clock settings; Manual Clock Setting; Auto Clock Setting; Clock; Child Lock; Poccия
47 RQT7448 Con v e n ie nt f unc tions ≥ The unit’s Preset Download or Auto-Setup function ( ➡ page 10, 11) automatically adjusts the clock to correct time. However, when “Poccия ” (Russia) is selected in the Country setting menu the Auto Clock Setting does not work. Under some reception conditions ...
Page 48 - Specifications
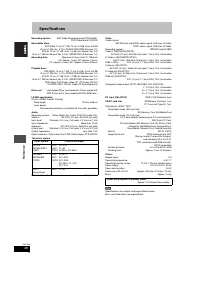
48 RQT7448 Re fe re n c e Specifications Recording system DVD Video Recording format (DVD-RAM), DVD-Video format (DVD-R) Recordable discs DVD-RAM: 12 cm 4.7 GB, 12 cm 9.4 GB, 8 cm 2.8 GB 12 cm 4.7 GB (Ver. 2.1/3 k -SPEED DVD-RAM Revision 1.0) DVD-R: 12 cm 4.7 GB, 8 cm 1.4 GB (for General Ver. 2.0) 1...
Page 49 - Glossary
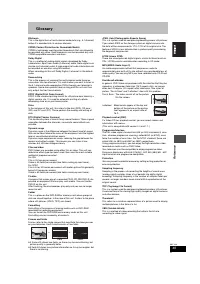
49 RQT7448 Re fe re n c e Glossary Bitstream This is the digital form of multi-channel audio data (e.g., 5.1 channel) before it is decoded into its various channels. CPRM (Content Protection for Recordable Media) CPRM is technology used to protect broadcasts that are allowed to be recorded only once...
Page 50 - jjj
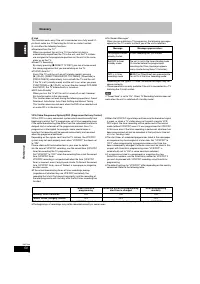
50 RQT7448 Re fe re n c e Glossary Q Link This function works only if the unit is connected via a fully wired 21-pin Scart cable to a TV featuring the Q Link or similar function.Q Link offers the following functions: ≥ Download from the TV § When you connect the unit to a TV, the station list data i...
Page 51 - Frequently asked questions; Set up
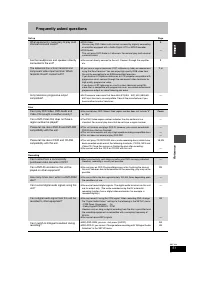
51 RQT7448 Re fe re n c e Frequently asked questions Set up Page Disc Recording What equipment is necessary to play multi channel surround sound? ≥ DVD-Video: You can play DVD-Video multi channel surround by digitally connecting an amplifier equipped with a Dolby Digital, DTS or MPEG decoder. ≥ DVD-...
Page 52 - Error messages; On the television
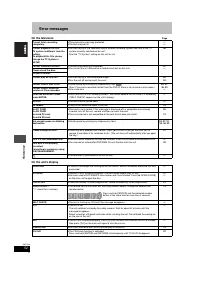
52 RQT7448 Re fe re n c e Error messages On the television Page On the unit’s display Cannot finish recording completely. ≥ The programme was copy-protected. ≥ The disc may be full. —— Cannot playback this title.TV system is different from the setting.To playback this title, please change the TV Sys...
Page 53 - Troubleshooting guide
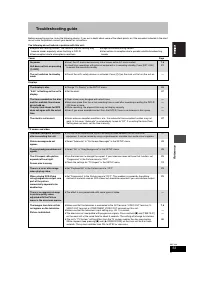
53 RQT7448 Re fe re n c e Troubleshooting guide Before requesting service, make the following checks. If you are in doubt about some of the check points, or if the remedies indicated in the chart do not solve the problem, consult your dealer for instructions. The following do not indicate a problem ...
Page 54 - Sound; programming does
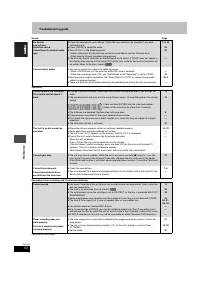
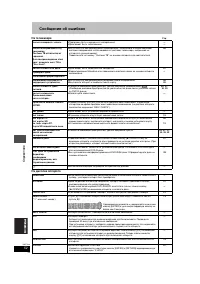
54 RQT7448 Re fe re n c e Troubleshooting guide Sound Page Operation Recording, timer recording and transferring (dubbing) Continued on next page No sound.Low volume.Distorted sound.Cannot hear the desired audio type. ≥ Check the connections and settings. Check the input mode on the amplifier if you...
Page 55 - Page
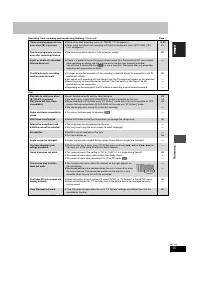
55 RQT7448 Re fe re n c e Recording, timer recording and transferring (dubbing) (Continued) Page Play Timer recording does not stop even when [ ∫ ] is pressed. ≥ While using timer recording, press [ F TIMER]. (“ F ” disappears.) ≥ When using the linked timer recording with external equipment, press ...
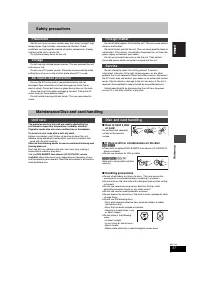
Page 57 - Safety precautions; If there is dirt or condensation on the disc; Maintenance/Disc and card handling
57 RQT7448 Re fe re n c e Safety precautions Set the unit up on an even surface away from direct sunlight, high temperatures, high humidity, and excessive vibration. These conditions can damage the cabinet and other components, thereby shortening the unit’s service life. Do not place heavy items on ...
Page 58 - Index; Enter name
58 RQT7448 Re fe re n c e Index Angle . . . . . . . . . . . . . . . . . . . . . . . . . . . 28Aspect . . . . . . . . . . . . . . . . . . . . . . . . . . 12Audio Attribute . . . . . . . . . . . . . . . . . . . . . . . 28Language . . . . . . . . . . . . . . . . . . . . . . 42Playback . . . . . . . . ....
Page 59 - MEMO
Page 60 - Clejaho b Rgohnn; Внутри аппарата; Panasonic; 5EE Panasonic
2 RQT7448 Под готов ка к э к с п л у а т а ции Mauywnta Íjektpnk Nhlactpnaj Ko., Jtl.1006 Kaloma, Ocaka, Rgohnr Clejaho b Rgohnn GPELOCTEPE·EHNE! B ÍTOM YCTPOÆCTBE NCGOJV„YETCR JA„EP.GPNMEHEHNE PEFYJNPOBOK N HACTPOEK, OTJN¨HSX OT HN·EOGNCAHHSX, MO·ET GPNBECTN K OGACHOMY JA„EPHOMY OøJY¨EHND.HE OTKPSB...
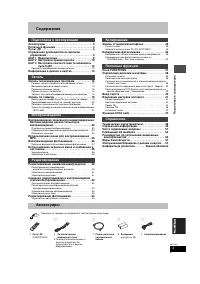
Page 61 - Содержание; ШАГ; Настройка соответствия телевизора и; Использование номера S; Воспроизведение записанного видеосодержания/; Редактирование наименований/; Создание, редактирование и воспроизведение; Аксессуары; Пожалуйста, проверьте и определите поставляемые аксессуары.; Пульт ДУ; для пульта ДУ
3 RQT7448 Под готов ка к э к с п л у а т а ции Содержание Аксессуары . . . . . . . . . . . . . . . . . . . . . . . . . . . . . . . 3Полезные функции . . . . . . . . . . . . . . . . . . . . . . . . 4Пульт ДУ . . . . . . . . . . . . . . . . . . . . . . . . . . . . . . . . . 4Справочное руководство по ...
Page 62 - Полезные функции; Мгновенная запись; Батарейки; He ncgojvÎyØte °atapen gepeÎaprÒaemofo tnga.; Использование; Time Slip; Пульт ДУ
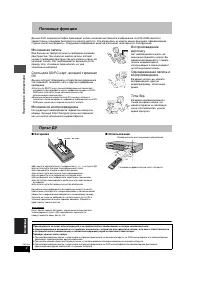
4 RQT7448 Под готов ка к э к с п л у а т а ции Полезные функции Данный DVD видеомагнитофон производит запись высококачественного изображения на DVD-RAM носители, совместимых с режимом быстрого случайного доступа. Это отразилось на многих новых функциях, превосходящих старые кассетные форматы. Следую...
Page 63 - Справочное руководство по органам управления; Основной блок; Дисплей аппарата
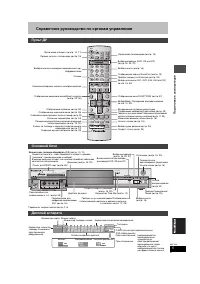
5 RQT7448 Под готов ка к э к с п л у а т а ции Справочное руководство по органам управления Терминалы задней панели ( ➡ стр. 7, 8) Пульт ДУ VOLUME CH DIRECT TV REC DVD TV AV 1 2 3 4 5 6 7 8 0 9 MANUAL SKIP ShowView CH CANCEL INPUT SELECT SKIP STOP PAUSE PLAY/x1.3 SLOW/SEARCH FUNCTIONS ENTER DIRECT N...
Page 64 - Подключение; Рекомендуемое подключение для телевизора; Функции Q Link; Не подключайте аппарат через видеомагнитофон; Видеомагнитофон
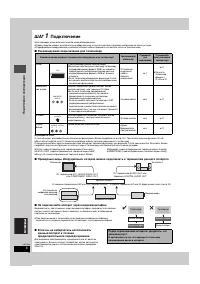
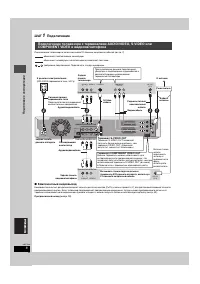
6 RQT7448 Под готов ка к э к с п л у а т а ции ШАГ 1 Подключение ≥ На примерах ниже описаны подключения оборудования. ≥ Перед подключением, выключите все оборудование и изучите соответствующие инструкции по эксплуатации. ≥ Периферийное оборудование и дополнительные кабели продаются отдельно, если не...
Page 65 - Терминал AV1
7 RQT7448 Под готов ка к э к с п л у а т а ции При отсутствии 21-пинового скартового терминала на телевизоре ( ➡ стр. 8) ∫ RGB Означает три основных световых цвета, красный (R), зеленый (G), и синий (B), а также метод производства видео с их использованием. Разделение видеосигнала на три цвета для п...
Page 66 - Компонентный видеовыход; Терминал COMPONENT VIDEO OUT
8 RQT7448 Под готов ка к э к с п л у а т а ции ШАГ 1 Подключение Подключение телевизора с использованием 21-пиновых скартовых кабелей ( ➡ стр. 7) ∫ Компонентный видеовыход Компонентный сигнал раздельно выводит сигналы различия цветов (P B /P R ) и сигнал яркости (Y) для достижения высокой точности в...
Page 67 - После завершения настройки (; Подключение усилителя или системного компонента; Красный Белый; Задняя панель данного аппарата
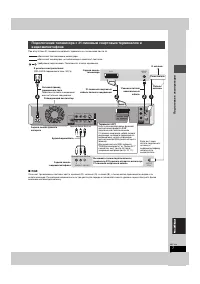
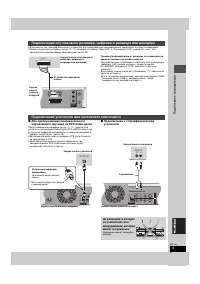
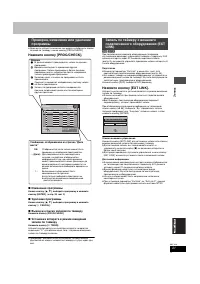
9 RQT7448 Под готов ка к э к с п л у а т а ции ≥ В данном случае, декодер обозначает устройство для декодирования закодированных трансляций (платное телевидение). ≥ После завершения настройки ( ➡ стр. 10, 11), измените установки “Ввод AV2” и “Соединение AV2” в меню Нач. наст. для соответствия подклю...
Page 68 - Настройки приема канала; Начинается загрузка с телевизора.; Для остановки операции; При отображении меню установки часов; Установите часы вручную (; Загрузить
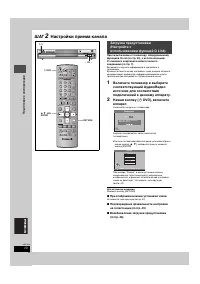
10 RQT7448 Под готов ка к э к с п л у а т а ции ШАГ 2 Настройки приема канала При подключении к телевизору, оборудованному функцией Q Link ( ➡ стр. 50), с использованием 21-пинового скартового кабеля полного соединения ( ➡ стр. 7). Вы можете загрузить информацию о настройках с телевизора.Функция авт...
Page 69 - Появится меню установки страны.; Нажмите и удерживайте нажатыми кнопки [
11 RQT7448 Под готов ка к э к с п л у а т а ции ≥ При подключении к телевизору с терминалом VIDEO OUT, S-VIDEO OUT или COMPONENT VIDEO OUT ( ➡ стр. 8). ≥ При подключении к телевизору, не оборудованному функцией Q Link ( ➡ стр. 50). Функция автоматической настройки данного аппарата производит автомат...
Page 70 - Настройка соответствия телевизора и пульта ДУ; В режиме остановки; телевизор с окном просмотра на 4:3; Начнется прогрессивный вывод.; Выход из экрана; Просмотр прогрессивной видеокартинки
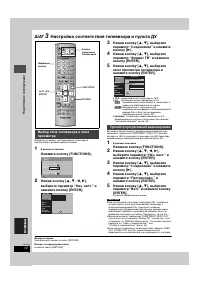
12 RQT7448 Под готов ка к э к с п л у а т а ции ШАГ 3 Настройка соответствия телевизора и пульта ДУ Выберите установку, для приведения телевизора в соответствие с вашими предпочтениями. 1 В режиме остановки Нажмите кнопку [FUNCTIONS]. 2 Нажав кнопку [ 3 , 4 , 2 , 1 ], выберите параметр “Нач. наст.” ...
Page 71 - используя цифровые кнопки.
13 RQT7448 Под готов ка к э к с п л у а т а ции Вы можете настроить кнопки управления телевизором на пульте ДУ на включение/выключение телевизора, переключение режима приема телевизора, выбор телевизионного канала и изменение уровня громкости телевизора. Направьте пульт ДУ на телевизор Нажимая кнопк...
Page 72 - Информация о дисках и картах; Перезаписываемые диски; Невоспроизводимые диски
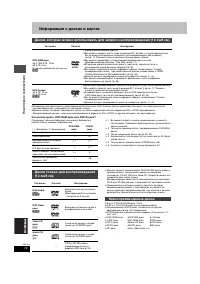
14 RQT7448 Под готов ка к э к с п л у а т а ции Информация о дисках и картах ≥ Рекомендуется использовать диски производства Panasonic. DVD-R-диски других производителей могут не записываться или воспроизводиться в зависимости от состояния записи. ≥ Данный аппарат не может производить запись на диск...
Page 73 - Карты, которые могут использоваться на данном аппарате; Дополнительные диски
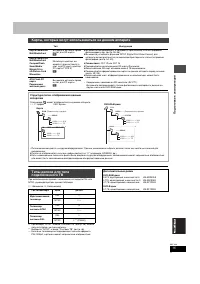
15 RQT7448 Под готов ка к э к с п л у а т а ции При использовании дисков, записанных в стандарте PAL или NTSC, руководствуйтесь данной таблицей. ( Y : Возможно, t : Невозможно) § 1 При выборе “NTSC” в меню “Система TB” ( ➡ стр. 46), можно получить более чистую картинку. § 2 Выберите “NTSC” в меню “С...
Page 74 - Запись телевизионных программ; Остановка записи; Индикатор Time Slip
16 RQT7448 За пис ь Запись телевизионных программ [RAM] [DVD-R] ≥ Вы можете записать до 99 наименований на один диск. ≥ Продолжительная запись второй стороны после первой на двустороннем диске невозможна. Вы должны извлечь диск и поменять сторону. ≥ При использовании 8 см DVD-RAM-диска, извлеките ди...
Page 75 - Остановка воспроизведения; Чaсов; честв; Воспроизведение во время записи
17 RQT7448 За пис ь ∫ Указание времени остановки записи—Запись одним нажатием Во время записи Нажав кнопку [ ¥ REC] на основном аппарате, выберите время записи. При каждом нажатии кнопки: ≥ Данная функция недоступна во время записи с использованием таймера ( ➡ стр. 19) или во время использования фун...
Page 76 - Переменный режим записи; Прямая запись с телевизора
18 RQT7448 За пис ь Запись телевизионных программ Для информации по управлению, смотрите стр. 16. [RAM] [DVD-R] Аппарат устанавливает наилучшее качество для картинки, при котором записываемый материал может быть помещен на свободное пространство на диске. Режим записи установится на режим FR.наприме...
Page 77 - Запись по таймеру; для; Отмена записи, когда запись уже началась; Включение функции VPS/PDC
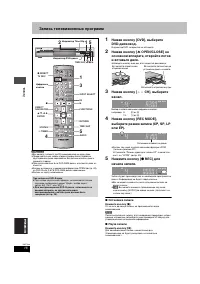
19 RQT7448 За пис ь Запись по таймеру [RAM] [DVD-R] Вы можете ввести до 16 программ максимум на месяц вперед. Ввод номеров S HOW V IEW является более легким методом записи по таймеру. Вы можете найти данные номера в программах телепередач в газетах и журналах. 1 Нажмите кнопку [ShowView]. 2 Нажимая ...
Page 78 - Дата
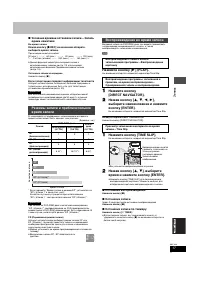
20 RQT7448 За пис ь Запись по таймеру Для информации по управлению, смотрите стр. 19. [RAM] [DVD-R] Вы можете ввести до 16 программ максимум на месяц вперед. (Каждая ежедневная или еженедельная программа считается как одна программа.) 1 Нажмите кнопку [PROG/CHECK]. 2 Нажав кнопку [ 3 , 4 ], выберите...
Page 79 - Изменение программы; ” для обозначения того, что режим ожидания; Подготовка; ] на основном аппарате на; Для вашей информации; Иконки; отсутствия свободного пространства
21 RQT7448 За пис ь ≥ Даже если аппарат выключен, вы можете отобразить список записей по таймеру, нажав кнопку [PROG/CHECK]. Нажмите кнопку [PROG/CHECK]. ∫ Изменение программы Нажав кнопку [ 3 , 4 ], выберите программу и нажмите кнопку [ENTER]. ( ➡ стр. 20 , шаг 3) ∫ Удаление программы Нажав кнопку ...
Page 80 - Отображение других страниц; Возврат на экран меню
22 RQT7448 Вос произ ве д е ние Воспроизведение записанного видеосодержания/Воспроизведение дисков только для воспроизведения ≥ Продолжительное воспроизведение второй стороны после первой на двустороннем диске невозможно. Вы должны извлечь диск и поменять сторону. ≥ При использовании 8 см DVD-RAM-ди...
Page 81 - Операции во время воспроизведения; Возобновление функции воспроизведения; Нажимайте цифровые кнопки.
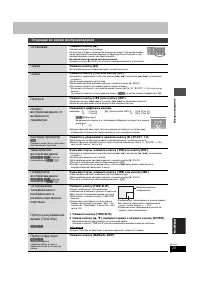
23 RQT7448 Вос произ ве д е ние Операции во время воспроизведения Остановка Нажмите кнопку [ ∫ ]. Запоминается место остановки.На дисплее аппарата появляется индикатор справа. (За исключением, когда происходит воспроизведение от функции Direct Navigator и при воспроизведении списка воспроизведения.)...
Page 82 - Переключение типа звучания невозможно в следующих случаях.; Операции редактирования во время воспроизведения; Стереть; ], выберите параметр “Стереть” и нажмите; Создать главу; Изменение звучания; например, выбран параметр “L R”
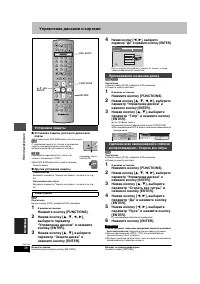
24 RQT7448 Вос произ ве д е ние Воспроизведение записанного видеосодержания/Воспроизведение дисков только для воспроизведения Для информации по управлению, смотрите стр. 22. Нажмите кнопку [AUDIO]. [RAM] [VCD] LR > L > R ^---------------} [DVD-V] [DVD-A] Вы можете переключить номер аудиоканала...
Page 83 - Использование меню для воспроизведения МР3
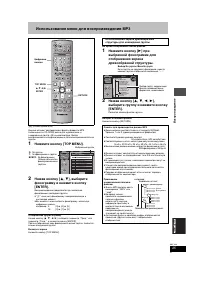
25 RQT7448 Вос произ ве д е ние Использование меню для воспроизведения МР3 [CD] (только диски MP3) Данный аппарат воспроизводит файлы формата МР3, записанные на CD-R/RW-диске для аудиозаписи, и завершенные ( ➡ стр. 49) на компьютере. Файлы воспринимаются как фонограммы и папки воспринимаются как гру...
Page 84 - Воспроизведение фотоснимков; Слот для SD карты
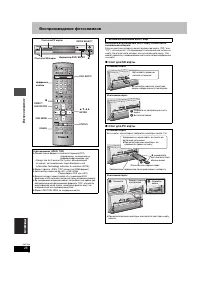
26 RQT7448 Вос произ ве д е ние Воспроизведение фотоснимков Вставляйте или извлекайте SD/PC карту только после выключения аппарата. Если на дисплее аппарата мигает индикатор карты (“SD” или “PC”), это означает, что происходит считывание или запись на карту. Не отключайте аппарат или не извлекайте ка...
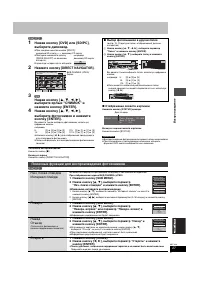
Page 85 - Отображение свойств картинки; Выход из экрана свойств картинки; Выбор фотоснимков в другой папке; Полезные функции для воспроизведения фотоснимков; При отображенном экране ВИД СНИМКА (JPEG); Изменение интервала воспроизведения
27 RQT7448 Вос произ ве д е ние [RAM] [SD] [PC] 1 Нажав кнопку [DVD] или [SD/PC], выберите дисковод. ≥ При каждом нажатии кнопки [SD/PC]: дисковод SD карты ,". дисковод PC карты ≥ Повторно нажимайте кнопку [DRIVE SELECT] на основном аппарате. Индикатор загорается на аппарате. 2 Нажмите кнопку [D...
Page 86 - Использование экранных меню и сообщений о состоянии; меню и нажмите кнопку [; Меню Диск—Настройка содержания диска
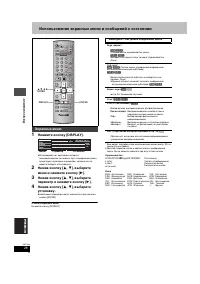
28 RQT7448 Вос произ ве д е ние Использование экранных меню и сообщений о состоянии 1 Нажмите кнопку [DISPLAY]. ≥ В зависимости от состояния аппарата (воспроизведение, остановка, др.) и содержания диска, существуют некоторые параметры, которые вы не можете выбрать или изменить. 2 Нажав кнопку [ 3 , ...
Page 87 - Усилитель диалога; Сообщения о состоянии
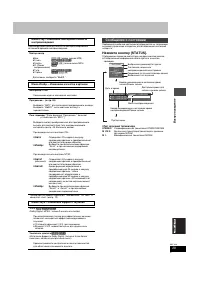
29 RQT7448 Вос произ ве д е ние Данная функция действительна только при отображении истекшего времени воспроизведения. § Только при установке параметра “Прогрессивн.” на “Вкл.” в меню Нач. наст. ( ➡ стр. 12). Сообщения о рабочем состоянии отображаются на телевизоре во время управления аппаратом для ...
Page 88 - Редактирование наименований/разделов; выберите наименование.; При выборе “Вид главы”; Отображение других страниц/Многократное
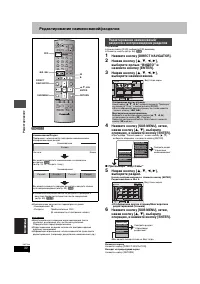
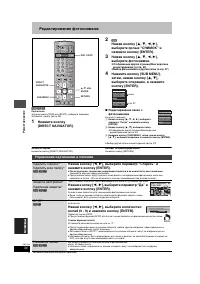
30 RQT7448 Р е д а кт ирова ние Редактирование наименований/разделов [RAM] [DVD-R] ≥ Максимальное количество параметров на диске:–Наименования: 99–Разделы: Приблизительно 1000(В зависимости от состояния записи.) ≥ Восстановление в исходном виде невозможно после удаления, разделения или частичного уд...
Page 89 - Управление наименованиями; Подтверждение точки разделения; Управление разделами; Ускорение редактирования
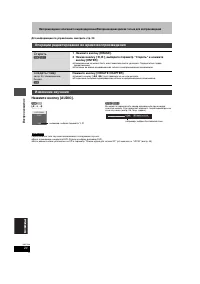
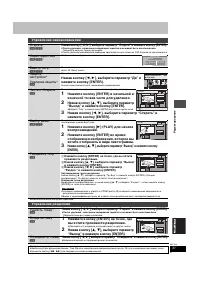
31 RQT7448 Р е д а кт ирова ние § Возможно многократное редактирование. § Возможно многократное редактирование. Управление наименованиями Стереть § [RAM] [DVD-R] Нажав кнопку [ 2 , 1 ], выберите параметр “Стереть” и нажмите кнопку [ENTER]. ≥ После удаления, записанное содержание теряется и не может ...
Page 90 - Создание списков воспроизведения
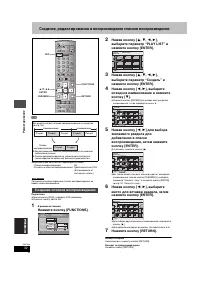
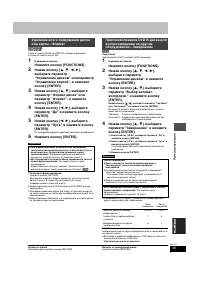
32 RQT7448 Р е д а кт ирова ние Создание, редактирование и воспроизведение списков воспроизведения [RAM] ≥ Максимальное количество параметров на диске:–Списки воспроизведения: 99 –Разделы в списках воспроизведения: Приблизительно 1000 (В зависимости от состояния записи.) Создание или редактирование ...
Page 91 - выберите список воспроизведения.; Возможно многократное редактирование.; Удалить
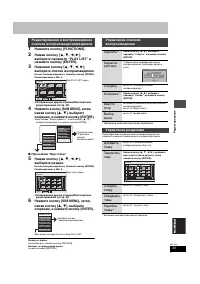
33 RQT7448 Р е д а кт ирова ние 1 Нажмите кнопку [FUNCTIONS]. 2 Нажав кнопку [ 3 , 4 , 2 , 1 ], выберите параметр “PLAY LIST” и нажмите кнопку [ENTER]. 3 Нажимая кнопку [ 3 , 4 , 2 , 1 ], выберите список воспроизведения. Начало воспроизведения ➡ Нажмите кнопку [ENTER]. Редактирование ➡ Шаг 4. ≥ Отоб...
Page 92 - Редактирование фотоснимков; Управление картинками и папками; Отмена функции печати
34 RQT7448 Р е д а кт ирова ние Редактирование фотоснимков [RAM] [SD] [PC] Подготовка ≥ Нажав кнопку [DVD] или [SD/PC], выберите дисковод. ≥ Снимите защиту ( ➡ стр. 38). 1 Нажмите кнопку [DIRECT NAVIGATOR]. 2 [RAM] Нажав кнопку [ 3 , 4 , 2 , 1 ], выберите ярлык “СНИМОК” и нажмите кнопку [ENTER]. 3 Н...
Page 93 - Запись от видеомагнитофона; Ручная запись
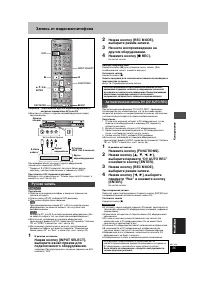
35 RQT7448 Копиро ва ни е Запись от видеомагнитофона например, Подключение другого видеооборудования к входным терминалам AV3 или DV ≥ Выключите аппарат и другое видеооборудование перед подключением. При монофоническом звучании от другого оборудования, подключите к терминалу L/MONO. § Терминал S-VID...
Page 94 - Копирование фотоснимков; Регистрация отдельных фотоснимков
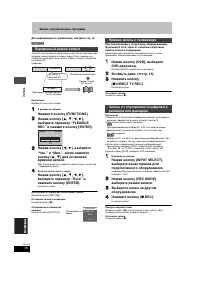
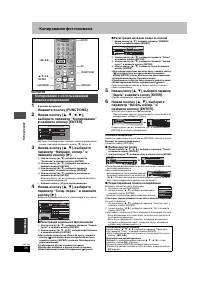
36 RQT7448 Копиро ва ни е Копирование фотоснимков [RAM] [SD] [PC] 1 В режиме остановки Нажмите кнопку [FUNCTIONS]. 2 Нажав кнопку [ 3 , 4 , 2 , 1 ], выберите параметр “Копирование” и нажмите кнопку [ENTER]. ≥ Если вы не собираетесь изменить зарегистрированный список, повторно нажимайте кнопку [ 4 ] ...
Page 95 - или; Окно FUNCTIONS
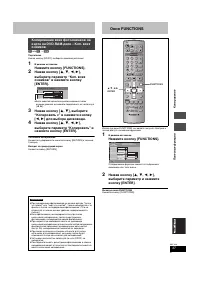
37 RQT7448 Пол е зн ы е функции К опирова ние [SD] или [PC] > [RAM] Подготовка Нажав кнопку [SD/PC], выберите дисковод-источник. 1 В режиме остановки Нажмите кнопку [FUNCTIONS]. 2 Нажав кнопку [ 3 , 4 , 2 , 1 ], выберите параметр “Коп. всех снимков” и нажмите кнопку [ENTER]. ≥ Если имеется нескол...
Page 96 - Управление дисками и картами; Для кассетного DVD-RAM-диска или для карты; Другие установки защиты; Название диска отображается в окне FUNCTIONS.; Установка защиты; Присваивание названия диску
38 RQT7448 Пол е зн ы е функции Управление дисками и картами ∫ Установка защиты для всего диска или карты ≥ Для кассетного DVD-RAM-диска или для карты [RAM] С задвижкой защиты от записи в положении защиты, воспроизведение начинается автоматически при установке в аппарат. [SD] [PC] Переведите переклю...
Page 98 - Ввод текста; Отображение экрана Ввести титр
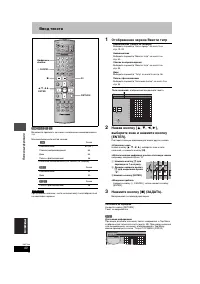
40 RQT7448 Пол е зн ы е функции Ввод текста [RAM] [DVD-R] [SD] [PC] Вы можете присвоить названия записанным наименованиям и т.д. Максимальное количество знаков: § Название наименования для записи по таймеру. При длинном названии, части названия могут не отображаться на некоторых экранах. 1 Отображен...
Page 99 - Изменение настроек аппарата; ярлык и нажмите кнопку [; Общие процедуры; Краткое содержание настроек; Ярлыки
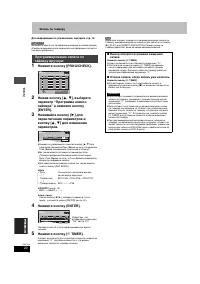
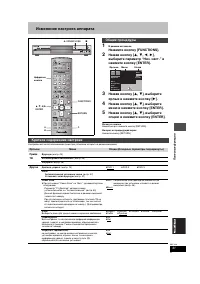
41 RQT7448 Пол е зн ы е функции Изменение настроек аппарата 1 В режиме остановки Нажмите кнопку [FUNCTIONS]. 2 Нажав кнопку [ 3 , 4 , 2 , 1 ], выберите параметр “Нач. наст.” и нажмите кнопку [ENTER]. 3 Нажав кнопку [ 3 , 4 ], выберите ярлык и нажмите кнопку [ 1 ]. 4 Нажав кнопку [ 3 , 4 ], выберите ...
Page 102 - Список кодов различных языков
44 RQT7448 Пол е зн ы е функции Изменение настроек аппарата Ярлыки Меню Опции (Исходные параметры подчеркнуты.) Соединение Формат TB ( ➡ стр. 12) ≥ 16:9 ≥ 4:3 ≥ Letterbox Прогрессивн. ( ➡ стр. 12) ≥ Вкл. ≥ Выкл. Система TB ( ➡ стр. 46) ≥ PAL ≥ NTSC Вывод AV1 Выбор вывода сигнала от терминала AV1.Выб...
Page 103 - Настройка вручную
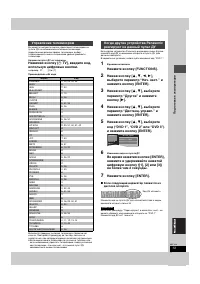
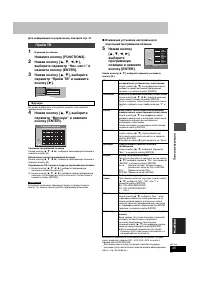
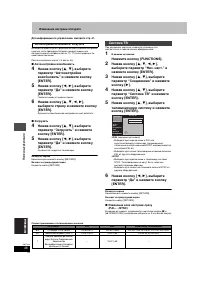
45 RQT7448 Пол е зн ы е функции Для информации по управлению, смотрите стр. 41. 1 В режиме остановки Нажмите кнопку [FUNCTIONS]. 2 Нажав кнопку [ 3 , 4 , 2 , 1 ], выберите параметр “Нач. наст.” и нажмите кнопку [ENTER]. 3 Нажав кнопку [ 3 , 4 ], выберите параметр “Приём ТВ” и нажмите кнопку [ 1 ]. В...
Page 104 - Автонастройки возобновить, Загрузить; Система TB
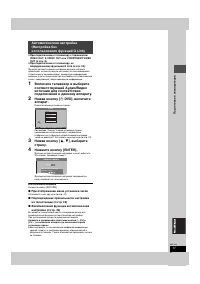
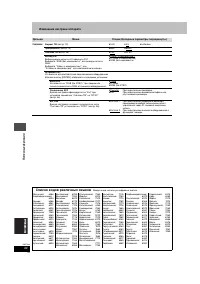
46 RQT7448 Пол е зн ы е функции Изменение настроек аппарата Для информации по управлению, смотрите стр. 41. Вы можете перезапустить функцию автоматической настройки каналов, если процедура Загрузка предустановки или Автоматическая настройка ( ➡ стр. 10, 11) была прервана по некоторым причинам. После...
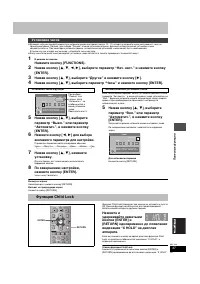
Page 105 - желаемого параметра для настройки.; Установка часов; Установка часов вручную; Автоматическая установка часов; Функция Child Lock
47 RQT7448 Пол е зн ы е функции ≥ Функция загрузки предустановки или автоматической настройки ( ➡ стр. 10, 11) аппарата автоматически настраивает часы на правильное время. Однако, при выборе “Россия” в меню установки страны, функция автоматической установки часов недействительна. При некоторых услов...
Page 106 - Технические характеристики
48 RQT7448 Спра воч ник Технические характеристики Система записи Формат записи DVD Video (DVD-RAM), Формат DVD-Video (DVD-R) Записываемые диски DVD-RAM-диск: 12 см 4,7 Гб, 12 см 9,4 ГБ, 8 см 2,8 ГБ 12 см 4,7 ГБ (Вер. 2.1/3 k -SPEED DVD-RAM Revision 1.0) DVD-R-диск: 12 см 4,7 ГБ, 8 см 1,4 ГБ (для Ge...
Page 107 - Справочная информация; поместить картинку на экран.
49 RQT7448 Спра воч ник Справочная информация Динамический диапазон Динамический диапазон - это разница между звучанием самого низкого уровня, которое может прослушиваться сквозь шум оборудования, и звучанием наивысшего уровня перед искажением.Сжатие динамического диапазона означает понижение разрыв...
Page 109 - Часто задаваемые вопросы; Установка; PCM
51 RQT7448 Спра воч ник Часто задаваемые вопросы Установка Стр. Диск Запись Какое оборудование необходимо для воспроизведения многоканального окружающего звучания? ≥ DVD-Video-диск:Вы можете воспроизводить многоканальное звучание DVD-Video-диска, выполнив цифровое подключение усилителя, оборудованно...
Page 110 - Сообщения об ошибках; На телевизоре
52 RQT7448 Спра воч ник Сообщения об ошибках На телевизоре Стр. На дисплее аппарата Нельзя завершить запись. ≥ Программа была защищена от копирования. ≥ Диск может быть заполненным. —— Нельзя воспроизвести эту программу.Система TB отличается от заданной.Для воспроизведения этой прог., изменить сист....
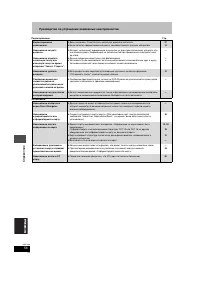
Page 111 - Руководство по устранению возможных неисправностей; Следующее не означает неисправную работу данного аппарата:
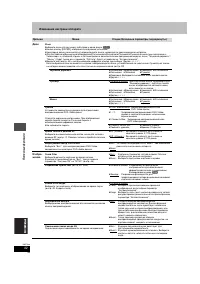
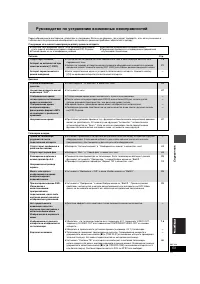
53 RQT7448 Спра воч ник Руководство по устранению возможных неисправностей Перед обращением в мастерскую, убедитесь в следующем. Если вы не уверены, где следует проверять, или, если указанные в таблице шаги по устранению неисправности не привели к решению проблемы, обратитесь к дилеру. Следующее не ...
Page 113 - Запись, запись по таймеру и копирование
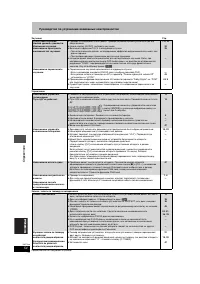
55 RQT7448 Спра воч ник Запись, запись по таймеру и копирование (Продолжение) Стр. Воспоизведение Запись по таймеру не прекращается даже при нажатии кнопки [ ∫ ]. ≥ Во время использования функции записи по таймеру, нажмите кнопку [ F TIMER]. (Индикация “ F ” отключается.) ≥ Во время использования фу...
Page 114 - Редактирование; Данные операции недоступны для фотоснимков.
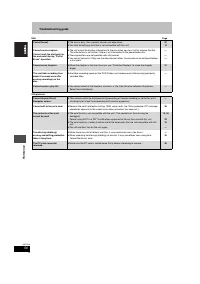
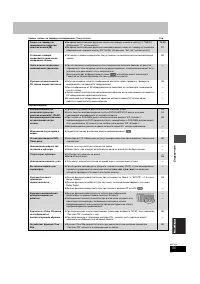
56 RQT7448 Спра воч ник Руководство по устранению возможных неисправностей Редактирование Стр. Фотоснимки Форматирование невозможно. ≥ Диск загрязнен. Очистите его, используя особый очиститель. ≥ Была попытка форматирования диска, несовместимого с данным аппаратом. 5714 Невозможно создать разделы. Н...
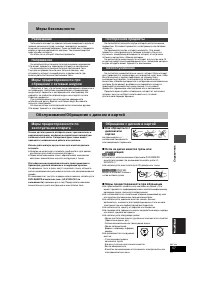
Page 115 - Меры безопасности; Меры предосторожности при обращении; Размещение; Обслуживание/Обращение с диском и картой; Обращение с диском и картой
57 RQT7448 Спра воч ник Меры безопасности Установите аппарат на горизонтальной поверхности вдали от прямых солнечных лучей, высоких температур, высокой влажности и сильной вибрации. Такие условия могут повредить корпус и прочие компоненты системы, тем самым сократив срок службы аппарата. Не ставьте ...
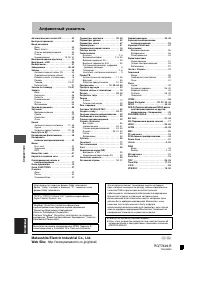
Page 116 - Алфавитный указатель; Digital Out” торговые марки фирмы; ) является официально; ) изготовлена по лицензии; py
Спра воч ник Алфавитный указатель Автоматическая запись DV . . . . . . . . 35 Быстрый просмотр . . . . . . . . . . . . . . . 23 Ввод названия Диск . . . . . . . . . . . . . . . . . . . . . . . . . . 38Ввод текста . . . . . . . . . . . . . . . . . . . 40Список воспроизведения. . . . . . . . . 33Папка...