Page 3 - Safety Information; CAUTION; IMPORTANT - Please read these instructions; Markings on the Product; CLASS 1
English - 2 - Safety Information CAUTION RISK OF ELECTRIC SHOCK DO NOT OPEN CAUTION: TO REDUCE THE RISK OF ELECTRIC SHOCK DO NOT REMOVE COVER (OR BACK). NO USER-SERVICEABLE PARTS INSIDE. REFER SERVICING TO QUALIFIED SERVICE PERSONNEL. Note: Follow the on screen instructions for operating the related...
Page 4 - English; WARNING
English - 3 - WARNING Do not ingest the battery, Chemical Burn Hazard This product or the accessories supplied with the product may contain a coin/button cell battery. If the coin/button cell battery is swallowed, it can cause severe internal burns in just 2 hours and can lead to death. Keep new and...
Page 5 - Preparations; Maintenance; Caution; Mains plug
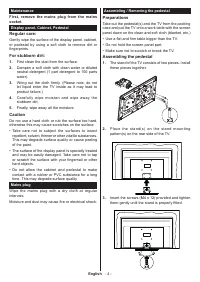
English - 4 - Assembling / Removing the pedestal Preparations Take out the pedestal(s) and the TV from the packing case and put the TV onto a work table with the screen panel down on the clean and soft cloth (blanket, etc.)• Use a flat and firm table bigger than the TV.• Do not hold the screen panel...
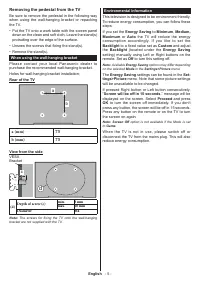
Page 6 - Available; Screen will be off in 15 seconds.; option is not available if the Mode is set; Removing the pedestal from the TV; When using the wall-hanging bracket; Note: The screws for fixing the TV onto the wall-hanging
English - 5 - Environmental Information This television is designed to be environment friendly. To reduce energy consumption, you can follow these steps:If you set the Energy Saving to Minimum , Medium, Maximum or Auto the TV will reduce the energy consumption accordingly. If you like to set the Bac...
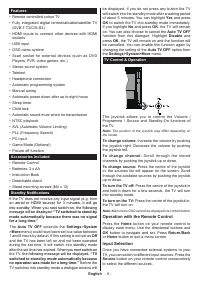
Page 7 - aerial or HDMI source) f; Off; en you next switch-on; TV Control & Operation; Note: The position of the joystick may differ depending on; Operation with the Remote Control
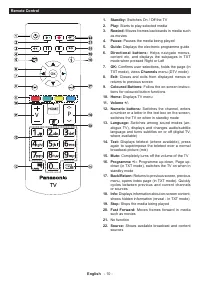
English - 6 - Features • Remote controlled colour TV• Fully integrated digital terrestrial/cable/satellite TV (DVB-T-T2/C/S-S2) • HDMI inputs to connect other devices with HDMI sockets • USB input• OSD menu system• Scart socket for external devices (such as DVD Players, PVR, video games, etc.) • Ste...
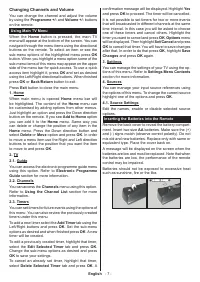
Page 8 - Changing Channels and Volume; Using Main TV Menu
English - 7 - Changing Channels and Volume You can change the channel and adjust the volume by using the Programme +/- and Volume +/- buttons on the remote. Using Main TV Menu When the Home button is pressed, the main TV menu will appear at the bottom of the screen. You can navigate through the menu...
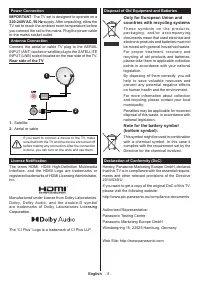
Page 9 - If you want to connect a device to the TV, make; License Notification; Licensing; Disposal of Old Equipment and Batteries; Only for European Union and
English - 8 - Power Connection IMPORTANT : The TV set is designed to operate on a 220-240V AC, 50 Hz supply. After unpacking, allow the TV set to reach the ambient room temperature before you connect the set to the mains. Plug the power cable to the mains socket outlet. Antenna Connection Connect th...
Page 10 - Fully integrated digital; Display; humidity max; Notice
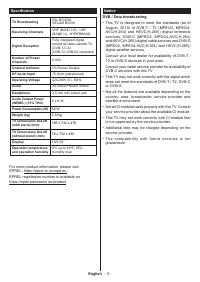
English - 9 - Specification TV Broadcasting PAL BG/I/DK SECAM BG/DK Receiving Channels VHF (BAND I/III) - UHF (BAND U) - HYPERBAND Digital Reception Fully integrated digital terrestrial-cable-satellite TV (DVB-T-C-S) (DVB-T2, DVB-S2 compliant) Number of Preset Channels 8 000 Channel Indicator On Scr...
Page 12 - uffi
English - 11 - Connections Connector Type Cables Device VGA Connection (back) AUDIO IN PC/YPbPr Audio Connection (side) YPbPr/PC Audio Cable HDMI Connection (back) Scart Connection (back) YPBPR YPbPr Video Connection (back) PC to YPbPr Connection Cable SIDE AV Side AV (Audio/Video) Connection (side)...
Page 13 - Note: When the TV is switched into standby mode, the standby; First Time Installation; About Selecting Broadcast Type; Searching duration will change depending on the; Configure LNB
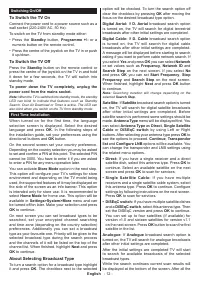
English - 12 - Switching On/Off To Switch the TV On Connect the power cord to a power source such as a wall socket (220-240V AC, 50 Hz). To switch on the TV from standby mode either:• Press the Standby button, Programme +/- or a numeric button on the remote control. • Press the centre of the joystic...
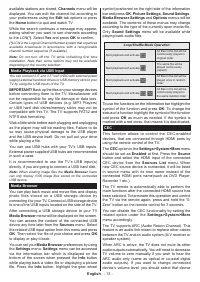
Page 14 - Media Playback via USB Input; supply) external hard disk drives or USB memory stick to your; Media Browser; Loop/Shuffle Mode Operation; CEC
English - 13 - available stations are stored, Channels menu will be displayed. You can edit the channel list according to your preferences using the Edit tab options or press the Home button to quit and watch TV. While the search continues a message may appear, asking whether you want to sort channe...
Page 15 - ARC is supported only via the HDMI1 input.; System Audio Control; Speakers; The audio device should support System Audio Control
English - 14 - from the source list. In that case volume control keys are directed to connected audio device. Note: ARC is supported only via the HDMI1 input. System Audio Control Allows an Audio Amplifier/Receiver to be used with the TV. The volume can be controlled using the remote control of the ...
Page 16 - Settings Menu Contents; Picture Menu Contents; Screen Off; OK; to start the auto adjustment.
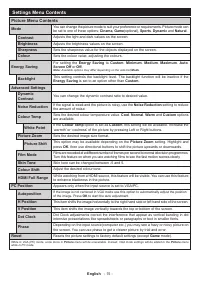
English - 15 - Settings Menu Contents Picture Menu Contents Mode You can change the picture mode to suit your preference or requirements. Picture mode can be set to one of these options: Cinema , Game (optional), Sports , Dynamic and Natural . Contrast Adjusts the light and dark values on the screen...
Page 17 - Sound Menu Contents; Installation Menu Contents; Analogue fine tune
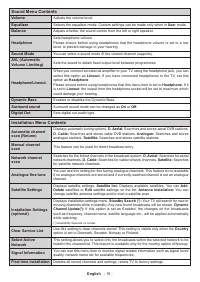
English - 16 - Sound Menu Contents Volume Adjusts the volume level. Equalizer Selects the equalizer mode. Custom settings can be made only when in User mode. Balance Adjusts whether the sound comes from the left or right speaker. Headphone Sets headphone volume.Please ensure before using headphones ...
Page 18 - System Menu Contents; Biss Key; Amplifier
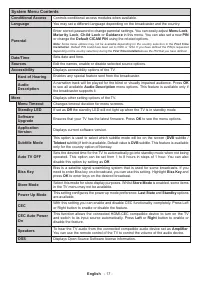
English - 17 - System Menu Contents Conditional Access Controls conditional access modules when available. Language You may set a different language depending on the broadcaster and the country. Parental Enter correct password to change parental settings. You can easily adjust Menu Lock , Maturity L...
Page 19 - General TV Operation; Using the Channel List; Managing the Favourite Lists; have defined the PIN(is requested depending on the country; Electronic Programme Guide; Timeline Schedule
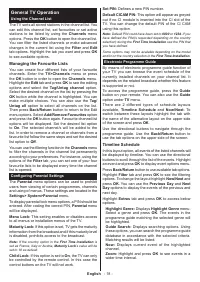
English - 18 - General TV Operation Using the Channel List The TV sorts all stored stations in the channel list. You can edit this channel list, set favourites or set active stations to be listed by using the Channels menu options. Press the OK button to open the channel list. You can filter the lis...
Page 20 - Teletext Services; Do not unplug the power cord while led is blinking during; Troubleshooting & Tips
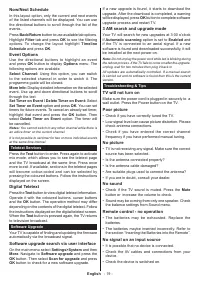
English - 19 - Now/Next Schedule In this layout option, only the current and next events of the listed channels will be displayed. You can use the directional buttons to scroll through the list of the events.Press Back/Return button to use available tab options. Highlight Filter tab and press OK to ...
Page 21 - The Image is not centered in VGA source; PC Input Typical Display Modes
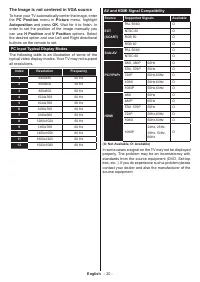
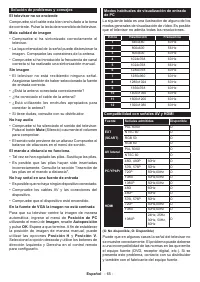
English - 20 - The Image is not centered in VGA source To have your TV automatically center the image, enter the PC Position menu in Picture menu, highlight Autoposition and press OK . Wait for it to finish. In order to set the position of the image manually you can use H Position and V Position opt...
Page 22 - Supported File Formats for USB Mode
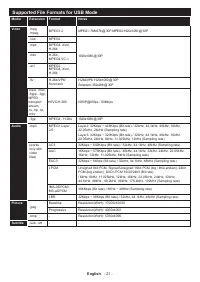
English - 21 - Supported File Formats for USB Mode Media Extension Format Notes Video .mpg, .mpeg MPEG1-2 MPEG1: 768x576 @ 30P, MPEG2:1920x1080 @ 30P .vob MPEG2 1920x1080 @ 30P .mp4 MPEG4, Xvid, H.264 .mkv H.264, MPEG4,VC-1 .avi MPEG2, MPEG4, Xvid, H.264 .flv H.264/VP6/ Sorenson H.264/VP6: 1920x1080...
Page 23 - When connecting device; DVB functionality information
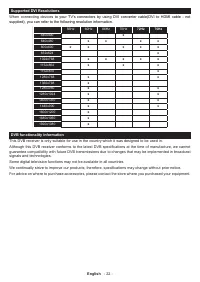
English - 22 - Supported DVI Resolutions When connecting device s to your TV’s connectors by using DVI converter cable(DVI to HDMI cable - not supplied), you can refer to the following resolution information. 56Hz 60Hz 66Hz 70Hz 72Hz 75Hz 640x400 x 640x480 x x x x 800x600 x x x x x 832x624 x 1024x76...
Page 25 - Consignes de sécurité; AVERTISSEMENT; IMPORTANT - Veuillez lire attentivement
Français - 24 - Consignes de sécurité AVERTISSEMENT RISQUE DE CHOC ÉLECTRIQUE NE PAS OUVRIR MISE EN GARDE: POUR ÉVITER TOUT RISQUE DE CHOC ÉLECTRIQUE, NE RETIREZ PAS LE COUVERCLE (OU L'ARRIÈRE). L’ENTRETIEN DES PIÈCES INTERNES EST INTERDIT AUX UTILISATEURS. VEUILLEZ CONFIER L'ENTRETIEN À UN PERSONNE...
Page 26 - Produit Laser de Classe 1 :; montage en hauteur ≤2 m.; AVERTISSEMENTS LIÉS À LA
Français - 25 - Symboles sur le produit Les symboles suivants sont utilisés sur le produit pour marquer les instructions relatives aux restrictions, aux précautions et à la sécurité. Chaque explication se rapporte uniquement à l'endroit du produit portant le symbole correspondant. Veuillez en tenir ...
Page 27 - Français; Entretien
Français - 26 - AVERTISSEMENT • En faisant recourt à d’autres supports de fixation murale ou en en installant un par vous-même, vous courrez le risque de vous blesser ou d’endommager l’appareil. Pour une performance et une sécurité optimales de l’appareil, pensez à vous rapprocher de votre magasin o...
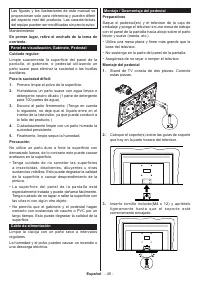
Page 28 - Supports de; Diamètre; Les vis pour positionner le téléviseur sur la fixation; Montage/Retrait du socle
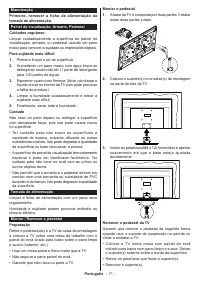
Français - 27 - Retrait du socle du téléviseur Assurez-vous de retirer le socle de la manière suivante lors de l'utilisation de la fixation murale ou du remballage du téléviseur.• Posez le téléviseur sur une table de travail, avec le panneau de l'écran couché sur un tissu propre et doux. Laissez le(...
Page 29 - antenne ou une source HDMI); Informations sur l'environnement; disponibles; Si vous appuyez sur le bouton de droite ou de; L’écran s’éteint au bout; Sélectionnez; Continuer; n'est pas disponible
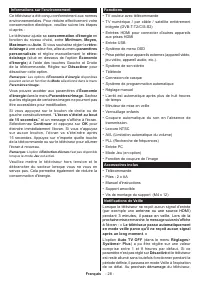
Français - 28 - Fonctions • TV couleur avec télécommande• TV numérique / par câble / satellite entièrement intégrée (DVB-T-T2/C/S-S2) • Entrées HDMI pour connecter d'autres appareils aux prises HDMI • Entrée USB• Système de menu OSD• Prise péritel pour appareils externes (appareil vidéo, jeu vidéo, ...
Page 30 - le message suivant s’affichera.; Commande et fonctionnement du téléviseur; La position du bouton joystick varie selon le; À l'Aide de Menu Principal TV
Français - 29 - le message suivant s’affichera. « La télé passe automatiquement en mode veille parce qu'aucun signal n'a été reçu après un long moment. » Avant que le téléviseur ne passe en mode veille, une fenêtre de dialogue s'affiche. Si vous n'appuyez sur aucune touche, le téléviseur passe en mo...
Page 31 - Configuration des Sources; Modifiez les noms, activez ou désactivez les options; Insertion des piles dans la télécommande
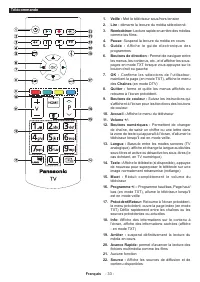
Français - 30 - 2. TV2.1. Guide Vous pouvez accéder au menu du guide électronique des programmes en utilisant cette option. Reportez- v o u s à l a s e c t i o n G u i d e É l e c t r o n i q u e d e s Programmes pour plus d'informations. 2.2. Chaînes Vous pouvez accéder au menu Chaînes en utilisant...
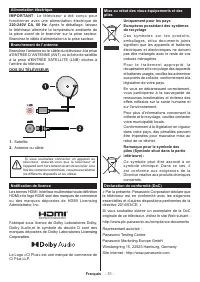
Page 32 - Si vous souhaitez connecter un appareil au; Notification de licence; Mise au rebut des vieux équipements et des; signifient que les appareils et batteries
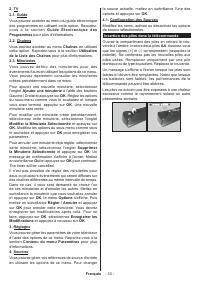
Français - 31 - Alimentation électrique IMPORTANT : Le téléviseur a été conçu pour fonctionner avec une alimentation électrique de 220-240V CA, 50 Hz . Après le déballage, laissez le téléviseur atteindre la température ambiante de la pièce avant de le brancher sur la prise secteur. Branchez le câble...
Page 33 - TV satellite numérique; Affichage; Remarque
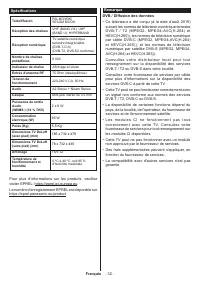
Français - 32 - Spécifications Télédiffusion PAL BG/I/DK/ SECAM BG/DK Réception des chaînes VHF (BAND I/III), UHF (BAND U), HYPERBAND Réception numérique TV satellite numérique terrestre intégré/câble (DVB-T-C-S) (DVB-T2, DVB-S2 conforme) Nombre de chaînes prédéfinies 8 000 Indicateur de chaîne Affi...
Page 35 - uf
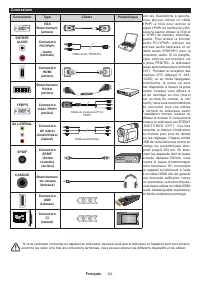
Français - 34 - Connexions Connecteur Type Câbles Périphérique VGA Branchement (arrière) ENTRÉE AUDIO Connexion PC/YPbPr Audio (latérale) Câble Audio YPbPr/PC Connexion HDMI (arrière) Branchement Péritel (arrière) YPBPR Connexion vidéo YPbPr (arrière) Câble de connexion PC à YPbPr AV LATÉRAL Connexi...
Page 36 - Installation initiale; , vous pouvez sélectionner; La durée de la sélection varie en fonction de
Français - 35 - Marche/Arrêt Pour mettre le téléviseur sous tension Connectez le cordon d'alimentation à une source d'alimentation telle qu'une prise murale (220-240 V AC, 50 Hz). Pour allumer le téléviseur à partir du mode veille :• Appuyez sur le bouton Veille , Programme +/- ou un autre bouton nu...
Page 37 - version du DiSEqC et appuyer sur; Lecture de média via entrée USB; Navigateur Multimédia; Navigateur multimédia; Fonctionnement du mode Aléatoire / Boucle
Français - 36 - • Système de câble satellite unique : Sélectionnez ce type d’antenne si vous possédez un système de câble satellite unique. Appuyez sur OK pour continuer. Configurez les paramètres en suivant les indications données à l’écran suivant. Appuyez sur le bouton OK pour rechercher des serv...
Page 38 - La souris ARC fonctionne uniquement via l'entrée
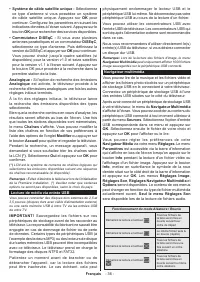
Français - 37 - Pour utiliser les fonctions de la barre d'information, mettez en évidence le symbole de la fonction et appuyez sur OK . Pour modifier l'état d'une fonction, mettez en surbrillance le symbole de la fonction et appuyez sur OK autant de fois que nécessaire. Si le symbole est marqué d'un...
Page 39 - Contenu du menu Réglages; Contenu du menu Image; Point blanc
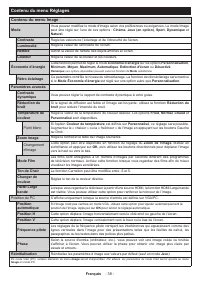
Français - 38 - Contenu du menu Réglages Contenu du menu Image Mode Vous pouvez modifiez le mode d'image selon vos préférences ou exigences. Le mode Image peut être réglé sur l’une de ces options : Cinéma , Jeux (en option) , Sport , Dynamique et Naturel . Contraste Règle les valeurs de l’éclairage ...
Page 40 - Recherche et mémorise
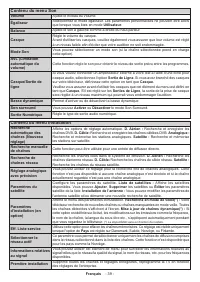
Français - 39 - Contenu du menu Son Volume Ajuste le niveau du volume. Égaliseur Sélectionnez le mode égaliseur. Les paramètres personnalisés ne peuvent être actifs que lorsque vous êtes en mode Utilisateur . Balance Ajuste le son à gauche comme à droite du haut-parleur. Casque Règle le volume du ca...
Page 41 - Système - Contenus du Menu; Indicateur de mise; Clé Biss
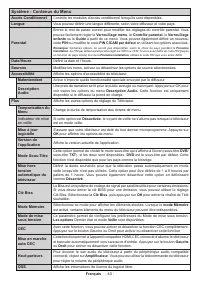
Français - 40 - Système - Contenus du Menu Accès Conditionnel Contrôle les modules d’accès conditionnel lorsqu’ils sont disponibles. Langue Vous pouvez définir une langue différente, selon votre diffuseur et votre pays. Parental Entrez le mot de passe correct pour modifier les réglages du contrôle p...
Page 42 - Fonctionnement général de la TV; Utilisation de la liste de chaînes; Installation Initiale; Guide des programmes électroniques
Français - 41 - Fonctionnement général de la TV Utilisation de la liste de chaînes Le téléviseur trie toutes les stations mémorisées dans la liste des chaînes. Vous pouvez modifier cette liste de chaînes, configurer les favoris ou les stations actives à inclure dans la liste en utilisant les options...
Page 45 - Formats de fichier pris en charge pour le mode USB
Français - 44 - Formats de fichier pris en charge pour le mode USB Périphérique multimédia Extension Formater Remarques Vidéo .mpg, .mpeg MPEG1-2 MPEG1: 768x576 @ 30P, MPEG2:1920x1080 @ 30P .vob MPEG2 1920x1080 @ 30P mp4 MPEG4, Xvid, H.264 .mkv H.264, MPEG4,VC-1 .avi MPEG2, MPEG4, Xvid, H.264 .flv H...
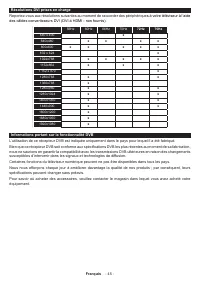
Page 46 - s à votre téléviseur à l’aide; Informations portant sur la fonctionnalité DVB
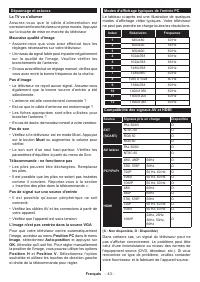
Français - 45 - Résolutions DVI prises en charge Reportez-vous aux résolutions suivantes au moment de raccorder des périphérique s à votre téléviseur à l’aide des câbles convertisseurs DVI (DVI à HDMI - non fournis). 56Hz 60Hz 66Hz 70Hz 72Hz 75Hz 640 x 400 x 640x480 x x x x 800x600 x x x x x 832 x 6...
Page 48 - PRECAUCIÓN; instrucciones detenidamente antes de; Marcas en el producto
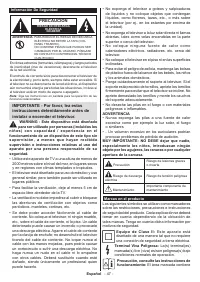
Español - 47 - Información De Seguridad PRECAUCIÓN RIESGO DE DESCARGA ELÉCTRICA NO ABRIR ADVERTENCIA: PARA REDUCIR EL RIESGO DE DESCARGA ELÉCTRICA NO RETIRE LA TAPA (O EL PANEL TRASERO). NO CONTIENE PIEZAS QUE PUEDAN SER CAMBIADAS POR EL USUARIO. PÓNGASE EN CONTACTO CON PERSONAL TÉCNICO CUALIFICADO....
Page 49 - Español; Producto Láser Clase 1; ADVERTENCIA
Español - 48 - baterías de celda de moneda o de botón reemplazable por el usuario. CLASS 1 LASER PRODUCT Producto Láser Clase 1 Este producto contiene una fuente láser Clase 1 que es s e g u r a e n c o n d i c i o n e s razonablemente previsibles de funcionamiento. ADVERTENCIA No ingiera pilas, hay...
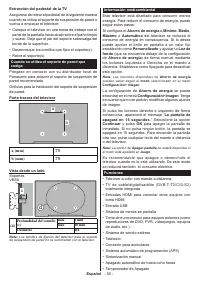
Page 51 - Ahorro de energía; Si pulsa los botones derecho e izquierdo de forma; Apagar pantalla; Funciones
Español - 50 - Información medioambiental Este televisor está diseñado para consumir menos energía. Para reducir el consumo de energía, puede seguir estos pasos:Si configura el Ahorro de energía a Mínimo , Medio , Máximo o Automático del televisor se reducirá el consumo de energía en consecuencia. S...
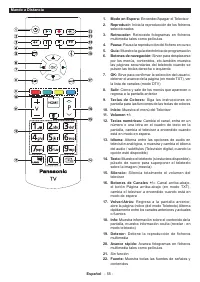
Page 52 - desde una antena o una fuente HDMI); Control y Funcionamiento del Televisor; En función del modelo, la disposición de la palanca de
Español - 51 - • Bloqueo infantil• Silenciado automático cuando no hay señal.• Reproducción NTSC• AVL (Limitador Automático de Volumen)• PLL (Búsqueda de Frecuencia por Lazos de Seguimiento de Fase) • Entrada de PC• Modo de Juego (opcional)• Función de apagado de imagen Accesorios Incluidos • Contro...
Page 53 - Podrá activar o desactivar las opciones de la fuente; Colocación de las pilas en el mando a distancia
Español - 52 - Usando el menú principal de TV Cuando se presiona el botón de Inicio , el menú TV aparecerá en la parte inferior de la pantalla. Puede navegar a través de los elementos del menú usando los botones direccionales en el control remoto. Para seleccionar un elemento o ver las opciones de s...
Page 54 - Si desea conectar un dispositivo al televisor,; Aviso sobre la licencia; Desecho de equipos viejos y Pilas gastadas; significan que los productos y baterías; Nota para el símbolo de la pila
Español - 53 - Conexión eléctrica ¡IMPORTANTE! Este conjunto de televisor está diseñado para funcionar con corriente alterna 220- 240V CA, 50 Hz . Tras desembalar el televisor, deje que éste alcance la temperatura ambiente antes de conectarlo a la corriente. Enchufe el cable de corriente a la electr...
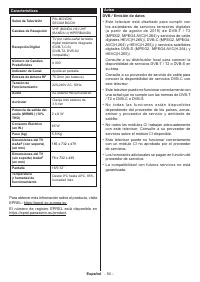
Page 55 - TV por cable-señal terrestre; Aviso
Español - 54 - Características Señal de Televisión PAL BG/I/DK/ SECAM BG/DK Canales de Recepción VHF (BANDA I/III) UHF (BANDA U) HIPERBANDA Recepción Digital TV por cable-señal terrestre digital totalmente integrada (DVB-T-C-S) (DVB-T2, DVB-S2 compatible) Número de Canales Predefinidos 8 000 Indicad...
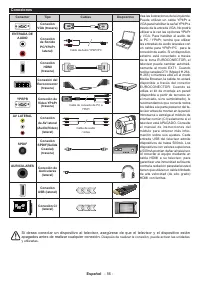
Page 57 - apagados antes de realizar cualquier conexión.
Español - 56 - Conexiones Conector Tipo Cables Dispositivo Conexión VGA (trasera) ENTRADA DE AUDIO Conexión de Sonido PC/YPbPr lateral) Cable de Audio YPbPr/PC Conexión HDMI (trasera) Conexión del Euroconector (trasera) YPBPR Conexión de Vídeo YPbPr (trasera) Cable de conexión de PC a YPbPr AV LATER...
Page 58 - puede seleccionar Network (Red) o establecer; Paso de Búsqueda; OKpara continuar. Seleccione un satélite disponible
Español - 57 - Encendido/Apagado Encendido del televisor Conecte el cable a una fuente de corriente, como por ejemplo un enchufe de pared (220-240V CA, 50 Hz). Para encender el televisor desde el modo de espera puede realizarlo de dos modos:• Pulse el botón Modo en espera , Canal +/- o un botón numé...
Page 59 - la versión DiSEqC y presione OK para continuar.; Reproducción multimedia por la entrada USB; Funcionamiento del Modo Bucle/Aleatorio
Español - 58 - seleccione este tipo de antena. Luego configure la versión DiSEqC y presione OK para continuar. Puede configurar hasta cuatro satélites (si están disponibles) para la versión v1.0 y dieciséis satélites para la versión v1.1 en la pantalla siguiente. Pulse el botón OK para buscar el pri...
Page 60 - ARC solo se admite a través de la entrada HDMI 1.; debería estar
Español - 59 - cambiar el estado de una función, resalte el símbolo de la función y pulse OK tantas veces como sea necesario. Si el símbolo está marcado con una cruz roja, eso significa que está desactivado. CEC Esta función permite controlar los dispositivos habilitados para CEC, conectados a travé...
Page 61 - Contenido del menú de Configuración; Contenido del Menú de Imagen; Punto Blanco
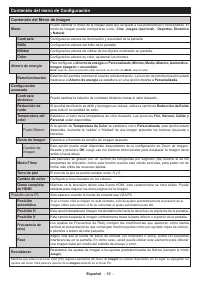
Español - 60 - Contenido del menú de Configuración Contenido del Menú de Imagen Modo Puede cambiar el modo de la imagen para que se ajuste a sus preferencias o necesidades. El modo de imagen puede configurarse como: Cine , Juegos (opcional) , Deportes, Dinámica y Natural . Contraste Configura los va...
Page 62 - Contenido del Menú de Audio; Busca y guarda emisoras de estaciones de
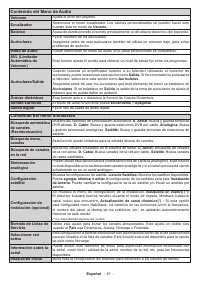
Español - 61 - Contenido del Menú de Audio Volumen Ajusta el nivel del volumen. Ecualizador Selecciona el modo ecualizador. Los valores personalizados se pueden hacer solo cuando esta en modo de Usuario . Balance Ajusta de donde procede el sonido principalmente, si del altavoz derecho o del izquierd...
Page 63 - Sistema - Contenido del Menú Imagen; PIN; LED de modo de
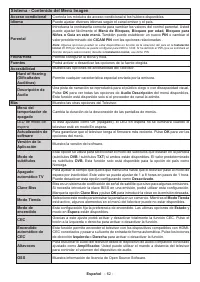
Español - 62 - Sistema - Contenido del Menú Imagen Acceso condicional Controla los módulos de acceso condicional si los hubiera disponibles. Idioma Puede ajustar diversos idiomas según el canal emisor y el país. Parental Introduzca la contraseña correcta para cambiar los valores del control parental...
Page 64 - Funcionamiento general del televisor; Manejo de la lista de canales; Primera Instalación; Instalación inicial; Guía electrónica de programación
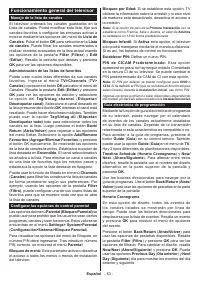
Español - 63 - Funcionamiento general del televisor Manejo de la lista de canales El televisor ordenará los canales guardados en la Lista de canales. Podrá modificar esta lista, fijar sus canales favoritos o configurar las emisoras activas a mostrar mediante las opciones del menú de Lista de Canales...
Page 66 - EXT
Español - 65 - Solución de problemas y consejos El televisor no se enciende Compruebe si el cable esta bien enchufado a la toma de corriente. Pulse la tecla de encendido del televisor. Mala calidad de imagen • Compruebe si ha sintonizado correctamente el televisor. • La baja intensidad de la señal p...
Page 67 - Formatos admitidos para el modo USB
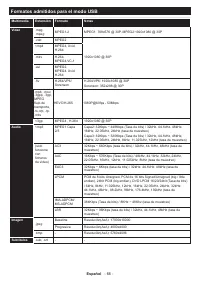
Español - 66 - Formatos admitidos para el modo USB Multimedia Extensión Formato Notas Vídeo .mpg, .mpeg MPEG1-2 MPEG1: 768x576 @ 30P, MPEG2:1920x1080 @ 30P .vob MPEG2 1920x1080 @ 30P <mp4 MPEG4, Xvid, H.264 .mkv H.264, MPEG4,VC-1 .avi MPEG2, MPEG4, Xvid, H.264 .flv H.264/VP6/ Sorenson H.264/VP6: ...
Page 68 - Al conectar equipo; Información sobre la función de DVB; donde compró el aparato.
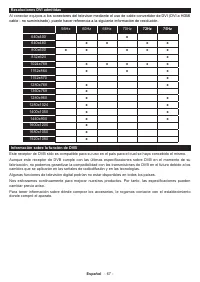
Español - 67 - Resoluciones DVI admitidas Al conectar equipo s a los conectores del televisor mediante el uso de cable convertidor de DVI (DVI a HDMI cable - no suministrado), puede hacer referencia a la siguiente información de resolución. 56Hz 60Hz 66Hz 70Hz 72Hz 75Hz 640x400 x 640x480 x x x x 800...
Page 70 - Informação de Segurança; CUIDADO; IMPORTANTE - Deve ler totalmente estas; Marcações no Produto
Português - 69 - Informação de Segurança CUIDADO RISCO DE CHOQUE ELÉTRICO NÃO ABRIR CUIDADO: PARA REDUZIR O RISCO DE CHOQUE ELÉTRICO, NÃO REMOVER A TAMPA (OU A PARTE DE TRÁS). NENHUMA PEÇA REPARÁVEL PELO UTILIZADOR NO INTERIOR. SOLICITAR ASSISTÊNCIA A UM TÉCNICO QUALIFICADO. Nota: Seguir as instruçõ...
Page 71 - Português; Produto Laser de classe 1:; ADVERTÊNCIAS DE MONTAGEM
Português - 70 - contém(êm) pilhas tipo moeda ou botão substituíveis pelo utilizador. CLASS 1 LASER PRODUCT Produto Laser de classe 1: Este produto contém fonte laser Classe 1 que é segura sob condições previsíveis razoáveis de funcionamento. WARNING : Não ingerir as pilhas, perigo de queimadura quí...
Page 73 - ” será exibida no ecrã. Selecionar; Continuar; e premir; Ecrã Desligado; Conectividade; Poupança de Energia
Português - 72 - As definições de Poupança de Energia podem ser encontradas no menu Definições>Imagem . Notar que, algumas definições de imagem ficarão indispo- níveis para alteração.S e S e p r e m i r o b o t ã o D i r e i t o o u E s q u e r d o consecutivamente, a mensagem, “ O Ecrã desliga-s...
Page 74 - A posição do joystick pode diferir dependendo do; Usar o menu principal da TV
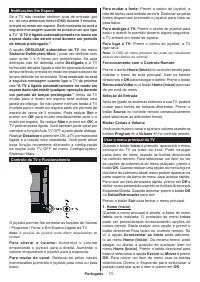
Português - 73 - Notificações Em Espera Se a TV não receber nenhum sinal de entrada (por ex., de uma antena ou fonte HDMI) durante 3 minutos, entrará no modo em espera. Será mostrada no ecrã a seguinte mensagem quando da próxima vez que ligar a TV: “ A TV é ligada automaticamente no modo em espera d...
Page 75 - Editar os nomes, ativar ou desativar as opções de; Inserir as pilhas no controlo remoto; Se pretender ligar um dispositivo à TV, assegurar
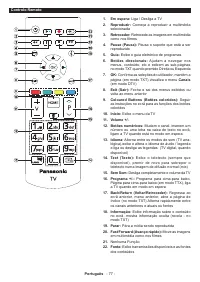
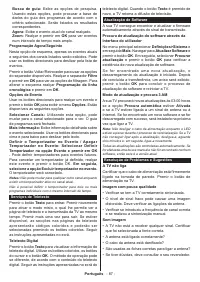
Português - 74 - 2. TV2.1. Guia Pode aceder ao menu do guia de programa eletrónico usando esta opção. Consultar a secção Guia de programa eletrónico para mais informação. 2.2. Canais Pode aceder ao menu Canais usando esta opção. Consultar a secção Usar a Lista de canais para mais informação. 2.3. Te...
Page 76 - Licensing Corporation; Eliminação do Equipamento Usado e das Pilhas; e / ou documentos anexos significa que; Nota para o símbolo da pilha
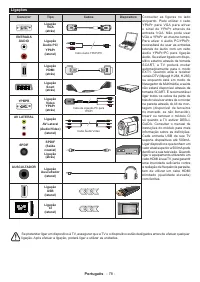
Português - 75 - Notificação de licença Os termos HDMI e High-Definition Multimedia Interface e o logotipo HDMI são marcas ou marcas registradas da HDMI Licensing Administrator, Inc. Fabricado sob a licença da Dolby Laboratories. Dolby, Dolby Audio , e double-D são marcas registadas da Dolby Laborat...
Page 77 - TV digital terrestre/cabo; Exibir; Observação
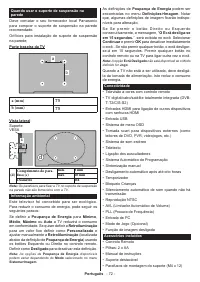
Português - 76 - Especificação Emissão de TV PAL BG/I/DK/ SECAM BG/DK Receção de Canais HIPERBANDA - VHF (BANDA I/III) - UHF (BANDA U) Receção Digital TV digital terrestre/cabo plenamente Integrada TV(DVB-T-C-S) (compatível DVB-T2 e DVB-S2) Número de Canais Predefinidos 8 000 Indicador de canal Visu...
Page 80 - Passo
Português - 79 - Ligar/Desligar Para ligar a TV Ligar o cabo de alimentação a uma fonte de alimentação, como uma tomada de parede (220-240V CA, 50 Hz). Para ligar a TV a partir do modo em espera pode:• Pressione o botão de espera, Programar +/- ou um botão numérico no controle remoto.. • Premir o ce...
Page 81 - Nota; Navegador de Multimédia; Funcionamento do Modo de Repetição/Aleatório
Português - 80 - configurar até quatro satélites (se disponíveis) para a versão v1.0 e dezasseis satélites para a versão 1.1 no ecrã seguinte. Premir o botão OK para pesquisar o primeiro satélite na lista. Analógica: Se a opção de procura de transmissão por Analógica estiver ligada, a TV procurará t...
Page 82 - ARC é suportado apenas através da entrada HDMI1.; deverá ser definida como
Português - 81 - CEC Esta função permite controlar os dispositivos ativados por CEC, que são ligados através das portas HDMI usando o controlo remoto da TV.A opção CEC no menu Definições>Sistema>Mais deve ser definida inicialmente como Ativada . Premir o botão Fonte e selecionar a entrada HDMI...
Page 83 - Conteúdos do Menu Definições; Conteúdo do Menu da Imagem; Ponto Branco
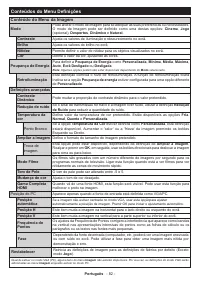
Português - 82 - Conteúdos do Menu Definições Conteúdo do Menu da Imagem Modo Pode alterar o modo de imagem para se adequar às suas preferências ou necessidades. O modo de Imagem pode ser definido como uma destas opções: Cinema , Jogo (opcional), Desportos , Dinâmico e Natural . Contraste Ajusta os ...
Page 84 - Conteúdos do Menu Som; Utilizador; . Se estiver definido para; Saída de Linha
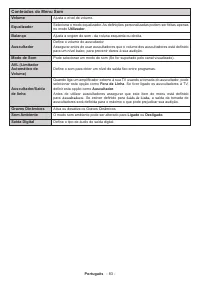
Português - 83 - Conteúdos do Menu Som Volume Ajusta o nível de volume. Equalizador Seleciona o modo equalizador. As definições personalizadas podem ser feitas apenas no modo Utilizador . Balanço Ajusta a origem do som - da coluna esquerda ou direita. Auscultador Define o volume do auscultador. Asse...
Page 85 - Conteúdos do Menu Instalação; Procura e memoriza os canais satélite.; Adicionar
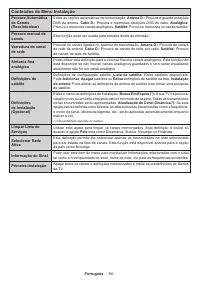
Português - 84 - Conteúdos do Menu Instalação Procura Automática de Canais (Ressintonizar) Exibe as opções automáticas de sintonização. Antena D.: Procura e guarda estações DVB da antena. Cabo D.: Procura e memoriza estações DVB do cabo. Analógica: Procura e memoriza canais analógicos. Satélite: Pro...
Page 86 - Sistema - Conteúdos do Menu; LED Em espera; ) se ambas existirem. Valor predefinido; Código Biss
Português - 85 - Sistema - Conteúdos do Menu Acesso Condicional Controla os módulos de acesso condicional quando existentes. Idioma Pode definir um idioma diferente dependendo da emissora e do país. Controlo parental Introduzir a palavra-passe correta para alterar as definições do controlo parental....
Page 87 - Funcionamento Geral da TV; Usar a Lista de Canais; Primeira Instalação; Guia eletrónico de programa
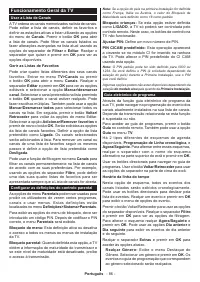
Português - 86 - Funcionamento Geral da TV Usar a Lista de Canais A TV ordena os canais memorizados na lista de canais. Pode editar a lista de canais, definir os favoritos e definir as estações ativas a listar utilizando as opções do menu de Canais . Premir o botão OK para abrir a lista de canais. P...
Page 88 - Serviços de Teletexto; Não desligar o cabo de alimentação enquanto o LED; Resolução de Problemas e Sugestões
Português - 87 - Busca de guia: Exibe as opções de pesquisa. Usando estas opções, pode procurar a base de dados do guia dos programas de acordo com o critério selecionado. Serão listados os resultados correspondentes. Agora: Exibe o evento atual do canal realçado. Zoom: Realçar e premir em OK para v...
Page 90 - Formatos de ficheiros suportados para o modo USB
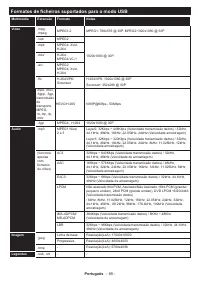
Português - 89 - Formatos de ficheiros suportados para o modo USB Multimédia Extensão Formato Notas Vídeo .mpg, .mpeg MPEG1-2 MPEG1: 768x576 @ 30P, MPEG2:1920x1080 @ 30P .vob MPEG2 1920x1080 @ 30P .mp4 MPEG4, Xvid, H.264 .mkv H.264, MPEG4,VC-1 .avi MPEG2, MPEG4, Xvid, H.264 .flv H.264/VP6/ Sorenson ...
Page 91 - Quando ligar dispositivos aos conetore; Informação de funcionalidade DVB
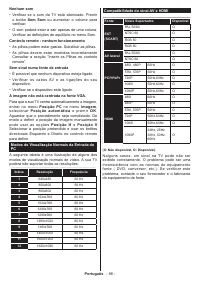
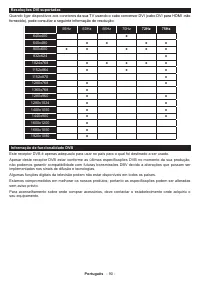
Português - 90 - Resoluções DVI suportadas Quando ligar dispositivos aos conetore s da sua TV usando o cabo conversor DVI (cabo DVI para HDMI -não fornecido), pode consultar a seguinte informação de resolução. 56Hz 60Hz 66Hz 70Hz 72Hz 75Hz 640x400 x 640x480 x x x x 800x600 x x x x x 832x624 x 1024x7...
Page 93 - Informazioni sulla sicurezza; IMPORTANTE - Leggere interamente queste; Indicazioni sul prodotto
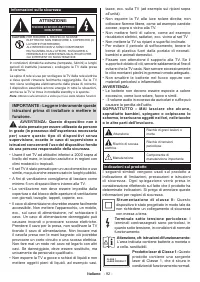
Italiano - 92 - Informazioni sulla sicurezza ATTENZIONE: RISCHIO DI SHOCK ELETTRICO: NON APRIRE CAUTION: PER RIDURRE IL RISCHIO DI SCOSSE ELETTRICHE NON RIMUOVERE IL COPERCHIO (O LA PARTE POSTERIORE). ALL'INTERNO NON VI SONO COMPONENTI RIUTILIZZABILI DALL'UTENTE. RIVOLGERSI A PERSONALE DI ASSISTENZA...
Page 94 - Italiano; AVVERTENZE PER
Italiano - 93 - AVVERTENZA: Non ingerire batterie, pericolo di esplosione chimica. Il prodotto o gli accessori forniti in dotazione col prodotto potrebbero contenere una batteria a moneta/ bottone. Se la batteria a cella, modello moneta/bottone viene ingoiata, può causare gravi lesioni interne in so...
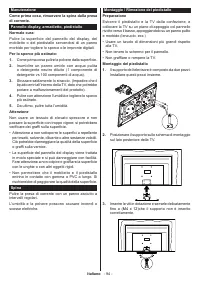
Page 96 - Informazioni per la tutela dell'ambiente; Risparmio energetico; Lo schermo si spegne dopo; .” verrà visualizzato a video. Selezionare; Schermo Off; Caratteristiche
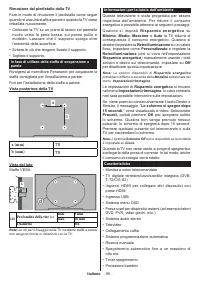
Italiano - 95 - Informazioni per la tutela dell'ambiente Questa televisione è stata progettata per essere rispettosa dell'ambiente. Per ridurre il consumo energetico è possibile attenersi ai seguenti passaggi:Q u a l o r a s i i m p o s t i Risparmio energetico s u Minimo , Medio, Massimo o Auto la ...
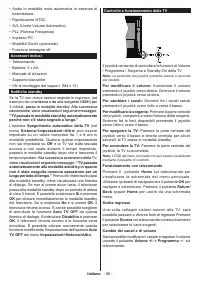
Page 97 - antenna o da una sorgente HDMI) pe; Controllo e funzionamento della TV; La posizione del joystick potrebbe variare a seconda
Italiano - 96 - • Audio in modalità muto automatica in assenza di trasmissione. • Riproduzione NTSC• AVL (Limite Volume Automatico)• PLL (Ricerca Frequenza)• Ingresso PC• Modalità Giochi (opzionale)• Funzione immagine off Accessori inclusi • Telecomando• Batterie: 2 x AA• Manuale di istruzioni• Supp...
Page 98 - Utilizzare il menu principale del TV; È possibile attivare o disattivare le opzioni fonte; Installazione delle batterie nel telecomando
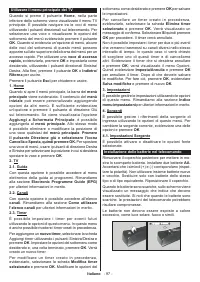
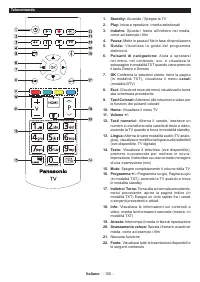
Italiano - 97 - Utilizzare il menu principale del TV Quando si preme il pulsante Home , nella parte inferiore dello schermo viene visualizzato il menu TV principale. È possibile navigare tra le voci di menu utilizzando i pulsanti direzionali sul telecomando. Per selezionare una voce o visualizzare l...
Page 99 - Per collegare un dispositivo alla TV, verificare che; Notifica di licenza; Licensing Corporation.; Smaltimento di strumentazione vecchia e; normali rifiuti domestici.; Nota per il simbolo batteria (simbolo; definiti dalla Direttiva per i prodotti chimici
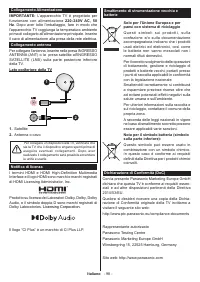
Italiano - 98 - Collegamento Alimentazione IMPORTANTE: L’apparecchio TV è progettato per funzionare con alimentazione 220-240V AC, 50 Hz . Dopo aver tolto l'imballaggio, fare in modo che l'apparecchio TV raggiunga la temperatura ambiente prima di collegarlo all'alimentazione principale. Inserire il ...
Page 100 - TV digitale terrestre-cavo; umidità; Avviso
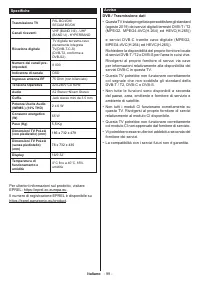
Italiano - 99 - Specifiche Trasmissione TV PAL BG/I/DK/ SECAM BG/DK Canali riceventi VHF (BAND I/III) - UHF (BAND U) - HYPERBAND Ricezione digitale TV digitale terrestre-cavo pienamente integrata TV(DVB-T-C-S) (DVB-T2, conforme a DVB-S2) Numero dei canali pre- impostati 8 000 Indicatore di canale OS...
Page 103 - Passo di
Italiano - 102 - Accensione/Spegnimento Per accendere la TV Collegare il cavo di alimentazione a una presa di corrente, quale ad esempio una presa a parete (220- 240V AC, 50 Hz). Per accendere la TV dalla modalità di standby è possibile:• Premere il tasto Standby , Programma +/- o un tasto numerico ...
Page 104 - Riproduzione multimediale trame ingresso USB; Media; Browser multimediale; Funzionamento modalità Loop/Shuffle
Italiano - 103 - attenendosi alle seguenti istruzioni sulla schermata successiva. Premere OK per eseguire una scansione dei dispositivi. • Interruttore DiSEqC: Nel caso in cui si disponga di più parabole satellitari e di un DiSEqC , selezionare questo tipo di antenna. Quindi, impostare la versione D...
Page 105 - ARC è supportato solo tramite l'ingresso HDMI1.
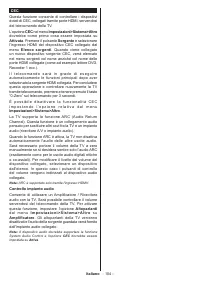
Italiano - 104 - CEC Questa funzione consente di controllare i dispositivi dotati di CEC, collegati tramite porte HDMI, servendosi del telecomando della TV.L’opzione CEC nel menu Impostazioni>Sistema>Altro dovrebbe come prima cosa essere impostata su Attivata . Premere il pulsante Sorgente e s...
Page 106 - Indice menu Impostazioni; Contenuti menu immagine; Punto di bianco; automaticamente la posizione dell’immagine. Premere; per iniziare la regolazione
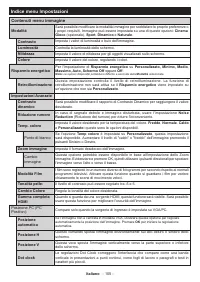
Italiano - 105 - Indice menu Impostazioni Contenuti menu immagine Modalità Sarà possibile modificare la modalità immagine per soddisfare le proprie preferenze o i propri requisiti. Immagine può essere impostata su una di queste opzioni: Cinema , Gioco (opzionale), Sport , Dinamico e Naturale . Contr...
Page 107 - Indice menu Audio; Cuffie
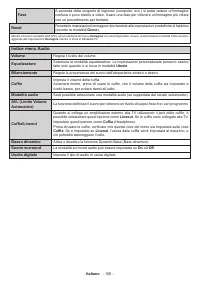
Italiano - 106 - Fase A seconda della sorgente di ingresso (computer, ecc.) si potrà vedere un'immagine confusa o poco stabile a video. Usare una fase per ottenere un'immagine più chiara con un procedimento per tentativi. Reset Resetta le impostazioni immagine riportandole alle impostazioni predefin...
Page 108 - Contenuti del menu installazione; Cerca e salva tutti i canali satellitari.; Aggiungere
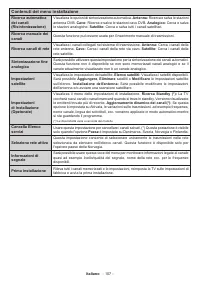
Italiano - 107 - Contenuti del menu installazione Ricerca automatica dei canali (Risintonizzazione) Visualizza le opzioni di sintonizzazione automatica. Antenna: Ricerca e salva le stazioni antenna DVB. Cavo: Ricerca e salva le stazioni cavo DVB. Analogico: Cerca e salva le stazioni analogiche. Sate...
Page 109 - Sistema - Contenuti Menu; LED Standby; ) qualora entrambe siano disponibili. Il valore predefinito; Tasto Biss; per inserire le chiavi
Italiano - 108 - Sistema - Contenuti Menu Accesso Condizionato Controlla i moduli di accesso condizionato se disponibili. Lingua Sarà possibile impostare una lingua diversa a seconda dell'emittente e del paese. Genitori Inserire la password corretta per modificare le impostazioni genitori. Sarà poss...
Page 110 - Funzionamento Generale della TV; Utilizzo dell'elenco canali; Guida elettronica ai programmi
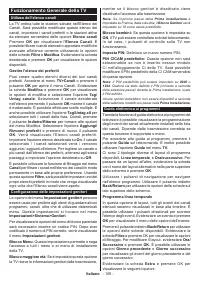
Italiano - 109 - Funzionamento Generale della TV Utilizzo dell'elenco canali La TV ordina tutte le stazioni salvate nell'Elenco dei Canali. Sarà possibile modificare questo elenco dei canali, impostare i canali preferiti o le stazioni attive da elencare servendosi delle opzioni Elenco canali Premere...
Page 113 - Formati di file supportati per la modalità USB
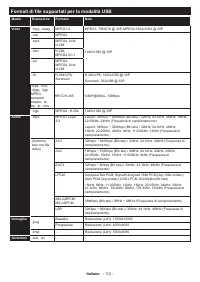
Italiano - 112 - Formati di file supportati per la modalità USB Media Estensione Formato Note Video .mpg, .mpeg MPEG1-2 MPEG1: 768x576 @ 30P, MPEG2:1920x1080 @ 30P .vob MPEG2 1920x1080 @ 30P .mp4, MPEG4, Xvid, H.264 .mkv H.264, MPEG4,VC-1 .avi MPEG2, MPEG4, Xvid, H.264 .flv H.264/VP6/ Sorenson H.264...
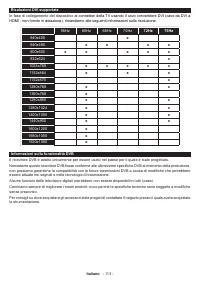
Page 114 - In fase di collegamento del dispositivo; Informazioni sulla funzionalità DVB
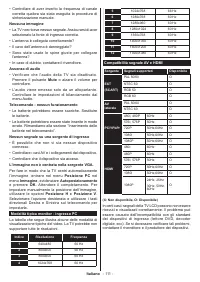
Italiano - 113 - Risoluzioni DVI supportate In fase di collegamento del dispositivo ai connettori della TV usando il cavo convertitore DVI (cavo da DVI a HDMI - non fornito in dotazione), rimandiamo alle seguenti informazioni sulla risoluzione. 56Hz 60Hz 66Hz 70Hz 72Hz 75Hz 640x400 x 640x480 x x x x...