Page 2 - Contents; Please observe the safety precautions at the end of this manual.
2 En Contents Gather these items (box contents) ................................................... 3 Attach the strap ..................................................................................... 3 Prepare the camera .............................................................................
Page 3 - Pull the strap tight so that it does not come loose.; Attach the strap
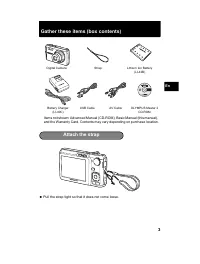
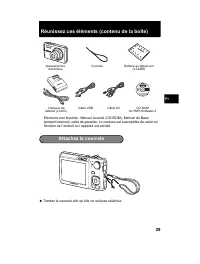
3 En Gather these items (box contents) ? Pull the strap tight so that it does not come loose. Items not shown: Advanced Manual (CD-ROM), Basic Manual (this manual), and the Warranty Card. Contents may vary depending on purchase location. Digital Camera Strap Lithium Ion Battery (LI-42B) USB Cable AV...
Page 4 - Prepare the camera; Battery comes partially charged.
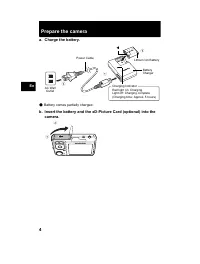
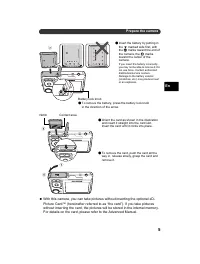
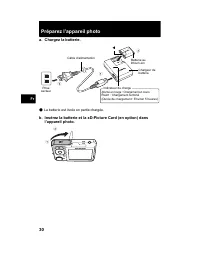
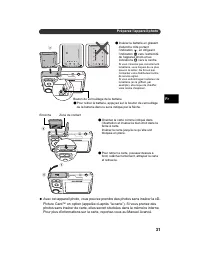
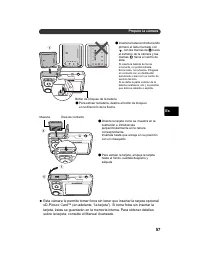
4 En Prepare the camera a. Charge the battery. ( Battery comes partially charged. b. Insert the battery and the xD-Picture Card (optional) into the camera. 2 1 3 Red light on: ChargingLight off: Charging complete(Charging time: Approx. 5 hours) AC Wall Outlet Power Cable Battery Charger Lithium Ion ...
Page 6 - Turn the camera on; a. Set the mode dial to; Hint; ON
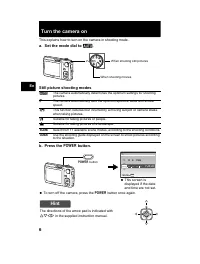
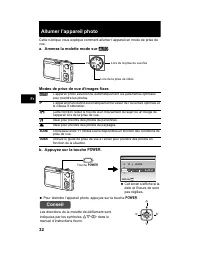
6 En Turn the camera on This explains how to turn on the camera in shooting mode. a. Set the mode dial to h . Still picture shooting modes b. Press the o button. ? To turn off the camera, press the o button once again. h The camera automatically determines the optimum settings for shooting pictures....
Page 7 - Set the date and time; and; The date and time screen
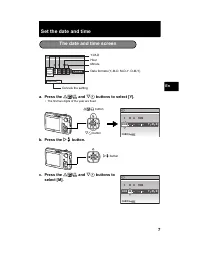
7 En Set the date and time a. Press the O F / < and N Y buttons to select [Y]. • The first two digits of the year are fixed. b. Press the Y # button. c. Press the O F / < and N Y buttons to select [M]. The date and time screen X Y M Y M D D TIME ---- -- -- -- -- MENU CANCEL Y-M-D Cancels the s...
Page 8 - AUTO
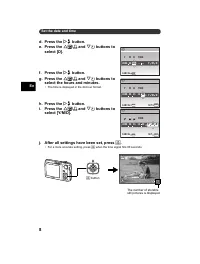
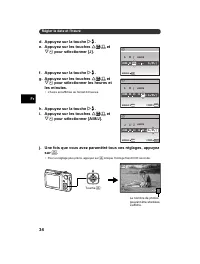
8 En Set the date and time d. Press the Y # button. e. Press the O F / < and N Y buttons to select [D]. f. Press the Y # button. g. Press the O F / < and N Y buttons to select the hours and minutes. • The time is displayed in the 24-hour format. h. Press the Y # button. i. Press the O F / <...
Page 9 - Set the language; button to display the top menu.; select a language, and press
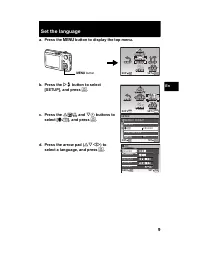
9 En Set the language a. Press the m button to display the top menu. b. Press the Y # button to select [SETUP], and press . c. Press the O F / < and N Y buttons to select [ W ], and press . d. Press the arrow pad ( ON XY ) to select a language, and press . m button MENU IMAGE QUALITY IMAGE ...
Page 10 - Take a picture
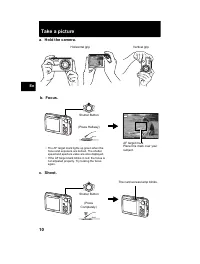
10 En Take a picture a. Hold the camera. c. Shoot. Horizontal grip Vertical grip b. Focus. AUTO 4 4 IN 8 M 8 M N ORM N ORM Shutter Button (Press Halfway) • The AF target mark lights up green when the focus and exposure are locked. The shutter speed and aperture value are also displayed. • If the AF ...
Page 11 - Review your pictures; Erase pictures
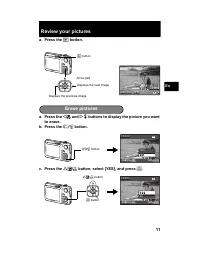
11 En Review your pictures a. Press the q button. a. Press the X & and Y # buttons to display the picture you want to erase. b. Press the / S button. c. Press the O F / < button, select [YES], and press . Arrow pad Displays the next image Displays the previous image q button 2008.08.26 20...
Page 12 - Basic operation; Shooting Mode Buttons
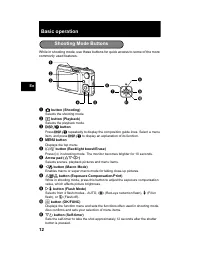
12 En Basic operation While in shooting mode, use these buttons for quick access to some of the more commonly used features. 1 K button (Shooting) Selects the shooting mode. 2 q button (Playback) Selects the playback mode. 3 button Press repeatedly to display the composition guide lines. Select ...
Page 13 - Shooting Scene Modes; Scene Modes; Macro Mode
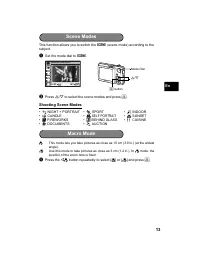
13 En This function allows you to switch the f (scene mode) according to the subject. 1 Set the mode dial to f . 2 Press O / N to select the scene modes and press . Shooting Scene Modes & This mode lets you take pictures as close as 10 cm (3.9 in.) (at the widest angle). % Use this mode to tak...
Page 14 - Flash Modes
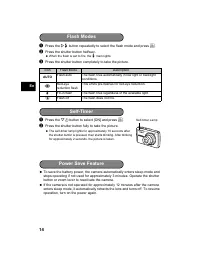
14 En 1 Press the Y # button repeatedly to select the flash mode and press . 2 Press the shutter button halfway. ? When the flash is set to fire, the # mark lights. 3 Press the shutter button completely to take the picture. 1 Press the N Y button to select [ON] and press . 2 Press the shutter bu...
Page 15 - Menus and settings; Top Menu; Erase All Pictures
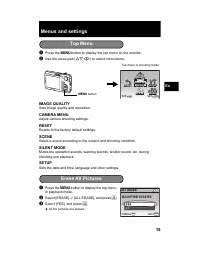
15 En Menus and settings 1 Press the m button to display the top menu on the monitor. 2 Use the arrow pad ( ON XY ) to select menu items. IMAGE QUALITY Sets image quality and resolution. CAMERA MENU Adjust various shooting settings. RESET Resets to the factory default settings. SCENE Select a scene ...
Page 16 - Connecting the camera; Turn the TV on and set it to the video input mode.; Playback on a TV
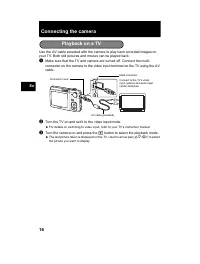
16 En Connecting the camera Use the AV cable provided with the camera to play back recorded images on your TV. Both still pictures and movies can be played back. 1 Make sure that the TV and camera are turned off. Connect the multi-connector on the camera to the video input terminal on the TV using t...
Page 17 - Press the
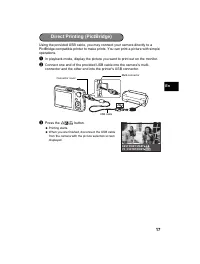
17 En Using the provided USB cable, you may connect your camera directly to a PictBridge compatible printer to make prints. You can print a picture with simple operations. 1 In playback mode, display the picture you want to print out on the monitor. 2 Connect one end of the provided USB cable into t...
Page 18 - Transfer images; Simply follow the on-screen instructions.
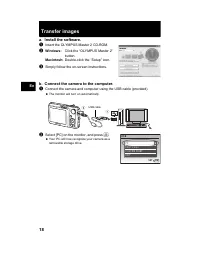
18 En Transfer images a. Install the software. 1 Insert the OLYMPUS Master 2 CD-ROM. 2 Windows: Click the “OLYMPUS Master 2” button. Macintosh: Double-click the “Setup” icon. 3 Simply follow the on-screen instructions. b. Connect the camera to the computer. 1 Connect the camera and computer using th...
Page 19 - Tips
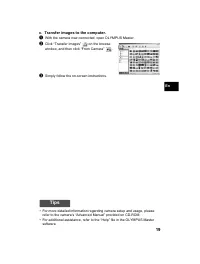
19 En c. Transfer images to the computer. 1 With the camera now connected, open OLYMPUS Master. 2 Click “Transfer Images” on the browse window, and then click “From Camera” . 3 Simply follow the on-screen instructions. Tips • For more detailed information regarding camera setup and usage, please ref...
Page 20 - OLYMPUS Master software; System Requirements; User Registration
20 En OLYMPUS Master software OLYMPUS Master Software: Use this software to download pictures from the camera, view, organize, retouch, e-mail and print your digital pictures, movies and more! ( System Requirements For the latest support information, visit the Olympus website (http://www.olympus.com...
Page 21 - Specifications; Camera
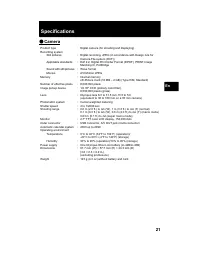
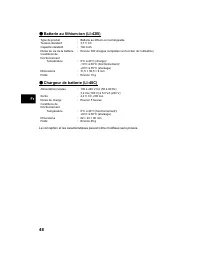
21 En Specifications ( Camera Product type : Digital camera (for shooting and displaying) Recording system Still pictures : Digital recording, JPEG (in accordance with Design rule for Camera File system (DCF)) Applicable standards : Exif 2.2, Digital Print Order Format (DPOF), PRINT Image Matching I...
Page 23 - Safety Precautions; CAUTION; General Precautions
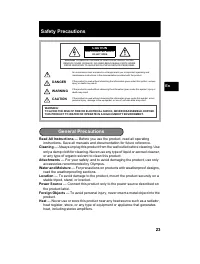
23 En Safety Precautions Read All Instructions — Before you use the product, read all operating instructions. Save all manuals and documentation for future reference. Cleaning — Always unplug this product from the wall outlet before cleaning. Use only a damp cloth for cleaning. Never use any type of...
Page 24 - stray objects - and cause serious damage.; Handling the Camera
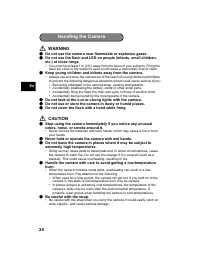
24 En WARNING ( Do not use the camera near flammable or explosive gases. ( Do not use the flash and LED on people (infants, small children, etc.) at close range. • You must be at least 1 m (3 ft.) away from the faces of your subjects. Firing the flash too close to the subject’s eyes could cause a mo...
Page 25 - Battery Handling Precautions
25 En DANGER • The camera uses a lithium ion battery specified by Olympus. Charge the battery with the specified charger. Do not use any other chargers. • Never heat or incinerate batteries.• Take precautions when carrying or storing batteries to prevent them from coming into contact with any metal ...
Page 26 - For customers in Europe
26 En Use Only Dedicated Rechargeable Battery and Battery Charger We strongly recommend that you use only the genuine Olympus dedicated rechargeable battery and battery charger with this camera.Using a non-genuine rechargeable battery and/or battery charger may result in fire or personal injury due ...
Page 27 - Notes regarding warranty maintenance; Disclaimer of Warranty; trademarks of their respective owners.; Trademarks
27 En 5. Olympus’s sole liability under this warranty shall be limited to repairing or replacing the product. Any liability for indirect or consequential loss or damage of any kind incurred or suffered by the customer due to a defect of the product, and in particular any loss or damage caused to any...
Page 28 - Table des matières
28 Fr Table des matières Réunissez ces éléments (contenu de la boîte) ............................. 29 Attachez la courroie ............................................................................. 29 Préparez l’appareil photo ................................................................ 30 A...
Page 29 - Réunissez ces éléments (contenu de la boîte); Tendez la courroie afin qu’elle ne soit pas relâchée.; Attachez la courroie
29 Fr Réunissez ces éléments (contenu de la boîte) ? Tendez la courroie afin qu’elle ne soit pas relâchée. Eléments non illustrés : Manuel Avancé (CD-ROM), Manuel de Base (présent manuel), carte de garantie. Le contenu est susceptible de varier en fonction de l’endroit où l’appareil est acheté. Câbl...
Page 30 - Préparez l’appareil photo; La batterie est livrée en partie chargée.
30 Fr Préparez l’appareil photo a. Chargez la batterie. ( La batterie est livrée en partie chargée. b. Insérez la batterie et la xD-Picture Card (en option) dans l’appareil photo. 2 1 3 Allumé en rouge : Chargement en coursÉteint : Chargement terminé(Durée de chargement : Environ 5 heures) Prise sec...
Page 32 - Allumer l’appareil photo; a. Amenez la molette mode sur; Pour éteindre l’appareil photo, appuyez sur la touche; Conseil
32 Fr Allumer l’appareil photo Cette rubrique vous explique comment allumer l’appareil en mode de prise de vue. a. Amenez la molette mode sur h . Modes de prise de vue d’images fixes b. Appuyez sur la touche o . ? Pour éteindre l’appareil photo, appuyez sur la touche o . h L’appareil photo sélection...
Page 33 - Régler la date et l’heure; a. Appuyez sur les touches; b. Appuyez sur la touche; Écran de la date et de l’heure
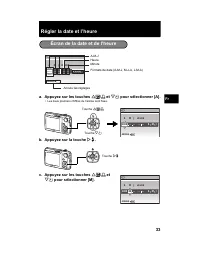
33 Fr Régler la date et l’heure a. Appuyez sur les touches O F / < et N Y pour sélectionner [A]. • Les deux premiers chiffres de l’année sont fixes. b. Appuyez sur la touche Y # . c. Appuyez sur les touches O F / < et N Y pour sélectionner [M]. Écran de la date et de l’heure X A M A M J J HEUR...
Page 35 - Régler la langue
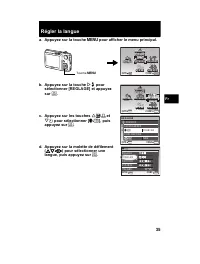
35 Fr Régler la langue a. Appuyez sur la touche m pour afficher le menu principal. b. Appuyez sur la touche Y # pour sélectionner [REGLAGE] et appuyez sur . c. Appuyez sur les touches O F / < et N Y pour sélectionner [ W ], puis appuyez sur . d. Appuyez sur la molette de défilement ( ON XY ) ...
Page 36 - Prendre une photo
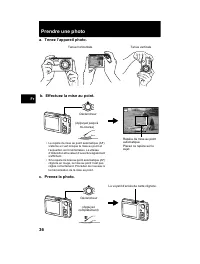
36 Fr Prendre une photo a. Tenez l’appareil photo. c. Prenez la photo. Tenue horizontale Tenue verticale b. Effectuez la mise au point. • Le repère de mise au point automatique (AF) s’allume en vert lorsque la mise au point et l’exposition sont mémorisées. La vitesse d’obturation et la valeur d’ouve...
Page 37 - Vérifier les images; Effacer des photos
37 Fr Vérifier les images a. Appuyez sur la touche q . a. Appuyez sur les touches X & et Y # pour afficher l’image que vous voulez effacer. b. Appuyez sur la touche / S . c. Appuyez sur la touche O F / < , sélectionnez [OUI], et appuyez sur . Molette de défilement Affiche l’image suivante...
Page 38 - Fonctionnement de base; Touches du mode prise de vue
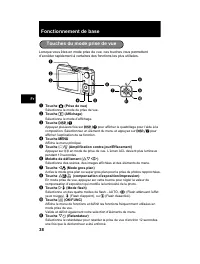
38 Fr Fonctionnement de base Lorsque vous êtes en mode prise de vue, ces touches vous permettent d’accéder rapidement à certaines des fonctions les plus utilisées. 1 Touche K (Prise de vue) Sélectionne le mode de prise de vue. 2 Touche q (Affichage) Sélectionne le mode d’affichage. 3 Touche Appuye...
Page 39 - Modes de scène de prise de vue; Modes de scène; Mode gros plan
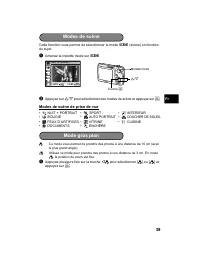
39 Fr Cette fonction vous permet de sélectionner le mode f (scène) en fonction du sujet. 1 Amenez la molette mode sur f . 2 Appuyez sur O / N pour sélectionner des modes de scène et appuyez sur . Modes de scène de prise de vue & Ce mode vous permet de prendre des photos à une distance de 10 cm...
Page 40 - Modes flash
40 Fr 1 Appuyez plusieurs fois sur la touche Y # pour sélectionner le mode de flash et appuyez sur . 2 Appuyez sur le déclencheur jusqu’à mi-course. ? Lorsque le flash est réglé pour se déclencher, l’indication # s’allume. 3 Enfoncez complètement le déclencheur pour prendre la photo. 1 Appuyez sur...
Page 41 - Menus et réglages; QUALITE D’IMAGE; Menu principal; Effacement de toutes les photos
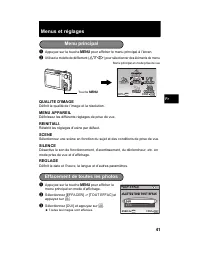
41 Fr Menus et réglages 1 Appuyez sur la touche m pour afficher le menu principal à l’écran. 2 Utilisez la molette de défilement ( ON XY ) pour sélectionner des éléments de menu. QUALITE D’IMAGE Définit la qualité de l’image et la résolution. MENU APPAREIL Définissez les différents réglages de prise...
Page 42 - Connexion de l’appareil photo; Allumez le téléviseur et mettez-le en mode entrée vidéo.; Affichage sur un téléviseur
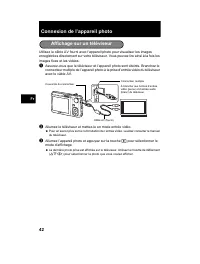
42 Fr Connexion de l’appareil photo Utilisez le câble AV fourni avec l’appareil photo pour visualiser les images enregistrées directement sur votre téléviseur. Vous pouvez lire ainsi à la fois les images fixes et les vidéos. 1 Assurez-vous que le téléviseur et l’appareil photo sont éteints. Branchez...
Page 43 - Appuyez sur la touche
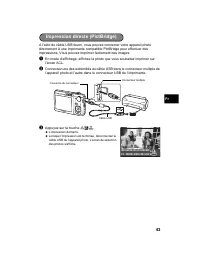
43 Fr A l’aide du câble USB fourni, vous pouvez connecter votre appareil photo directement à une imprimante compatible PictBridge pour effectuer des impressions. Vous pouvez imprimer facilement des images. 1 En mode d’affichage, affichez la photo que vous souhaitez imprimer sur l’écran ACL. 2 Connec...
Page 44 - Transfert d’images; Suivez simplement les instructions à l’écran.; b. Connectez l’appareil photo à l’ordinateur.; Sélectionnez [PC] à l’écran ACL et appuyez sur
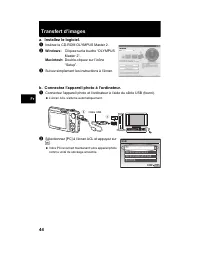
44 Fr Transfert d’images a. Installez le logiciel. 1 Insérez le CD-ROM OLYMPUS Master 2. 2 Windows: Cliquez sur la touche “OLYMPUS Master 2”. Macintosh: Double-cliquez sur l’icône “Setup”. 3 Suivez simplement les instructions à l’écran. b. Connectez l’appareil photo à l’ordinateur. 1 Connectez l’app...
Page 45 - c. Transférez les images vers l’ordinateur.; Gardez votre appareil photo connecté, puis ouvrez OLYMPUS Master.; Conseils
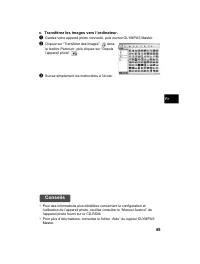
45 Fr c. Transférez les images vers l’ordinateur. 1 Gardez votre appareil photo connecté, puis ouvrez OLYMPUS Master. 2 Cliquez sur “Transférer des images” dans la fenêtre Parcourir, puis cliquez sur “Depuis l’appareil photo” . 3 Suivez simplement les instructions à l’écran. Conseils • Pour des info...
Page 46 - Logiciel OLYMPUS Master; Configurations système minimales; Enregistrement de l’utilisateur
46 Fr Logiciel OLYMPUS Master Logiciel OLYMPUS Master : Utilisez ce logiciel pour télécharger des photos à partir de l’appareil photo, pour afficher, organiser, retoucher, envoyer par courrier électronique et imprimer vos photos et vidéos numériques, etc. ( Configurations système minimales Pour obte...
Page 47 - Caractéristiques; Appareil photo
47 Fr Caractéristiques ( Appareil photo Type de produit : Appareil photo numérique (prise de vue et affichage) Système d’enregistrement Photos : Enregistrement numérique, JPEG (conforme à la norme DCF (Design rule for Camera File system)) Normes applicables : Exif 2.2, Digital Print Order Format (DP...
Page 49 - Précautions de sécurité; ATTENTION; Précautions générales
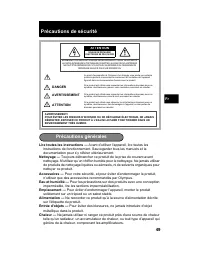
49 Fr Précautions de sécurité Lire toutes les instructions — Avant d’utiliser l’appareil, lire toutes les instructions de fonctionnement. Sauvegarder tous les manuels et la documentation pour s’y référer ultérieurement. Nettoyage — Toujours débrancher ce produit de la prise de courant avant nettoyag...
Page 50 - AVERTISSEMENT; Ne pas laisser l’appareil à la portée des enfants.; Ne jamais manipuler l’appareil avec des mains mouillées.; Maniement de l’appareil
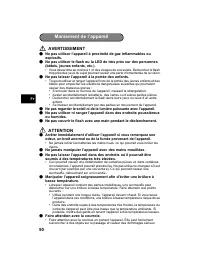
50 Fr AVERTISSEMENT ( Ne pas utiliser l’appareil à proximité de gaz inflammables ou explosifs. ( Ne pas utiliser le flash ou la LED de très près sur des personnes (bébés, jeunes enfants, etc.). • Vous devez être au moins à 1 m des visages de vos sujets. Déclencher le flash trop près des yeux du suje...
Page 51 - spécifiée, arrêter de les charger et ne pas les utiliser.; Précautions de manipulation de la batterie
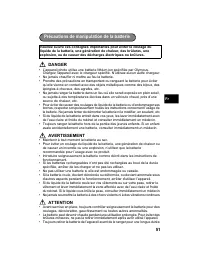
51 Fr DANGER • L’appareil photo utilise une batterie lithium ion spécifiée par Olympus. Chargez l’appareil avec le chargeur spécifié. N’utilisez aucun autre chargeur. • Ne jamais chauffer ni mettre au feu la batterie.• Prendre des précautions en transportant ou rangeant la batterie pour éviter qu’el...
Page 52 - Conditions d’obtention de la garantie; Pour les utilisateurs en Europe
52 Fr Précaution sur l’utilisation de la batterie et du chargeur de batterie Il est vivement recommandé de n’utiliser que la batterie et le chargeur de batterie spécifiques, qui sont disponibles comme accessoires d’origine Olympus, avec cet appareil photo.L’utilisation d’une batterie et /ou d’un cha...
Page 53 - Remarques sur l’établissement de la carte de garantie; Restrictions relatives à la garantie; Marques déposées
53 Fr (j) non présentation d’un justificatif d’achat (ticket de caisse) en même temps que la présente garantie. 4. Cette garantie concerne uniquement le produit lui-même. Elle ne couvre pas les autres pièces telles que sac de transport, bandoulière, couvercle d’objectif, piles, etc. 5. La seule obli...
Page 54 - Contenido
54 Es Contenido Reúna estos componentes (contenido de la caja) ....................... 55 Fije la correa........................................................................................ 55 Prepare la cámara ............................................................................ 56 Encien...
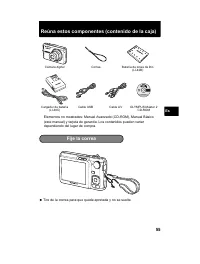
Page 55 - Reúna estos componentes (contenido de la caja); Tire de la correa para que quede apretada y no se suelte.; Fije la correa
55 Es Reúna estos componentes (contenido de la caja) ? Tire de la correa para que quede apretada y no se suelte. Elementos no mostrados: Manual Avanzado (CD-ROM), Manual Básico (este manual) y tarjeta de garantía. Los contenidos pueden variar dependiendo del lugar de compra. Cámara digital Correa Ba...
Page 56 - Prepare la cámara; La batería viene cargada parcialmente.
56 Es Prepare la cámara a. Cargue la batería. ( La batería viene cargada parcialmente. b. Inserte la batería y la xD-Picture Card (opcional) en la cámara. 2 1 3 Luz encendida (roja): CargandoApagada: Carga completa(Tiempo de carga: Aprox. 5 horas) Toma de corriente CA Cable de corriente Cargador de ...
Page 58 - Encienda la cámara; a. Sitúe el disco en modo; Para apagar la cámara, presione de nuevo el botón; Consejo
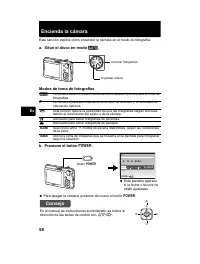
58 Es Encienda la cámara Esta sección explica cómo encender la cámara en el modo de fotografía. a. Sitúe el disco en modo h . Modos de toma de fotografías b. Presione el botón o . ? Para apagar la cámara, presione de nuevo el botón o . h La cámara determina automáticamente los ajustes óptimos para l...
Page 59 - Ajuste la fecha y hora; a. Presione los botones; b. Presione el botón; La pantalla de fecha y hora
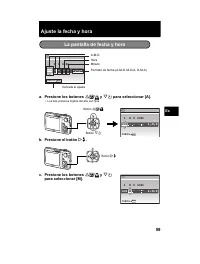
59 Es Ajuste la fecha y hora a. Presione los botones O F / < y N Y para seleccionar [A]. • Los dos primeros dígitos del año son fijos. b. Presione el botón Y # . c. Presione los botones O F / < y N Y para seleccionar [M]. La pantalla de fecha y hora X A M A M D D HORA ---- -- -- -- -- MENU CAN...
Page 61 - Ajuste el idioma
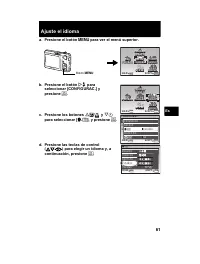
61 Es Ajuste el idioma a. Presione el botón m para ver el menú superior. b. Presione el botón Y # para seleccionar [CONFIGURAC.] y presione . c. Presione los botones O F / < y N Y para seleccionar [ W ], y presione . d. Presione las teclas de control ( ON XY ) para elegir un idioma y, a conti...
Page 62 - Tome una fotografía
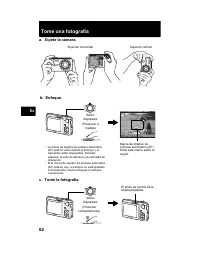
62 Es Tome una fotografía a. Sujete la cámara. c. Tome la fotografía. Sujeción horizontal Sujeción vertical b. Enfoque. AUTO 4 4 IN 8 M 8 M N ORM N ORM Botón disparador (Presionar a medias) • La marca de objetivo de enfoque automático (AF) está en verde cuando el enfoque y la exposición están bloque...
Page 63 - Revise sus fotografías; a. Presione el botón; Borrado de imágenes
63 Es Revise sus fotografías a. Presione el botón q . a. Presione los botones X & y Y # para ver la fotografía que desee borrar. b. Presione el botón / S . c. Presione el botón O F / < , seleccione [SI] y presione . 2008.08.26 2008.08.26 12:30 12:30 4 4 100-0004 100-0004 IN 8 M 8 M N ORM...
Page 64 - Funcionamiento básico; Botones del modo de fotografía
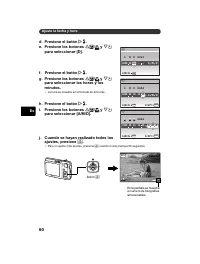
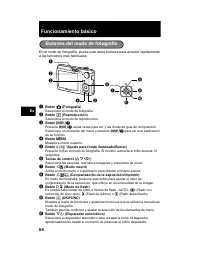
64 Es Funcionamiento básico En el modo de fotografía, puede usar estos botones para acceder rápidamente a las funciones más habituales. 1 Botón K (Fotografía) Selecciona el modo de fotografía. 2 Botón q (Reproducción) Selecciona el modo de reproducción. 3 Botón Presione varias veces para ver y l...
Page 65 - Fotografía de modos de escena; Modos de escena; Modo macro
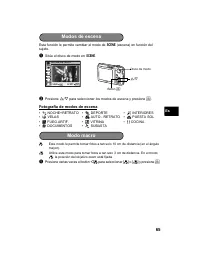
65 Es Esta función le permite cambiar el modo de f (escena) en función del sujeto. 1 Sitúe el disco de modo en f . 2 Presione O / N para seleccionar los modos de escena y presione . Fotografía de modos de escena & Este modo le permite tomar fotos a tan solo 10 cm de distancia (en el ángulo may...
Page 66 - Modos de flash
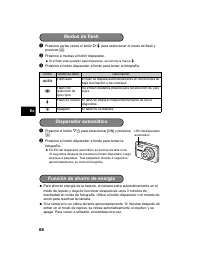
66 Es 1 Presione varias veces el botón Y # para seleccionar el modo de flash y presione . 2 Presione a medias el botón disparador. ? Si el flash está ajustado para dispararse, se ilumina la marca # . 3 Presione el botón disparador a fondo para tomar la fotografía. 1 Presione el botón N Y para sele...
Page 67 - Menús y ajustes; CALIDAD IMAGEN; Menú superior; Borrar todas las fotografías
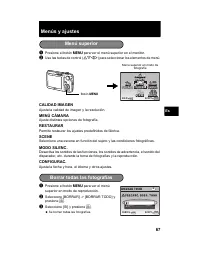
67 Es Menús y ajustes 1 Presione el botón m para ver el menú superior en el monitor. 2 Use las teclas de control ( ON XY ) para seleccionar los elementos de menú. CALIDAD IMAGEN Ajusta la calidad de imagen y la resolución. MENÚ CÁMARA Ajuste distintas opciones de fotografía. RESTAURAR Permite restau...
Page 68 - Conexión de la cámara; Encienda el televisor y cambie al modo de entrada de vídeo.; Reproducción en un televisor
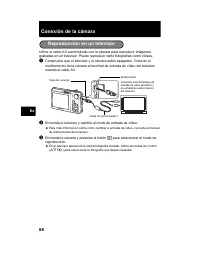
68 Es Conexión de la cámara Utilice el cable AV suministrado con la cámara para reproducir imágenes grabadas en un televisor. Puede reproducir tanto fotografías como vídeos. 1 Compruebe que el televisor y la cámara estén apagados. Conecte el multiconector de la cámara al terminal de entrada de vídeo...
Page 69 - Presione el botón
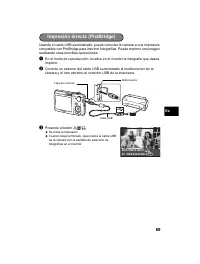
69 Es Usando el cable USB suministrado, puede conectar la cámara a una impresora compatible con PictBridge para imprimir fotografías. Puede imprimir una imagen realizando unas sencillas operaciones. 1 En el modo de reproducción, localice en el monitor la fotografía que desea imprimir. 2 Conecte un e...
Page 70 - Transferir imágenes; Siga las instrucciones en pantalla.; Seleccione [PC] en el monitor y presione
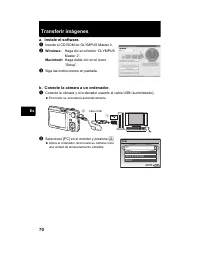
70 Es Transferir imágenes a. Instale el software. 1 Inserte el CD-ROM de OLYMPUS Master 2. 2 Windows: Haga clic en el botón “OLYMPUS Master 2”. Macintosh: Haga doble clic en el icono “Setup”. 3 Siga las instrucciones en pantalla. b. Conecte la cámara a un ordenador. 1 Conecte la cámara y el ordenado...
Page 71 - Consejos
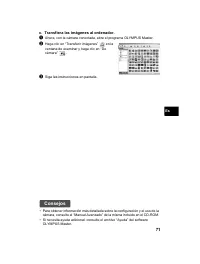
71 Es c. Transfiera las imágenes al ordenador. 1 Ahora, con la cámara conectada, abra el programa OLYMPUS Master. 2 Haga clic en “Transferir imágenes” en la ventana de examinar y haga clic en “De cámara” . 3 Siga las instrucciones en pantalla. Consejos • Para obtener información más detallada sobre ...
Page 72 - Software OLYMPUS Master; Requisitos del sistema; Registro de usuario
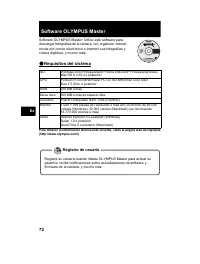
72 Es Software OLYMPUS Master Software OLYMPUS Master: Utilice este software para descargar fotografías de la cámara, ver, organizar, retocar, enviar por correo electrónico e imprimir sus fotografías y vídeos digitales, y mucho más. ( Requisitos del sistema Para obtener la información técnica más re...
Page 73 - Especificaciones; Cámara
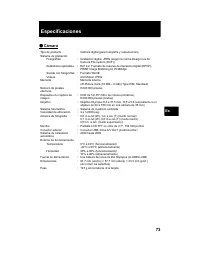
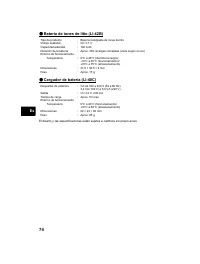
73 Es Especificaciones ( Cámara Tipo de producto : Cámara digital (para fotografía y reproducción) Sistema de grabación Fotografías : Grabación digital, JPEG (según la norma Design rule for Camera File system (DCF)) Estándares aplicables : Exif 2.2, Formato de reserva de impresión digital (DPOF), PR...
Page 75 - Precauciones de seguridad; PRECAUCIÓN; Precauciones Generales
75 Es Precauciones de seguridad Lea todas las instrucciones — Antes de utilizar este producto, lea todas las instrucciones operativas. Guarde todos los manuales y la documentación para futuras consultas. Limpieza — Siempre desenchufe el producto de la toma de corriente antes de limpiarlo. Para la li...
Page 76 - ADVERTENCIA; • Lesionarse accidentalmente con las piezas móviles de la cámara.; incendio o quemarle las manos.; Manejo de la cámara
76 Es ADVERTENCIA ( No utilice la cámara cerca de gases inflamables o explosivos. ( No utilice el flash ni el LED a corta distancia de las personas (bebés, niños pequeños, etc.). • Cuando dispare el flash, deberá mantener, por lo menos, una distancia de 1 m de la cara de los sujetos. El disparo dema...
Page 77 - especificado, interrumpa la carga y no las utilice.; Precauciones acerca del uso de la batería
77 Es PELIGRO • La cámara utiliza una batería de iones de litio especificada por Olympus. Cargue la batería con el cargador especificado. No utilice otros cargadores. • Nunca caliente ni incinere las baterías.• Tome precauciones al transportar o guardar las baterías a fin de evitar que entren en con...
Page 78 - Condiciones de la garantía; Para los clientes de Europa
78 Es Utilice únicamente la batería recargable y el cargador de batería especificados Se recomienda enfáticamente usar solamente la pila recargable y cargador de pila especificados, que se disponen con esta cámara como accesorios originales Olympus.El uso de una batería recargable o un cargador de b...
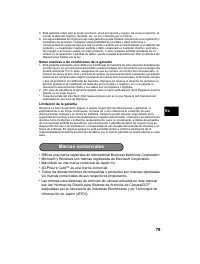
Page 79 - Notas relativas a las condiciones de la garantía; Limitación de la garantía; y/o marcas comerciales de sus respectivos propietarios.; Marcas comerciales
79 Es 4. Esta garantía cubre sólo el propio producto: otros accesorios y equipo, tal como el estuche, la correa, la tapa del objetivo, las pilas, etc. no son cubiertos por la misma. 5. La responsabilidad de Olympus bajo esta garantía queda limitada únicamente a la reparación y reemplazo del producto...
Page 80 - Inhaltsverzeichnis
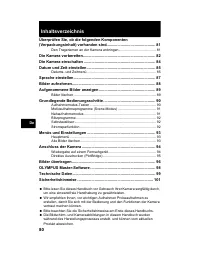
80 De Inhaltsverzeichnis Überprüfen Sie, ob die folgenden Komponenten (Verpackungsinhalt) vorhanden sind............................................. 81 Den Trageriemen an der Kamera anbringen ....................................... 81 Die Kamera vorbereiten.............................................
Page 81 - Ziehen Sie den Trageriemen fest, damit er sich nicht lösen kann.; Den Trageriemen an der Kamera anbringen
81 De Überprüfen Sie, ob die folgenden Komponenten (Verpackungsinhalt) vorhanden sind ? Ziehen Sie den Trageriemen fest, damit er sich nicht lösen kann. Nicht angezeigte Elemente: Erweiterte Anleitung (CD-ROM), Einfache Anleitung (dieses Handbuch) und die Garantiekarte. Die Inhalte können je nach La...
Page 82 - Die Kamera vorbereiten; Beim Kauf ist der Akku noch nicht vollständig aufgeladen.
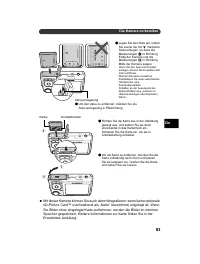
82 De Die Kamera vorbereiten a. Laden Sie den Akku auf. ( Beim Kauf ist der Akku noch nicht vollständig aufgeladen. b. Legen Sie den Akku und die xD-Picture Card (optional erhältlich) in die Kamera ein. 2 1 3 Die rote LED leuchtet: Ladevorgang läuftLED ist aus: Ladevorgang abgeschlossen(Ladezeit: Ca...
Page 84 - Die Kamera einschalten; a. Die Programmwählscheibe auf; Drücken Sie zum Ausschalten der Kamera die; Hinweis
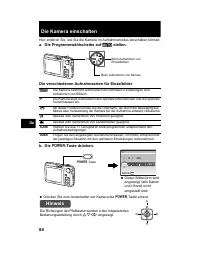
84 De Die Kamera einschalten Hier erfahren Sie, wie Sie die Kamera im Aufnahmemodus einschalten können. a. Die Programmwählscheibe auf h stellen. Die verschiedenen Aufnahmearten für Einzelbilder b. Die o -Taste drücken. ? Drücken Sie zum Ausschalten der Kamera die o -Taste erneut. h Die Kamera besti...
Page 85 - Datum und Zeit einstellen; a. Drücken Sie die Tasten
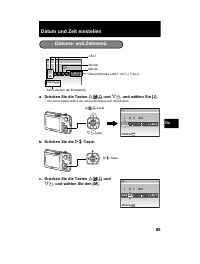
85 De Datum und Zeit einstellen a. Drücken Sie die Tasten O F / < und N Y , und wählen Sie [J]. • Die ersten beiden Ziffern der Jahreszahl lassen sich nicht ändern. b. Drücken Sie die Y # -Taste. c. Drücken Sie die Tasten O F / < und N Y , und wählen Sie den [M]. Datums- und Zeitmenü X J M J M...
Page 87 - Sprache einstellen; a. Drücken Sie zur Anzeige des Hauptmenüs die
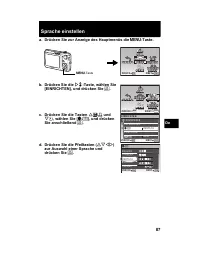
87 De Sprache einstellen a. Drücken Sie zur Anzeige des Hauptmenüs die m -Taste. b. Drücken Sie die Y # -Taste, wählen Sie [EINRICHTEN], und drücken Sie . c. Drücken Sie die Tasten O F / < und N Y , wählen Sie [ W ], und drücken Sie anschließend . d. Drücken Sie die Pfeiltasten ( ON XY ) zur ...
Page 88 - Bilder aufnehmen
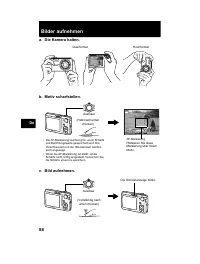
88 De Bilder aufnehmen a. Die Kamera halten. c. Bild aufnehmen. Querformat Hochformat b. Motiv scharfstellen. AUTO 4 4 IN 8 M 8 M N ORM N ORM Auslöser • Die AF-Markierung leuchtet grün, wenn Schärfe und Belichtungswerte gespeichert sind. Die Verschlusszeit und der Blendenwert werden auch angezeigt. ...
Page 89 - Aufgenommene Bilder anzeigen; Bilder löschen
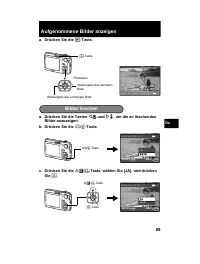
89 De Aufgenommene Bilder anzeigen a. Drücken Sie die q -Taste. a. Drücken Sie die Tasten X & und Y # , um die zu löschenden Bilder anzuzeigen. b. Drücken Sie die / S -Taste. c. Drücken Sie die O F / < -Taste, wählen Sie [JA], und drücken Sie . 2008.08.26 2008.08.26 12:30 12:30 4 4 100-00...
Page 90 - Grundlegende Bedienungsschritte
90 De Grundlegende Bedienungsschritte Verwenden Sie diese Tasten im Aufnahmemodus, um schnell zu einigen der häufiger benutzten Funktionen zu gelangen. 1 K -Taste (Aufnahme) Zum Auswählen des Aufnahmemodus. 2 q -Taste (Wiedergabe) Zum Auswählen des Wiedergabemodus. 3 -Taste Blenden Sie durch wiede...
Page 91 - Motivaufnahmeprogramme verwenden; Nahaufnahmemodus
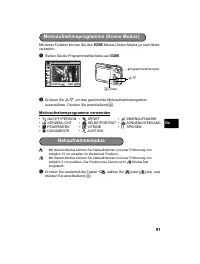
91 De Mit dieser Funktion können Sie den f -Modus (Scene Modus) je nach Motiv verändern. 1 Stellen Sie die Programmwählscheibe auf f . 2 Drücken Sie O / N , um das gewünschte Motivaufnahmeprogramm auszuwählen. Drücken Sie anschließend . Motivaufnahmeprogramme verwenden & Mit diesem Modus könne...
Page 92 - Blitzprogramme
92 De 1 Drücken Sie wiederholt die Taste Y # , wählen Sie den gewünschten Blitzmodus aus, und drücken Sie anschließend . 2 Drücken Sie den Auslöser halb nach unten. ? Wenn der Blitz auslösebereit ist, leuchtet die # -Markierung. 3 Drücken Sie den Auslöser vollständig nach unten, um die Aufnahme zu...
Page 93 - Menüs und Einstellungen; KAMERAMENÜ; Hauptmenü; Alle Bilder löschen
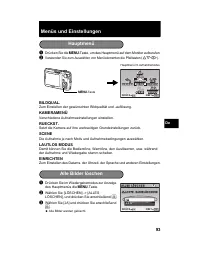
93 De Menüs und Einstellungen 1 Drücken Sie die m -Taste, um das Hauptmenü auf dem Monitor aufzurufen. 2 Verwenden Sie zum Auswählen von Menüelementen die Pfeiltasten ( ON XY ). BILDQUAL. Zum Einstellen der gewünschten Bildqualität und -auflösung. KAMERAMENÜ Verschiedene Aufnahmeeinstellungen einste...
Page 94 - Anschluss der Kamera; Schalten Sie die Kamera ein und drücken Sie die; Wiedergabe auf einem Fernsehgerät
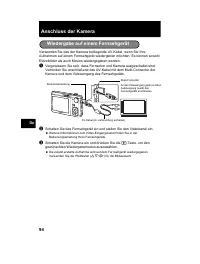
94 De Anschluss der Kamera Verwenden Sie das der Kamera beiliegende AV-Kabel, wenn Sie Ihre Aufnahmen auf einem Fernsehgerät wiedergeben möchten. Es können sowohl Einzelbilder als auch Movies wiedergegeben werden. 1 Vergewissern Sie sich, dass Fernseher und Kamera ausgeschaltet sind. Verbinden Sie a...
Page 95 - Drücken Sie die
95 De Mit dem der Kamera beiliegenden USB-Kabel können Sie die Kamera direkt an einen PictBridge-kompatiblen Drucker zum Drucken anschließen. Das Ausdrucken von Bildern ist einfach durchzuführen. 1 Rufen Sie das Bild, das Sie ausdrucken möchten, im Wiedergabemodus auf dem Monitor auf. 2 Schließen Si...
Page 96 - Bilder übertragen; b. Die Kamera an einen Computer anschließen.
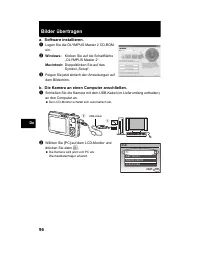
96 De Bilder übertragen a. Software installieren. 1 Legen Sie die OLYMPUS Master 2 CD-ROM ein. 2 Windows: Klicken Sie auf die Schaltfläche „OLYMPUS Master 2“. Macintosh: Doppelklicken Sie auf das Symbol „Setup“. 3 Folgen Sie jetzt einfach den Anweisungen auf dem Bildschirm. b. Die Kamera an einen Co...
Page 97 - Tipps
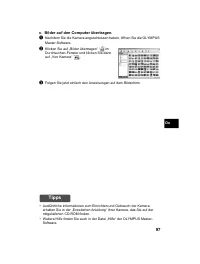
97 De c. Bilder auf den Computer übertragen. 1 Nachdem Sie die Kamera angeschlossen haben, öffnen Sie die OLYMPUS Master-Software. 2 Klicken Sie auf „Bilder übertragen“ im Durchsuchen-Fenster und klicken Sie dann auf „Von Kamera“ . 3 Folgen Sie jetzt einfach den Anweisungen auf dem Bildschirm. Tipps...
Page 98 - OLYMPUS Master-Software; Systemanforderungen; Benutzer-Registrierung
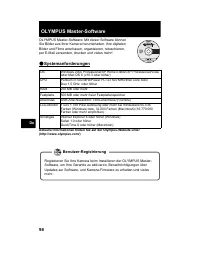
98 De OLYMPUS Master-Software OLYMPUS Master-Software: Mit dieser Software können Sie Bilder aus Ihrer Kamera herunterladen, Ihre digitalen Bilder und Filme anschauen, organisieren, retuschieren, per E-Mail versenden, drucken und vieles mehr! ( Systemanforderungen Aktuelle Informationen finden Sie a...
Page 99 - Technische Daten; Kamera
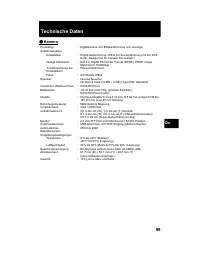
99 De Technische Daten ( Kamera Produkttyp : Digitalkamera (zur Bildaufzeichnung und -anzeige) Aufnahmesystem Einzelbilder : Digital-Aufzeichnung, JPEG (in Übereinstimmung mit der DCF- Norm „Design rule for Camera File system“) Gültige Standards : Exif 2.2, Digital Print Order Format (DPOF), PRINT I...
Page 101 - Sicherheitshinweise; VORSICHT; Allgemeine Vorsichtsmaßregeln
101 De Sicherheitshinweise Die Benutzerdokumentation sorgfältig lesen — Vor dem Gebrauch dieses Produktes erst die Bedienungsanleitung lesen. Bewahren Sie alle Benutzerhandbücher und Dokumentationen zum späteren Nachschlagen auf. Reinigung — Trennen Sie dieses Produkt vor jeder Reinigung vom Netz. Z...
Page 102 - ACHTUNG; Kinder und Kleinkinder von der Kamera fernhalten.; Die Kamera niemals mit nassen Händen halten oder bedienen.; Sicherheitshinweise bei der Produkthandhabung
102 De ACHTUNG ( Die Kamera niemals in der Nähe von entflammbaren oder explosiven Gasen verwenden. ( Richten Sie niemals den Blitz oder die LED (Leuchtdiode) aus geringer Entfernung auf Personen (insbesondere Kleinkinder oder Säuglinge usw.). Entfernung mit Blitz fotografieren. • Sie müssen Sie mind...
Page 103 - GEFAHR; mit klarem Wasser spülen und sofort einen Augenarzt aufsuchen.; oder sonstige Beeinträchtigungen überprüfen.; Sicherheitshinweise bei der Akkuhandhabung
103 De GEFAHR • Die Kamera arbeitet mit einem von Olympus spezifizierten Lithiumionen-Akku. Laden Sie den Akku vor Gebrauch mit dem Ladegerät vollständig auf. In keinem Fall darf ein ungeeignetes Ladegerät verwendet werden. • Akkus niemals stark erwärmen oder verbrennen.• Akkus stets so transportier...
Page 104 - Für Kunden in Europa
104 De Sicherheitshinweise zum Gebrauch des Akkus und Ladegeräts Es wird ausdrücklich empfohlen, ausschließlich einen Akku und ein Ladegerät zu verwenden, welche als Original-Olympus-Zubehör erhältlich und spezifisch für diese Kamera geeignet sind.Falls ein Akku und/oder ein Ladegerät einer anderen ...
Page 105 - Warenzeichen/Handelsmarken der jeweiligen Rechteinhaber.; Warenzeichen
105 De (i) Wenn die Eintragungen dieser Garantieurkunde bei den Angaben zum Jahr, Monat und Tag des Kaufdatums, Kundennamen, Händlernamen, zur Seriennummer etc. verändert wurden. (j) Wenn der Kaufbeleg (Kassenbon) nicht zusammen mit der Garantiekarte vorgelegt werden kann. 4. Die Garantiebedingungen...
Page 106 - о р а
106 Ru о р а ь коро к р м ............................................ 107 ....................................................................... 107 По о о ь о окам р ........................................................... 108 к о окам р ...........................................................
Page 107 - Пр кр
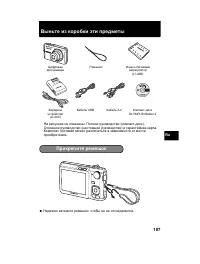
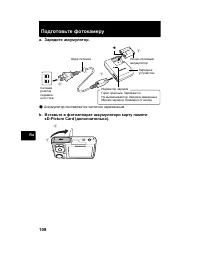
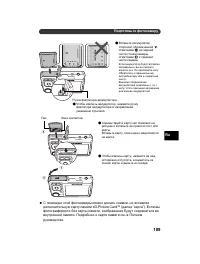
107 Ru ь коро к р м ? , . : ( - ), ( ) . . - (LI-42B) USB AV - OLYMPUS Master 2 З (LI-40C) Пр кр р м ок
Page 110 - о окам р
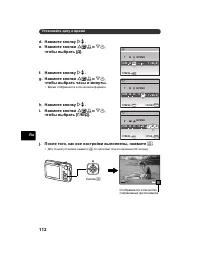
110 Ru к о окам р , . a. У а о к р мо о о h . м о о мк b. а м к о к o . ? Ч , o . h . P . h . B . E . f В 11 . R , , . o X Г M Г М Д Д ВРЕМЯ ---- -- -- -- -- OTMEHA MENU ? , . о В ON XY . O N Y X
Page 111 - кра
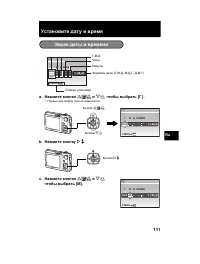
111 Ru У а о а р м a. а м к о к O F / < N Y , о ра ь [ ] . • . b. а м к о к Y # . c. а м к о к O F / < N Y , о ра ь [ ]. кра а р м X Г M Г М Д Д ВРЕМЯ ---- -- -- -- -- OTMEHA MENU - - Ч ( - - , - - , - - ) O F / < N Y 2008 -- -- -- -- X Г M Г M Д Д ВРЕМЯ MENU OTMEHA Y # 2008 08 -- -- -- X Г...
Page 113 - У а о
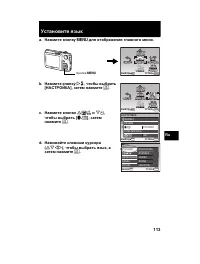
113 Ru У а о к a. а м к о к m о о ра а о о м . b. а м к о к Y # , о ра ь [ ], а м а м . c. а м к о к O F / < N Y , о ра ь [ W ], а м а м . d. а ма к а к р ора ( ON XY ), о ра ь к , а а м а м . m MENU OK УСТАН ВЫХОД СБРОС СБРОС НА- СТРОЙКА НА- СТРОЙКА ТИХИЙ РЕЖИМ ТИХИЙ РЕЖИМ SCENE SCENE КАЧ-...
Page 114 - мок
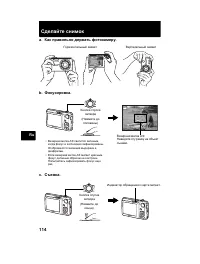
114 Ru а мок a. ак ра ь о р а ь о окам р . c. мка . В b. ок ро ка . AUTO 4 4 IN 8 M 8 M N ORM N ORM ( ) • В , . . • Е , . . В . 1/1000 1/1000 F3.5 F3.5 AUTO ( ) .
Page 115 - У а
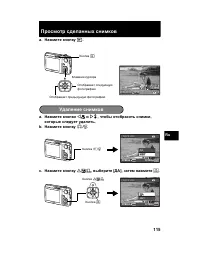
115 Ru Про мо р а мко a. а м к о к q . a. а м к о к X & Y # , о о о ра ь мк , ко ор а ь . b. а м к о к / S . c. а м к о к O F / < , р [ ], а м а м . 2008.08.26 2008.08.26 12:30 12:30 4 4 100-0004 100-0004 IN 8 M 8 M N ORM N ORM q У а мко / S УДАЛЕНИЕ УДАЛЕНИЕ OK IN Н Е Т Н Е Т ДА УСТАН ...
Page 116 - о к
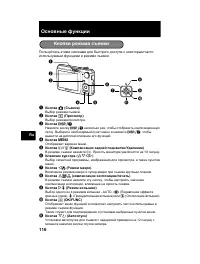
116 Ru о к . 1 о ка K ( мка ) В . 2 о ка q ( Про мо р ) В . 3 о ка , . В , . 4 о ка m . 5 о ка / S ( ом а а о к / У а ) В . 10 . 6 а к р ора ( ON XY ) В , , . 7 о ка X & ( м макро ) В - . 8 о ка O F / < ( ком а к о / а ь ) В , , . 9 о ка Y # ( м к ) В 4 - U , ! ( ), # ( ) $ ( ). 0 о...
Page 117 - Е Е; мк; макро
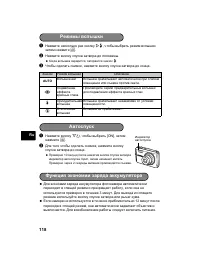
117 Ru f ( ) . 1 f . 2 O / N , , . м мк & В 10 ( ). % , 3 . В % . 1 X & , [ & ] [ % ], . • M Ч + Е • j • N В Е Е • W ВЕЧ • R В Е • S З • X Е Е ВЕ • P ЧЕ ЕЗ Е • V • d Е • i м мк OK MENU НОЧЬ+ПОРТРЕТ УСТАН ВЫХОД O / N м макро
Page 118 - ко ом
118 Ru 1 Y # , , . 2 . ? , # . 3 Ч , . 1 N Y , [ON], . 2 , . ? 10 , . 2 . ? , 3 . . ? Е 12 , . . З AUTO В В . ! . # В . $ В . м к о к к ко ом ар а акк м ора
Page 119 - а ро к; SCENE; В Е; а о
119 Ru а ро к 1 m . 2 ( ON XY ). Ч - . В . Ы . . SCENE В . , , . . . , , . 1 m . 2 В [ Е Е ] -> [ . В Е ] . 3 В [ ] . ? В . а о м m MENU OK УСТАН ВЫХОД СБРОС СБРОС НА- СТРОЙКА НА- СТРОЙКА ТИХИЙ РЕЖИМ ТИХИЙ РЕЖИМ SCENE SCENE КАЧ-ВО ИЗОБР. КАЧ-ВО ИЗОБР. МЕНЮ КАМЕРЫ МЕНЮ КАМЕРЫ У а мко IN Д A Д ...
Page 120 - Про мо р
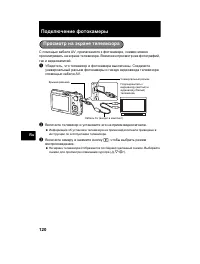
120 Ru По к о окам р AV, , . В , . 1 , . AV. 2 В . ? . 3 В q , . ? . В ( ON XY ). Про мо р а кра ора ( ) ( ) . AV ( )
Page 121 - Пр ма
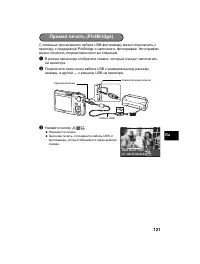
121 Ru USB PictBridge . . 1 В , , . 2 USB , — USB . 3 O F / < . ? . ? З , USB , . Пр ма а ь (PictBridge) USB OK PC / НАСТР ПЕЧАТИ УДОБ ПЕЧАТ СТАРТ
Page 122 - У а о ка; “OLYMPUS; По к
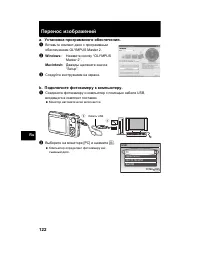
122 Ru П р о о ра a. У а о ка ро рамм о о о . 1 В - OLYMPUS Master 2. 2 Windows: “OLYMPUS Master 2”. Macintosh: “Setup”. 3 . b. По к о окам р к ком ь р . 1 USB, . ? . 2 В [PC] . ? . 1 2 USB УДОБ ПЕЧАТ USB УСТАН OK ВЫХОД НАСТР ПЕЧАТИ PC
Page 123 - OLYMPUS; ам к
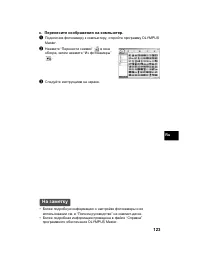
123 Ru c. П р о ра а ком ь р . 1 , OLYMPUS Master. 2 “ ” , “ ” . 3 . а ам к • . “ ” - . • “ ” OLYMPUS Master.
Page 124 - р о а; ам; OC; ра
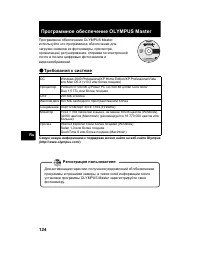
124 Ru Про рамм о о OLYMPUS Master OLYMPUS Master: , , , , . ( р о а к м ам о орма о о р к мо о а а - а Olympus (http://www.olympus.com/) OC Windows 2000 Professional/XP Home Edition/XP Professional/Vista Mac OS X (v10.3 ) Pentium III 500 /Power PC G3 500 /Intel Core Solo/ Duo 1,5 З 256 500 USB/ IEE...
Page 125 - арак р; о оа ара
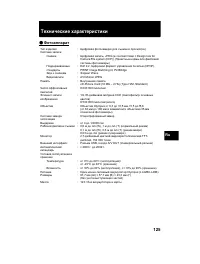
125 Ru к арак р к ( о оа ара : ( ) : , JPEG ( Design rule for Camera File system (DCF)) ( ) : Exif 2.2, (DPOF), PRINT Image Matching III, PictBridge З : Wave В : AVI Motion JPEG: В xD-Picture Card (16 – 2 ) (Type H/M, Standard) Ч : 8 000 000 : 1/2,35- CCD ( ) 8 500 000 ( ) : Olympus 6,3 31,5 , f3,5 ...
Page 127 - р о оро о; м р
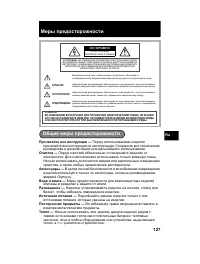
127 Ru р р о оро о Про а р к — . . ка — . . , . к ар — В , Olympus. о а а а — . а м — , , . о к а — , . По оро р м — В . о — , , , , . . . : В З Е Е Е Е ЧЕ Е Е ( З Е ). В Е Е Е Е , В В Е В . ВЕ Е Е ЧЕ Е В Е В В В Е В Е OLYMPUS. В , , . П , , . , , . П УП , , , . П ! П Ч , УЧ , П Ы П У У П Ы У Щ Ы . ...
Page 128 - LED
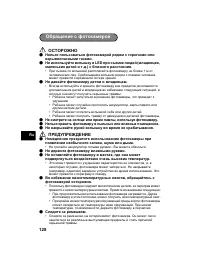
128 Ru ( ь о ь о а ь о окам ро р ом ор м р оо а м а ам . ( о ь к LED р мк ( м а , ма ьк . .) ко о ра о . • 1 . . ( а а о окам р м м а ам . • В , : • , . • , . • . • . ( мо р а о рк ам , о ь о окам р . ( ь ра ь о окам р ь а ом . ( акр а р ко к о р м ра а а . П УП ( м о р кра о ь о а о окам р р о о о ...
Page 130 - По ь о а
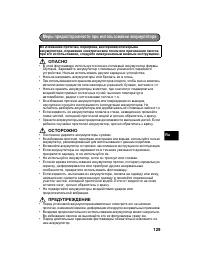
130 Ru о ь о ько а ь акк м ор ар о ро о Olympus . / , , . Olympus , / , Olympus. У о ара 1. В , , , , ( , ) Olympus Olympus Imaging Europa GmbH, - : http:// www.olympus.com ( Olympus). , , Olympus Olympus Imaging Europa GmbH, - : http://www.olympus.com. В В Olympus. , , Olympus. 2. Olympus , . 3. В ...
Page 131 - Пр м а; ара; ор о
131 Ru (h) . (i) В , , , . (j) , , . 4. ; , , , , . 5. Olympus . - , - , , - , , , - - . . Пр м а о о ь о а ара 1. Olympus , , . В В , , , , . В - ( , ). Olympus , , . 2. , . * Olympus : http://www.olympus.com а о ара о а ь а В , , Olympus . Olympus - , - , , - , , ( , , , ), . З , В . • IBM Interna...