Page 3 - Table of contents; Produktinfo
3 Ú Table of contents [en]Instruction manual Important safety information..................................................... 4 Causes of damage .............................................................................5 Energy and environment tips ..................................................
Page 4 - Important safety information; accessories
4 : Important safety information Read these instructions carefully. Only then will you be able to operate your appliance safely and correctly. Retain the instruction manual and installation instructions for future use or for subsequent owners.This appliance is only intended to be fully fitted in a k...
Page 5 - Risk of electric shock!; Causes of damage; Energy and environment tips; Saving energy
5 Risk of electric shock! ■ Incorrect repairs are dangerous. Repairs may only be carried out by one of our trained after-sales engineers. If the appliance is faulty, unplug the mains plug or switch off the fuse in the fuse box. Contact the after-sales service. Risk of electric shock and serious inju...
Page 6 - Your new appliance; Control panel
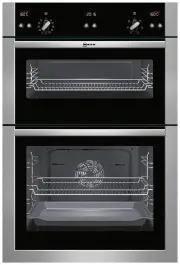
6 Your new appliance In this section, you will find information on ■ the control panel ■ the operating modes Control panel Pop-out operating knob The rotary, temperature and operating mode selectors can all be popped out. Push the required operating knob to pop it in or out. ; C # 3 + K Controls and...
Page 7 - Operating modes
7 Operating modes Here is an overview of the operating modes of your appliance. Main oven õ Top oven ô Operating mode Use 3 CircoTherm® For baking and roasting on one or more levels % Top/bottom heating For baking and roasting on one level. Ideal for cakes with moist toppings (e.g. cheese- cake) 0 P...
Page 8 - Your accessories; Accessories
8 Your accessories In this section, you will find information on ■ Your accessories ■ the correct way to insert the accessories into the cooking compartment ■ the shelf positions ■ the optional accessories Accessories The following accessories are included with your appliance: Note: The baking tray ...
Page 9 - Optional accessories; Before using the appliance for the first time; Setting the clock; Cleaning the appliance; Operating the appliance; Switching on the appliance
9 Optional accessories You can buy optional accessories from your after-sales service or from specialist retailers. A comprehensive range of products for your appliance can be found in our brochures or on our home page. Before using the appliance for the first time In this section, you can read abou...
Page 11 - Electronic clock; Clock display; Timer
11 Electronic clock In this section, you can read about ■ how to set the timer ■ how to switch your appliance off automatically (cooking time and end of operation) ■ how to switch your appliance on and off automatically (preset operation) ■ how to set the time ■ find out how to activate rapid heat u...
Page 13 - Checking, correcting or deleting settings; Childproof lock; Lock; Permanent lock
13 Checking, correcting or deleting settings 1. To check your settings, press the KJ clock function button repeatedly until the corresponding symbol lights up. 2. If necessary, you can correct your setting using the rotary selector. 3. If you wish to cancel your setting, turn the rotary selector ant...
Page 14 - Baking; Baking on one level
14 Baking In this section, you will find information on ■ Baking on one level ■ Baking on two or more levels ■ The baking table ■ The baking table for ready-made products ■ Tips and tricks for baking Note: Do not use shelf height 2 when baking with 3 CircoTherm®. The air circulation is impaired and ...
Page 17 - Roasting and braising; Roasting; Braising
17 Roasting and braising In this section, you will find information on ■ Roasting ■ Braising ■ Tables for roasting and braising ■ Tips and tricks : There is a risk of injury if you use roasting dishes that are not heat-resistant! Only use roasting dishes that are marked as being suitable for use in ...
Page 18 - Tables for roasting and braising
18 Tables for roasting and braising The details given in the table are guidelines and apply to food placed in a cold oven and for meat taken directly from the refrigerator. Poultry The information in the tables applies to unstuffed poultry. Turn the poultry after half of the cooking time. Lean meat ...
Page 19 - Tips and tricks
19 Tips and tricks Turkey Drumstick õ 3 1 180 20 + 20 Crown õ 3 1 160 25 + 20 Whole, 3 - 4 kg õ 3 1 160 - 170 15 + 10 Whole, 4.5 - 8 kg õ 3 1 150 - 160 13 + 10 Whole, 8.5 - 12 kg õ 3 1 140 - 150 12 + 10 Complete Meal with beef õ 3 1 + 3 160 30 + 25* with chicken õ 3 1 + 3 180 20 + 25 Casseroles Oven...
Page 20 - Grilling; Radiant grilling
20 Grilling In this section, you will find information on ■ Grilling in general ■ Circo-roasting 4 ■ Radiant grilling (Full-surface + and Centre-area grill ( ) ■ The grilling table Caution! Material damage due to effect of heat: The temperature generated in the cooking compartment is very high. Keep...
Page 22 - CircoTherm® eco
22 CircoTherm® eco With the “ "CircoTherm® eco" heating type, you can prepare many dishes on one level and save energy. Notes ■ Place your dishes in the empty cooking compartment before it has heated up. ■ Only open the appliance door during cooking if it is absolutely necessary. The table c...
Page 23 - Low-temperature cooking; Using Low-temperature cooking; Table for Low-temperature cooking
23 Low-temperature cooking In this section, you will find information on ■ Low-temperature cooking / ■ Tips and tricks Low-temperature cooking is a method of cooking slowly at low temperatures, and is also known as slow cooking.Low-temperature cooking is ideal for all prime cuts of meat (e.g. tender...
Page 24 - Defrost; Defrosting with CircoTherm®; Yoghurt
24 Defrost In this section, you can read about ■ how to defrost using 3 CircoTherm® ■ how to use Defrost Defrosting with CircoTherm® Use 3 CircoTherm® to defrost and cook frozen products. Notes ■ Frozen products that have been defrosted (meat in particular) require shorter cooking times than fresh p...
Page 26 - Removing and fitting the appliance door
26 Self-cleaning surfaces The back wall, side walls and ceiling of the cooking compartment are coated with a highly porous ceramic layer. This coating absorbs and disintegrates splashes from baking and roasting while the oven is in operation.The higher the set temperature and the longer the oven is ...
Page 27 - Cleaning the door panels; Cleaning the hook-in racks
27 Fitting the appliance door 1. Insert the hinges in the left and right-hand holders (figure C).The notch on both hinges must engage. 2. Open the appliance door fully. 3. Close the locking levers on the left and right-hand side fully (figure D). The appliance door is secured and can no longer be re...
Page 28 - Faults and repairs
28 3. Clean the hook-in rack with washing-up liquid and a sponge or brush. 4. Align the hook-in rack with the indentation (a) facing downwards, so that the shelf heights match. 5. Insert the hook-in rack at the rear as far as it will go and push to the rear (figure C). 6. Insert the hook-in rack at ...
Page 30 - Test dishes
30 Test dishes These tables have been produced for test institutes to facilitate the inspection and testing of the various appliances.Test dishes tested to standard EN 50304/EN 60350 (2009) and IEC 60350. Please note the information in the tables about preheating. The table values do not include Rap...
Page 32 - Register your product online
www.neff-international.com Register your product online *9001135398* 9001135398 950723 Constructa-Neff Vertriebs-GmbHCarl-Wery-Straße 34D-81739 MünchenGERMANY