Neff D46BR22N1A - User Manual
Neff D46BR22N1A Range Hood – User Manual, read for free online in PDF format. We hope this helps you resolve any issues you may have. If you have further questions, please contact us through the contact form.


Table of Contents:
- Page 2 – Table of contents; Safety; General information
- Page 3 – WARNING ‒ Risk of fire!
- Page 4 – WARNING ‒ Risk of electric shock!; Avoiding material damage; Disposing of packaging
- Page 5 – Operating modes; Air extraction mode
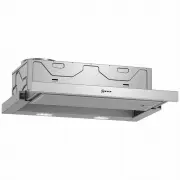
- Page 6 – Familiarising yourself with your appliance
- Page 7 – Cleaning and servicing; Cleaning products
- Page 8 – Troubleshooting
- Page 9 – Customer Service; Other accessories
- Page 10 – 2 Installation instructions; Included with the appliance; Safety clearances; Secure installation
- Page 11 – WARNING ‒ Risk of suffocation!
- Page 12 – Information on the installation situation; Round pipes; General information; Checking the unit
- Page 13 – Preparing the appliance
- Page 14 – Changing the filter pull-out's limit stop
User manual and installation
instructions
D46BR12X6, D46BR22N1B, D46BR22X1, D49ED22X1,
D49ED22N1B, D46ED22N1B, D46ED22X1
"Loading the manual" means you need to wait until the file loads and becomes available for online reading. Some manuals are very large, and the time they take to appear depends on your internet speed.
Summary
en Safety 2 Table of contents USER MANUAL 1 Safety .................................................................... 2 2 Avoiding material damage................................... 4 3 Environmental protection and saving en-ergy ....................................................................
Safety en 3 Toxic gases from the flue or the extractionshaft are sucked back into the living space. ▶ Always ensure adequate fresh air in theroom if the appliance is being operated inexhaust air mode at the same time as aroom air-dependent heat-producing appli-ance is being operated. ▶ It is only p...
en Avoiding material damage 4 WARNING ‒ Risk of electric shock! If the appliance or the power cord is dam-aged, this is dangerous. ▶ Never operate a damaged appliance. ▶ Never pull on the power cord to unplug theappliance. Always unplug the appliance atthe mains. ▶ If the appliance or the power cor...