Page 2 - Contents
Caring for the environment Description of the appliance Warning and Safety instructions Preparing for use Accessories supplied Using the accessories supplied Use Mains cable . . . . . . . . . . . . . . . . . . . . . . . . . . . . . . . . . . . . . . . . . . . . . . . . . . . . . . 16 Switching on an...
Page 3 - Disposal of your old appliance; Caring for the environment
Disposal of the packingmaterial The transport and protective packinghas been selected from materials whichare environmentally friendly for disposaland can normally be recycled. Ensure that any plastic wrappings,bags, etc. are disposed of safely andkept out of the reach of babies andyoung children. D...
Page 4 - Description of the appliance
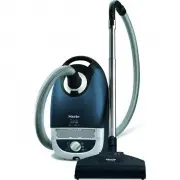
The illustration shows the maximum number of features available on these Mielevacuum cleaners. Certain models are supplied as standard with the following accessories which arenot illustrated on this page. These floorheads and brushes are supplied with theirown operating instructions. – Electrobrush ...
Page 6 - Warning and Safety instructions
This vacuum cleaner meets statutorysafety requirements. Improper usecan, however, lead to personal injuryand material damage.To avoid the risk of accidents anddamage to the vacuum cleaner,read these instructions carefullybefore using it for the first time. Theycontain important notes on its safety,o...
Page 7 - Technical safety
Technical safety ~ Ensure that the connection data on the data plate (voltage and frequency)match the mains electricity supply. It isessential that they match to avoiddamage to the appliance. ~ Before using the vacuum cleaner, check for any signs of damage. Do notuse a damaged appliance: It could be...
Page 8 - Correct use
Correct use ~ To avoid the risk of damage, do not use the vacuum cleaner without thedustbag, dust compartment filter andexhaust filter in place. Otherwise itcould get damaged. ~ If a dustbag is not inserted, the dust compartment cover does not normallyclose. Do not force it. ~ Do not vacuum up anyth...
Page 9 - Accessories
Accessories ~ The Miele Electrobrush is a motor driven accessory for use only with Mielevacuum cleaners. The cleaner must notbe used with an electrobrush producedby another manufacturer. ~ To avoid the risk of injury when vacuuming with a Miele Electrobrush orTurbobrush, do not touch the rotatingrol...
Page 10 - Attaching the suction hose; Preparing for use
Attaching the suction hose ^ Insert the hose connector into thesocket until it clicks into position. Todo this, line up the guides on the twopieces. To remove the suction hosefrom the cleaner ^ Press the release buttons at the sideof the hose connector, and lift thehose from the socket. Connecting t...
Page 12 - Fitting the standard floorhead
Fitting the standard floorhead ^ Push the suction tube into thefloorhead and turn it clockwise oranti-clockwise until it clicks intoposition. ^ To release the floorhead from thesuction tube, press the locking button(see arrow) and pull the suction tubeaway from the floorhead. The floorhead can be us...
Page 13 - Accessories supplied
The following accessories are supplied: a Crevice nozzle b Dusting brush c Upholstery nozzle To open the accessoriescompartment ^ Press the release button to open theaccessories compartment lid. ^ Take out the accessory you require. ^ Press down firmly on the lid to closeit. Accessories supplied 13
Page 14 - Using the accessories supplied
Crevice nozzle For cleaning in folds, crevices orcorners. Dusting brush For cleaning skirting boards, ornate orcarved articles, etc. The head of the dusting brush can beswivelled to attain the best cleaningposition. Using the accessories supplied 14
Page 16 - Mains cable; Unwinding the cable; Rewinding the cable; Use
Mains cable Unwinding the cable ^ Pull out the mains cable to therequired length (max. approximately6.5 m). , If vacuuming for longer than 30 minutes, the mains cable must bepulled out to its fullest extent.Otherwise there is a danger ofoverheating and damage. Rewinding the cable ^ Switch off at the...
Page 17 - Switching on and off
Switching on and off ^ Step on the On/Off foot switch s . Models with radio controls on thehandle To pause the appliance duringoperation: ^ Press the stand-by button on thehandle. , The stand-by button is designed to pause the vacuum cleaner forshort periods of time whilstvacuuming. There is a risk ...
Page 18 - Vacuuming; Adjusting the suction power
Vacuuming ^ When vacuuming, pull the cleanerbehind you on its wheels. You canstand it upright for vacuuming stairsand curtains etc. , When vacuuming especially fine dust, e.g. sawdust, sand, plaster,flour, talcum powder etc.,electrostatic charges build upnaturally. Under certain conditionsthese char...
Page 19 - Rotary selector; Eco
Rotary selector ^ Turn the suction power selectormanually to the suction power settingyou require. On some models, the selected settinglights up green. + / - foot controls Press and hold the + or - foot controluntil the power setting you require lightsup green. ^ Press the + control to select a high...
Page 20 - Opening the air inlet valve
+ / - controls on the handle(radio-operated) Press and hold the + or - button untilthe symbol for the power setting yourequire shows in the display on thecleaner. ^ Press the + control to select a higher setting. ^ Press the - control to select a lower setting. The LED will indicate each time abutto...
Page 21 - Parking system; Setting down, transportation and storage
Parking system A parking system has been designedfor conveniently parking the vacuumcleaner during pauses. ^ Slot the floorhead into the parkingattachment at the back of thevacuum cleaner. Switching on and off with the parkingsystem Some models are fitted with an On/Offswitch in the parking system. ...
Page 22 - Transportation and storage
Transportation and storage ^ Stand the vacuum cleaner uprightwhen it is not being used and duringstorage. ^ Slot the floorhead downwards into oneof the parking attachments on eitherside of the vacuum cleaner. ^ Retract the telescopic tube fully. This makes the cleaner easier to carryor store. Settin...
Page 23 - Maintenance and care
, Always disconnect the vacuum cleaner from the electrical supply formaintenance work and for cleaning.Switch off at the wall socket andremove the plug. The Miele filter system consists of threefilters which must be replaced fromtime to time to ensure that your cleanerperforms efficiently. – Dustbag...
Page 24 - When to change the dustbag
When to change the dustbag Change the dustbag when the colourmarker in the dustbag change indicatorfills the display, or sooner if it is nolonger effective (see possible reasonsfor this below). Miele dustbags are disposable, anddesigned for single use only.Do not attempt to re-use them assuction wou...
Page 25 - Replacing the dustbag
Replacing the dustbag ^ Press the release button for the dustcompartment lid and raise the lid asfar as it will go. The dustbag has a closing flap whichcloses automatically when the dustcompartment lid is raised to preventany dust escaping. ^ Pull the dustbag out by the grip nextto the self-closing ...
Page 26 - Exhaust filter change indicator
When to change the exhaustfilter Depending on the model, your vacuumcleaner will be fitted as standard withone of the following exhaust filters: a an Air Clean filter SF-AC 30 Replace this filter every time you start anew packet of Miele dustbags. An AirClean exhaust filter and a dustcompartment fil...
Page 27 - Replacing the Air Clean filter
Replacing the Air Clean filter Do not use more than one exhaustfilter at a time. ^ Open the dust compartment lid. ^ Release the filter grille and raise itupwards. Grasp the used Air Cleanfilter by the clean, unsoiled section(see arrow) and take it out. ^ Replace it with a new Air Clean filter. If yo...
Page 29 - Please note
Replacing one type of filterwith another Depending on the model, your vacuumcleaner will be fitted as standard withone of the following exhaust filters: a an Air Clean filter SF-AC 30, b an Active Air Clean filter SF-AAC 50 (black), c an Active HEPA filter SF-AH 50 (blue). Please note 1. If you wish...
Page 32 - To replace the thread lifters; Upholstery nozzle, 190 mm
When to change the threadlifters The thread lifters on the suction inlet tothe floorhead and the upholstery nozzlecan be replaced. Check them from time to time andreplace them if the pile has worn down. To replace the thread lifters ^ Use a suitable tool to remove themfrom the slots. ^ Fit new threa...
Page 33 - Vacuum cleaner and accessories; Dust compartment; Cleaning and care
, Always disconnect the vacuum cleaner from the electricity supplyfor maintenance work and forcleaning. Switch off at the wallsocket and remove the plug. Vacuum cleaner and accessories External surfaces of the vacuumcleaner and of the accessories can becleaned with a dry or a slightly dampcloth, or ...
Page 34 - Electrical connection
All work should be carried out by asuitably qualified and competentperson in strict accordance withnational and local safety regulations. The voltage connected load are givenon the data plate located underneaththe vacuum cleaner. Please ensure thatthese match the household mainssupply. The fuse rati...
Page 35 - Problem solving guide
The vacuum cleaner switches offautomatically.On certain models, the overheatingwarning light also comes on. A temperature limiter switches thevacuum cleaner off automatically if itgets too hot. Some models also have awarning light , which comes on to indicate that it has overheated. This can occur i...
Page 36 - After sales service
In the event of a fault that you cannoteasily remedy, please contact – your Miele Vacuum Cleaner Specialist or or – the Miele Service Department (see back cover for contact details). After sales service 36
Page 37 - Classic Allergotec floorhead; Optional accessories
Miele accessories includingfloorheads, filter and dustbags areavailable to order from your MieleVacuum Cleaner Specialist, theMiele Spare Parts Department or viathe internet on www.miele-shop.com Certain models are supplied as stan-dard with one or more of the followingaccessories: It is also import...