Page 2 - Contents
Contents 2 Warning and Safety instructions ...................................................................... 4 Caring for the environment .............................................................................. 14 Guide to the appliance .......................................................
Page 4 - Warning and Safety instructions
Warning and Safety instructions 4 This hob complies with all relevant local and national safetyrequirements. Inappropriate use can, however, lead to personalinjury and material damage. Read the operating and installation instructions carefully beforeusing the hob. They contain important information ...
Page 5 - Correct application; This hob is intended for domestic use and use in other similar
Warning and Safety instructions 5 Correct application This hob is intended for domestic use and use in other similar environments. This hob is not intended for outdoor use. It is intended for domestic use only to cook food and keep it warm. Any other use is not supported by the manufacturer an...
Page 6 - Safety with children
Warning and Safety instructions 6 Safety with children Children under 8 years of age must be kept away from the hob unless they are constantly supervised. Children over 8 years of age may use the hob without supervision if its operation has been clearly explained to them and they are ableto use ...
Page 7 - Technical safety
Warning and Safety instructions 7 Technical safety Unauthorised installation, maintenance and repairs can cause considerable danger for the user. Installation, maintenance andrepairs must only be carried out by a Miele authorised technician. Damage to the hob can compromise your safety. Check th...
Page 9 - If the hob is installed behind a cabinet door, do not close the door
Warning and Safety instructions 9 If the hob is installed behind a cabinet door, do not close the door while the hob is in use. Heat and moisture can build up behind theclosed door. This can result in damage to the hob, the housing unitand the floor. Do not close the door until the residual heat i...
Page 10 - Correct use
Warning and Safety instructions 10 Correct use The hob gets hot when in use and remains hot for a while after being switched off. There is a danger of burning until the residualheat indicators go out. Due to the high temperatures radiated, objects left near the hob when it is in use could catch ...
Page 11 - When the appliance is switched on either deliberately or by
Warning and Safety instructions 11 When the appliance is switched on either deliberately or by mistake, or when there is residual heat present, there is the risk ofany metal items left on the hob heating up, with the danger ofburning. Depending on the material, other items left on the hob couldals...
Page 13 - Cleaning and care; Do not use a steam cleaning appliance to clean this hob.
Warning and Safety instructions 13 Cleaning and care Do not use a steam cleaning appliance to clean this hob. The steam could reach electrical components and cause a shortcircuit. Miele will guarantee to supply functional spare parts for a minimum of 10 years and up to 15 years following thedisc...
Page 14 - Caring for the environment
Caring for the environment 14 Disposing of the packagingmaterial The packaging material is used forhandling and protects the appliancefrom transport damage. The packagingmaterial used is selected from materialswhich are environmentally friendly fordisposal and can generally be recycled. Recycling th...
Page 15 - Guide to the appliance; Hob; Single-circle cooking zone
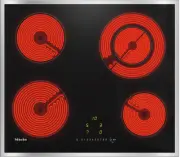
Guide to the appliance 15 Hob KM 6520 FR, KM 6520 FL a Single-circle cooking zone b Single-circle cooking zone c Double-circle cooking zone d Single-circle cooking zone e Controls and indicators
Page 16 - Double-circle cooking zone
Guide to the appliance 16 KM 6521 FR a e d a e d b c a Double-circle cooking zone b Single-circle cooking zone c Single circle cooking zone/extended zone d Single-circle cooking zone e Controls and indicators
Page 19 - Triple circle cooking zone
Guide to the appliance 19 KM 6527 FR a Triple circle cooking zone b Single-circle cooking zone c Single-circle cooking zone d Controls and indicators
Page 20 - Controls and display; Sensor controls
Guide to the appliance 20 Controls and display a b c d i h g e f j Sensor controls a Hob On/Off b Numerical display– To set the power level– To set the times c For switching on an extended cooking zone d Stop & GoTo stop/start a cooking process in progress e Cooking zone selection and display ...
Page 21 - Displays/indicator lights
Guide to the appliance 21 Displays/indicator lights f Timer display to Duration in minutes System lock/safety lock is activated Demo mode is activated g Cooking zone allocation auto switch offAuto switch off for the cooking zone is activated h Power level – extended setting range i Stop ...
Page 22 - Cooking zones
Guide to the appliance 22 Cooking zones KM 6520 FR, KM 6520 FL Cooking zone Ø in cm Rating in watts for 230 V 18.0 1800 16.0 1500 12.0/21.0 750/2200 14.5 1200 Total: 6700 KM 6521 FR Cooking zone Ø in cm Rating in watts for 230 V 12.0/21.0 1200/2200 14.5 1200 17.0/17.0 x 26.5 1500/240...
Page 24 - Before using for the first time
Before using for the first time 24 Please stick the extra data plate forthe appliance supplied with thisdocumentation in the space providedin the “After sales service” section ofthis booklet. Remove any protective wrapping andstickers. Cleaning the hob for the firsttime Before using for the fi...
Page 25 - How it works; Single circle zone
How it works 25 Single circle cooking zones have oneheating element, whilst double circlecooking zones and extended zoneshave two. Depending on the model, theheating elements may be separated byan insulating ring.Each cooking zone has overheatingprotection (a temperature limiter), whichstops the cer...
Page 26 - Pans; The best pots and pans
Pans 26 The best pots and pans are metal ones with a thick base which is veryslightly concave when cold. Whenheated, the base flattens to rest evenlyon the hob, optimising the conductionof the heat. cold hot Glass, ceramic, or stoneware is less suitable . These materials do not conduct the heat well...
Page 27 - Tips on saving energy; - Check that the diameter of the pan
Tips on saving energy 27 - Check that the diameter of the pan base is wide enough for the cookingzone so that heat is not lostunnecessarily. - Use a pan lid whenever possible to minimize heat loss. - Select a smaller pan when cooking small quantities. A small pan on asmall cooking zone uses less ene...
Page 28 - Setting range
Setting range 28 The hob is programmed with 9 power levels at the factory. If you wish to fine-tunea setting, you can extend the power level range to 17 power levels (see“Programming”). Setting ranges Default setting (9 power levels) Extended settings (17 power levels) Melting butter, chocolate etc....
Page 29 - Operation; Using the appliance; sensor needs to be touched
Operation 29 Using the appliance This ceramic hob is equipped withelectronic sensor controls which reactto finger contact. For safety reasons, inorder to switch the appliance on, theOn/Off sensor needs to be touched for a little longer than the other sensors.Each time a sensor control is activate...
Page 30 - Risk of fire with overheated food.; Switching on the hob; Touch the; Setting the power level
Operation 30 Risk of fire with overheated food. Unattended food can overheat andcatch alight.Do not leave the hob unattendedwhilst it is being used. Switching on the hob Touch the sensor. Other sensors will light up. If no further entry is made, the hob willswitch itself off after a few secon...
Page 31 - Residual heat indicator; Risk of burning due to hot
Operation 31 Residual heat indicator If the cooking zone is still hot, theresidual heat indicator will light up afterit has been switched off. The bars of the residual heat indicatorgo out one after the other as thecooking zone cools down. The lasthorizontal bar only goes out when thecooking zone is...
Page 32 - Triple circle cooking zone:
Operation 32 Switching on an extendedzone/outer ring Double circle cooking zone or singlecircle cooking zone/extended zone: When you switch on a double circlecooking zone or an extended zone, thesecond heating circle is alwaysswitched on automatically. Triple circle cooking zone: When you switch on ...
Page 33 - Activating Auto heat-up
Operation 33 Auto heat-up When Auto heat-up has been activated,the cooking zone switches onautomatically at the highest setting andthen switches to the continued cookingsetting which you have previouslyselected. The heat-up time depends onwhich continued cooking setting hasbeen chosen (see chart). A...
Page 34 - Timer; Minute minder; Setting the minute minder
Timer 34 The hob has to be switched on if youwant to use the timer. The timer can be used for the following2 functions: - For setting the minute minder - For automatically switching a cooking zone off You can use the functionssimultaneously. A duration of between 1 min ( ) and 99 min ( ) can b...
Page 35 - Auto switch off; Setting the switch-off time
Timer 35 Auto switch off You can set a time after which acooking zone will switch offautomatically. This function can beused for all cooking zones at the sametime. If the time programmed is longer thanthe maximum operating time allowed,the cooking zone will be switched offby the safety switch-off fu...
Page 36 - starts flashing in
Timer 36 Using both timer functions atthe same time If you have programmed in one or moreswitch-off times, and would like to usethe minute minder as well: Touch the timer display repeatedlyuntil the indicator lights of theprogrammed cooking zones light upconstantly and starts flashing in the ti...
Page 37 - Additional functions; Activating/Deactivating; Recall; Switch the hob on again.
Additional functions 37 Stop & Go When Stop & Go is activated, the powerlevel of all cooking zones in use isreduced to power level 1.The cooking zone power levels and thetimer settings cannot be altered; thehob can only be switched off. Theminute minder, switch-off times andheat-up boost tim...
Page 38 - Demonstration mode; In the timer display,; Displaying hob data; Model number/Serial number
Additional functions 38 Demonstration mode This function enables the hob to bedemonstrated in showrooms withoutheating up. Activating/deactivatingdemonstration mode Switch the hob on. Touch and hold the 0 and 2 sensorcontrols on the numerical keybank atthe same time for 6 seconds. In the timer d...
Page 39 - Safety features; System lock / Safety lock
Safety features 39 System lock / Safety lock Your hob is equipped with a systemlock and a safety lock to prevent thehob and the cooking zones beingswitched on or any settings beingaltered by mistake. The system lock is activated when the hob is switched off. If the system lock isactivated, the hob c...
Page 40 - will appear in the
Safety features 40 Safety switch-off Safety switch-off if the sensors arecovered Your hob will switch off automatically ifone or several of the sensors remaincovered for longer than 10 seconds, forexample, by finger contact, food boilingover or by an object such as an ovenglove or tea towel. will ...
Page 41 - Overheating protection; - No cookware is present on the
Safety features 41 Overheating protection Each cooking zone is equipped withoverheating protection (internaltemperature limiter). This switches offthe cooking zone heating elementautomatically before it overheats. Assoon as the cooking zone temperaturehas cooled sufficiently, heating isswitched on a...
Page 42 - Programming; Changing the programming; Accessing programming mode
Programming 42 You can adapt the programming of thehob to your personal needs. Severalsettings can be altered in succession. After accessing programming mode, (Programme) and (Code) will appear in the timer display, and the indicators for2 cooking zones. The programme is shown in the lefthand co...
Page 45 - Note for test institutes
Note for test institutes 45 Test food acc. to EN 60350-2 9 power levels are programmed at the factory. For testing in accordance with the above standard, programme the hob to theextended power level setting. Test food Pan base (mm) Lid Power level Pre-heat Cooking Heating oil up 150 No – 1–2 Panca...
Page 46 - Unsuitable cleaning agents
Cleaning and care 46 Risk of burning due to hot cooking zones.The cooking zones will be hot afteruse.Switch the hob off.Allow the cooking zones to cooldown before cleaning the hob. Risk of damage due to moisture ingress.The steam from a steam cleaningappliance could reach live electricalcomponen...
Page 47 - Cleaning the ceramic surface; Spots
Cleaning and care 47 Cleaning the ceramic surface Risk of damage by pointed objects.The seal between the hob and theworktop could suffer damage.The seal between the ceramicsurface and the frame could sufferdamage.Do not use pointed objects forcleaning. Not all soiling and residues can beremoved us...
Page 48 - Problem solving guide; Messages in the display; Problem
Problem solving guide 48 Many malfunctions and faults that can occur in daily operation can be easilyremedied. Time and money will be saved because a service call will not beneeded. The following guide may help you to find the reason for a malfunction or a fault,and to correct it. Messages in the di...
Page 49 - Unexpected behaviour
Problem solving guide 49 Unexpected behaviour Problem Cause and remedy The heating element forone of the cookingzones switches on andoff. This “timing” of the element is normal. It is causedby the electronic temperature control (see “How thecooking zones work”). If the heating switches on and off at...
Page 50 - Unsatisfactory results
Problem solving guide 50 Unsatisfactory results Problem Cause and remedy The food in the pandoes not heat up whenthe Auto heat-up func-tion is switched on. A large amount of food is being heated up. Start cooking at the highest power level and thenturn down to a lower one manually later on. The pa...
Page 51 - General problems or technical faults
Problem solving guide 51 General problems or technical faults Problem Cause and remedy The hob or cookingzones will not switchon. There is no power to the hob. Check whether the mains fuse has tripped.Contact an electrician or Miele Service (for theminimum fuse rating, see data plate). There may b...
Page 52 - Optional accessories; Cleaning and care products; Microfibre cloth
Optional accessories 52 Miele offer a comprehensive range ofuseful accessories as well as cleaningand conditioning products for yourMiele appliances. These products can be ordered throughthe Miele Webshop. They can also be ordered from Miele(see end of this booklet for contactdetails) or from your M...
Page 53 - After sales service; Contact in the event of a fault
After sales service 53 Contact in the event of a fault In the event of any faults which you cannot remedy yourself, please contact yourMiele dealer or the Miele Customer Service Department. You can book a Miele Customer Service Department call-out online atwww.miele.com/service. Contact information ...
Page 54 - Installation; Safety instructions for installation; Risk of damage from incorrect connection.; The veneer or laminate coatings of worktops (or adjacent kitchen
Installation *INSTALLATION* 54 Safety instructions for installation Risk of damage from incorrect connection. Incorrect installation can cause damage to the hob.The hob must only be installed by a qualified person. Risk of electric shock from mains voltage. Incorrect connection to the mains supp...
Page 55 - Safety distances; Safety distance above the hob
Installation *INSTALLATION* 55 Safety distances Safety distance above the hob The safety distance specified by themanufacturer of the cooker hood mustbe maintained between the hob and thecooker hood above it. If combustible objects are installedabove the hob (e.g., cabinets, utensilrail, etc.), a mi...
Page 56 - back
Installation *INSTALLATION* 56 Safety distances to the sides andback of the appliance It is advisable to install the hob withplenty of space either side of it. The minimum distance shown below must be maintained between the backof the hob and a tall unit or wall. The minimum distance , shown be...
Page 57 - Interim shelf
Installation *INSTALLATION* 57 Interim shelf It is not necessary to fit an interim shelfunderneath the hob but one may befitted if you wish. If an interim shelf is fitted under thehob, there must be a minimum gap of110 mm between the top of theworktop and the top of the shelf. A gap of 10 mm should ...
Page 58 - Hob with frame or bevelled edge
Installation *INSTALLATION* 58 Safety distance when installing the appliance near a wall with additionalniche cladding A minimum safety distance must be maintained between the worktop cut-out andany niche cladding to protect it from heat damage. If the niche cladding is made from a combustible mater...
Page 59 - Installation notes; Surface-mounted installation
Installation *INSTALLATION* 59 Installation notes Surface-mounted installation Seal between the hob and theworktop Damage caused by incorrect installation.Using sealant under the hob couldresult in damage to the hob and theworktop if the hob ever needs to beremoved for servicing.Do not use sealant...
Page 60 - Flush-fit installation
Installation *INSTALLATION* 60 Flush-fit installation A flush-fit hob is suitable only forinstallation in natural stone (granite,marble), solid wood and tiledworktops. Certain models are alsosuitable for building into glassworktops – these are marked with anappropriate note in “Installation –Install...
Page 61 - Installation dimensions – Surface-mounted; All dimensions are given in mm.
Installation *INSTALLATION* 61 Installation dimensions – Surface-mounted All dimensions are given in mm. KM 6520 FR a Front b Mains connection box with mains connection cableMains connection cable L = 1440 mm c Wiring harness, L = 1550 mm d Spring clamps
Page 62 - Front
Installation *INSTALLATION* 62 KM 6521 FR a Front b Mains connection box with mains connection cableMains connection cable L = 1440 mm c Spring clamps
Page 65 - Preparing the worktop
Installation *INSTALLATION* 65 Surface-mounted installation Preparing the worktop Create the worktop cut-out.Remember to maintain the minimumsafety distances (see “Installation –Safety distances”). Seal any cut surfaces on wooden worktops with a special varnish, silicone sealant or resin to prev...
Page 66 - Attach the adhesive tape
Installation *INSTALLATION* 66 Securing the spring clamps – naturalstone worktops You will need heavy-duty double-sidedadhesive tape (not included with thehob) to fasten the spring clamps. The exact positioning of the springclamps is shown in the individual hobdiagrams. a Attach the adhesive tape ...
Page 67 - Installation dimensions – Flush-fit
Installation *INSTALLATION* 67 Installation dimensions – Flush-fit All dimensions are given in mm. KM 6520 FL a Front b Mains connection box with mains connection cableMains connection cable L = 1440 mm c Stepped cut-out, natural stone worktop d Wooden batten 13 mm (not supplied)
Page 69 - Connect the hob to the power supply.
Installation *INSTALLATION* 69 Flush-fit installation Create the worktop cut-out.Remember to maintain the minimumsafety distances (see “Installation –Safety distances”). Solid wood, tiled and glass worktops:Fix a wooden frame 7 mm below thetop edge of the worktop (see thediagram in “Installation...
Page 70 - Electrical connection; Risk of damage from incorrect
Installation *INSTALLATION* 70 Electrical connection Risk of damage from incorrect connection.Unauthorised installation,maintenance and repairs can causeconsiderable danger for the user.Miele cannot be held liable fordamage or injury caused byunauthorised installation,maintenance or repair work, o...
Page 71 - Disconnecting from the mains
Installation *INSTALLATION* 71 Disconnecting from the mains Risk of electric shock. There is a risk of electric shock if theappliance is connected to the mainssupply during repair or service work.After disconnection, ensure theappliance cannot be switched backon by mistake. To disconnect the appli...
Page 72 - Wiring diagram
Installation *INSTALLATION* 72 Wiring diagram Some connection methods are notpermitted in all installation locations.Ensure compliance with nationalregulations and any additionalregulations issued by the localelectricity provider.
Page 73 - Product data sheets; Information for domestic electric hobs
Product data sheets 73 The following data sheets apply to the models described in this operatinginstruction manual. Information for domestic electric hobs In acc. with regulation (EU) No. 66/2014 MIELE Model name / identifier KM 6520 Number of cooking zones and/or areas 4 For circular cooking zones:...


 Miele WWD380 WCS PWash&Steam&9kg User Manual
 Miele W 1614 Manual
 Miele G 5266 SCVi SFP Active Plus User Manual
 Miele Classic C1 Turbo Team PowerLine - SBAN0 User Manual
![Miele PDR 307 [EL]](https://manualsarea.com/img/product/thumbs/48/ba/fd/bafde84806e8abc8b420f34eaf8fcd6e.webp) Miele PDR 307 [EL] User Manual
Miele PDR 307 [EL] User Manual Miele F 1911 Vi Manual
![Miele PDR 908 [EL MAR 3N AC 400V 50-60Hz]](https://manualsarea.com/img/product/thumbs/48/05/b7/05b705998b251f92b271e908423e1ecb.webp) Miele PDR 908 [EL MAR 3N AC 400V 50-60Hz] Installation Manual
Miele PDR 908 [EL MAR 3N AC 400V 50-60Hz] Installation Manual Miele K 9757 iD Manual


