Page 2 - Contents
Contents 2 Warning and Safety instructions .......................................................................... 8 Caring for the environment ................................................................................ 17 Guide to the appliance ...............................................
Page 3 - Operation: Combination cooking mode
Contents 3 Cancelling cooking ................................................................................................ 43 Operation: Combination cooking mode ............................................................ 44 Simple operation .......................................................
Page 4 - Minute minder + Alarm
Contents 4 Minute minder + Alarm ....................................................................................... 67 Using the alarm ................................................................................................. 67 Setting the alarm ........................................
Page 5 - Food probe
Contents 5 Defrost ................................................................................................................. 102Bottling ................................................................................................................ 105Bottling cakes............................
Page 6 - System lock
Contents 6 Brightness ........................................................................................................... 147Volume................................................................................................................. 147 Buzzer tones..................................
Page 8 - Warning and Safety instructions
Warning and Safety instructions 8 The steam combination oven is referred to in the following instructions as asteam oven. This appliance complies with statutory safety requirements. Inap-propriate use can, however, lead to personal injury and damage toproperty. To avoid the risk of accidents and dam...
Page 9 - Correct application
Warning and Safety instructions 9 Correct application This steam oven is intended for use in domestic households and similar working and residential environments. This steam oven is not intended for outdoor use. This steam oven is intended for domestic use only as described in these operating ...
Page 10 - Safety with children
Warning and Safety instructions 10 Safety with children Activate the system lock to ensure that children cannot switch on the steam oven inadvertently. Children under 8 years of age must be kept away from the appli- ance unless they are constantly supervised. Children 8 years and older may onl...
Page 11 - Technical safety
Warning and Safety instructions 11 Technical safety Unauthorised installation, maintenance and repairs can cause considerable danger for the user. Installation, maintenance and re-pairs must only be carried out by a Miele authorised technician. Never use a damaged steam oven. It could be dangero...
Page 13 - Correct use
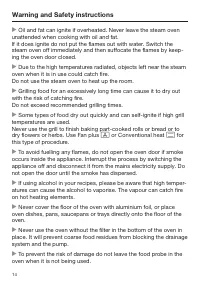
Warning and Safety instructions 13 Correct use Danger of burning. The steam oven becomes hot when in use. You could burn yourself on the heating elements, oven interior,cooked food, oven accessories, hot steam or the door glass.Wear oven gloves when placing food in the oven or removing it,when adj...
Page 15 - Do not operate the steam oven without the lamp cover. Steam
Warning and Safety instructions 15 When using a small electrical appliance, e.g. a hand-held blender, near the steam oven, care should be taken that the cable of the ap-pliance cannot get trapped by the steam oven door. The insulationon the cable could become damaged, giving rise to an electric sh...
Page 16 - Cleaning and care
Warning and Safety instructions 16 Cleaning and care Do not use a steam cleaning appliance to clean this appliance. The steam could reach electrical components and cause a short cir-cuit. Scratches on the door glass can result in the glass breaking. Do not use abrasive cleaners, hard sponges, br...
Page 17 - Caring for the environment
Caring for the environment 17 Disposal of the packing mater-ial The packaging is designed to protectthe appliance from damage duringtransportation. The packaging materialsused are selected from materials whichare environmentally friendly for disposaland should be recycled. Recycling the packaging re...
Page 18 - Guide to the appliance; Steam oven front view
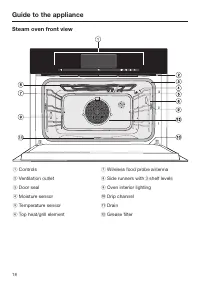
Guide to the appliance 18 Steam oven front view a Controls b Ventilation outlet c Door seal d Moisture sensor e Temperature sensor f Top heat/grill element g Wireless food probe antenna h Side runners with 3 shelf levels i Oven interior lighting j Drip channel k Drain l Grease filter
Page 19 - Condensate container compartment
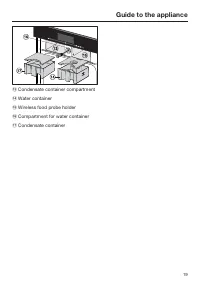
Guide to the appliance 19 m Condensate container compartment n Water container o Wireless food probe holder p Compartment for water container q Condensate container
Page 20 - Accessories supplied; Universal tray
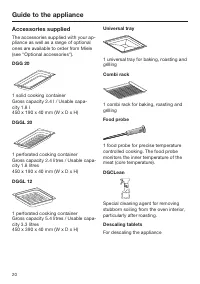
Guide to the appliance 20 Accessories supplied The accessories supplied with your ap-pliance as well as a range of optionalones are available to order from Miele(see "Optional accessories"). DGG 20 1 solid cooking containerGross capacity 2.4 l / Usable capa-city 1.8 l450 x 190 x 40 mm (W x D...
Page 21 - FlexiClip telescopic runners HFC 71
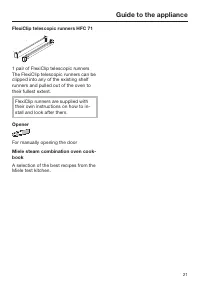
Guide to the appliance 21 FlexiClip telescopic runners HFC 71 1 pair of FlexiClip telescopic runnersThe FlexiClip telescopic runners can beclipped into any of the existing shelfrunners and pulled out of the oven totheir fullest extent. FlexiClip runners are supplied withtheir own instructions on how...
Page 22 - Controls
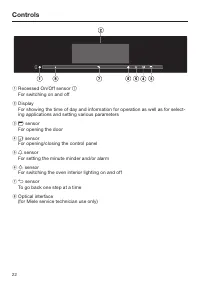
Controls 22 a Recessed On/Off sensor For switching on and off b DisplayFor showing the time of day and information for operation as well as for select-ing applications and setting various parameters c sensor For opening the door d sensor For opening/closing the control panel e sensor For set...
Page 23 - Sensor controls; Sensor Function
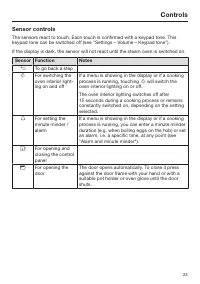
Controls 23 Sensor controls The sensors react to touch. Each touch is confirmed with a keypad tone. Thiskeypad tone can be switched off (see "Settings – Volume – Keypad tone"). If the display is dark, the sensor will not react until the steam oven is switched on. Sensor Function Notes To g...
Page 24 - Touch display
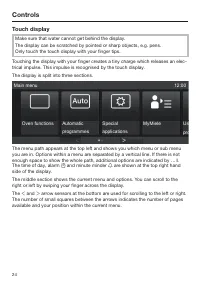
Controls 24 Touch display Make sure that water cannot get behind the display.The display can be scratched by pointed or sharp objects, e.g. pens.Only touch the touch display with your finger tips. Touching the display with your finger creates a tiny charge which releases an elec-trical impulse. This...
Page 25 - Symbols
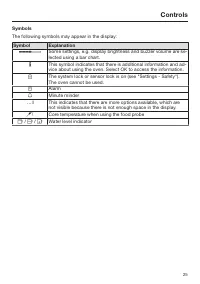
Controls 25 Symbols The following symbols may appear in the display: Symbol Explanation Some settings, e.g. display brightness and buzzer volume are se-lected using a bar chart. This symbol indicates that there is additional information and ad-vice about using the oven. Select OK to access the i...
Page 26 - Operation; To select or open a menu
Controls 26 Operation Each time you touch a possible option the relevant field lights up orange. To select or open a menu Touch the field you want once with your finger. Scrolling You can scroll left or right. Swipe the screen, i.e. place your finger on the touch display and swipe it in thedirec...
Page 27 - Entering numbers
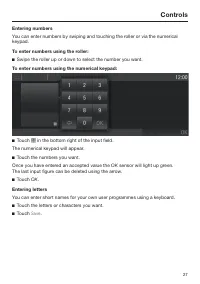
Controls 27 Entering numbers You can enter numbers by swiping and touching the roller or via the numericalkeypad. To enter numbers using the roller: Swipe the roller up or down to select the number you want. To enter numbers using the numerical keypad: Touch in the bottom right of the input fi...
Page 28 - Description of functions; Control panel; sensor is; Water container
Description of functions 28 Control panel The water container, condensate con-tainer and food probe are located be-hind the control panel. The sensor is used for opening and closing the con-trol panel. The panel is fitted with adevice which will automatically stop itmoving if it meets an obstructi...
Page 29 - Moisture; Duration; Noises
Description of functions 29 Moisture The Combi mode mode and Reheat functions use a combination of ovenheat and moisture. You can alter themoisture/humidity level within a givenrange for an individual cooking pro-gramme or a cooking stage. Depending on the moisture setting forthe programme, eith...
Page 30 - Cooking phase
Description of functions 30 Heating-up phase During the heating-up phase the displaywill show the temperature in the cook-ing compartment as it rises and Heat-up phase in all programmes except for Automatic programmes , Menu cooking and Maintenance . When cooking with steam, the durationof the heati...
Page 31 - Using for the first time; General settings; The steam oven must not be op-
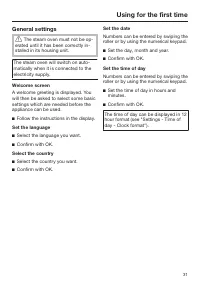
Using for the first time 31 General settings The steam oven must not be op- erated until it has been correctly in-stalled in its housing unit. The steam oven will switch on auto-matically when it is connected to theelectricity supply. Welcome screen A welcome greeting is displayed. Youwill then be...
Page 32 - Time of day display; The time always shows in the display.; Select the option you want.; The steam oven is ready for use.; Cleaning for the first time; Touch
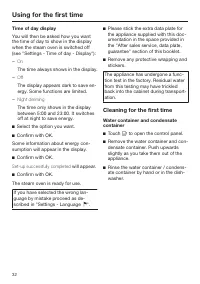
Using for the first time 32 Time of day display You will then be asked how you wantthe time of day to show in the displaywhen the steam oven is switched off(see "Settings - Time of day - Display"): – On The time always shows in the display. – Off The display appears dark to save en-ergy. Som...
Page 33 - Accessories / Oven interior; Set the water hardness level; The steam oven is set ex-works for
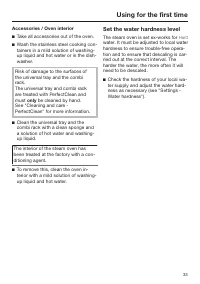
Using for the first time 33 Accessories / Oven interior Take all accessories out of the oven. Wash the stainless steel cooking con-tainers in a mild solution of washing-up liquid and hot water or in the dish-washer. Risk of damage to the surfaces ofthe universal tray and the combirack.The univer...
Page 34 - This procedure; Heating up the appliance; function for 30
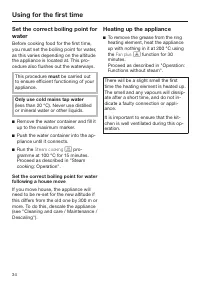
Using for the first time 34 Set the correct boiling point forwater Before cooking food for the first time,you must set the boiling point for water,as this varies depending on the altitudethe appliance is located at. This pro-cedure also flushes out the waterways. This procedure must be carried out t...
Page 35 - Level 3
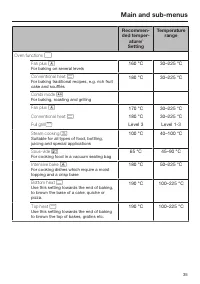
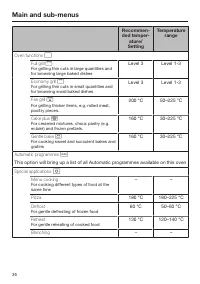
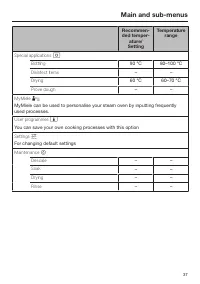
Main and sub-menus 35 Recommen-ded temper- ature/ Setting Temperature range Oven functions Fan plus For baking on several levels 160 °C 30–225 °C Conventional heat For baking traditional recipes, e.g. rich fruitcake and soufflés 180 °C 30–225 °C Combi mode For baking, roasting and grilling...
Page 38 - Operation: Steam cooking; Simple operation; Only use cold mains tap water
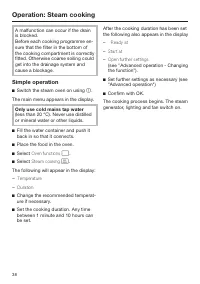
Operation: Steam cooking 38 A malfunction can occur if the drainis blocked.Before each cooking programme en-sure that the filter in the bottom ofthe cooking compartment is correctlyfitted. Otherwise coarse soiling couldget into the drainage system andcause a blockage. Simple operation Switch the s...
Page 39 - At the end of the cooking duration
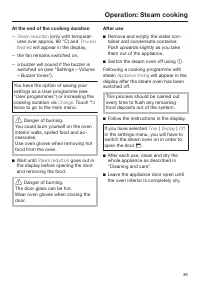
Operation: Steam cooking 39 At the end of the cooking duration – Steam reduction (only with temperat- ures over approx. 80 °C) and Process finished will appear in the display, – the fan remains switched on, – a buzzer will sound if the buzzer is switched on (see "Settings – Volume– Buzzer tones&...
Page 40 - Insufficient water; Interrupting operation
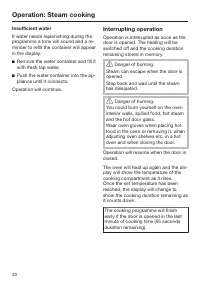
Operation: Steam cooking 40 Insufficient water If water needs replenishing during theprogramme a tone will sound and a re-minder to refill the container will appearin the display. Remove the water container and fill itwith fresh tap water. Push the water container into the ap-pliance until it co...
Page 41 - Advanced operation; Setting further durations
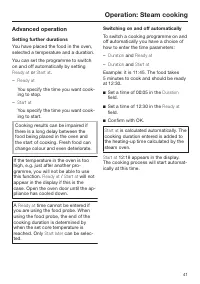
Operation: Steam cooking 41 Advanced operation Setting further durations You have placed the food in the oven,selected a temperature and a duration. You can set the programme to switchon and off automatically by setting Ready at or Start at . – Ready at You specify the time you want cook-ing to stop...
Page 43 - Deleting a finish time; Changing the function; Cancelling cooking
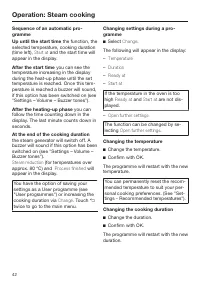
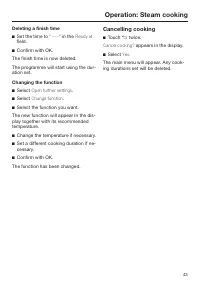
Operation: Steam cooking 43 Deleting a finish time Set the time to "----" in the Ready at field. Confirm with OK. The finish time is now deleted. The programme will start using the dur-ation set. Changing the function Select Open further settings . Select Change function . Select t...
Page 44 - works by combining
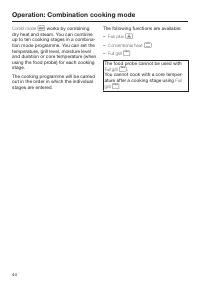
Operation: Combination cooking mode 44 Combi mode works by combining dry heat and steam. You can combineup to ten cooking stages in a combina-tion mode programme. You can set thetemperature, grill level, moisture leveland duration or core temperature (whenusing the food probe) for each cookingst...
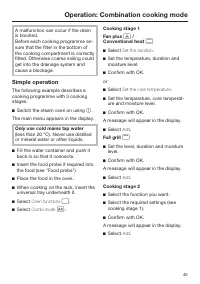
Page 46 - Cooking stage 3
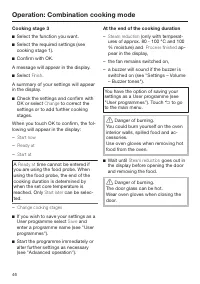
Operation: Combination cooking mode 46 Cooking stage 3 Select the function you want. Select the required settings (seecooking stage 1). Confirm with OK. A message will appear in the display. Select Finish . A summary of your settings will appearin the display. Check the settings and confir...
Page 47 - After use; will appear in the
Operation: Combination cooking mode 47 After use Remove and empty the water con-tainer and condensate container. Push upwards slightly as you takethem out of the appliance. Switch the steam oven off using . Following a cooking programme withsteam Appliance rinsing will appear in the display af...
Page 50 - Up until the start time
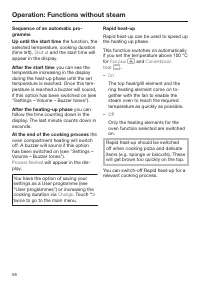
Operation: Combination cooking mode 50 Sequence of an automatic pro-gramme Up until the start time the function, the selected temperature and moisture,cooking duration (time left), Start at and the start time will appear in the display. After the start time you can see the temperature increasing in ...
Page 51 - Operation: Functions without steam; will appear in
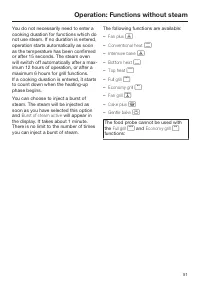
Operation: Functions without steam 51 You do not necessarily need to enter acooking duration for functions which donot use steam. If no duration is entered,operation starts automatically as soonas the temperature has been confirmedor after 15 seconds. The steam ovenwill switch off automatically afte...
Page 53 - After cooking
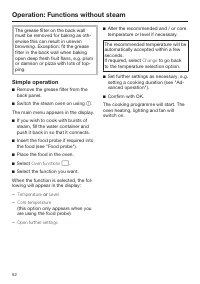
Operation: Functions without steam 53 After cooking Danger of burning. You could burn yourself on the oveninterior walls, spilled food and ac-cessoriesUse oven gloves when removing hotfood from the oven. Take the food out of the oven. Danger of burning. The door glass can be hot.Wear oven glov...
Page 55 - Switching off automatically
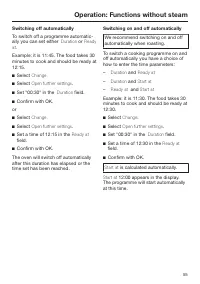
Operation: Functions without steam 55 Switching off automatically To switch off a programme automatic-ally you can set either Duration or Ready at . Example: it is 11:45. The food takes 30minutes to cook and should be ready at12:15. Select Change. Select Open further settings . Set "00:30&...
Page 57 - Switching off Rapid heat-up
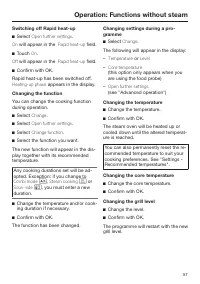
Operation: Functions without steam 57 Switching off Rapid heat-up Select Open further settings . On will appear in the Rapid heat-up field. Touch On . Off will appear in the Rapid heat-up field. Confirm with OK. Rapid heat-up has been switched off. Heating-up phase appears in the display. Chan...
Page 58 - Changing the cooking duration
Operation: Functions without steam 58 Changing the cooking duration Change the duration. Confirm with OK. The programme will restart with the newduration. Deleting a cooking duration Set the time to "----" in the Duration field. Confirm with OK. The programme will continue with these...
Page 59 - MyMiele; To add an entry; You can add up to 20 entries.
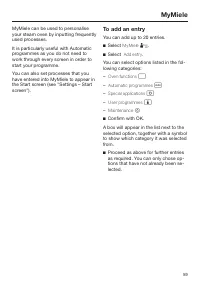
MyMiele 59 MyMiele can be used to personaliseyour steam oven by inputting frequentlyused processes. It is particularly useful with Automaticprogrammes as you do not need towork through every screen in order tostart your programme. You can also set processes that youhave entered into MyMiele to appea...
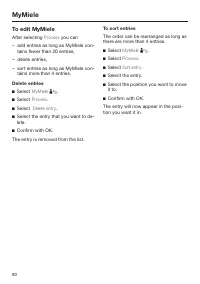
Page 60 - To edit MyMiele; Delete entries
MyMiele 60 To edit MyMiele After selecting Process you can – add entries as long as MyMiele con- tains fewer than 20 entries, – delete entries, – sort entries as long as MyMiele con- tains more than 4 entries. Delete entries Select MyMiele . Select Process . Select Delete entry . Select ...
Page 61 - Automatic programmes; List of food types
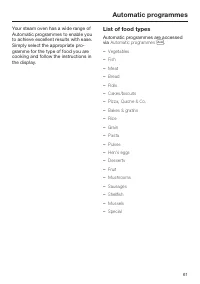
Automatic programmes 61 Your steam oven has a wide range ofAutomatic programmes to enable youto achieve excellent results with ease.Simply select the appropriate pro-gramme for the type of food you arecooking and follow the instructions inthe display. List of food types Automatic programmes are acce...
Page 62 - Notes on using these programmes
Automatic programmes 62 To use an Automatic pro-gramme Select Automatic programmes . A list of food types will appear in thedisplay. Select the food category. The Automatic programmes availablefor the food type selected will then ap-pear. Select the Automatic programme thatyou want. Each s...
Page 63 - Search
Automatic programmes 63 – To end an automatic programme early, you need to switch the steamoven off completely by touching . Cancel cooking? will appear in the dis- play. If Yes is selected, the main menu will be shown in the display. – If by the end of an Automatic pro- gramme the food is not coo...
Page 64 - User programmes; To create a User programme
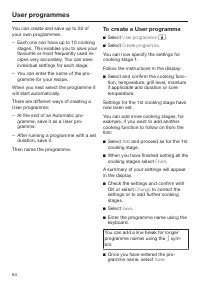
User programmes 64 You can create and save up to 20 ofyour own programmes. – Each one can have up to 10 cooking stages. This enables you to save yourfavourite or most frequently used re-cipes very accurately. You can saveindividual settings for each stage. – You can enter the name of the pro- gramme...
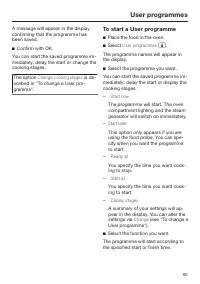
Page 65 - The option; To start a User programme; Place the food in the oven.
User programmes 65 A message will appear in the displayconfirming that the programme hasbeen saved. Confirm with OK. You can start the saved programme im-mediately, delay the start or change thecooking stages. The option Change cooking stages is de- scribed in "To change a User pro-gramme"...
Page 66 - To change a User programme; Changing cooking stages; To delete a User programme
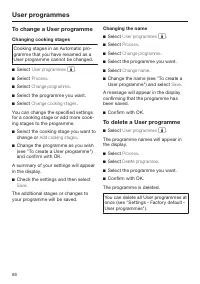
User programmes 66 To change a User programme Changing cooking stages Cooking stages in an Automatic pro-gramme that you have renamed as aUser programme cannot be changed. Select User programmes . Select Process . Select Change programme . Select the programme you want. Select Change c...
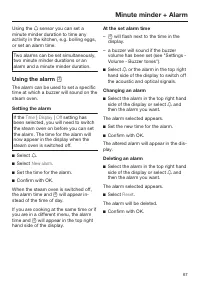
Page 67 - Using the alarm; Setting the alarm; At the set alarm time
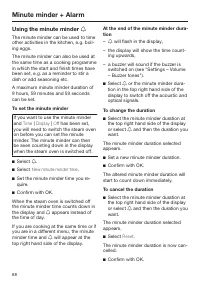
Minute minder + Alarm 67 Using the sensor you can set a minute minder duration to time anyactivity in the kitchen, e.g. boiling eggs,or set an alarm time. Two alarms can be set simultaneously,two minute minder durations or analarm and a minute minder duration. Using the alarm The alarm can be ...
Page 68 - Using the minute minder; To set the minute minder; To change the duration
Minute minder + Alarm 68 Using the minute minder The minute minder can be used to timeother activities in the kitchen, e.g. boil-ing eggs. The minute minder can also be used atthe same time as a cooking programmein which the start and finish times havebeen set, e.g. as a reminder to stir adish or...
Page 69 - General notes; Suitable containers; Cooking containers
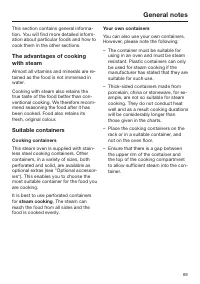
General notes 69 This section contains general informa-tion. You will find more detailed inform-ation about particular foods and how tocook them in the other sections. The advantages of cookingwith steam Almost all vitamins and minerals are re-tained as the food is not immersed inwater. Cooking with...
Page 70 - Shelf level
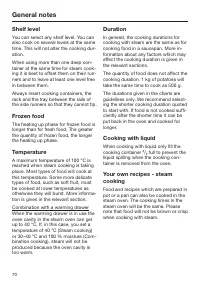
General notes 70 Shelf level You can select any shelf level. You canalso cook on several levels at the sametime. This will not alter the cooking dur-ation. When using more than one deep con-tainer at the same time for steam cook-ing it is best to offset them on their run-ners and to leave at least o...
Page 71 - Combi rack / Universal tray; Non-tip safety notches
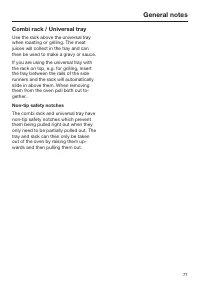
General notes 71 Combi rack / Universal tray Use the rack above the universal traywhen roasting or grilling. The meatjuices will collect in the tray and canthen be used to make a gravy or sauce. If you are using the universal tray withthe rack on top, e.g. for grilling, insertthe tray between the ra...
Page 72 - Vegetables; or
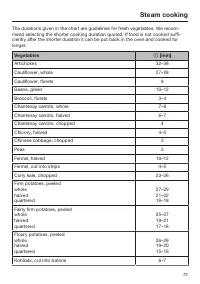
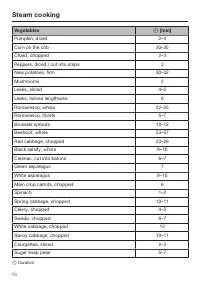
Steam cooking 72 Vegetables Fresh Prepare fresh vegetables in the usualway, i.e. wash, clean and cut them up. Frozen Frozen vegetables do not need to bedefrosted beforehand, unless they havebeen frozen together in a block. Frozen and fresh vegetables which takethe same length of time to cook can bec...
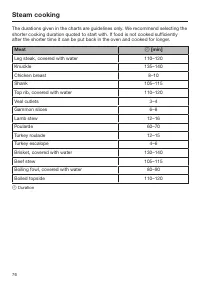
Page 75 - Meat
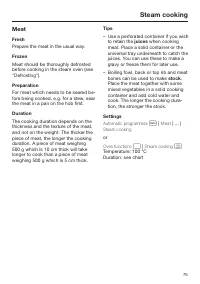
Steam cooking 75 Meat Fresh Prepare the meat in the usual way. Frozen Meat should be thoroughly defrostedbefore cooking in the steam oven (see"Defrosting"). Preparation For meat which needs to be seared be-fore being cooked, e.g. for a stew, searthe meat in a pan on the hob first. Duration T...
Page 77 - Sausages; Frankfurters; Fish
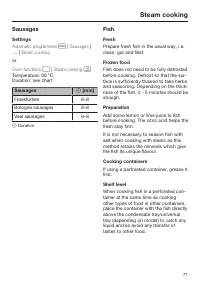
Steam cooking 77 Sausages Settings Automatic programmes | Sausages | ... | Steam cooking or Oven functions | Steam cooking Temperature: 90 °CDuration: see chart Sausages [min] Frankfurters 6–8 Bologna sausages 6–8 Veal sausages 6–8 Duration Fish Fresh Prepare fresh fish in the usual way,...
Page 78 - – Adding herbs and spices, such as
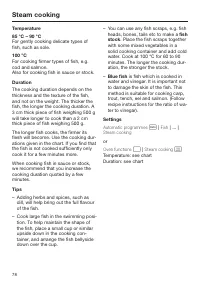
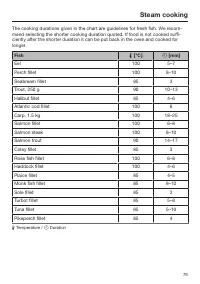
Steam cooking 78 Temperature 85 °C – 90 °C For gently cooking delicate types offish, such as sole. 100 °C For cooking firmer types of fish, e.g.cod and salmon.Also for cooking fish in sauce or stock. Duration The cooking duration depends on thethickness and the texture of the fish,and not on the wei...
Page 80 - Shellfish; Preparation
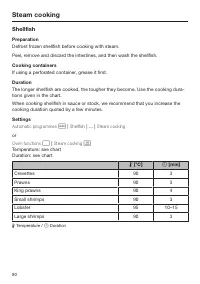
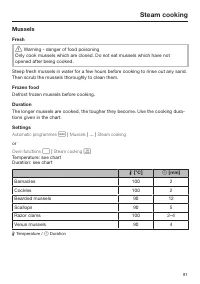
Steam cooking 80 Shellfish Preparation Defrost frozen shellfish before cooking with steam. Peel, remove and discard the intestines, and then wash the shellfish. Cooking containers If using a perforated container, grease it first. Duration The longer shellfish are cooked, the tougher they become. Use...
Page 81 - Mussels; Fresh
Steam cooking 81 Mussels Fresh Warning - danger of food poisoning Only cook mussels which are closed. Do not eat mussels which have notopened after being cooked. Steep fresh mussels in water for a few hours before cooking to rinse out any sand.Then scrub the mussels thoroughly to clean them. Froze...
Page 82 - Rice; Settings; Ratio
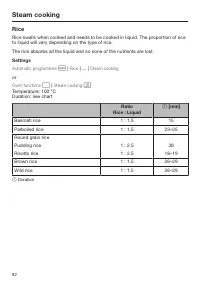
Steam cooking 82 Rice Rice swells when cooked and needs to be cooked in liquid. The proportion of riceto liquid will vary depending on the type of rice. The rice absorbs all the liquid and so none of the nutrients are lost. Settings Automatic programmes | Rice | ... | Steam cooking or Oven functio...
Page 83 - Pasta; Dry pasta
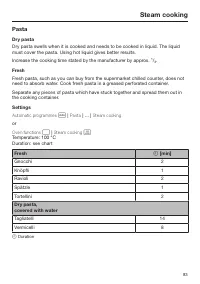
Steam cooking 83 Pasta Dry pasta Dry pasta swells when it is cooked and needs to be cooked in liquid. The liquidmust cover the pasta. Using hot liquid gives better results. Increase the cooking time stated by the manufacturer by approx. ¹/₃. Fresh Fresh pasta, such as you can buy from the supermarke...
Page 84 - Dumplings; Cook fresh dumplings in a greased, perforated container.; Sweet dumplings
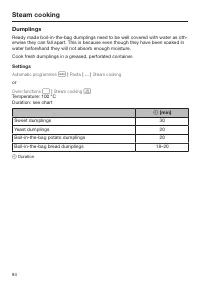
Steam cooking 84 Dumplings Ready made boil-in-the-bag dumplings need to be well covered with water as oth-erwise they can fall apart. This is because even though they have been soaked inwater beforehand they will not absorb enough moisture. Cook fresh dumplings in a greased, perforated container. Se...
Page 85 - Grain
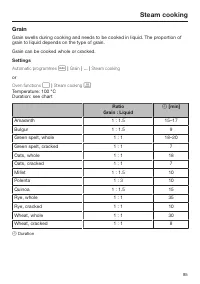
Steam cooking 85 Grain Grain swells during cooking and needs to be cooked in liquid. The proportion ofgrain to liquid depends on the type of grain. Grain can be cooked whole or cracked. Settings Automatic programmes | Grain | ... | Steam cooking or Oven functions | Steam cooking Temperature: 1...
Page 86 - Dried pulses; Lentils; Soaked
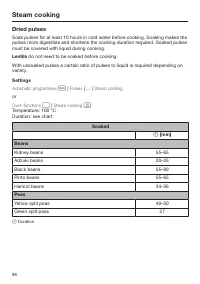
Steam cooking 86 Dried pulses Soak pulses for at least 10 hours in cold water before cooking. Soaking makes thepulses more digestible and shortens the cooking duration required. Soaked pulsesmust be covered with liquid during cooking. Lentils do not need to be soaked before cooking. With unsoaked pu...
Page 87 - Unsoaked
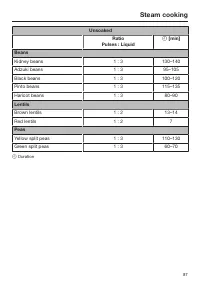
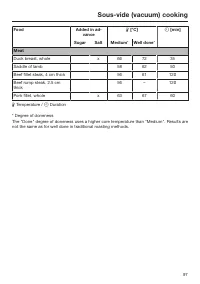
Steam cooking 87 Unsoaked Ratio Pulses : Liquid [min] Beans Kidney beans 1 : 3 130–140 Adzuki beans 1 : 3 95–105 Black beans 1 : 3 100–120 Pinto beans 1 : 3 115–135 Haricot beans 1 : 3 80–90 Lentils Brown lentils 1 : 2 13–14 Red lentils 1 : 2 7 Peas Yellow split peas 1 : 3 110–130 Green split peas...
Page 88 - Use a perforated container to boil eggs in the steam oven.; Small
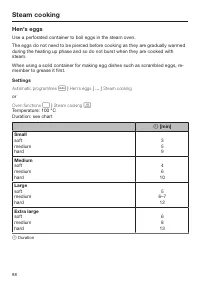
Steam cooking 88 Hen's eggs Use a perforated container to boil eggs in the steam oven. The eggs do not need to be pierced before cooking as they are gradually warmedduring the heating up phase and so do not burst when they are cooked withsteam. When using a solid container for making egg dishes such...
Page 89 - Fruit
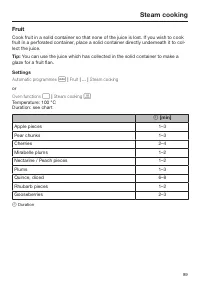
Steam cooking 89 Fruit Cook fruit in a solid container so that none of the juice is lost. If you wish to cookfruit in a perforated container, place a solid container directly underneath it to col-lect the juice. Tip: You can use the juice which has collected in the solid container to make a glaze fo...
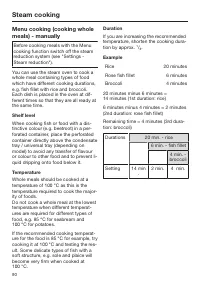
Page 91 - Procedure
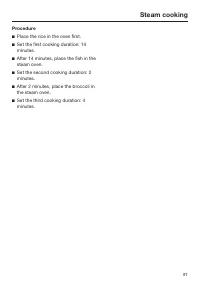
Steam cooking 91 Procedure Place the rice in the oven first. Set the first cooking duration: 14minutes. After 14 minutes, place the fish in thesteam oven. Set the second cooking duration: 2minutes. After 2 minutes, place the broccoli inthe steam oven. Set the third cooking duration: 4min...
Page 93 - Important
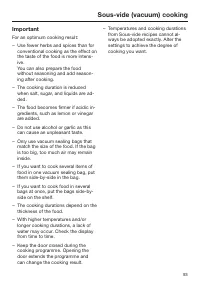
Sous-vide (vacuum) cooking 93 Important For an optimum cooking result: – Use fewer herbs and spices than for conventional cooking as the effect onthe taste of the food is more intens-ive. You can also prepare the foodwithout seasoning and add season-ing after cooking. – The cooking duration is reduc...
Page 94 - Tips
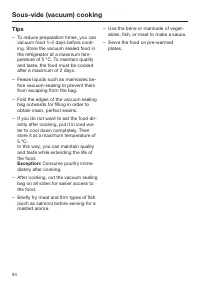
Sous-vide (vacuum) cooking 94 Tips – To reduce preparation times, you can vacuum food 1–2 days before cook-ing. Store the vacuum sealed food inthe refrigerator at a maximum tem-perature of 5 °C. To maintain qualityand taste, the food must be cookedafter a maximum of 2 days. – Freeze liquids such as ...
Page 98 - Reheating
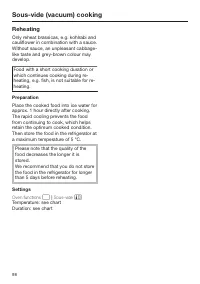
Sous-vide (vacuum) cooking 98 Reheating Only reheat brassicas, e.g. kohlrabi andcauliflower in combination with a sauce.Without sauce, an unpleasant cabbage-like taste and grey-brown colour maydevelop. Food with a short cooking duration orwhich continues cooking during re-heating, e.g. fish, is not ...
Page 99 - Chart for reheating Sous-vide cooked food
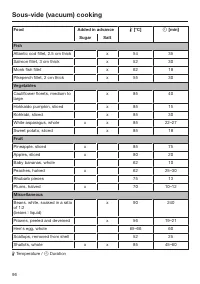
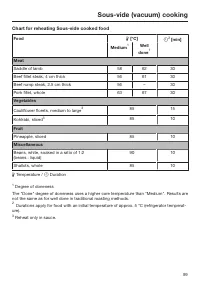
Sous-vide (vacuum) cooking 99 Chart for reheating Sous-vide cooked food Food [°C] 2 [min] Medium 1 Well done 1 Meat Saddle of lamb 58 62 30 Beef fillet steak, 4 cm thick 56 61 30 Beef rump steak, 2.5 cm thick 56 – 30 Pork fillet, whole 63 67 30 Vegetables Cauliflower florets, medium to large 3 8...
Page 100 - Reheat
Special applications 100 Reheat To reheat food which was cooked us-ing the Sous-vide method, use theSous-vide function (see "Sous-vide(vacuum) cooking – Reheating"). The steam oven is very effective at re-heating food gently, without drying itout or cooking it further. The food willreheat ev...
Page 101 - cm thick
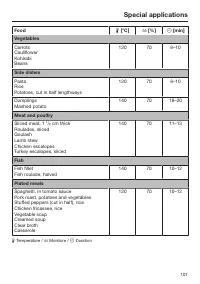
Special applications 101 Food [°C] [%] [min] Vegetables CarrotsCauliflowerKohlrabiBeans 120 70 8–10 Side dishes PastaRicePotatoes, cut in half lengthways 120 70 8–10 DumplingsMashed potato 140 70 18–20 Meat and poultry Sliced meat, 1 ¹ / ₂ cm thick Roulades, slicedGoulashLamb stewChicken esca...
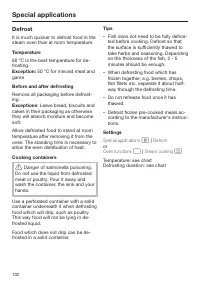
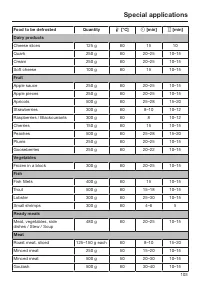
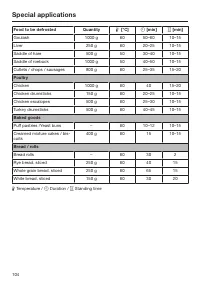
Page 102 - Defrost
Special applications 102 Defrost It is much quicker to defrost food in thesteam oven than at room temperature. Temperature 60 °C is the best temperature for de-frosting. Exception: 50 °C for minced meat and game Before and after defrosting Remove all packaging before defrost-ing. Exceptions : Leave ...
Page 105 - Bottling; Glass jars
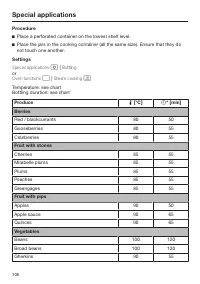
Special applications 105 Bottling Only use unblemished, fresh producewhich is in good condition for bottling. Glass jars Use clean glass jars and accessoriesand check them for any defects. Glassjars with twist off lids or glass lids with arubber seal are suitable. Make sure that all the jars are the...
Page 107 - Produce
Special applications 107 Produce [°C] * [min] Beetroot 100 60 Temperature / Duration * The durations quoted are for 1.0 litre jars. If using 0.5 litre jars, reduce the duration byabout 15 minutes. If using 0.25 litre jars, reduce the duration by about 20 minutes.
Page 108 - Bottling cakes
Special applications 108 Bottling cakes Creamed, sponge and yeast dough mixtures are all suitable for bottling. Cakes willkeep for approx. 6 months.Cakes made with fresh fruit are not suitable for long term storage , and must be consumed within 2 days of being made. Glass jars Only use clean jars an...
Page 109 - Extracting juice with steam
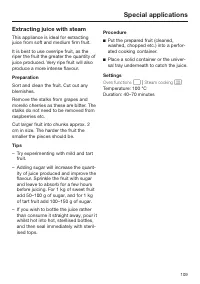
Special applications 109 Extracting juice with steam This appliance is ideal for extractingjuice from soft and medium firm fruit. It is best to use overripe fruit, as theriper the fruit the greater the quantity ofjuice produced. Very ripe fruit will alsoproduce a more intense flavour. Preparation So...
Page 111 - Drying food
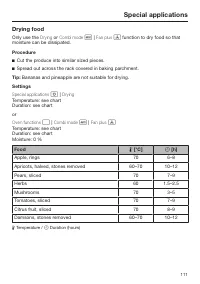
Special applications 111 Drying food Only use the Drying or Combi mode | Fan plus function to dry food so that moisture can be dissipated. Procedure Cut the produce into similar sized pieces. Spread out across the rack covered in baking parchment. Tip: Bananas and pineapple are not sui...
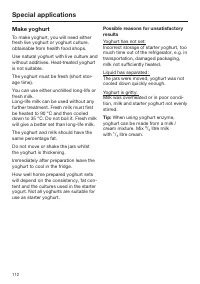
Page 112 - Make yoghurt; When using yoghurt enzyme,
Special applications 112 Make yoghurt To make yoghurt, you will need eitherfresh live yoghurt or yoghurt culture,obtainable from health food shops. Use natural yoghurt with live culture andwithout additives. Heat-treated yoghurtis not suitable. The yoghurt must be fresh (short stor-age time). You ca...
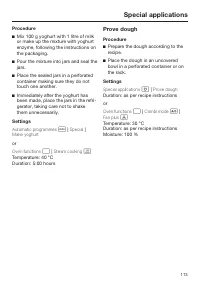
Page 113 - Prove dough
Special applications 113 Procedure Mix 100 g yoghurt with 1 litre of milkor make up the mixture with yoghurtenzyme, following the instructions onthe packaging. Pour the mixture into jars and seal thejars. Place the sealed jars in a perforatedcontainer making sure they do nottouch one another. ...
Page 114 - Dissolve gelatine; Melt chocolate
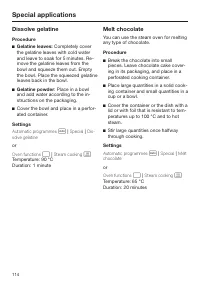
Special applications 114 Dissolve gelatine Procedure Gelatine leaves: Completely cover the gelatine leaves with cold waterand leave to soak for 5 minutes. Re-move the gelatine leaves from thebowl and squeeze them out. Emptythe bowl. Place the squeezed gelatineleaves back in the bowl. Gelatine po...
Page 115 - Skinning vegetables and fruit; Food
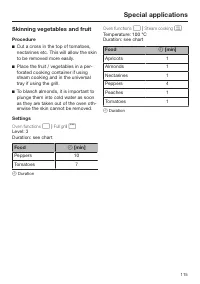
Special applications 115 Skinning vegetables and fruit Procedure Cut a cross in the top of tomatoes,nectarines etc. This will allow the skinto be removed more easily. Place the fruit / vegetables in a per-forated cooking container if usingsteam cooking and in the universaltray if using the grill...
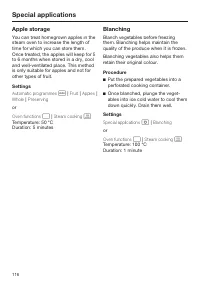
Page 116 - Apple storage; Blanching
Special applications 116 Apple storage You can treat homegrown apples in thesteam oven to increase the length oftime for which you can store them.Once treated, the apples will keep for 5to 6 months when stored in a dry, cooland well-ventilated place. This methodis only suitable for apples and not fo...
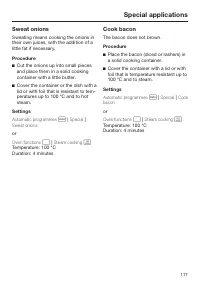
Page 117 - Sweat onions; Cook bacon; The bacon does not brown.
Special applications 117 Sweat onions Sweating means cooking the onions intheir own juices, with the addition of alittle fat if necessary. Procedure Cut the onions up into small piecesand place them in a solid cookingcontainer with a little butter. Cover the container or the dish with alid or wi...
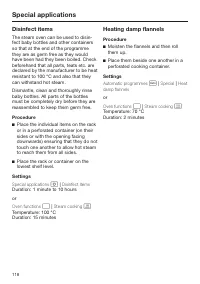
Page 118 - Disinfect items; Heating damp flannels
Special applications 118 Disinfect items The steam oven can be used to disin-fect baby bottles and other containersso that at the end of the programmethey are as germ free as they wouldhave been had they been boiled. Checkbeforehand that all parts, teats etc. aredeclared by the manufacturer to be he...
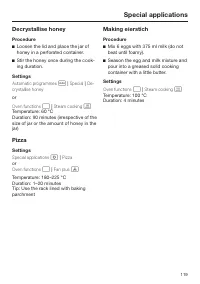
Page 119 - Decrystallise honey; Pizza; Making eierstich
Special applications 119 Decrystallise honey Procedure Loosen the lid and place the jar ofhoney in a perforated container. Stir the honey once during the cook-ing duration. Settings Automatic programmes | Special | De- crystallise honey or Oven functions | Steam cooking Temperature: 60 °CD...
Page 120 - Making preserves
Special applications 120 Making preserves Only use unblemished, fresh producewhich is in good condition. Glass jars Only use sterilised jars with twist-off lidsup to a maximum capacity of 250 ml. After pouring in the fruit, clean the rimof the jar with a clean cloth and hot wa-ter. Preparation Sort ...
Page 121 - How the food probe works; or User programmes where
Food probe 121 How the food probe works The metal tip of the food probe is inser-ted into the food. There is a temperat-ure sensor in the metal tip which meas-ures the core temperature of the foodduring cooking. The core temperature set will dependon how well cooked you want yourmeat to be and on th...
Page 122 - When to use it; – Do not place any metal items above
Food probe 122 When to use it The food probe can be used in the fol-lowing operating modes: – Combi mode | Fan plus – Combi mode | Conventional heat – Fan plus – Fan grill – Conventional heat – Intensive bake – Cake plus – Steam cooking – Special appli...
Page 123 - Prepare the meat in the usual way.
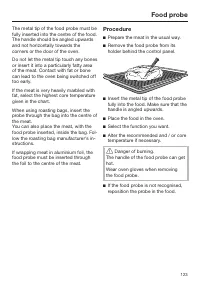
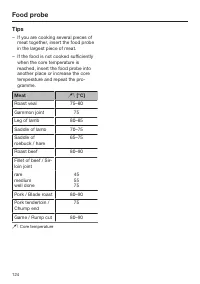
Food probe 123 The metal tip of the food probe must befully inserted into the centre of the food.The handle should be angled upwardsand not horizontally towards thecorners or the door of the oven. Do not let the metal tip touch any bonesor insert it into a particularly fatty areaof the meat. Contact...
Page 125 - Roasting; Roasting tips; Combination mode; Lean meat
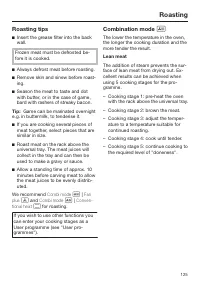
Roasting 125 Roasting tips Insert the grease filter into the backwall. Frozen meat must be defrosted be-fore it is cooked. Always defrost meat before roasting. Remove skin and sinew before roast-ing. Season the meat to taste and dotwith butter, or in the case of game,bard with rashers of str...
Page 126 - Fatty meat
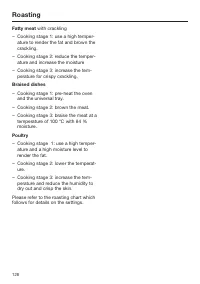
Roasting 126 Fatty meat with crackling – Cooking stage 1: use a high temper- ature to render the fat and brown thecrackling. – Cooking stage 2: reduce the temper- ature and increase the moisture – Cooking stage 3: increase the tem- perature for crispy crackling. Braised dishes – Cooking stage 1: pre...
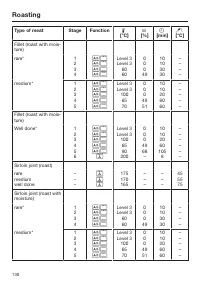
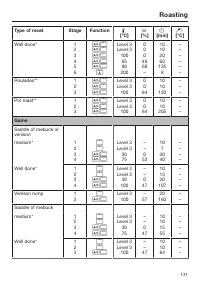
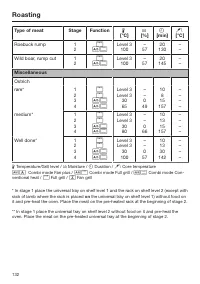
Page 127 - Roasting chart; Type of meat
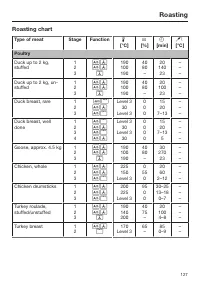
Roasting 127 Roasting chart Type of meat Stage Function [°C] [%] [min] [°C] Poultry Duck up to 2 kg,stuffed 123 190100190 4080 – 20 140 23 ––– Duck up to 2 kg, un-stuffed 123 190100190 4080 – 20 100 23 ––– Duck breast, rare 123 Level 3 30 Level 3 000 1520 7–13 ––– Duck b...
Page 133 - Baking
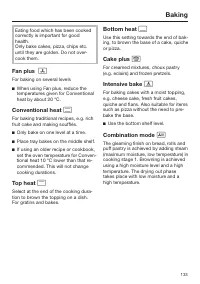
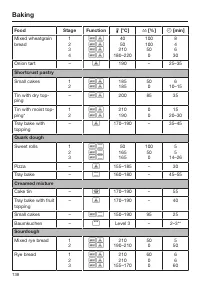
Baking 133 Eating food which has been cookedcorrectly is important for goodhealth.Only bake cakes, pizza, chips etc.until they are golden. Do not over-cook them. Fan plus For baking on several levels When using Fan plus, reduce thetemperatures given for Conventionalheat by about 20 °C. Convent...
Page 134 - Baking tips; Grease filter
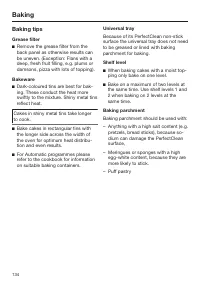
Baking 134 Baking tips Grease filter Remove the grease filter from theback panel as otherwise results canbe uneven. (Exception: Flans with adeep, fresh fruit filling, e.g. plums ordamsons, pizza with lots of topping). Bakeware Dark-coloured tins are best for bak-ing. These conduct the heat mores...
Page 135 - Frozen food; Notes on the baking chart
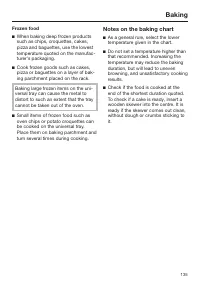
Baking 135 Frozen food When baking deep frozen productssuch as chips, croquettes, cakes,pizza and baguettes, use the lowesttemperature quoted on the manufac-turer's packaging. Cook frozen goods such as cakes,pizza or baguettes on a layer of bak-ing parchment placed on the rack. Baking large froz...
Page 136 - Baking chart
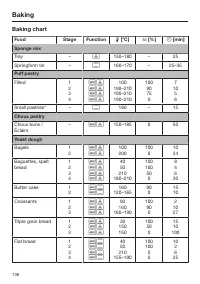
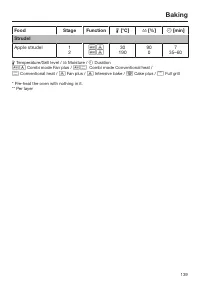
Baking 136 Baking chart Food Stage Function [°C] [%] [min] Sponge mix Tray – 150–180 – 25 Springform tin – 160–170 – 25–35 Puff pastry Filled 1234 100 190–210190–210190–210 100 9075 0 7 10 56 Small pastries* – 180 – 15 Choux pastry Choux buns /Éclairs – 150–185 0 50 Yea...
Page 140 - Grilling; The food probe cannot be used with; and; Full grill; Turn the food after
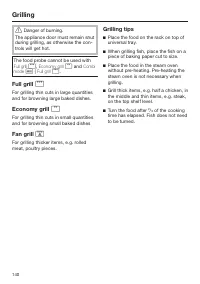
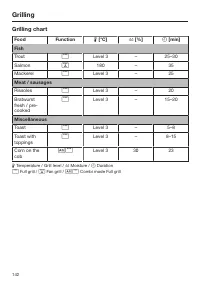
Grilling 140 Danger of burning. The appliance door must remain shutduring grilling, as otherwise the con-trols will get hot. The food probe cannot be used with Full grill , Economy grill and Combi mode | Full grill . Full grill For grilling thin cuts in large quantitiesand f...
Page 142 - Grilling chart
Grilling 142 Grilling chart Food Function [°C] [%] [min] Fish Trout Level 3 – 25–30 Salmon 180 – 35 Mackerel Level 3 – 25 Meat / sausages Rissoles Level 3 – 20 Bratwurstfresh / pre-cooked Level 3 – 15–20 Miscellaneous Toast Level 3 – 5–8 Toast withtoppings Level 3 – 8–15 Co...
Page 143 - Select; Changing and saving settings; Confirm with
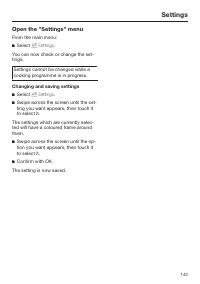
Settings 143 Open the "Settings" menu From the main menu: Select Settings . You can now check or change the set-tings. Settings cannot be changed while acooking programme is in progress. Changing and saving settings Select Settings . Swipe across the screen until the set-ting you w...
Page 144 - Settings overview; Option
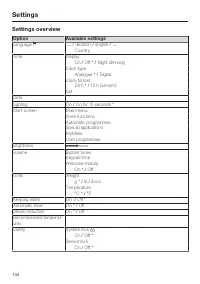
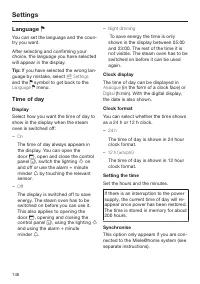
Settings 144 Settings overview Option Available settings Language ... / deutsch / english / ... Country Time Display On / Off * / Night dimming Clock type Analogue * / Digital Clock format 24 h * / 12 h (am/pm) Set DateLighting On / On for 15 seconds * Start screen Main menuOven functionsAutomatic...
Page 146 - Language; Display
Settings 146 Language You can set the language and the coun-try you want. After selecting and confirming yourchoice, the language you have selectedwill appear in the display. Tip: If you have selected the wrong lan- guage by mistake, select Settings and the symbol to get back to the Language ...
Page 147 - Date; Buzzer tones
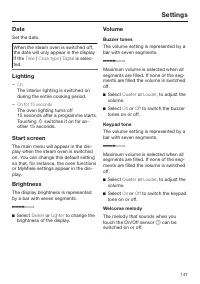
Settings 147 Date Set the date. When the steam oven is switched off,the date will only appear in the displayif the Time | Clock type | Digital is selec- ted. Lighting – On The interior lighting is switched onduring the entire cooking period. – On for 15 seconds The oven lighting turns off15 seco...
Page 148 - Units; Weight; Temperature; if a temperature above ap-; will
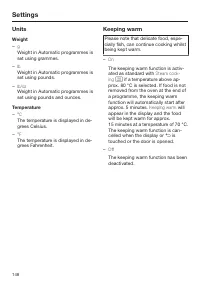
Settings 148 Units Weight – g Weight in Automatic programmes isset using grammes. – lb Weight in Automatic programmes isset using pounds. – lb/oz Weight in Automatic programmes isset using pounds and ounces. Temperature – °C The temperature is displayed in de-grees Celsius. – °F The temperature is d...
Page 149 - Automatic rinsing
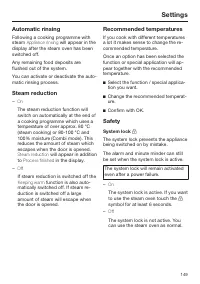
Settings 149 Automatic rinsing Following a cooking programme withsteam Appliance rinsing will appear in the display after the steam oven has beenswitched off. Any remaining food deposits areflushed out of the system. You can activate or deactivate the auto-matic rinsing process. Steam reduction – On...
Page 150 - Sensor lock; Water hardness
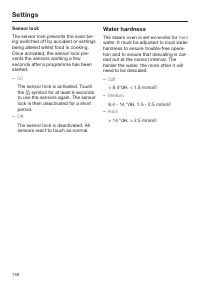
Settings 150 Sensor lock The sensor lock prevents the oven be-ing switched off by accident or settingsbeing altered whilst food is cooking.Once activated, the sensor lock pre-vents the sensors working a fewseconds after a programme has beenstarted. – On The sensor lock is activated. Touchthe symb...
Page 151 - Showroom programme; Demo mode; Factory default; All user programmes will be deleted.
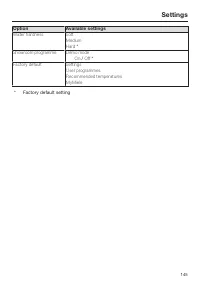
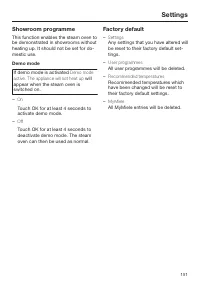
Settings 151 Showroom programme This function enables the steam oven tobe demonstrated in showrooms withoutheating up. It should not be set for do-mestic use. Demo mode If demo mode is activated Demo mode active. The appliance will not heat up will appear when the steam oven isswitched on. – On Touc...
Page 152 - Note for test institutes; Test food
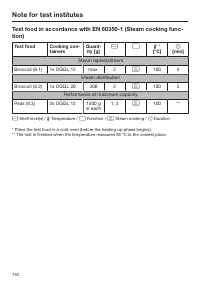
Note for test institutes 152 Test food in accordance with EN 60350-1 (Steam cooking func-tion) Test food Cooking con-tainers Quant- ity [g] * [°C] [min] Steam replenishment Broccoli (8.1) 1x DGGL 12 max. 2 100 3 Steam distribution Broccoli (8.2) 1x DGGL 20 300 2 100 3 Performance at maxi...
Page 153 - Energy efficiency class
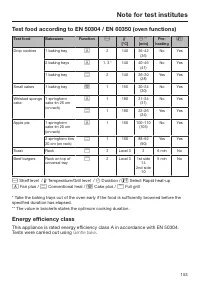
Note for test institutes 153 Test food according to EN 50304 / EN 60350 (oven functions) Test food Bakeware Function [°C] ** [min] Pre- heating Drop cookies 1 baking tray 2 140 36–42 (36) No Yes 2 baking trays 1, 3 * 140 40–46 (41) No Yes 1 baking tray 2 140 26–30 (28) Yes Yes Small ca...
Page 155 - Unsuitable cleaning agents
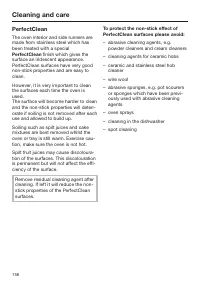
Cleaning and care 155 Unsuitable cleaning agents To avoid damaging the surfaces, do notuse: – cleaning agents containing soda, am- monia, acids or chlorides – cleaning agents containing descaling agents – abrasive cleaning agents, e.g. powder cleaners and cream cleaners – solvent-based cleaning agen...
Page 156 - PerfectClean
Cleaning and care 156 PerfectClean The oven interior and side runners aremade from stainless steel which hasbeen treated with a special PerfectClean finish which gives the surface an iridescent appearance.PerfectClean surfaces have very goodnon-stick properties and are easy toclean. However, it is v...
Page 157 - Oven interior; After a programme using steam
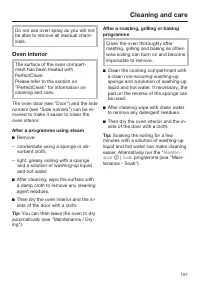
Cleaning and care 157 Do not use oven spray as you will notbe able to remove all residual chem-icals. Oven interior The surface of the oven compart-ment has been treated withPerfectClean.Please refer to the section on"PerfectClean" for information oncleaning and care. The oven door (see "...
Page 158 - Floor filter
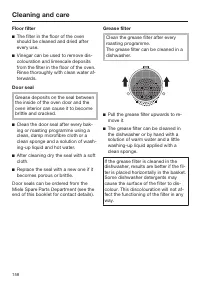
Cleaning and care 158 Floor filter The filter in the floor of the ovenshould be cleaned and dried afterevery use. Vinegar can be used to remove dis-colouration and limescale depositsfrom the filter in the floor of the oven.Rinse thoroughly with clean water af-terwards. Door seal Grease deposits ...
Page 159 - Accessories; Cooking containers and food probe
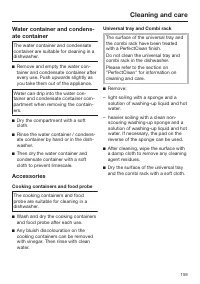
Cleaning and care 159 Water container and condens-ate container The water container and condensatecontainer are suitable for cleaning in adishwasher. Remove and empty the water con-tainer and condensate container afterevery use. Push upwards slightly asyou take them out of the appliance. Water can...
Page 160 - Side runners; , then from the back
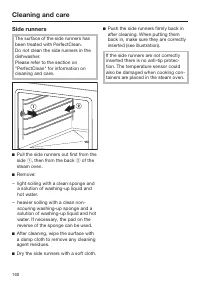
Cleaning and care 160 Side runners The surface of the side runners hasbeen treated with PerfectClean.Do not clean the side runners in thedishwasher.Please refer to the section on"PerfectClean" for information oncleaning and care. Pull the side runners out first from theside , then from t...
Page 161 - Maintenance; Soak
Cleaning and care 161 Maintenance The Ready at and Start at functions are not available in Maintenance . Soak Stubborn soiling from roasting can besoaked using this programme. Allow the oven interior to cool down. Remove all accessories from theoven. Fill the water container. Select Main...
Page 162 - After descaling
Cleaning and care 162 Switch the steam oven off and select Maintenance | Descale . The message Please wait... will appear in the display. The descaling process isbeing primed and may take a fewminutes. As soon as the appliance isready you will be prompted to fill thewater container. Fill...
Page 163 - Door; To remove the oven door
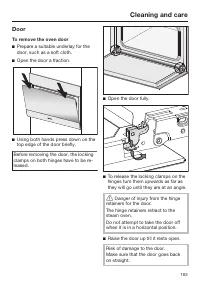
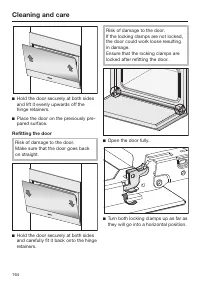
Cleaning and care 163 Door To remove the oven door Prepare a suitable underlay for thedoor, such as a soft cloth. Open the door a fraction. Using both hands press down on thetop edge of the door briefly. Before removing the door, the lockingclamps on both hinges have to be re-leased. Open th...
Page 164 - Refitting the door
Cleaning and care 164 Hold the door securely at both sidesand lift it evenly upwards off thehinge retainers. Place the door on the previously pre-pared surface. Refitting the door Risk of damage to the door.Make sure that the door goes backon straight. Hold the door securely at both sidesand c...
Page 170 - To open the panel manually; Carefully open the appliance door.; To close the panel manually; Carefully push the panel downwards.
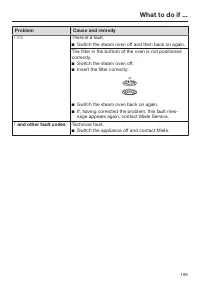
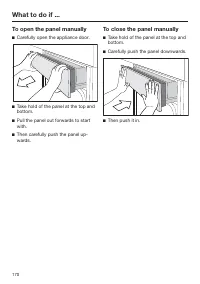
What to do if ... 170 To open the panel manually Carefully open the appliance door. Take hold of the panel at the top andbottom. Pull the panel out forwards to startwith. Then carefully push the panel up-wards. To close the panel manually Take hold of the panel at the top andbottom. Care...
Page 171 - To open the door manually; Insert the opener supplied
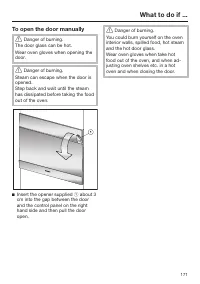
What to do if ... 171 To open the door manually Danger of burning. The door glass can be hot.Wear oven gloves when opening thedoor. Danger of burning. Steam can escape when the door isopened.Step back and wait until the steamhas dissipated before taking the foodout of the oven. Insert the open...
Page 172 - Optional accessories
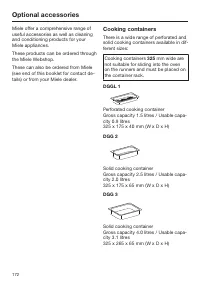
Optional accessories 172 Miele offer a comprehensive range ofuseful accessories as well as cleaningand conditioning products for yourMiele appliances. These products can be ordered throughthe Miele Webshop. These can also be ordered from Miele(see end of this booklet for contact de-tails) or from yo...
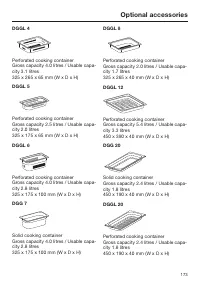
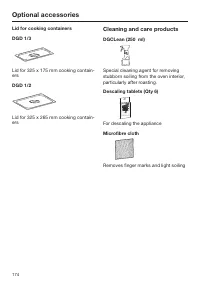
Page 174 - Lid for cooking containers; Cleaning and care products; For descaling the appliance
Optional accessories 174 Lid for cooking containers DGD 1/3 Lid for 325 x 175 mm cooking contain-ers DGD 1/2 Lid for 325 x 265 mm cooking contain-ers Cleaning and care products DGCLean (250 ml) Special cleaning agent for removingstubborn soiling from the oven interior,particularly after roasting. D...
Page 175 - Miscellaneous
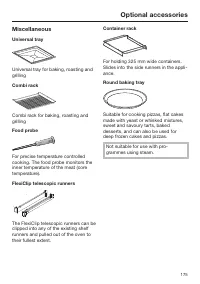
Optional accessories 175 Miscellaneous Universal tray Universal tray for baking, roasting andgrilling Combi rack Combi rack for baking, roasting andgrilling Food probe For precise temperature controlledcooking. The food probe monitors theinner temperature of the meat (coretemperature). FlexiClip tel...
Page 176 - Gourmet oven dish
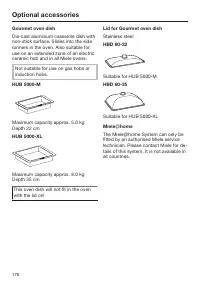
Optional accessories 176 Gourmet oven dish Die-cast aluminium casserole dish withnon-stick surface. Slides into the siderunners in the oven. Also suitable foruse on an extended zone of an electricceramic hob and in all Miele ovens. Not suitable for use on gas hobs orinduction hobs. HUB 5000-M Maximu...
Page 178 - Further information
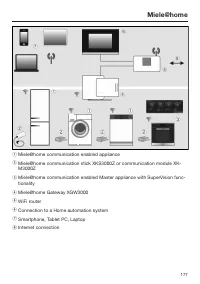
Miele@home 178 Please note that the Miele@home andSuperVision system is currently onlyavailable in selected countries. This appliance / is network enabled and can be connected to theMiele@home system via a communica-tion module or communication stick and a conversion kit where required. The Mi...
Page 179 - Safety instructions for installation; All dimensions are given in mm.
Safety instructions for installation 179 Incorrect installation can result in personal injury and damage to property. Before connecting the appliance to the mains supply, ensure that the connection data on the data plate (voltage and frequency) matchthe mains electricity supply.This data must co...
Page 180 - Detailed dimensions of oven front; Front ArtLine
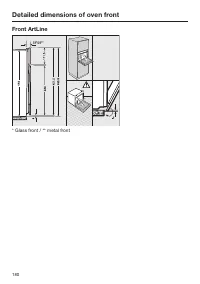
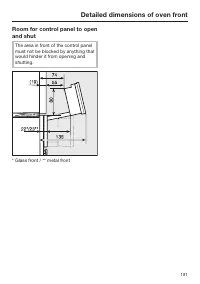
Detailed dimensions of oven front 180 Front ArtLine * Glass front / ** metal front
Page 182 - Building-in dimensions; Installation in a tall unit; Steam oven
Building-in dimensions 182 Installation in a tall unit The furniture housing unit must not have a back panel fitted behind the build-ing-in niche. a Steam oven b Niche c Inlet for mains connection cable to the appliance d Recommended position for electrical socket. Important: Do not position behindt...
Page 183 - Ventilation cut-outs for the steam oven
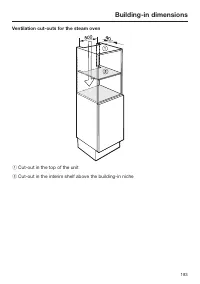
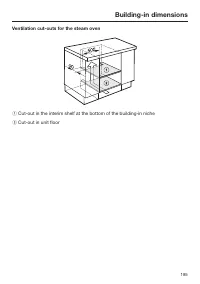
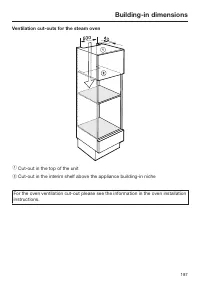
Building-in dimensions 183 Ventilation cut-outs for the steam oven a Cut-out in the top of the unit b Cut-out in the interim shelf above the building-in niche
Page 184 - Installation in a base unit
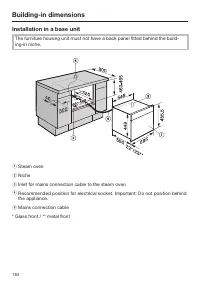
Building-in dimensions 184 Installation in a base unit The furniture housing unit must not have a back panel fitted behind the build-ing-in niche. a Steam oven b Niche c Inlet for mains connection cable to the steam oven d Recommended position for electrical socket. Important: Do not position behind...
Page 186 - Installation in a tall unit in combination with an oven
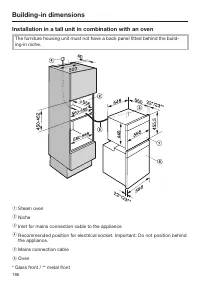
Building-in dimensions 186 Installation in a tall unit in combination with an oven The furniture housing unit must not have a back panel fitted behind the build-ing-in niche. a Steam oven b Niche c Inlet for mains connection cable to the appliance d Recommended position for electrical socket. Import...
Page 188 - Installation; Installing the steam oven
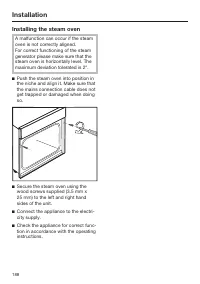
Installation 188 Installing the steam oven A malfunction can occur if the steamoven is not correctly aligned.For correct functioning of the steamgenerator please make sure that thesteam oven is horizontally level. Themaximum deviation tolerated is 2°. Push the steam oven into position inthe niche ...
Page 189 - Electrical connection; Total power rating; See data plate; Connection
Electrical connection 189 All electrical work should be carried outby a suitably qualified and competentperson in strict accordance with currentlocal and national safety regulations(e.g. BS 7671 in the UK). Connectionshould be made via a switched socket.This will make it easier for service tech-nici...
Page 190 - Disconnecting from the mains; Danger of electrical shock.; Connecting the mains cable; Danger of electric shock.; Wiring diagram
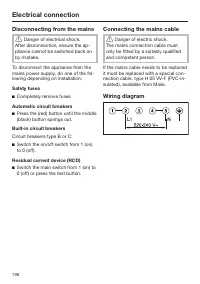
Electrical connection 190 Disconnecting from the mains Danger of electrical shock. After disconnection, ensure the ap-pliance cannot be switched back onby mistake. To disconnect the appliance from themains power supply, do one of the fol-lowing depending on installation: Safety fuses Completely ...
Page 191 - After sales service, data plate, guarantee; After sales service; – your Miele Dealer, or; Data plate; The appliance is guaranteed for 2 years from the date of purchase.; Guarantee: Other countries
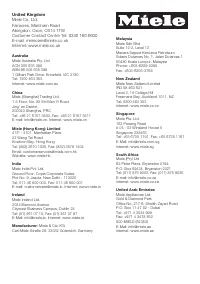
After sales service, data plate, guarantee 191 After sales service In the event of any faults which you cannot easily remedy, please contact – your Miele Dealer, or – Miele Service. See end of this booklet for contact details. Please note that telephone calls may be monitored and recorded for traini...
Page 192 - Copyright and licences; Miele uses software to operate and control the appliance.
Copyright and licences 192 Miele uses software to operate and control the appliance. The copyright authorisation from Miele and other relevant software suppliers (e.g.Adobe) must be respected. Miele and their suppliers reserve the rights to the software components. In particular the following are pr...