Maytag UXT5530AAS - User Manual
Maytag UXT5530AAS Range Hood – User Manual, read for free online in PDF format. We hope this helps you resolve any issues you may have. If you have further questions, please contact us through the contact form.


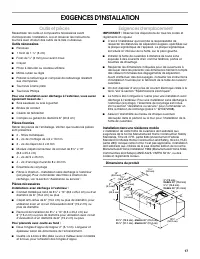

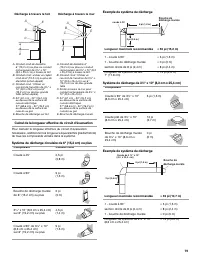
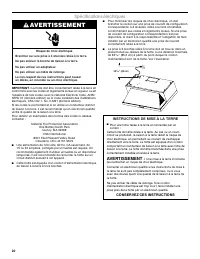
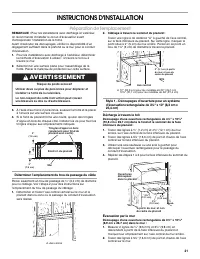
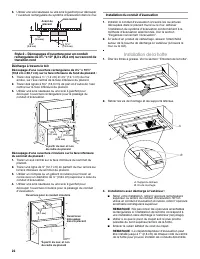
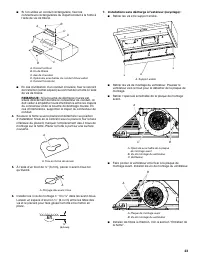
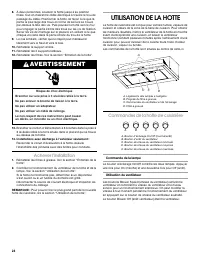
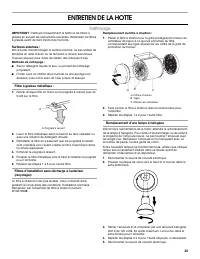
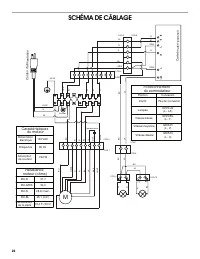
Table of Contents:
- Page 2 – Your safety and the safety of others are very important.; DANGER
- Page 3 – INSTALLATION REQUIREMENTS; Tools and Parts; Tools needed; IMPORTANT SAFETY INSTRUCTIONS; READ AND SAVE THESE INSTRUCTIONS
- Page 4 – Parts needed; Location Requirements; For Mobile Home Installations
- Page 5 – Venting Requirements; Cold Weather Installations
- Page 6 – Electrical Requirements; WARNING
- Page 7 – INSTALLATION INSTRUCTIONS; Prepare Location; Determine Wiring Hole Location; GROUNDING INSTRUCTIONS
- Page 8 – Wall Venting; Install Vent System
- Page 9 – Install Range Hood
- Page 10 – Complete Installation; RANGE HOOD USE
- Page 11 – Range Hood Controls; Operating the light; RANGE HOOD CARE; Cleaning; Replacing a Halogen Lamp
- Page 12 – WIRING DIAGRAM; Switch operation
- Page 13 – ASSISTANCE OR SERVICE; If you need replacement parts; In Canada; For further assistance; Accessories; Replacement Charcoal Filter Kit (2 Pack of Filters)
- Page 14 – WHIRLPOOL CORPORATION MAJOR APPLIANCE WARRANTY
- Page 15 – SÉCURITÉ DE LA HOTTE DE CUISINIÈRE; Votre sécurité et celle des autres est très importante.; AVERTISSEMENT
- Page 16 – IMPORTANTES INSTRUCTIONS DE SÉCURITÉ; LIRE ET CONSERVER CES INSTRUCTIONS
- Page 17 – EXIGENCES D'INSTALLATION; Outils et pièces; Outils nécessaires; Exigences d'emplacement; Installation dans une résidence mobile
- Page 18 – Dégagements de séparation à respecter; Exigences concernant l'évacuation; (Uniquement pour modèles avec évacuation); Installations pour régions à climat froid
- Page 20 – Spécifications électriques; INSTRUCTIONS DE MISE À LA TERRE
- Page 21 – INSTRUCTIONS D'INSTALLATION; Préparation de l'emplacement; Déterminer l’emplacement du trou de passage du câble; Décharge à travers le toit; Évacuation par le mur
- Page 22 – Installation du conduit d’évacuation; Installation de la hotte
- Page 24 – Achever l’installation; UTILISATION DE LA HOTTE; Commandes de la hotte de cuisinière; Commande de la lampe
- Page 25 – ENTRETIEN DE LA HOTTE; Nettoyage; Filtre à graisse métallique :; Remplacement d’une lampe à halogène
- Page 26 – SCHÉMA DE CÂBLAGE; Fonctionnement
- Page 27 – ASSISTANCE OU SERVICE; Si vous avez besoin de pièces de rechange; Au Canada; Pour plus d’assistance; Accessoires; Filtre à charbon de rechange (Ensemble de 2 filtres); GARANTIE DES GROS APPAREILS MÉNAGERS
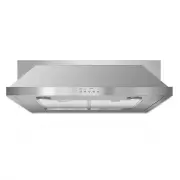
30" (76.2 CM) AND 36" (91.4 CM) RANGE HOOD
Installation Instructions and Use & Care Guide
HOTTE D’ASPIRATION DE
30" (76,2 CM) ET 36" (91,4 CM)
Instructions d’installation et Guide d’utilisation et d’entretien
Table of Contents/Table des matières............................................................................. 2
IMPORTANT: READ AND SAVE THESE INSTRUCTIONS.
FOR RESIDENTIAL USE ONLY.
IMPORTANT : LIRE ET CONSERVER CES INSTRUCTIONS.
POUR UTILISATION RÉSIDENTIELLE UNIQUEMENT.
LI3VQB/W10274302C
"Loading the manual" means you need to wait until the file loads and becomes available for online reading. Some manuals are very large, and the time they take to appear depends on your internet speed.
Other Manuals for Maytag UXT5530AAS
Summary
2 TABLE OF CONTENTS RANGE HOOD SAFETY ................................................................. 2 INSTALLATION REQUIREMENTS ................................................ 3 Tools and Parts ............................................................................ 3Location Requirements ....
3 INSTALLATION REQUIREMENTS Tools and Parts Gather the required tools and parts before starting installation. Read and follow the instructions provided with any tools listed here. Tools needed ■ Drill ■ 1 ¹⁄₄ " (3.0 cm) drill bit ■ ¹⁄₈ " (3.0 mm) drill bit for pilot holes ■ Pencil ■ Wire str...
4 ■ 4 - 5 x 45 mm screws ■ 4 - 8 x 40 mm wall anchors ■ Recirculating kit ■ Charcoal filters for non-vented (recirculating) installations. See the “Assistance or Service” section to order replacement filters. Parts needed For vented installations: ■ 3 ¹⁄₄ " x 10" (8.3 x 25.4 cm) or 6" (1...