Page 2 - Installation Instructions; CONTENTS; General information
Installation Instructions 2 CONTENTS General information Important Safety Instructions .....................3 Electrical Requirements ..............................3 Hood Exhaust ...........................................4, 5 Damage – Shipment/Installation .................6 Parts Included............
Page 3 - IMPORTANT SAFETY INSTRUCTIONS; ELECTRICAL REQUIREMENTS
Installation Instructions 3 IMPORTANT SAFETY INSTRUCTIONS This product requires a three-prong grounded outlet. The installer must perform a ground continuity check on the power outlet box before beginning the installation to insure that the outlet box is properly grounded. If not properly grounded, ...
Page 4 - HOOD EXHAUST
Installation Instructions 4 HOOD EXHAUST NOTE: Read these next two pages only if you plan to vent your exhaust to the outside. If you plan to recirculate the air back into the room, proceed to page 11. OUTSIDE TOP EXHAUST (EXAMPLE ONLY) The following chart describes an example of one possible ductwo...
Page 6 - PARTS INCLUDED; HARDWARE PACKET; ADDITIONAL PARTS
Installation Instructions 6 DAMAGE – SHIPMENT/INSTALLATION • If the unit is damaged in shipment, return the unit to the store in which it was bought for repair or replacement. • If the unit is damaged by the customer, repair or replacement is the responsibility of the customer. • If the unit is dama...
Page 7 - TOOLS YOU WILL NEED
Installation Instructions 7 TOOLS YOU WILL NEED # 1 and #2 Phillips screwdriver Level Safety goggles Stud finder or Hammer (optional) Saw (saber, hole or keyhole) Gloves Scissors (to cut template, if necessary) Pencil Filler blocks or scrap wood pieces, if needed for top cabinet spacing (used on rec...
Page 8 - FINDING THE WALL STUDS; PLACEMENT OF THE MOUNTING PLATE
Installation Instructions 8 A. REMOVING THE MICROWAVE OVEN FROM THE CARTON/REMOVING THE MOUNTING PLATE 1. Remove the installation instructions, Exhaust adaptor, filters, glass tray and the small hardware bag. Do not remove the Styrofoam protecting the front of the oven. 2. Fold back all 4 carton fla...
Page 9 - DETERMINING WALL PLATE LOCATION UNDER YOUR CABINET
Installation Instructions 9 C. DETERMINING WALL PLATE LOCATION UNDER YOUR CABINET Your cabinets may have decorative trim that interferes with the microwave installation. Remove the decorative trim to install the microwave properly and to make it level. THE MICROWAVE MUST BE LEVEL. Use a level to mak...
Page 10 - ALIGNING THE WALL PLATE
Installation Instructions 10 D. ALIGNING THE WALL PLATE 1. Draw a Vertical line on the wall at the center of the 30" wide space. 2. Draw a Horizontal line on the wall at the bottom of “Rear Wall Template”. 3. Drill 5/8" holes for toggle bolts on 3 locations (Hole A, Hole B, Hole C) but if th...
Page 11 - INSTALLATION TYPES; RECIRCULATING
Installation Instructions 11 2. INSTALLATION TYPES (Choose A, B or C) This microwave oven is designed for adaptation to the following three types of ventilation: A. Recirculating (Non-Vented Ductless) B. Outside Top Exhaust (Vertical Duct) C. Outside Back Exhaust (Horizontal Duct) NOTE: This microwa...
Page 12 - INSTALLATION OVERVIEW
Installation Instructions 12 A. RECIRCULATING (Non-Vented Ductless) A1. ATTACH THE MOUNTING PLATE TO THE WALL Attach the plate to the wall using toggle bolts. At least one wood screw must be used to attach the plate to a wall stud. 1. Remove the toggle wings from the bolts. 2. Insert the bolts into ...
Page 13 - MOUNT THE MICROWAVE OVEN
Installation Instructions 13 A3. MOUNT THE MICROWAVE OVEN FOR EASIER INSTALLATION AND PERSONAL SAFETY, WE RECOMMEND THAT TWO PEOPLE INSTALL THIS MICROWAVE OVEN. IMPORTANT: Do not grip or use handle during installation. NOTE: If your cabinet is metal, use the nylon grommet around the power cord hole ...
Page 14 - OUTSIDE TOP EXHAUST
Installation Instructions 14 B. OUTSIDE TOP EXHAUST (Vertical Duct) B1. ATTACH THE MOUNTING PLATE TO THE WALL Attach the plate to the wall using toggle bolts. At least one wood screw must be used to attach the plate to a wall stud. 1. Remove the toggle wings from the bolts. 2. Insert the bolts into ...
Page 16 - CHECK FOR PROPER DAMPER
Installation Instructions 16 7. Secure the blower unit to the microwave with the two screws removed in Step 2. 8. Close the blower cover and secure it with the screw removed in Step 1. 9. Attach the exhaust adaptor to the rear of the microwave by sliding it into the guides at the top center of the b...
Page 17 - ADJUST THE EXHAUST ADAPTOR
Installation Instructions 17 B5. MOUNT THE MICROWAVE OVEN (cont.) 4. Attach the microwave oven to the top cabinet. 6. Tighten the outer two screws to the top of the microwave oven. (While tightening screws, hold the microwave oven in place against the wall and the top cabinet.) 7. Install grease fil...
Page 18 - OUTSIDE BACK EXHAUST
Installation Instructions 18 C. OUTSIDE BACK EXHAUST (Horizontal Duct) C1. PREPARING THE REAR WALL FOR OUTSIDE BACK EXHAUST You need to cut an opening in the rear wall for outside exhaust. • Read the instructions on the REAR WALL TEMPLATE. • Tape it to the rear wall. • Cut the opening, following the...
Page 22 - BEFORE YOU USE YOUR MICROWAVE
Installation Instructions 22 BEFORE YOU USE YOUR MICROWAVE 1. Make sure the microwave oven has been installed according to instructions. 2. Remove all packing material from the microwave oven. 3. Install turntable and ring in cavity. 4. Replace house fuse or turn breaker back on. 5. Plug power cord ...
Page 23 - NOTE
Page 25 - Instrucciones de instalación; Para toda la gama de hornos microondas; ANTES DE EMPEZAR; LEA ESTAS INSTRUCCIONESDETENIDAMENTE. CONSÉRVELAS.
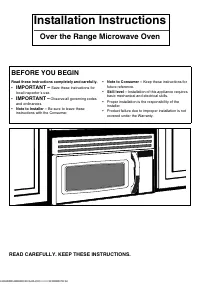
Instrucciones de instalación Para toda la gama de hornos microondas ANTES DE EMPEZAR Lea estas instrucciones completa y detenidamente • IMPORTANTE: Guarde estas instrucciones para referencia del inspector local. • IMPORTANTE: Tenga en cuenta todas las normativas locales. • Nota para el instalador: A...
Page 26 - INDICE GENERAL; Información general; Guía de instalación paso a paso
Instrucciones de instalación 2 INDICE GENERAL Información general Instrucciones importantes sobre seguridad ....3 Requisitos eléctricos ...................................3 Difusor de escape ....................................4, 5 Daños – Envío/Instalación ...........................6 Piezas inclui...
Page 27 - INSTRUCCIONES DE SEGURIDAD IMPORTANTES; REQUISITOS ELÉCTRICOS
Instrucciones de instalación 3 INSTRUCCIONES DE SEGURIDAD IMPORTANTES Este producto necesita un enchufe mural con toma a tierra de tres patas. El instalador debe realizar una prueba de continuidad de la puesta a tierra en la toma de corriente antes de comenzar la instalación, para asegurarse de que ...
Page 28 - DIFUSOR DE ESCAPE
Instrucciones de instalación 4 DIFUSOR DE ESCAPE NOTA: Lea las dos páginas siguientes sólo si desea que el escape de ventilación se dirija al exterior. Si desea que recircule el aire de nuevo hacia la habitación, consulte la página 11. ESCAPE SUPERIOR AL EXTERIOR (EJEMPLO) El diagrama siguiente desc...
Page 29 - Conexión del escape; Longitud máxima de la conducción
Instrucciones de instalación 5 NOTA: Si necesita instalar conducciones, tenga en cuenta que la longitud total de la conducción rectangular de 8,25 x 25,40 cm o la conducción redonda de 15,24 cm no debe superar los 42,67 metros equivalentes. La ventilación exterior requiere una conducción difusora de...
Page 30 - PIEZAS INCLUIDAS; PIEZAS ADICIONALES
Instrucciones de instalación 6 * IMPORTANTE: Si se utiliza un adaptador de transición de ectangular a redondo, las esquinas inferiores del regulador de tiro se deberán cortar para conseguir el ajuste, usando la cortadora, con el fin de permitir el libre movimiento del regulador de tiro. Las longitud...
Page 31 - HERRAMIENTAS QUE NECESITARÁ
Instrucciones de instalación 7 HERRAMIENTAS QUE NECESITARÁ Destornillador Phillips # 1 y # 2 Nivel Gafas de seguridad Detector de clavos o martillo (opcional) Sierra (de vaivén, de perforación o de calar) Guantes Tijeras(para cortar la plantilla, si fuera necesario) Lápiz Bloques de relleno o trozos...
Page 32 - COLOCACIÓN DE LA PLACA DE MONTAJE
Instrucciones de instalación 8 1.COLOCACIÓN DE LA PLACA DE MONTAJE A. EXTRACCIÓN DEL MICROONDAS DE LA CAJA/EXTRACCIÓN DE LA PLACA DE MONTAJE 1. Saque las instrucciones de instalación, el adaptador del escape, los filtros, la bandeja de cristal y la pequeña bolsa con piezas. No retire la protección d...
Page 33 - UBICACIÓN DE LA PLACA MURAL BAJO EL ARMARIO
Instrucciones de instalación 9 C. UBICACIÓN DE LA PLACA MURAL BAJO EL ARMARIO Es posible que los armarios tengan una banda decorativa que estorbe en la instalación del microondas. Retire la banda decorativa para instalar adecuadamente el microondas y nivelarlo. EL MICROONDAS DEBE ESTAR NIVELADO. Use...
Page 34 - ALINEACIÓN DE LA PLACA MURAL
Instrucciones de instalación 10 D. ALINEACIÓN DE LA PLACA MURAL 1. Dibuje una línea vertical en la pared, en el centro de un espacio de 76,2 cm de ancho. 2. Trace una línea horizontal en la pared, en la parte inferior de la “Plantilla posterior para la pared”. 3. Perfore orificios de 1,5 cm para los...
Page 35 - TIPOS DE INSTALACIÓN
Instrucciones de instalación 11 2. TIPOS DE INSTALACIÓN (Seleccione A, B o C) El microondas está diseñado para adaptarlo a los tres tipos de ventilación siguientes: A. Recirculación (sin conducciones de ventilación) B. Escape superior al exterior (conducción vertical) C. Escape posterior al exterior...
Page 36 - RECIRCULACIÓN; Para usar los pernos acodados:
Instrucciones de instalación 12 A. RECIRCULACIÓN (sin conducciones de ventilación) A1. FIJE LA PLACA DE MONTAJE A LA PARED Acople la placa a la pared mediante los pernos acodados. Se debe usar al menos un tirafondos para acoplar la placa a un entramado. 1. Retire las palomillas de los pernos. 2. Ins...
Page 37 - MONTE EL MICROONDAS
Instrucciones de instalación 13 A3. MONTE EL MICROONDAS PARA FACILITAR LA INSTALACIÓN Y MEJORAR LA SEGURIDAD, SE RECOMIENDA QUE EN LA INSTALACIÓN DE ESTE MICROONDAS PARTICIPEN DOS PERSONAS. IMPORTANTE: No sujete el horno por las asas durante la instalación. NOTA: Si el armario es metálico, proteja e...
Page 38 - ESCAPE SUPERIOR AL EXTERIOR
Instrucciones de instalación 14 B. ESCAPE SUPERIOR AL EXTERIOR (Conducción vertical) B1. FIJE LA PLACA DE MONTAJE A LA PARED Acople la placa a la pared mediante los pernos acodados. Se debe usar al menos un tirafondos para fijar la placa al entramado de la pared. 1. Retire las palomillas de los pern...
Page 40 - CONTROLE EL CORRECTO
Instrucciones de instalación 16 B5. MONTE EL MICROONDAS PARA FACILITAR LA INSTALACIÓN Y MEJORAR LA SEGURIDAD, SE RECOMIENDA QUE EN LA INSTALACIÓN DE ESTE MICROONDAS PARTICIPEN DOS PERSONAS. IMPORTANTE: No sujete el horno por las asas durante la instalación. NOTA: Si el armario es metálico, proteja e...
Page 42 - ESCAPE POSTERIOR AL EXTERIOR
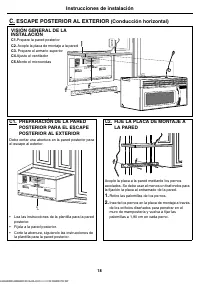
Instrucciones de instalación 18 C. ESCAPE POSTERIOR AL EXTERIOR (Conducción horizontal) C1. PREPARACIÓN DE LA PARED POSTERIOR PARA EL ESCAPE POSTERIOR AL EXTERIOR Debe cortar una abertura en la pared posterior para el escape al exterior. • Lea las instrucciones de la plantilla para la pared posterio...
Page 46 - ANTES DE UTILIZAR EL MICROONDAS
Instrucciones de instalación 22 ANTES DE UTILIZAR EL MICROONDAS 1. Compruebe que el microondas se haya instalado de acuerdo con las instrucciones. 2. Retire todo el material de embalaje del interior del microondas. 3. Instale el plato giratorio y el aro en la cavidad. 4. Conecte la caja de fusibles ...
Page 47 - NOTA
Page 49 - Instructions d’installation; Four à micro-ondes plus grand que la normale; AVANT DE COMMENCER; IMPORTANT –; A LIRE ATTENTIVEMENT : CONSERVEZ SOIGNEUSEMENT CES INSTRUCTIONS.
Instructions d’installation Four à micro-ondes plus grand que la normale AVANT DE COMMENCER Veuillez lire attentivement et dans leur intégralité les instructions suivantes. • IMPORTANT – Conservez ces instructions en vue de leur utilisation par un contrôleur local. • IMPORTANT – Respectez la régleme...
Page 50 - TABLE DES MATIERES; Généralités; Avant d’utiliser votre four à micro-ondes 22
Instructions d’installation 2 TABLE DES MATIERES Généralités Importantes consignes de sécurité ............3 Normes électriques ......................................3 Evacuation ................................................4, 5 Dommages – Transport/Installation ...........6 Pièces fournies ........
Page 51 - IMPORTANTES CONSIGNES DE SECURITE; NORMES ELECTRIQUES
Instructions d’installation 3 IMPORTANTES CONSIGNES DE SECURITE Ce produit doit être branché à une prise secteur à fiche tripolaire mise à la terre. L’installateur doit vérifier la continuité de la mise à la terre au niveau de la prise murale avant de commencer l’installation afin de s’assurer que l...
Page 52 - EVACUATION; EVACUATION EXTERIEURE PAR LE HAUT (EXEMPLE UNIQUEMENT); EVACUATION EXTERIEURE PAR L’ARRIERE (EXEMPLE UNIQUEMENT)
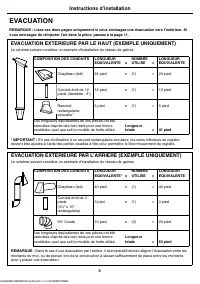
Instructions d’installation 4 EVACUATION REMARQUE : Lisez ces deux pages uniquement si vous envisagez une évacuation vers l’extérieur. Si vous envisagez de réinjecter l’air dans la pièce, passez à la page 11. EVACUATION EXTERIEURE PAR LE HAUT (EXEMPLE UNIQUEMENT) Le schéma suivant constitue un exemp...
Page 53 - Branchement de l’évacuation:; Longueur maximale du conduit :
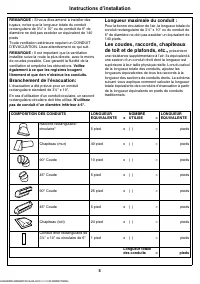
Instructions d’installation 5 REMARQUE : Si vous êtes amené à installer des tuyaux, notez que la longueur totale du conduit rectangulaire de 3¼" x 10" ou du conduit de 6" de diamètre ne doit pas excéder un équivalent de 140 pieds Toute ventilation extérieure requiert un CONDUIT D’EVACUAT...
Page 54 - PIECES FOURNIES; QUINCAILLERIE
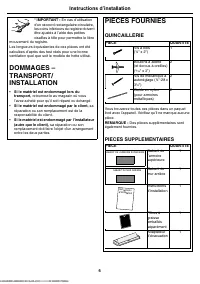
Instructions d’installation 6 * IMPORTANT : En cas d’utilisation d’un raccord rectangulaire-circulaire, les coins inférieurs du registre doivent être ajustés à l’aide des petites cisailles à tôle pour permettre le libre mouvement du registre. Les longueurs équivalentes de ces pièces ont été calculée...
Page 55 - OUTILS NECESSAIRES
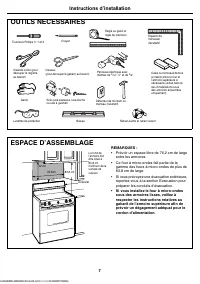
Instructions d’installation 7 OUTILS NECESSAIRES Tournevis Phillips n° 1 et 2 Niveau Lunettes de protection Détecteur de montant ou marteau (facultatif) Scie (scie sauteuse, scie-cloche ou scie à guichet) Gants Ciseaux(pour découper le gabarit, au besoin) Crayon Cales ou morceaux de bois à insérer e...
Page 56 - POSITIONNEMENT DE LA PLAQUE DE MONTAGE
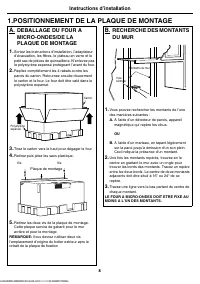
Instructions d’installation 8 A. DEBALLAGE DU FOUR A MICRO-ONDES/DE LA PLAQUE DE MONTAGE 1. Sortez les instructions d’installation, l’adaptateur d’évacuation, les filtres, le plateau en verre et le petit sac de pièces de quincaillerie. N’enlevez pas le polystyrène expansé protégeant l’avant du four....
Page 57 - POSITIONNEMENT DE LA PLAQUE MURALE SOUS L’ARMOIRE
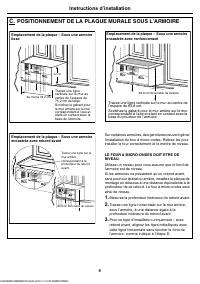
Instructions d’installation 9 C. POSITIONNEMENT DE LA PLAQUE MURALE SOUS L’ARMOIRE Sur certaines armoires, des garnitures peuvent gêner l’installation du four à micro-ondes. Retirez-les pour installer le four correctement et le mettre de niveau. LE FOUR A MICRO-ONDES DOIT ETRE DE NIVEAU. Utilisez un...
Page 58 - ALIGNEMENT DE LA PLAQUE MURALE
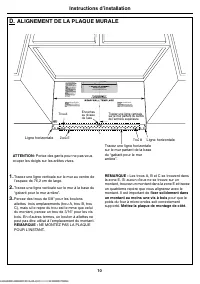
Instructions d’installation 10 D. ALIGNEMENT DE LA PLAQUE MURALE 1. Tracez une ligne verticale sur le mur au centre de l’espace de 76,2 cm de large. 2. Tracez une ligne verticale sur le mur à la base du “gabarit pour le mur arrière”. 3. Percez des trous de 5/8" pour les boulons ailettes trois em...
Page 59 - TYPES D’INSTALLATION
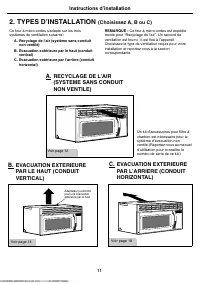
Instructions d’installation 11 2. TYPES D’INSTALLATION G (Choisissez A, B ou C) Ce four à micro-ondes s’adapte sur les trois systèmes de ventilation suivants : A. Recyclage de l’air (système sans conduit non ventilé) B. Evacuation extérieure par le haut (conduit vertical) C. Evacuation extérieure pa...
Page 60 - RECYCLAGE DE L’AIR; Pour utiliser les boulons à ailette :
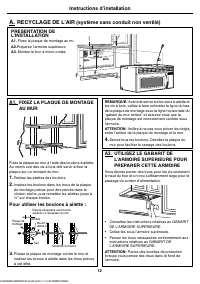
Instructions d’installation 12 A. RECYCLAGE DE L’AIR (système sans conduit non ventilé) A1. FIXEZ LA PLAQUE DE MONTAGE AU MUR Fixez la plaque au mur à l’aide des boulons à ailette. Au moins une des vis à bois doit servir à fixer la plaque sur un montant du mur. 1. Retirez les ailettes des boulons. 2...
Page 62 - EVACUATION EXTERIEURE PAR LE HAUT
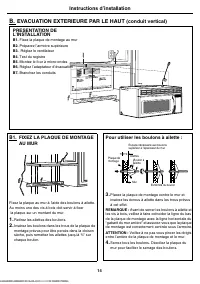
Instructions d’installation 14 B. EVACUATION EXTERIEURE PAR LE HAUT (conduit vertical) B1. FIXEZ LA PLAQUE DE MONTAGE AU MUR Fixez la plaque au mur à l’aide des boulons à ailette. Au moins une des vis à bois doit servir à fixer la plaque sur un montant du mur. 1. Retirez les ailettes des boulons. 2....
Page 63 - L'ouverture du manchon
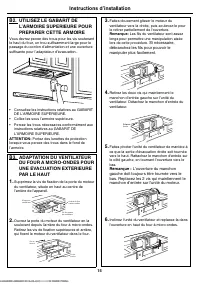
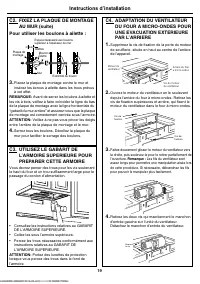
Instructions d’installation 15 B2. UTILISEZ LE GABARIT DE L’ARMOIRE SUPERIEURE POUR PREPARER CETTE ARMOIRE Vous devrez percer des trous pour les vis soutenant le haut du four, un trou suffisamment large pour le passage du cordon d’alimentation et une ouverture suffisante pour l’adaptateur d’évacuati...
Page 64 - VÉRIFICATION DU BON
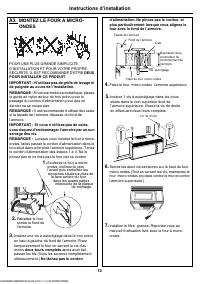
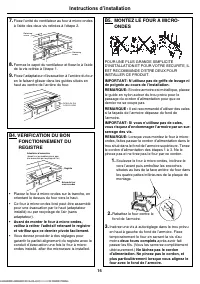
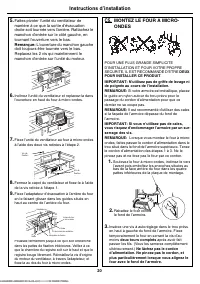
Instructions d’installation 16 B5. MONTEZ LE FOUR A MICRO-ONDES POUR UNE PLUS GRANDE SIMPLICITE D’INSTALLATION ET POUR VOTRE SECURITE, IL EST RECOMMANDE D’ETRE DEUX POUR INSTALLER CE PRODUIT. IMPORTANT: N’utilisez pas de griffe de levage ni de poignée au cours de l’installation. REMARQUE: Si votre a...
Page 65 - BRANCHEZ LES CONDUITS; Vissez chaque
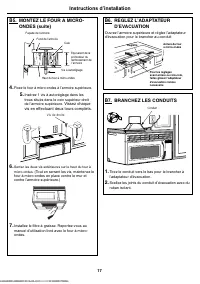
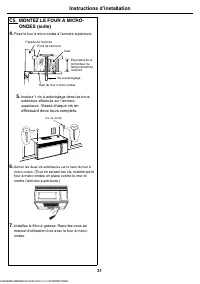
Instructions d’installation 17 B5. MONTEZ LE FOUR A MICRO-ONDES (suite) 4. Fixez le four à micro-ondes à l’armoire supérieure. 6. Serrez les deux vis extérieures sur le haut du four à micro-ondes. (Tout en serrant les vis, maintenez le four à micro-ondes en place contre le mur et contre l’armoire su...
Page 66 - EVACUATION EXTERIEURE PAR L’ARRIERE
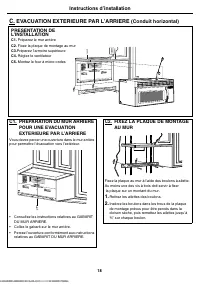
Instructions d’installation 18 C. EVACUATION EXTERIEURE PAR L’ARRIERE (Conduit horizontal) C1. PREPARATION DU MUR ARRIERE POUR UNE EVACUATION EXTERIEURE PAR L’ARRIERE Vous devez percer une ouverture dans le mur arrière pour permettre l’évacuation vers l’extérieur. • Consultez les instructions relati...
Page 68 - L'ouverture du manchon gauche
Instructions d’installation 20 C5. MONTEZ LE FOUR A MICRO-ONDES POUR UNE PLUS GRANDE SIMPLICITE D’INSTALLATION ET POUR VOTRE PROPRE SECURITE, IL EST RECOMMANDE D’ETRE DEUX POUR INSTALLER CE PRODUIT . IMPORTANT: N’utilisez pas de griffe de levage ni de poignée au cours de l’installation. REMARQUE: Si...
Page 69 - Vissez chaque vis en
Instructions d’installation 21 C5. MONTEZ LE FOUR A MICRO-ONDES (suite) 4. Fixez le four à micro-ondes à l’armoire supérieure. 6. Serrez les deux vis extérieures sur le haut du four à micro-ondes. (Tout en serrant les vis, maintenez le four à micro-ondes en place contre le mur et contre l’armoire su...
Page 70 - AVANT D’UTILISER VOTRE FOUR A MICRO-ONDES
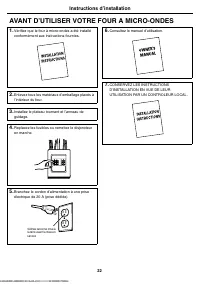
Instructions d’installation 22 AVANT D’UTILISER VOTRE FOUR A MICRO-ONDES 1. Vérifiez que le four à micro-ondes a été installé conformément aux instructions fournies. 2. Enlevez tous les matériaux d’emballage placés à l’intérieur du four. 3. Installez le plateau tournant et l’anneau de guidage. 4. Re...
Page 71 - REMARQUE












 Maytag MLE2000AYW User Manual
 Maytag MLG23PD Manual
 Maytag MMV1153AAB Installation Manual
 Maytag MMV1153AAW User Manual
 Maytag MMV1153BAB User Manual
 Maytag MMV1164WW5 Installation Manual
 Maytag MMV1174FZ User Manual
 Maytag MMV1174FZ0 Installation Manual
 Maytag MMV4184AA Manual