Page 2 - STACKED WASHER/DRYER SAFETY; Your safety and the safety of others are very important.; DANGER
2 STACKED WASHER/DRYER SAFETY You can be killed or seriously injured if you don't immediately You can be killed or seriously injured if you don't follow All safety messages will tell you what the potential hazard is, tell you how to reduce the chance of injury, and tell you what canhappen if the ins...
Page 3 - WHAT TO DO IF YOU SMELL GAS:
3 STACKED WASHER/DRYER SAFETY In the State of Massachusetts, the following installation instructions apply: ■ Installations and repairs must be performed by a qualified or licensed contractor, plumber, or gas fitter qualified or licensed by the State of Massachusetts. ■ Acceptable Shut-off Devices: ...
Page 4 - IMPORTANT SAFETY INSTRUCTIONS
4 STACKED WASHER/DRYER SAFETY IMPORTANT SAFETY INSTRUCTIONS To reduce the risk of fire, electric shock, or injury to persons when using the washer/dryer, follow basic precautions, including the following: WARNING: SAVE THESE INSTRUCTIONS ■ Read all instructions before using the washer/dryer. ■ Do no...
Page 6 - ALTERNATE PARTS AND ACCESSORIES; Alternate Parts; Accessories
6 ALTERNATE PARTS AND ACCESSORIES Alternate Parts Your installation may require additional parts. If you are interested in purchasing one of the items listed here, call the toll-free number in the “If You Need Assistance” section. If You Have: You Will Need to Buy: Overhead sewer Standard 20 gal. (7...
Page 7 - DIMENSIONS/CLEARANCES; Clearances
7 DIMENSIONS/CLEARANCES Front View Side View Back View 27" (686 mm) 1" (25 mm) 74" (1880 mm) 1" (25 mm) 74" (1880 mm) 51" (1295 mm) 29 .5 " (751 mm) 1 / 2 Clearances Side Clearances Back/Top Clearances 0" (0 mm) 0" (0 mm)
Page 8 - Stacked Washer/Gas Dryer Location; STACKED WASHER/GAS DRYER INSTALLATION
8 Selecting the proper location for your washer/dryer improves performance and minimizes noise and possible washer “walk.”Your washer/dryer can be installed in a basement, laundry room, or recessed area. This washer/dryer is not intended for install in a mobile home or recreational vehicle. See the ...
Page 9 - Stacked Washer/Gas Dryer Grounding; Stacked Washer/Gas Dryer Electrical Requirements
9 Stacked Washer/Gas Dryer Grounding IMPORTANT: The washer/dryer must be electrically grounded in accordance with local codes and ordinances or, in the absence of local codes, with the National Electrical Code, ANSI/NFPA 70, latest edition, or Canadian Electrical Code, CSA C22.1. If codes permit and...
Page 10 - WARNING; Stacked Washer/Gas Dryer Gas Supply
10 IMPORTANT: Observe all governing codes and ordinances. This installation must conform with all local codes and ordinances. In the absence of local codes, installation must conform with American National Standard, National Fuel Gas Code ANSI Z223.1/NFPA 54 or CAN/CSA B149.A copy of the above code ...
Page 11 - Stacked Washer/Electric Dryer Location; STACKED WASHER/ELECTRIC DRYER INSTALLATION
11 Selecting the proper location for your washer/dryer improves performance and minimizes noise and possible washer “walk.”Your washer/dryer can be installed in a basement, laundry room, or recessed area. This washer/dryer is not intended for install in a mobile home or recreational vehicle. See the...
Page 12 - Stacked Washer/Electric Dryer Electrical Requirements
12 ■ Do not have a fuse in the neutral or ground circuit. ■ This washer/dryer is equipped with a power supply cord having a 3 prong grounding plug. ■ To minimize the possibility of shock, the cord must be plugged into a mating, 3 prong, grounding-type outlet, grounded in accordance with local codes ...
Page 13 - Dryer Electrical Requirements
13 STACKED WASHER/ELECTRIC DRYER INSTALLATION REQUIREMENTS It is your responsibility: ■ To contact a qualified electrical installer. ■ To be sure that the electrical connection is adequate and in conformance with the National Electrical Code, ANSI/NFPA 70-latest edition and all local codes and ordin...
Page 15 - DRYER VENTING REQUIREMENTS
15 DRYER VENTING REQUIREMENTS WARNING: To reduce the risk of fire, this dryer must be exhausted outdoors. IMPORTANT: Observe all governing codes and ordinances. Dryer exhaust must not be connected into any gas vent, chimney, wall, ceiling, attic, crawlspace, or a concealed space of a building. Only ...
Page 16 - Vent Hoods; Vent System Length
16 4" (102 mm) Diameter Exhaust Hoods box hood louvered hood angled hood Vent Hoods DRYER VENTING REQUIREMENTS Exhaust hood must be at least 12" (305 mm) from the ground or any object that may be in the path of the exhaust (such as flowers, rocks, bushes, or snow). Maximum Vent Length/Vent C...
Page 18 - Type of Gas; DRYER GAS SUPPLY REQUIREMENTS; Gas Supply Line
18 This dryer is equipped for use with natural gas. It is design-certified by CSA International for propane and butane gases with appropriate conversion. No attempt shall be made to convert dryer from gas specified on serial/rating plate for use with a different gas without consulting the serving ga...
Page 19 - INSTALLING STACKED WASHER/DRYER; Remove Transport System
19 4. Models with separate washer power cords: Push the power cord plug into the opening on the right side of the rear panel and pull the power cord through the opening on the left side of the rear panel and close holes with the attached cap. Do not pull plug end of power cord through the right side...
Page 20 - Connect Inlet Hoses
20 INSTALLING STACKED WASHER/DRYER Insert new hose washers (supplied) into each end of the inlet hoses. Firmly seat the washers in the couplings. Connect Inlet Hoses to Water Faucets Make sure the washer drum is empty.1. Attach a hose to the hot water faucet. Screw on coupling by hand until it is se...
Page 21 - Route Drain Hose
21 INSTALLING STACKED WASHER/DRYER Proper routing of the drain hose avoids damage to your floor due to water leakage. Read and follow these instructions. Remove drain hose from the washer drum 1. Using locking pliers, squeeze hose clamp tabs together and insert over the end of the drain hose. 2. Sli...
Page 22 - WASHER DRAIN SYSTEM; Standpipe drain system – wall or floor; Floor; Wall
22 WASHER DRAIN SYSTEM The washer can be installed using the standpipe drain system (floor or wall), the laundry tub drain system, or the floor drain system. Standpipe drain system – wall or floor The standpipe drain requires a minimum diameter standpipe of 2" (50 mm). The minimum carry-away cap...
Page 23 - Strain Relief; ELECTRIC DRYER ELECTRICAL CONNECTIONS
23 Power Supply Cord Strain Relief 1. Insert strain relief. 2. Insert power cord into strain relief. Remove Terminal Block Cover Strain Relief ELECTRIC DRYER ELECTRICAL CONNECTIONS Direct Wire Strain Relief 1. Insert strain relief. 2. Insert conduit into strain relief and tighten clamp . Strain Reli...
Page 24 - Standard Power Supply Cord Connectors; Connection Options
24 ELECTRIC DRYER ELECTRICAL CONNECTIONS Power Cord 4-wire receptacle (NEMA Type 14-30R) 3-wire receptacle (NEMA Type 10-30R ) Standard Power Supply Cord Connectors Flanged spade connector Ring Connector Connecting Ground and Neutral Wires 1. Remove center terminal block screw and the ground wire by...
Page 25 - Connecting 3-Wire Connection: Power Supply Cord
25 2. Connect neutral wire to center terminal block. 3. Connect remaining wires with outer terminal block screws. Standard Power Cord Connectors Flanged spade connector Ring Connector Connecting Neutral Wire 1. Loosen or remove center terminal block screw. IMPORTANT: A 4-wire connection is required ...
Page 26 - Connecting Direct Wire Ground; Connecting 3-Wire Connection: Direct Wire
26 2. Connect neutral wire to center terminal block. 3. Connect remaining wires to outer terminal block . Connecting Ground and Neutral Wires (cont.) 2. Connect ground and neutral wire to center terminal block. Connecting Direct Wire Ground 3. Connect ground wire (green or bare) with external ground...
Page 27 - Leveling Stacked Washer/Dryer; LEVELING; LEVEL; Not Level
27 ELECTRIC DRYER ELECTRICAL CONNECTIONS 3. Connect remaining wires to outer terminal block. 4. Connect a separate copper ground wire from the external ground conductor to an adequate ground. Use for direct wire or power supply cord where local codes do not permit connecting cabinet-ground conductor...
Page 28 - Complete Installation
28 1. Check the electrical requirements. Be sure that you have the correct electrical supply and the recommended grounding method. See the “Electrical Requirements” section. 2. Check that all parts are now installed. If there is an extra part, go back through the steps. 3. Check that you have all of...
Page 32 - STACKED WASHER/DRYER MAINTENANCE INSTRUCTIONS; Washer
32 Cleaning the Door Seal/Bellow 1. Open the washer door and remove any clothing or items from the washer. 2. Inspect inner glass door. If debris is present, wipe it off using a damp cloth. 3. Inspect the colored seal/bellow between the door opening and the basket for stained areas. Pull back the se...
Page 33 - Dryer; IF YOU NEED ASSISTANCE
33 STACKED WASHER/DRYER MAINTENANCE INSTRUCTIONS Maintenance instructions: ■ Clean lint screen before and after each cycle. ■ Removing accumulated lint: From inside the dryer cabinet: Lint should be removed every 2 years or more often, depending on dryer usage. Cleaning should be done by a qualified...
Page 34 - ELECTRONIC CONTROL SETUP INSTRUCTIONS; General Washer/Dryer User Information
34 ELECTRONIC CONTROL SETUP INSTRUCTIONS Washer Control Dryer Control General Washer/Dryer User Information NOTE: After the washer/dryer has been installed and plugged in, the display will show “0 MINUTES” on the washer and dryer portions of the display. After the washer and dryer doors have been op...
Page 35 - Pricing; Debit Card Ready; top off price
35 ELECTRONIC CONTROL SETUP INSTRUCTIONS Warm Start (after power failure) A few seconds after power is restored, if a cycle was in progress at the time of the power failure, “RESELECT CYCLE” will flash in the display, indicating the need for a key press to restart washer or dryer. Washer Door Lock P...
Page 40 - MAYTAG COMMERCIAL LAUNDRY LIMITED WARRANTY
40 MAYTAG COMMERCIAL LAUNDRY LIMITED WARRANTY MHN33PDCWW, MHN33PDCXW, MHN33PDCGW, MHN33PRCWW, MHN33PNCGW 1. All other costs including labor, transportation, shipping, or custom duties for covered parts. 2. Factory specified replacement parts if this commercial appliance is used for other than normal...
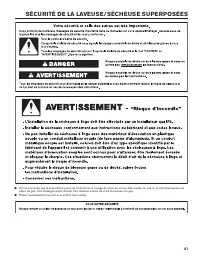
Page 41 - SÉCURITÉ DE LA LAVEUSE/SÉCHEUSE SUPERPOSÉES
41 SÉCURITÉ DE LA LAVEUSE/SÉCHEUSE SUPERPOSÉES ■ On recommande que le propriétaire place les instructions à l’usage du client en un lieu bien visible, au cas où le client percevrait une odeur de gaz. Ces renseignements doivent être obtenus auprès de votre fournisseur en gaz. ■ Placer l’avertissement...
Page 42 - – QUE FAIRE DANS LE CAS D’UNE ODEUR DE GAZ :; AVERTISSEMENT :
42 SÉCURITÉ DE LA LAVEUSE/SÉCHEUSE SUPERPOSÉES Dans l’État du Massachusetts, les instructions d’installation suivantes sont applicables : ■ Les travaux d’installation et réparation doivent être exécutés par un plombier ou tuyauteur qualifié ou licencié, ou par le personnel qualifié d’une entreprise ...
Page 43 - IMPORTANTES INSTRUCTIONS DE SÉCURITÉ; Lorem ipsum
43 SÉCURITÉ DE LA LAVEUSE/SÉCHEUSE SUPERPOSÉES IMPORTANTES INSTRUCTIONS DE SÉCURITÉ AVERTISSEMENT : Pour réduire les risques d’incendie, de choc électrique ou de blessures lors de l’utilisation de la laveuse/sécheuse, suivre les précautions fondamentales dont les suivantes : CONSERVEZ CES INSTRUCTIO...
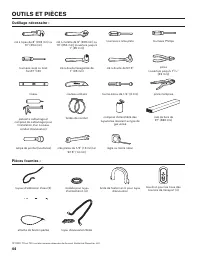
Page 44 - OUTILS ET PIÈCES; Outillage nécessaire :
44 OUTILS ET PIÈCES Outillage nécessaire : clé à tuyau de 8" (203 mm) ou 10" (254 mm) clé à molette de 8" (203 mm) ou 10" (254 mm) (ouverture jusqu’à 1" [25 mm]) tournevis à lame plate tournevis Phillips tournevis isolé ou foret Torx®† T-20 clé à douille hexagonale de 1" (25 ...
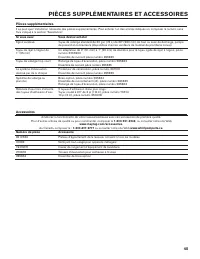
Page 45 - PIÈCES SUPPLÉMENTAIRES ET ACCESSOIRES; Pièces supplémentaires; Accessoires
45 PIÈCES SUPPLÉMENTAIRES ET ACCESSOIRES Pièces supplémentaires Il se peut que l’installation nécessite des pièces supplémentaires. Pour acheter l’un des articles indiqués ici, composer le numéro sans frais indiqué à la section “Assistance”. Si vous avez Vous devrez acheter Égout surélevé Tuyau de v...
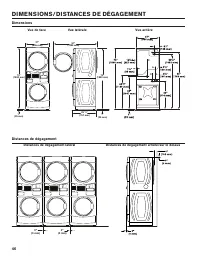
Page 46 - DIMENSIONS/DISTANCES DE DÉGAGEMENT; Dimensions; Distances de dégagement latéral
46 DIMENSIONS/DISTANCES DE DÉGAGEMENT Dimensions Distances de dégagement Distances de dégagement latéral Distances de dégagement arrière/sur le dessus 0" (0 mm) 0" (0 mm) 1" (25 mm) 74" (1880 mm) 51" (1295 mm) 29 .5 " (751 mm) 1 / 2 27" (686 mm) 1" (25 mm) 74" (18...
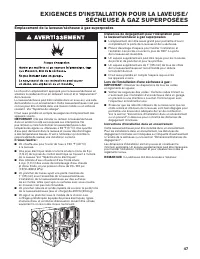
Page 47 - Emplacement de la laveuse/sécheuse à gaz superposées; EXIGENCES D’INSTALLATION POUR LA LAVEUSE/; Distances de dégagement pour l’installation pour
47 Le choix d’un emplacement approprié pour la laveuse/sécheuse en améliore le rendement tout en réduisant le bruit et le “déplacement” de la laveuse. La laveuse/sécheuse peut être installée dans un sous-sol, une salle de buanderie ou un encastrement. Cette laveuse/sécheuse n’est pas conçue pour êtr...
Page 49 - Mise à la terre de la laveuse/sécheuse à gaz; Alimentation en gaz de la laveuse/sécheuse
49 IMPORTANT : Observer les dispositions de tous les codes et règlements en vigueur.L’installation doit satisfaire aux critères de tous les codes et règlements locaux. En l’absence de code local, l’installation doit satisfaire aux prescriptions de la norme American National Standard, National Fuel G...
Page 50 - Emplacement de la laveuse/sécheuse électriques superposées
50 Le choix d’un emplacement approprié pour la laveuse/sécheuse en améliore le rendement tout en réduisant le bruit et le “déplacement” de la laveuse. La laveuse/sécheuse peut être installée dans un sous-sol, une salle de buanderie ou un encastrement. Cette laveuse/sécheuse n’est pas conçue pour êtr...
Page 51 - Mise à la terre de la laveuse/sécheuse électriques
51 ■ Ne pas installer un fusible dans le conducteur neutre ou le circuit de liaison à la terre. ■ Cette laveuse/sécheuse comporte un cordon d’alimentation électrique à trois broches pour liaison à la terre. ■ Pour minimiser le risque de choc électrique, on doit brancher le cordon sur une prise de co...
Page 52 - Spécifications électriques de la laveuse/
52 EXIGENCES D’INSTALLATION POUR LA LAVEUSE/ SÉCHEUSE ÉLECTRIQUES SUPERPOSÉES Spécifications électriques de la laveuse/ sécheuse électriques superposées (suite) Mise à la terre de la laveuse/sécheuse électriques superposées (suite)
Page 53 - Spécifications électriques de la sécheuse; C’est à l’utilisateur qu’incombe la responsabilité de :
53 EXIGENCES D’INSTALLATION POUR LA LAVEUSE/ SÉCHEUSE ÉLECTRIQUES SUPERPOSÉES Spécifications électriques de la sécheuse C’est à l’utilisateur qu’incombe la responsabilité de : ■ Contacter un électricien qualifié. ■ S’assurer que le raccordement électrique est adéquat et conforme au code national de ...
Page 54 - Raccordement par câblage direct de la sécheuse
54 Risque d’incendie Utiliser du fil en cuivre de calibre 10.Utiliser un réducteur de tension homologué UL.Déconnecter la source de courant électrique avant de réaliser les connexions électriques.Connecter le conducteur neutre (blanc ou conducteur central) à la borne centrale.Le conducteur de liaiso...
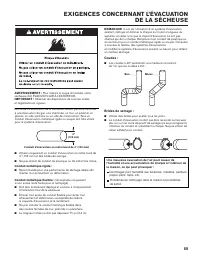
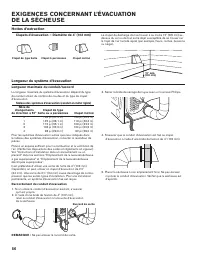
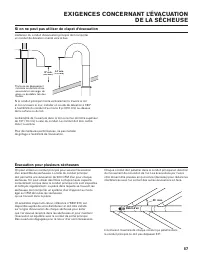
Page 56 - Longueur maximale du conduit/raccord; Hottes d’extraction; EXIGENCES CONCERNANT L’ÉVACUATION; Longueur du système d’évacuation
56 Longueur maximale du conduit/raccord La longueur maximale du système d’évacuation dépend du type de conduit utilisé, du nombre de coudes et du type de clapet d’évacuation. Tableau des systèmes d’évacuation (conduit en métal rigide) Nbre de changements Clapet de type de direction à 90° boîte ou à ...
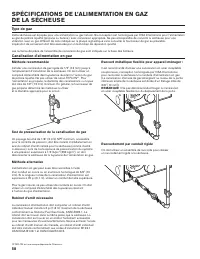
Page 58 - Type de gaz; SPÉCIFICATIONS DE L’ALIMENTATION EN GAZ; Canalisation d’alimentation en gaz
58 Cette sécheuse est équipée pour une alimentation au gaz naturel. Sa conception est homologuée par CSA International pour l’alimentation au gaz de pétrole liquéfié (propane ou butane), avec conversion appropriée. Ne pas entreprendre de convertir la sécheuse pour une utilisation avec un gaz différe...
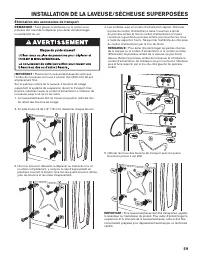
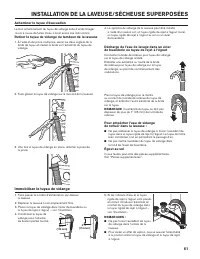
Page 59 - INSTALLATION DE LA LAVEUSE/SÉCHEUSE SUPERPOSÉES; Élimination des accessoires de transport
59 4. Les modèles avec un cordon d’alimentation séparé : Enfoncer la prise du cordon d’alimentation dans l’ouverture à droite du panneau arrière et tirer le cordon d’alimentation à travers l’ouverture à gauche du panneau arrière, puis boucher les trous à l’aide du capuchon fourni. Ne pas tirer l’ext...
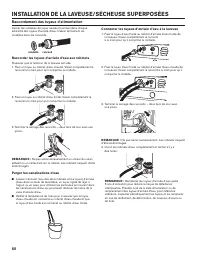
Page 60 - Raccorder les tuyaux d’arrivée d’eau aux robinets; Connecter les tuyaux d’arrivée d’eau à la laveuse; Raccordement des tuyaux d’alimentation
60 INSTALLATION DE LA LAVEUSE/SÉCHEUSE SUPERPOSÉES Insérer les rondelles de tuyau neuves (fournies) dans chaque extrémité des tuyaux d’arrivée d’eau. Insérer fermement les rondelles dans les raccords. Raccorder les tuyaux d’arrivée d’eau aux robinets S’assurer que le tambour de la laveuse est vide.1...
Page 61 - Immobiliser le tuyau de vidange
61 INSTALLATION DE LA LAVEUSE/SÉCHEUSE SUPERPOSÉES Le bon acheminement du tuyau de vidange évite d’endommager le sol à cause de fuites d’eau. Lire et suivre ces instructions. Retirer le tuyau de vidange du tambour de la laveuse 1. À l’aide d’une pince multiprise, serrer les deux onglets de la bride ...
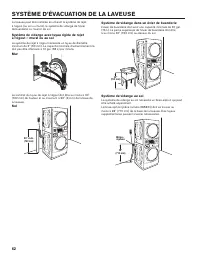
Page 62 - SYSTÈME D’ÉVACUATION DE LA LAVEUSE
62 SYSTÈME D’ÉVACUATION DE LA LAVEUSE La laveuse peut être installée en utilisant le système de rejet à l’égout (au sol ou mural), le système de vidange de l’évier de buanderie ou l’avaloir de sol. Système de vidange avec tuyau rigide de rejet à l’égout – mural ou au sol Le système de rejet à l’égou...
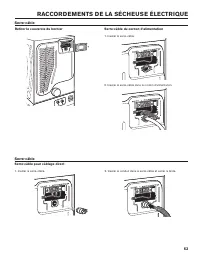
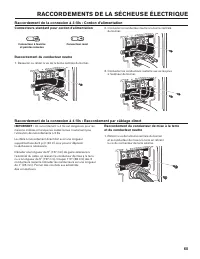
Page 63 - RACCORDEMENTS DE LA SÉCHEUSE ÉLECTRIQUE; Serre-câble pour câblage direct
63 Serre-câble du cordon d’alimentation 1. Insérer le serre-câble. 2. Insérer le serre-câble dans le cordon d’alimentation. Retirer le couvercle du bornier Serre-câble RACCORDEMENTS DE LA SÉCHEUSE ÉLECTRIQUE Serre-câble pour câblage direct 1. Insérer le serre-câble. 2. Insérer le conduit dans le ser...
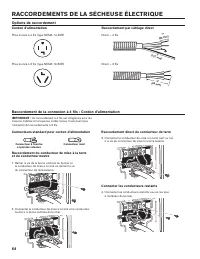
Page 64 - Options de raccordement
64 RACCORDEMENTS DE LA SÉCHEUSE ÉLECTRIQUE Cordon d’alimentation Prise murale à 4 fils (type NEMA 14-30R) Prise murale à 3 fils (type NEMA 10-30R) Connecteurs standard pour cordon d’alimentation Connecteur à fourche Connecteur rond et pointes relevées Raccordement du conducteur de mise à la terre et...
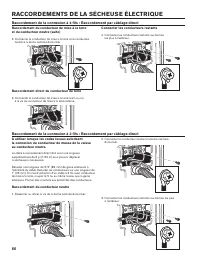
Page 65 - Connecteurs standard pour cordon d'alimentation; Raccordement du conducteur neutre; Raccordement de la connexion à 3 fils : Cordon d’alimentation; Raccordement du conducteur de mise à la terre
65 2. Connecter le conducteur neutre à la borne centrale du bornier. 3. Connecter les conducteurs restants aux vis les plus à l’extérieur du bornier. Connecteurs standard pour cordon d'alimentation Connecteur à fourche Connecteur rond et pointes relevées Raccordement du conducteur neutre 1. Desserre...
Page 67 - Raccordement de la connexion à 3 fils : Facultatif; NIVELLEMENT; D’APLOMB; Pas d’aplomb
67 RACCORDEMENTS DE LA SÉCHEUSE ÉLECTRIQUE 3. Connecter les conducteurs restants aux bornes les plus à l’extérieur. 4. Raccorder un autre conducteur de mise à la terre en cuivre depuis le conducteur de mise à la terre externe jusqu’à une terre adéquate. À utiliser pour le raccordement direct ou le c...
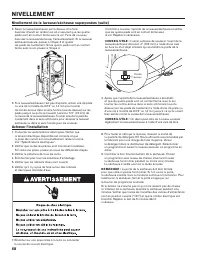
Page 68 - Achever l’installation
68 Jam nut 1. Consulter les spécifications électriques. Vérifier que la tension électrique disponible est correcte et que la prise de courant est convenablement reliée à la terre. Voir “Spécifications électriques”. 2. Vérifier que toutes les pièces sont maintenant installées. S’il reste une pièce, p...
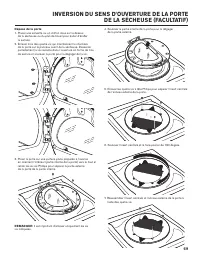
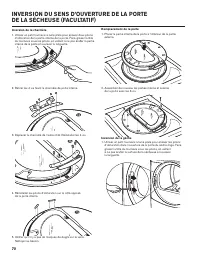
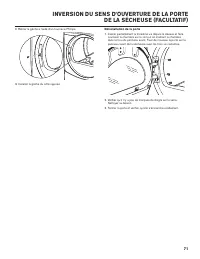
Page 69 - INVERSION DU SENS D’OUVERTURE DE LA PORTE
69 INVERSION DU SENS D’OUVERTURE DE LA PORTE DE LA SÉCHEUSE (FACULTATIF) Dépose de la porte 1. Placer une serviette ou un chiffon doux sur le dessus de la sécheuse ou du plan de travail pour éviter d’érafler la surface. 2. Enlever trois des quatre vis qui maintiennent la charnière de la porte sur le...
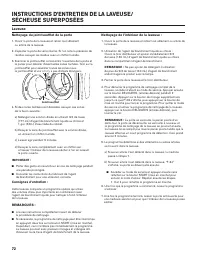
Page 72 - INSTRUCTIONS D’ENTRETIEN DE LA LAVEUSE/; Nettoyage de l’intérieur de la laveuse :; Laveuse
72 Nettoyage du joint/soufflet de la porte 1. Ouvrir la porte de la laveuse et retirer tout vêtement ou article de la laveuse. 2. Inspecter la porte de verre interne. Si l’on note la présence de résidus, essuyer les résidus avec un chiffon humide. 3. Examiner le joint/soufflet coloré entre l’ouvertu...
Page 73 - Consignes d’entretien :; Sécheuse; Nettoyage de l’extérieur; SI VOUS AVEZ BESOIN D’ASSISTANCE
73 INSTRUCTIONS D’ENTRETIEN DE LA LAVEUSE/ SÉCHEUSE SUPERPOSÉES Consignes d’entretien : ■ Nettoyer le filtre à charpie avant ou après chaque programme. ■ Comment enlever la charpie accumulée : À l’intérieur de la caisse de la sécheuse : Il faut retirer la charpie accumulée dans le conduit d’évacuati...
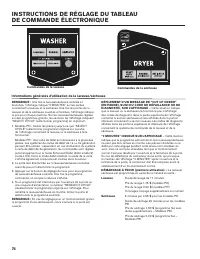
Page 74 - Informations générales d’utilisation de la laveuse/sécheuse
74 INSTRUCTIONS DE RÉGLAGE DU TABLEAU DE COMMANDE ÉLECTRONIQUE REMARQUE : Une fois la laveuse/sécheuse installée et branchée, l’affichage indique “0 MINUTES” sur les parties concernant la laveuse et la sécheuse. Une fois les portes de la laveuse et de la sécheuse ouvertes et fermées, l’affichage ind...
Page 75 - Tarifs
75 INSTRUCTIONS DE RÉGLAGE DU TABLEAU DE COMMANDE ÉLECTRONIQUE D é marrage à Chaud (après coupure d’électricité) Quelques secondes après le rétablissement de l’alimentation, si un programme était en cours au moment de la coupure, “RESELECT CYCLE” (resélectionner programme) clignote sur l’affichage, ...
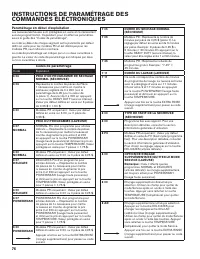
Page 76 - INSTRUCTIONS DE PARAMÉTRAGE DES
76 Paramétrage en début d’exploitation Les laveuses/sécheuses sont préréglées en usine et ne nécessitent aucune programmation. Cependant, pour modifier les paramètres, suivre le guide des “Codes de paramétrage”.Le code au début de chaque segment est le paramètre par défaut défini en usine pour les m...
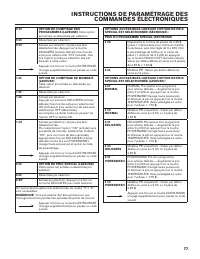
Page 79 - la touche
79 C.20 VALEUR DE LA PIÈCE 2 (LAVEUSE) C.20 MODÈLES PD : Représente la valeur de la pièce 2 en nombre de pièces de 0,05 $ : 20 = 1,00 $. Augmenter le prix entre 1 et 200 pièces de 0,05 $ en appuyant sur la touche POWERWASH (lavage haute puissance) et diminuer en appuyant sur la touche TEMPERATURE. C...
Page 81 - GARANTIE LIMITÉE MAYTAG COMMERCIAL LAUNDRY
81 GARANTIE LIMITÉE MAYTAG COMMERCIAL LAUNDRY MHN33PDCWW, MHN33PDCXW, MHN33PDCGW, MHN33PRCWW, MHN33PNCGW 1. Tous les autres coûts, y compris les frais de main-d’œuvre, de transport, de port ou de dédouanement des pièces couvertes par la garantie. 2. Pièces de rechange recommandées par le fabricant s...
Page 82 - SEGURIDAD DE LA LAVADORA/SECADORA APILADAS; Su seguridad y la seguridad de los demás es muy importante.; ADVERTENCIA
82 SEGURIDAD DE LA LAVADORA/SECADORA APILADAS Si no sigue las instrucciones de inmediato, usted puede morir o sufrir una lesión grave. Si no sigue las instrucciones, usted puede morir o sufrir una lesión grave. Todos los mensajes de seguridad le dirán el peligro potencial, le dirán cómo reducir las ...
Page 83 - PELIGRO DE INCENDIO O EXPLOSIÓN
83 SEGURIDAD DE LA LAVADORA/SECADORA APILADAS En el estado de Massachusetts se aplican las siguientes instrucciones de instalación: ■ Las instalaciones y reparaciones se deben efectuar por un contratista, plomero o gasista calificado o licenciado por el estado de Massachusetts. ■ Reemplace con dispo...
Page 84 - INSTRUCCIONES IMPORTANTES DE SEGURIDAD
84 SEGURIDAD DE LA LAVADORA/SECADORA APILADAS INSTRUCCIONES IMPORTANTES DE SEGURIDAD A fin de reducir el riesgo de incendio, descarga eléctrica o de daño a las personas que usen la lavadora/secadora, deben seguirse las precauciones básicas, incluidas las siguientes: ADVERTENCIA: GUARDE ESTAS INSTRUC...
Page 85 - HERRAMIENTAS Y PIEZAS; Herramientas necesarias:
85 HERRAMIENTAS Y PIEZAS Herramientas necesarias: llave para tubos de 8" (203 mm) o 10" (254 mm) llave ajustable de 8" (203 mm) o 10" (254 mm) que se abra a 1" (25 mm) destornillador de hoja plana destornillador Phillips destornillador o broca de seguridad Torx®† T-20 llave de cu...
Page 86 - Piezas y accesorios adicionales; Piezas adicionales
86 Piezas y accesorios adicionales Piezas adicionales Su instalación puede requerir piezas adicionales. Si está interesado en adquirir una de las piezas aquí enlistadas, llame al número gratuito que se encuentra en la sección “Si necesita ayuda”. Si tiene: Necesitará adquirir: Una alcantarilla suspe...
Page 87 - DIMENSIONES Y ESPACIOS LIBRES; Dimensiones; Vista frontal
87 DIMENSIONES Y ESPACIOS LIBRES Dimensiones Espacios libres 0" (0 mm) 0" (0 mm) 1" (25 mm) 74" (1880 mm) 51" (1295 mm) 29 .5 " (751 mm) 1 / 2 27" (686 mm) 1" (25 mm) 74" (1880 mm) Vista frontal Vista lateral Vista posterior Espacios libres en la parte posterior y...
Page 88 - Ubicación de la lavadora/secadora a gas apiladas; REQUISITOS DE INSTALACIÓN DE LA LAVADORA/
88 La selección de una ubicación apropiada para su lavadora/secadora mejora el rendimiento y reduce al mínimo el ruido y la posible “caminata” de la lavadora.Su lavadora/secadora se puede instalar en un sótano, cuarto para lavar o un lugar empotrado. Esta lavadora/secadora no ha sido diseñada para i...
Page 89 - Requisitos eléctricos de la lavadora/secadora a gas apiladas
89 Conexión a tierra de la lavadora/secadora a gas apiladas IMPORTANTE: La lavadora/secadora debe conectarse a tierra se acuerdo a los códigos y las ordenanzas locales o, en la ausencia de códigos locales, de acuerdo al National Electrical Code (Código Nacional Eléctrico) ANSI/NFPA 70, última edició...
Page 90 - Suministro de gas para la lavadora/secadora
90 REQUISITOS DE INSTALACIÓN DE LA LAVADORA/ SECADORA A GAS APILADAS Conexión a tierra de la lavadora/secadora a gas apiladas (cont.) Suministro de gas para la lavadora/secadora a gas apiladas IMPORTANTE: Observe todos los códigos y ordenanzas aplicables.Esta instalación debe hacerse de acuerdo con ...
Page 91 - Ubicación de la lavadora/secadora eléctrica apiladas; Espacios libres de instalación para la lavadora/
91 La selección de una ubicación apropiada para su lavadora/ secadora mejora el rendimiento y reduce al mínimo el ruido y la posible “caminata” de la lavadora. Su lavadora/secadora se puede instalar en un sótano, cuarto para lavar o un lugar empotrado. Esta lavadora/secadora no ha sido diseñada para...
Page 93 - Requisitos eléctricos de la secadora
93 REQUISITOS DE INSTALACIÓN DE LA LAVADORA/ SECADORA ELÉCTRICAS APILADAS Conexión a tierra de la lavadora/secadora eléctrica apiladas (cont.) Requisitos eléctricos de la secadora Usted es responsable de: ■ Ponerse en contacto con un instalador eléctrico calificado. ■ Asegurarse de que la conexión e...
Page 95 - REQUISITOS DE VENTILACIÓN DE LA SECADORA; Ducto de escape de metal rígido:; si es accesible para la limpieza)
95 REQUISITOS DE VENTILACIÓN DE LA SECADORA ADVERTENCIA: Para reducir el riesgo de incendio, esta secadora DEBE VENTILARSE HACIA EL EXTERIOR. IMPORTANTE: Observe todos los códigos y ordenanzas aplicables. El ducto de escape de la secadora no debe conectarse en ningún ducto de gas, chimenea, pared, t...
Page 96 - Capotas de ventilación; Largo del sistema de ventilación
96 12" min. (305 mm) La capota de ventilación debe estar por lo menos a 12" (305 mm) de distancia del piso o de cualquier objeto que pudiese estar en el trayecto del ducto de escape (como flores, rocas, arbustos o nieve). Capotas de ventilación de 4" (102 mm) de diámetro capota tipo caja...
Page 98 - Tipo de gas; REQUISITOS DEL SUMINISTRO DE GAS DE LA SECADORA; Línea de suministro de gas
98 Esta secadora está equipada para uso con gas natural. Su diseño está certificado por CSA International para gases LP (propano y butano) con la conversión apropiada. No se deberá hacer intento alguno para convertir la secadora del gas especificado en la placa indicadora de la serie/clasificaciónpa...
Page 99 - INSTALACIÓN DE LA LAVADORA/SECADORA APILADAS; Quite el sistema de transporte
99 4. Modelos con suministro de energía de lavadora separada: Empuje el cable de suministro de energía dentro de la abertura, en lado derecho del panel posterior, y jale el cable de suministro de energía a través de la abertura en el lado izquierdo del panel posterior; cierre los orificios con la ta...
Page 100 - Conexión de las mangueras de entrada; Conecte las mangueras de entrada a los grifos
100 INSTALACIÓN DE LA LAVADORA/SECADORA APILADAS Conexión de las mangueras de entrada Inserte las nuevas arandelas para manguera (suministradas) en cada extremo de las mangueras de entrada. Asiente firmemente las arandelas en los acoplamientos. arandela acoplamiento Conecte las mangueras de entrada ...
Page 102 - SISTEMA DE DESAGÜE DE LA LAVADORA; Sistema de desagüe de tina de lavadero; Pared
102 SISTEMA DE DESAGÜE DE LA LAVADORA Se puede instalar la lavadora utilizando el sistema de desagüe por tubo vertical (en el piso o en la pared), el sistema de desagüe por la tina de lavadero, o el sistema de desagüe por el piso. Sistema de desagüe por tubo vertical: pared o piso El desagüe por tub...
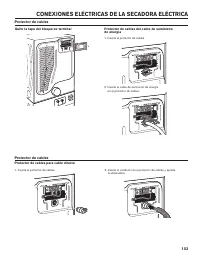
Page 103 - Quite la tapa del bloque de terminal; Protector de cables; Protector de cables para cable directo; Protector de cables
103 Protector de cables del cable de suministro de energía 1. Inserte el protector de cables. 2. Inserte el cable de suministro de energía en el protector de cables. Quite la tapa del bloque de terminal Protector de cables CONEXIONES ELÉCTRICAS DE LA SECADORA ELÉCTRICA Protector de cables para cable...
Page 104 - Opciones de conexión
104 CONEXIONES ELÉCTRICAS DE LA SECADORA ELÉCTRICA Cable de suministro de energía Contacto de 4 hilos (tipo NEMA 14-30R) Contacto de 3 hilos (tipo NEMA 10-30R) Conectores estándar del cable de suministro de energía Conector de horquilla Conector de anillo con bridas Cómo hacer la conexión de los hil...
Page 105 - Cómo conectar el hilo neutro; Cómo hacer la conexión de 3 hilos: Cable de suministro de energía; Cómo hacer la conexión de los hilos a tierra y neutro
105 2. Conecte el hilo neutro al bloque de terminal central. 3. Conecte los hilos restantes a los tornillos de los bloques de terminal de los extremos. Conectores estándar del cable de suministro de energía Conector de horquilla Conector de anillo con bridas Cómo conectar el hilo neutro 1. Afloje o ...
Page 107 - Cómo hacer la conexión de 3 hilos: Opcional; NIVELACIÓN; NIVELADA; No está nivelada
107 CONEXIONES ELÉCTRICAS DE LA SECADORA ELÉCTRICA 3. Conecte los hilos restantes al bloque de terminal del extremo. 4. Conecte un hilo de tierra de cobre separado desde el conductor a tierra externo a tierra adecuada. Úselo para el cable directo o el cable de suministro de energía donde los códigos...
Page 108 - Complete la instalación
108 1. Revise los requisitos eléctricos. Asegúrese de contar con la fuente de electricidad correcta y el método recomendado de conexión a tierra. Vea “Requisitos eléctricos”. 2. Verifique que todas las piezas estén ahora instaladas. Si hay una pieza extra, repita los pasos. 3. Verifique que tenga to...
Page 109 - CÓMO INVERTIR EL CIERRE DE LA PUERTA DE LA
109 CÓMO INVERTIR EL CIERRE DE LA PUERTA DE LA SECADORA (OPCIONAL) Cómo quitar el ensamblaje de la puerta 1. Coloque una toalla o un paño suave en la parte superior de la secadora o de la superficie de trabajo, para evitar rayar la superficie. 2. Quite tres de los cuatro tornillos que sostienen la b...
Page 110 - CÓMO INVERTIR EL CIERRE DE LA PUERTA
110 CÓMO INVERTIR EL CIERRE DE LA PUERTA DE LA SECADORA (OPCIONAL) Invierta la bisagra 1. Use un destornillador de hoja plana pequeño para quitar los 2 tapones largos de la puerta interior. Deslice la hoja del destornillador debajo de los tapones, sin rayar la superficie de la puerta interior, y lev...
Page 112 - INSTRUCCIONES DE MANTENIMIENTO DE LA LAVADORA/; Para limpiar el interior de la lavadora:; Lavadora
112 Limpieza del sello/fuelle de la puerta 1. Abra la puerta de la lavadora y quite cualquier prenda o artículo que estuviera dentro de la misma. 2. Inspeccione la puerta interior de vidrio. Si hay desechos en ésta, límpiela con un paño húmedo. 3. Inspeccione el sello/fuelle de color que se encuentr...
Page 113 - Secadora; SI NECESITA AYUDA
113 INSTRUCCIONES DE MANTENIMIENTO DE LA LAVADORA/ SECADORA APILADAS Instrucciones de mantenimiento: ■ Limpie el filtro de pelusa antes y después de cada ciclo. ■ Cómo quitar la pelusa acumulada: En el interior de la carcasa de la secadora: Según el uso de la secadora, se debe quitar la pelusa cada ...
Page 114 - Información general sobre la lavadora/secadora
114 INSTRUCCIONES DE PROGRAMACIÓN DEL CONTROL ELECTRÓNICO NOTA: Después de haber instalado y enchufado la lavadora/ secadora, se mostrará “0 MINUTES” (0 Minutos) en las partes de la pantalla para la lavadora y la secadora. Después de que se hayan abierto y cerrado las puertas de la lavadora y de la ...
Page 115 - Precio del acumulador; Procedimientos de programación del control; Cómo utilizar los botones para programar los controles
115 INSTRUCCIONES DE PROGRAMACIÓN DEL CONTROL ELECTRÓNICO INICIO CON AGUA TIBIA (después de un corte de corriente) – Unos segundos después de que se reestablezca la electricidad, si un ciclo se encontraba funcionando cuando ocurrió el corte de corriente, destellará “RESELECT CYCLE” (Vuelva a selecci...
Page 116 - INSTRUCCIONES DE PROGRAMACIÓN DEL
116 Paramétrage en début d’exploitation Les laveuses/sécheuses sont préréglées en usine et ne nécessitent aucune programmation. Cependant, pour modifier les paramètres, suivre le guide des “Codes de paramétrage”.Le code au début de chaque segment est le paramètre par défaut défini en usine pour les ...
Page 121 - GARANTÍA LIMITADA DE MAYTAG COMMERCIAL LAUNDRY
121 GARANTÍA LIMITADA DE MAYTAG COMMERCIAL LAUNDRY MHN33PDCWW, MHN33PDCXW, MHN33PDCGW, MHN33PRCWW, MHN33PNCGW 1. Todos los demás costes, incluyendo mano de obra, transporte, envío o derechos de aduana de los recambios cubiertos. 2. Recambios especificados de fábrica si este electrodoméstico comercia...
Page 122 - NOTES