Page 7 - Explanation of general view; guide
7 ENGLISH (Original instructions) Explanation of general view 1-1. Bit protrusion 1-2. Tool base 1-3. Scale 1-4. Locking lever 1-5. Adjusting screw 1-6. Hex nut 2-1. Switch 2-2. OFF (O) side 2-3. ON ( I ) side 3-1. Speed adjusting dial 4-1. Tighten 4-2. Loosen 4-3. Hold 5-1. Tighten 5-2. Loosen 5-3....
Page 8 - SPECIFICATIONS; EC Declaration of Conformity
8 SPECIFICATIONS Model RT0700C Collet chuck capacity 6 mm, 8 mm, 1/4" or 3/8" No load speed (min -1 ) 10,000 - 30,000 Overall length 200 mm Net weight 1.8 kg Safety class /II • Due to our continuing programme of research and development, the specifications herein are subject to change withou...
Page 9 - TRIMMER SAFETY WARNINGS; Holding the work by your hand or against; Handle the bits very carefully.; SAVE THESE INSTRUCTIONS.; Adjusting bit protrusion; Constant speed control; Speed adjusting dial
9 serious injury. Save all warnings and instructions for future reference. GEB019-4 TRIMMER SAFETY WARNINGS 1. Hold power tool by insulated gripping surfaces, because the cutter may contact its own cord. Cutting a "live" wire may make exposed metal parts of the power tool "live" and ...
Page 10 - ASSEMBLY; Installing or removing trimmer bit; Use only the wrenches provided with the tool.; OPERATION; For the trimmer base
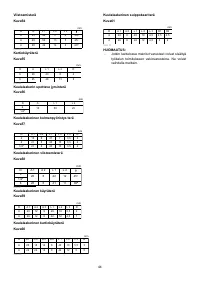
10 Number min -1 123 456 10,000 30,000 12,00017,000 22,00027,000 011932 CAUTION: • If the tool is operated continuously at low speeds for a long time, the motor will get overloaded, resulting in tool malfunction. • The speed adjusting dial can be turned only as far as 6 and back to 1. Do not force i...
Page 11 - Circular work; Pivot the tool around the nail in clockwise direction.
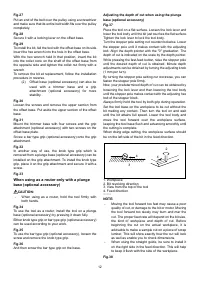
11 Fig.8 Secure the templet to the workpiece. Place the tool on the templet and move the tool with the templet guide sliding along the side of the templet. Fig.9 NOTE: • The workpiece will be cut a slightly different size from the templet. Allow for the distance (X) between the router bit and the ou...
Page 13 - Dust nozzle sets
13 Straight guide when using as a router (needed to use with guide holder (optional accessory)) The straight guide is effectively used for straight cuts when chamfering or grooving. 1 2 3 4 5 6 7 8 011988 Install the straight guide on the guide holder (optional accessory) with the wing nut. Insert t...
Page 14 - For the plunge base (optional accessory); MAINTENANCE; Replacing carbon brushes; OPTIONAL ACCESSORIES; Trimmer bits; Straight bit
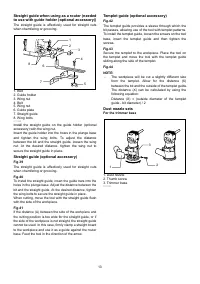
14 For the plunge base (optional accessory) 1 2 011853 Use the dust nozzle for dust extraction. Install the dust nozzle on the tool base using the thumb screw so that protrusion on the dust nozzle fit to the notch in the tool base. Then connect a vacuum cleaner to the dust nozzle. Fig.45 MAINTENANCE...
Page 16 - Förklaring till översiktsbilderna
16 SVENSKA (Originalbruksanvisning) Förklaring till översiktsbilderna 1-1. Fräsdjup 1-2. Bottenplatta 1-3. Skala 1-4. Låsspak 1-5. Inställningsskruv 1-6. Sexkantmutter 2-1. Strömbrytare 2-2. (O) OFF-sidan 2-3. ( I ) ON-sidan 3-1. Ratt för hastighetsinställning 4-1. Dra fast 4-2. Lossa 4-3. Håll 5-1....
Page 17 - SPECIFIKATIONER; EU-konformitetsdeklaration
17 SPECIFIKATIONER Modell RT0700C Max spännhylsediameter 6 mm, 8 mm, 1/4" eller 3/8" Obelastat varvtal (min -1 ) 10 000 - 30 000 Längd 200 mm Vikt 1,8 kg Säkerhetsklass /II • På grund av vårt pågående program för forskning och utveckling kan dessa specifikationer ändras utan föregående medde...
Page 18 - Hantera fräsverktygen försiktigt.; SPARA DESSA ANVISNINGAR.; Inställning av fräsdjupet; Konstant hastighetskontroll; Ratt för hastighetsinställning
18 Spara alla varningar och instruktioner för framtida referens. GEB019-4 SÄKERHETSVARNINGAR FÖR KANTFRÄS 1. Håll maskinen i de isolerade greppytorna eftersom maskinen kan komma i kontakt med sin egen kabel. Om maskinen kommer i kontakt med en strömförande ledning blir dess metalldelar strömförande ...
Page 19 - MONTERING; Montering eller demontering av fräsverktyg; ANVÄNDNING; För fräsens bottenplatta
19 Detta gör att ideal hastighet kan väljas för optimal materialbearbetning, dvs. hastigheten kan ställas in så att den lämpar sig för materialet och fräsdiametern. Se tabellen för förhållandet mellan inställningarna på ratten och ungefärlig verktygshastighet. Nummer min -1 123 456 10 000 30 000 12 ...
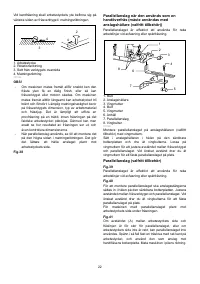
Page 21 - Distansbottenplatta (valfritt tillbehör); Montera maskinen på distansbottenplattan
21 Bottenplattans skydd borttaget från den fällbara bottenplattan (valfritt tillbehör) Montering av bottenplattans skydd, vilken har tagits bort från den fällbara bottenplattan på fräsens bottenplatta, tillåter byte av fräsens bottenplatta från en rund till en fyrkantig. För en annan applikation, ta...
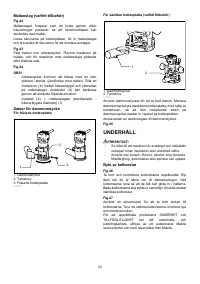
Page 23 - Satser för dammunstycke; UNDERHÅLL; Byte av kolborstar
23 Mallanslag (valfritt tillbehör) Fig.42 Mallanslaget fungerar som en hylsa genom vilket fräsverktyget passerar, så att handöverfräsen kan användas med mallar. Lossa skruvarna på bottenplattan, för in mallanslaget och dra sedan åt skruvarna för att montera anslaget. Fig.43 Fäst mallen mot arbetssty...
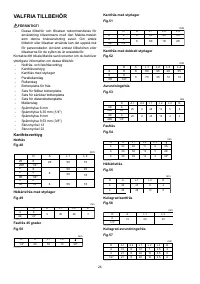
Page 24 - VALFRIA TILLBEHÖR; Kantfräsverktyg
24 VALFRIA TILLBEHÖR FÖRSIKTIGT! • Dessa tillbehör och tillsatser rekommenderas för användning tillsammans med den Makita-maskin som denna bruksanvisning avser. Om andra tillbehör eller tillsatser används kan det uppstå risk för personskador. Använd endast tillbehören eller tillsatserna för de syfte...
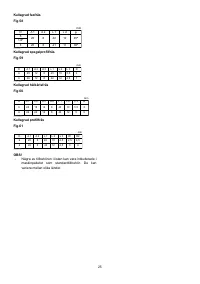
Page 25 - Kullagrad fasfräs; Kullagrad spegelprofilfräs; Kullagrad hålkärlsfräs; Kullagrad profilfräs
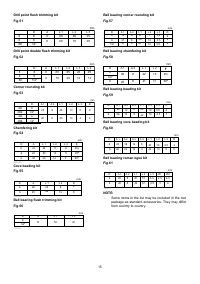
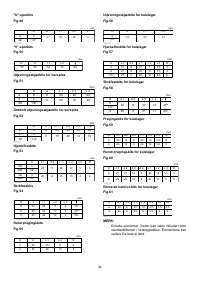
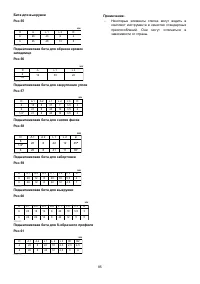
25 Kullagrad fasfräs Fig.58 mm D A 1 L 1 26 42 6 1/4" 45 60 6 20 A 2 8 8 41 L 2 12 11 006467 Kullagrad spegelprofilfräs Fig.59 mm D A 1 A 2 A 3 L 1 L 2 L 3 R 66 5,5 4 4,5 1012 7 26 12 8 42 20 12 8 40 006468 Kullagrad hålkärlsfräs Fig.60 mm D A 1 A 2 A 4 L 1 L 2 L 3 R 6 6 5,5 3 5 10 12 5 26 22 8 ...
Page 26 - Oversiktsforklaring
26 NORSK (originalinstruksjoner) Oversiktsforklaring 1-1. Bitsfremspring 1-2. Maskinfot 1-3. Skala 1-4. Låsehendel 1-5. Justeringsskrue 1-6. Sekskantmutter 2-1. Bryter 2-2. OFF (O)-side 2-3. ON ( I )-side 3-1. Hastighetsinnstillingshjul 4-1. Stramme 4-2. Løsne 4-3. Holde 5-1. Stramme 5-2. Løsne 5-3....
Page 27 - TEKNISKE DATA; eller mindre; EF-samsvarserklæring; Tomoyasu Kato
27 TEKNISKE DATA Modell RT0700C Kjokskapasitet 6 mm, 8 mm, 1/4" eller 3/8" Ubelastet turtall (min -1 ) 10 000 - 30 000 Total lengde 200 mm Nettovekt 1,8 kg Sikkerhetsklasse /II • Som følge av vårt kontinuerlige forsknings- og utviklingsprogram kan de tekniske dataene endres uten ytterligere ...
Page 28 - FUNKSJONSBESKRIVELSE; Justere bitsfremspring
28 Oppbevar alle advarsler og instruksjoner for senere bruk. GEB019-4 SIKKERHETSADVARSLER FOR SKJÆREMASKIN 1. Hold maskinen i det isolerte håndtaket, fordi skjæreren kan komme i kontakt med maskinens egen ledning. Hvis en strømførende ledning kuttes, vil uisolerte metalldeler av maskinen bli strømfø...
Page 29 - Montere eller demontere tilskjæringsbits; BRUK; For skjærefoten
29 Hastigheten øker når hjulet dreies i retning av nummer 6, og hastigheten reduseres når det dreies i retning av nummer 1. På denne måten kan den ideelle hastigheten velges for optimal materialbehandling, dvs. at hastigheten kan justeres korrekt for å passe til det aktuelle materialet og bitsdiamet...
Page 30 - Sirkelarbeid; Fotbeskytter fjernet fra vippefoten (valgfritt tilbehør); Fest deretter fotbeskytteren på skjærefoten.
30 riktig side i materetningen. Dette vil hjelpe deg å holde den i flukt med siden på arbeidsemnet. Fig.6 FORSIKTIG: • Siden overdreven skjæring kan overbelaste motoren eller skape vanskeligheter med å kontrollere verktøyet, må ikke skjæredybden være mer enn 3 mm på det dypeste når du skjærer spor. ...
Page 33 - Støvdysesett; VEDLIKEHOLD; Skifte kullbørster; VALGFRITT TILBEHØR; Tilskjæringsmaskinbits; Rett bits
33 Støvdysesett For skjærefoten 1 2 3 011989 For senkefoten (tilleggsutstyr) 1 2 011853 Bruk støvdysen til støvsuging. Monter støvdysen på verktøyfoten, slik at fremspringet på støvdysen passer i hakket i verktøyfoten. Koble så en støvsuger til støvdysen. Fig.45 VEDLIKEHOLD FORSIKTIG: • Forviss deg ...
Page 35 - Yleisselostus; ulkohalkaisija
35 SUOMI (alkuperäiset ohjeet) Yleisselostus 1-1. Terän työntymä 1-2. Työkalun pohja 1-3. Asteikko 1-4. Lukitusvipu 1-5. Säätöruuvi 1-6. Kuusiomutteri 2-1. Kytkin 2-2. OFF (O) -puoli 2-3. ON ( I ) -puoli 3-1. Nopeudensäätöpyörä 4-1. Kiristä 4-2. Löysää 4-3. Pidä 5-1. Kiristä 5-2. Löysää 5-3. Karaluk...
Page 36 - TEKNISET TIEDOT; VAKUUTUS EC-VASTAAVUUDESTA
36 TEKNISET TIEDOT Malli RT0700C Kiristysistukan kapasiteetti 6 mm, 8 mm, 1/4" tai 3/8" Tyhjäkäyntinopeus (min -1 ) 10 000 - 30 000 Kokonaispituus 200 mm Nettopaino 1,8 kg Turvaluokitus /II • Jatkuvan tutkimus- ja kehitysohjelman vuoksi pidätämme oikeuden muuttaa tässä mainittuja teknisiä om...
Page 37 - VAROITUS Lue kaikki turvallisuusvaroitukset ja; Varoitusten ja ohjeiden noudattamatta; Käsittele teriä hyvin varovasti.; SÄILYTÄ NÄMÄ OHJEET.
37 GEA010-1 Sähkötyökalujen käyttöä koskevat varoitukset VAROITUS Lue kaikki turvallisuusvaroitukset ja käyttöohjeet. Varoitusten ja ohjeiden noudattamatta jättäminen voi johtaa sähköiskuun, tulipaloon ja/tai vakavaan vammautumiseen. Säilytä varoitukset ja ohjeet tulevaa käyttöä varten. GEB019-4 LEI...
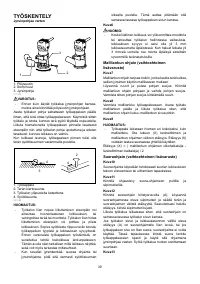
Page 38 - TOIMINTOJEN KUVAUS; Teräulkoneman säätö; Vakionopeuden säätö; Nopeudensäätöpyörä; KOKOONPANO; Jyrsinterän kiinnitys ja irrotus
38 TOIMINTOJEN KUVAUS HUOMIO: • Varmista aina ennen koneen säätöjen ja toiminnallisten tarkistusten tekemistä, että kone on sammutettu ja irrotettu pistorasiasta. Teräulkoneman säätö Kuva1 Säädä teräulkonema löysäämällä ensin lukitusvipu ja siirtämällä sitten työkalun pohjaa ylös tai alas säätöruuvi...
Page 39 - TYÖSKENTELY; Jyrsinpohjaa varten; Suoraohjain (vaihtoehtoinen lisävaruste)
39 TYÖSKENTELY Jyrsinpohjaa varten 1 2 3 011989 VAROITUS: • Ennen kuin käytät työkalua jyrsinpohjan kanssa, muista aina kiinnittää pölysuutin jyrsinpohjaan. Aseta työkalun pohja sahattavan työkappaleen päälle ilman, että terä ottaa työkappaleeseen. Käynnistä sitten työkalu ja odota, kunnes terä pyör...
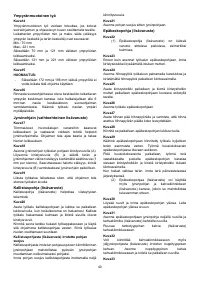
Page 40 - Asenna pohjan suojus sitten jyrsinpohjaan.
40 Ympyränmuotoinen työ Kuva14 Ympyränmuotoinen työ voidaan toteuttaa, jos kokoat suoraohjaimen ja ohjauslevyn kuvan osoittamalla tavalla. Leikattavien ympyröiden min. ja maks. säde (etäisyys ympyrän keskeltä ja terän keskeltä) ovat seuraavat: Min.: 70 mm Max.: 221 mm Säteeltään 70 mm ja 121 mm väli...
Page 41 - Kierrä sitten tankotyyppinen kahva paikalleen pohjaan.
41 Uran jyrsiminen pelkällä yläjyrsinpohjalla (lisävaruste) varustettuna HUOMIO: • Jos käytät laitetta urajyrsimenä, pidä laitteesta tukevasti kiinni kaksi käsin. Kuva34 Jos haluat käyttää työkalua urajyrsimenä, asenna laite yläjyrsinpohjaan (lisävaruste) painamalla työkalu kokonaan pohjan sisään. V...
Page 43 - KUNNOSSAPITO; Hiiliharjojen vaihtaminen; LISÄVARUSTEET; Jyrsinterät; Suora terä; Porakärjen upottama jyrsinterä; Porakärjen tuplasti upottama jyrsinterä; Kulmanpyöristys terä
43 KUNNOSSAPITO HUOMIO: • Varmista aina ennen tarkastuksia ja huoltotöitä, että laite on kone on sammutettu ja irrotettu virtalähteestä. • Älä koskaan käytä bensiiniä, ohentimia, alkoholia tai tms. aineita. Muutoin pinta voi halkeilla tai sen värit ja muoto voivat muuttua. Hiiliharjojen vaihtaminen ...
Page 45 - in; Kopskata skaidrojums; ķē
45 LATVIEŠU (ori ģ in ā l ā s instrukcijas) Kopskata skaidrojums 1-1. Uzga ļ a izcilnis 1-2. Darbar ī ka pamatne 1-3. Skala 1-4. Blo ķē šanas svira 1-5. Regul ē šanas skr ū ve 1-6. Sešš ķ aut ņ u uzgrieznis 2-1. Sl ē dzis 2-2. Puse IZSL Ē GT (O) 2-3. Puse IESL Ē GT ( I ) 3-1. Ā truma regul ē šanas s...
Page 46 - āģē; EK Atbilst; ņē; ņā
46 SPECIFIK Ā CIJAS Modelis RT0700C Ietvara sp īļ patronas jauda 6 mm, 8 mm, 1/4" vai 3/8" Apgriezieni min ū t ē bez slodzes (min -1 ) 10 000 - 30 000 Kop ē jais garums 200 mm Neto svars 1,8 kg Droš ī bas klase /II • D ēļ m ū su nep ā rtraukt ā s p ē tniec ī bas un izstr ā des programmas, še...
Page 48 - FUNKCIJU APRAKSTS; ļņ; ēļ; ēģ; MONT
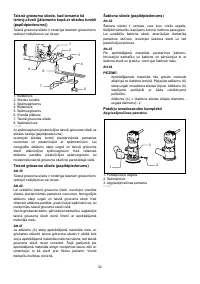
48 FUNKCIJU APRAKSTS UZMAN Ī BU: • Pirms regul ē jat vai p ā rbaud ā t instrumenta darb ī bu, vienm ē r p ā rliecinieties, vai instruments ir izsl ē gts un atvienots no barošanas. Uzga ļ a izci ļņ a regul ē šana Att.1 Lai noregul ē tu uzga ļ a izcilni, atbr ī vojiet aiztura sviru un virziet darbar ī...
Page 49 - ļā; Taisn
49 EKSPLUAT Ā CIJA Apgriez ē jmaš ī nas pamatnei 1 2 3 011989 BR Ī DIN Ā JUMS: • Pirms darbar ī ka izmantošanas ar apgriez ē jmaš ī nas pamatni vienm ē r uzst ā diet putek ļ u izvadcauruli uz apgriez ē jmaš ī nas pamatnes. Uzst ā diet darbar ī ka pamatni uz apstr ā d ā jam ā materi ā la, lai var ē t...
Page 50 - Pamatnes aizsargs no; Nob
50 vai ja apstr ā d ā jam ā materi ā la mala nav taisna, tad taisn ā griezuma sliedi nevar izmantot. Šaj ā gad ī jum ā pie apstr ā d ā jam ā materi ā la stingri nostipriniet taisnu d ē li un izmantojiet to k ā sliedi pret apgriez ē jmaš ī nas pamatni. Virziet darbar ī ku bulti ņ as virzien ā . Att.1...
Page 51 - UZMAN; PIEZ
51 Att.30 Atskr ū v ē jiet skr ū vi un no nob ī des pamatnes no ņ emiet augšda ļ u. Novietojiet mal ā pamatnes augšda ļ u. Att.31 Pie nob ī des pamatnes pl ā ksnes piestipriniet apgriez ē jmaš ī nas pamatni ar č etr ā m skr ū v ē m un papildrokturi (papildpiederums) ar div ā m skr ū v ē m. Pie papil...
Page 52 - Apgriez
52 Taisn ā griezuma sliede, kad izmanto k ā ierievju ē veli (j ā izmanto kop ā ar sliedes turekli (papildpiederums)) Taisn ā griezuma sliede ir noder ī ga taisniem griezumiem, veidojot noš ķē lumus vai rievas. 1 2 3 4 5 6 7 8 011988 Ar sp ā rnuzgriezni pieskr ū v ē jiet taisn ā griezuma sliedi uz sl...
Page 53 - Piestiprin; APKOPE; Ogles suku nomai; PAPILDU PIEDERUMI
53 Piestiprin ā majai pamatnei (papildpiederums) 1 2 011853 Putek ļ u izvadcauruli izmantojiet putek ļ u izs ū kšanai. Uzst ā diet putek ļ u izvadcauruli uz r ī ka pamatnes, izmantojot skr ū vi, t ā , lai putek ļ u izvadcaurules izvirz ī jums sakr ī t ar robu r ī ka pamatn ē . Tad pie putek ļ u izva...
Page 55 - Bendrasis aprašymas
55 LIETUVI Ų KALBA (Originali naudojimo instrukcija) Bendrasis aprašymas 1-1. Antgalio išsikišimas 1-2. Į rankio pagrindas 1-3. Skal ė 1-4. Fiksavimo svirtel ė 1-5. Reguliavimo varžtas 1-6. Šešiakamp ė veržl ė 2-1. Jungiklis 2-2. Pad ė t į IŠJUNGTA (O) 2-3. Pad ė t į Į JUNGTA ( I ) 3-1. Grei č io re...
Page 56 - SPECIFIKACIJOS; ES atitikties deklaracija
56 SPECIFIKACIJOS Modelis RT0700C Į vor ė s kumštelinio griebtuvo dydis 6 mm, 8 mm, 1/4" arba 3/8" Greitis be apkrovos (min -1 ) 10 000 - 30 000 Bendras ilgis 200 mm Neto svoris 1,8 kg Saugos klas ė /II • Atliekame nepertraukiamus tyrimus ir nuolatos tobuliname savo gaminius, tod ė l č ia pa...
Page 57 - SP
57 GEA010-1 Bendrieji persp ė jimai darbui su elektriniais į rankiais Į SP Ė JIMAS Perskaitykite visus saugos į sp ė jimus ir instrukcijas. Nesilaikydami žemiau pateikt ų į sp ė jim ų ir instrukcij ų galite patirti elektros sm ū g į , gaisr ą ir/arba sunk ų sužeidim ą . Išsaugokite visus į sp ė jimu...
Page 58 - VEIKIMO APRAŠYMAS; Nuolatinis grei; SURINKIMAS; Profiliavimo stakli
58 VEIKIMO APRAŠYMAS D Ė MESIO: • Prieš reguliuodami į rengin į arba tikrindami jo veikim ą visada patikrinkite, ar į renginys išjungtas, o laido kištukas - ištrauktas iš elektros lizdo. Antgalio išsikišimo reguliavimas Pav.1 Nor ė dami pareguliuoti antgalio išsikišim ą , atsukite fiksavimo svirt į ...
Page 59 - Tiesusis kreiptuvas (papildomas priedas)
59 Į SP Ė JIMAS: • Prieš naudodami š į į rank į su profiliavimo stakli ų pagrindu, ant profiliavimo stakli ų pagrindo visada sumontuokite dulki ų išleidimo antgal į . Pad ė kite į rank į pagrindu ant ruošinio, kur į pjausite, taip, kad antgalis ruošinio neliest ų . Į junkite į rank į ir palaukite, k...
Page 60 - taisas; Slenkamas pagrindas (papildomas priedas)
60 Profiliavimo kreiptuvas (papildomas priedas) Pav.17 Profiliavimo kreipikliu galima lengvai atlikti profilinius, lenktus pj ū vius baldams skirtose faneros plokšt ė se. Kreipiklio velen ė lis slenka kreive ir užtikrina tiksl ų pj ū v į . Pav.18 Sumontuokite profiliavimo kreipikl į ant į rankio pag...
Page 61 - Kreipkite tiesiai, naudodami kaip frez
61 Pav.35 Nor ė dami naudoti vamzdžio tipo ranken ą (pasirenkam ą pried ą ), atsukite varžt ą ir nuimkite ranken ė l ė s tipo ranken ą . Pav.36 Tada į sukite vamzdžio tipo ranken ą į pagrind ą . Pjovimo gylio nustatymas naudojant nuleidžiam ą pagrind ą (pasirenkam ą pried ą ) Pav.37 Pad ė kite į ran...
Page 62 - TECHNIN
62 Pav.41 Jeigu atstumas (A) tarp ruošinio ir pjovimo pad ė ties yra per didelis tiesiajam kreipikliui, arba jeigu ruošinys neteisus, tiesiojo kreipiklio naudoti negalima. Tokiu atveju, prie ruošinio tvirtai prispauskite tiesi ą lent ą ir naudokite j ą kaip kreiptuv ą , atr ė m ę į frezos pagrind ą ...
Page 63 - PASIRENKAMI PRIEDAI; Profiliavimo antgaliai
63 PASIRENKAMI PRIEDAI D Ė MESIO: • Su šiame vadove aprašytu į renginiu „Makita" rekomenduojama naudoti tik nurodytus priedus ir papildomus į taisus. Jeigu bus naudojami kitokie priedai ar papildomi į taisai, gali b ū ti sužaloti žmon ė s. Priedus arba papildomus į taisus naudokite tik pagal pas...
Page 65 - Üldvaate selgitus; sektsioon
65 EESTI (algsed juhised) Üldvaate selgitus 1-1. Otsaku kaugus 1-2. Tööriistaalus 1-3. Skaala 1-4. Lukustushoob 1-5. Reguleerkruvi 1-6. Kuuskantmutter 2-1. Lüliti 2-2. VÄLJAS (O) pool 2-3. SEES (I) pool 3-1. Kiiruseregulaator 4-1. Pinguta 4-2. Keerake lahti 4-3. Hoidke 5-1. Pinguta 5-2. Keerake laht...
Page 66 - TEHNILISED ANDMED; Tüüpiline A-korrigeeritud müratase vastavalt EN60745:; või vähem; EÜ vastavusdeklaratsioon
66 TEHNILISED ANDMED Mudel RT0700C Tsangpadruni maht 6 mm, 8 mm, 1/4" või 3/8" Ilma koormuseta kiirus (min -1 ) 10 000 - 30 000 Kogupikkus 200 mm Netomass 1,8 kg Kaitseklass /II • Meie jätkuva teadus- ja arendustegevuse programmi tõttu võidakse siin antud tehnilisi andmeid muuta ilma ette te...
Page 67 - HOIATUS Lugege läbi kõik ohutushoiatused ja; Hoiatuste ja juhiste mittejärgmine võib; Käsitsege lõikeotsikuid väga ettevaatlikult.; HOIDKE JUHEND ALLES.
67 GEA010-1 Üldised elektritööriistade ohutushoiatused HOIATUS Lugege läbi kõik ohutushoiatused ja juhised. Hoiatuste ja juhiste mittejärgmine võib põhjustada elektrišokki, tulekahju ja/või tõsiseid vigastusi. Hoidke alles kõik hoiatused ja juhised edaspidisteks viideteks. GEB019-4 SOONEFREESI OHUTU...
Page 68 - FUNKTSIONAALNE KIRJELDUS; Otsaku kauguse reguleerimine; Püsikiiruse juhtimine; Kiiruseregulaator; KOKKUPANEK
68 FUNKTSIONAALNE KIRJELDUS HOIATUS: • Kandke alati hoolt selle eest, et tööriist oleks enne reguleerimist ja kontrollimist välja lülitatud ja vooluvõrgust lahti ühendatud. Otsaku kauguse reguleerimine Joon.1 Otsaku kauguse reguleerimiseks lõdvendage lukustushooba ja nihutage tööriista alust regulee...
Page 69 - TÖÖRIISTA KASUTAMINE; Servamismasina alusele; Kinnitage juhtplaat poldi ja tiibmutri abil sirgjuhiku külge.
69 TÖÖRIISTA KASUTAMINE Servamismasina alusele 1 2 3 011989 HOIATUS: • Enne tööriista kasutamist servamismasina alusega paigaldage servamismasina alusele alati tolmuotsak. Asetage tööriista alus lõigatavale detailile, ilma et see detaili vastu puutuks. Seejärel lülitage tööriist sisse ja oodake, kun...
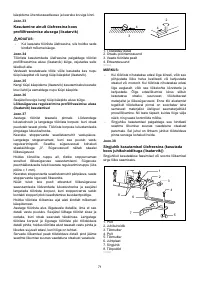
Page 70 - Ringlõigete tegemine; Kallutusaluselt (lisatarvik) eemaldatud aluse turvis; Monteerige tööriist nihutatud otsaku aluse külge.
70 Ringlõigete tegemine Joon.14 Ringlõigete tegemiseks tuleb monteerida sirgjuhik ja juhtplaat, nagu näidatud joonistel. Lõigatavate ringide minimaalne ja maksimaalne raadius (ringi keskpunkti ja tera keskpunkti vahekaugus) on järgmine: Min: 70 mm Max: 221 mm 70 mm kuni 121 mm raadiusega ringide lõi...
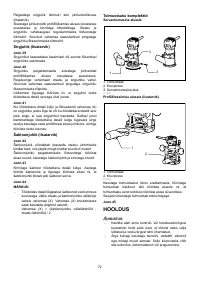
Page 72 - Tolmuotsaku komplektid; HOOLDUS
72 Paigaldage sirgjuhik tiibmutri abil juhikuhoidikusse (lisatarvik). Sisestage juhikuhoidik profiillõikamise aluses olevatesse avaustesse ja kinnitage tiibpoltidega. Otsaku ja sirgjuhiku vahekauguse reguleerimiseks lõdvendage tiibmutrit. Soovitud vahemaa saavutamisel pingutage sirgjuhiku fikseerimi...
Page 73 - Süsiharjade asendamine; VALIKULISED TARVIKUD; Servamisotsakud; Sirgotsak; Puuriteravikuga tasaservamisotsak; Puuriteravikuga kahekordne tasaservamisotsak; Nurgaümardusotsak
73 Süsiharjade asendamine Joon.46 Võtke välja ja kontrollige süsiharju regulaarselt. Asendage süsiharjad uutega, kui need on kulunud piirmärgini. Hoidke süsiharjad puhtad, nii on neid lihtne oma hoidikutesse libistada. Mõlemad süsiharjad tuleb asendada korraga. Kasutage ainult identseid süsiharju. J...
Page 75 - Объяснения
75 РУССКИЙ ЯЗЫК ( Исходная инструкция ) Объяснения общего плана 1-1. Выступ биты 1-2. Основание инструмента 1-3. Шкала 1-4. Стопорный рычаг 1-5. Регулировочный винт 1-6. Шестигранная гайка 2-1. Переключатель 2-2. Сторона OFF (O) ( Выкл .) 2-3. Сторона ON ( I ) ( Вкл .) 3-1. Поворотный регулятор скор...
Page 76 - MDF; Декларация; Makita Corporation
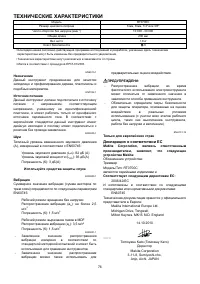
76 ТЕХНИЧЕСКИЕ ХАРАКТЕРИСТИКИ Модель RT0700C Размер цангового патрона 6 мм , 8 мм , 1/4" или 3/8" Число оборотов без нагрузки ( мин -1 ) 10 000 - 30 000 Общая длина 200 мм Вес нетто 1,8 кг Класс безопасности /II • Благодаря нашей постоянно действующей программе исследований и разработок , ук...
Page 77 - ПРЕДУПРЕЖДЕНИ
77 GEA010-1 Общие рекомендации по технике безопасности для электроинструментов ПРЕДУПРЕЖДЕНИЕ Ознакомьтесь со всеми инструкциями и рекомендациями по технике безопасности . Невыполнение инструкций и рекомендаций может привести к поражению электротоком , пожару и / или тяжелым травмам . Сохраните брош...
Page 78 - МОНТАЖ
78 ОПИСАНИЕ ФУНКЦИОНИРОВАНИЯ ПРЕДУПРЕЖДЕНИ : • Перед проведением регулировки или проверки работы инструмента всегда проверяйте , что инструмент выключен , а шнур питания вынут из розетки . Регулировка выступа биты Рис .1 Для настройки выступа насадки ослабьте стопорный рычаг и переместите основание ...
Page 79 - ЭКСПЛУАТАЦИЯ
79 ЭКСПЛУАТАЦИЯ Для основания кромкообрезчика 1 2 3 011989 ПРЕДУПРЕЖДЕНИ : • Перед началом использования инструмента с основанием кромкообрезчика обязательно устанавливайте на основание кромкообрезчика противопыльную насадку . Установите основание инструмента на распиливаемую деталь так , чтобы режу...
Page 83 - ТЕХОБСЛУЖИВАНИЕ
83 Рис .41 Если расстояние (A) между боковой стороной обрабатываемой детали и положением резки слишком широкое для прямой направляющей , или если боковая сторона обрабатываемой детали неровная , прямую направляющую использовать нельзя . В данном случае , надежно закрепите прямую доску к обрабатываем...
Page 84 - Режущий
84 Для обеспечения БЕЗОПАСНОСТИ и НАДЕЖНОСТИ оборудования , ремонт , любое другое техобслуживание или регулировку необходимо производить в уполномоченных сервис - центрах Makita, с использованием только сменных частей производства Makita. ДОПОЛНИТЕЛЬНЫЕ АКСЕССУАРЫ ПРЕДУПРЕЖДЕНИ : • Эти принадлежност...