Page 2 - SPECIFICATIONS; Applicable battery cartridge and charger; Recommended portable power pack; SAFETY WARNINGS; General power tool safety warnings; Save all warnings and instruc-
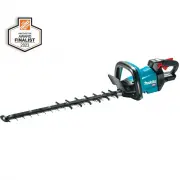
2 ENGLISH ENGLISH (Original instructions) SPECIFICATIONS Model: GHU01 GHU02 GHU03 Blade length 600 mm (23-5/8") 750 mm (29-1/2") Strokes per minute 2,000 / 3,000 / 4,000 /min 2,000 / 3,600 / 5,000 /min Overall length 1,123 mm (44-1/4") 1,120 mm (44") 1,262 mm (49-3/4") Rated volt...
Page 4 - Cordless Hedge Trimmer Safety
4 ENGLISH 7. Follow all charging instructions and do not charge the battery pack or tool outside the temperature range specified in the instruc - tions. Charging improperly or at temperatures outside the specified range may damage the battery and increase the risk of fire. Service 1. Have your power...
Page 5 - SAVE THESE INSTRUCTIONS.; Symbols
5 ENGLISH 10. Avoid dangerous environment. Don't use the tool in damp or wet locations or expose it to rain. Water entering the tool will increase the risk of electric shock. 11. When you use the tool on muddy ground, wet slope, or slippery place, pay attention to your footing. 12. Avoid working in ...
Page 6 - Important safety instructions for
6 ENGLISH Important safety instructions for battery cartridge 1. Before using battery cartridge, read all instruc- tions and cautionary markings on (1) battery charger, (2) battery, and (3) product using battery. 2. Do not disassemble or tamper the battery cartridge. It may result in a fire, excessi...
Page 7 - FUNCTIONAL; Installing or removing battery; Indicating the remaining battery
7 ENGLISH FUNCTIONAL DESCRIPTION CAUTION: Always be sure that the tool is switched off and the battery cartridge is removed before adjusting or checking function on the tool. Installing or removing battery cartridge CAUTION: Always switch off the tool before installing or removing of the battery car...
Page 8 - Tool / battery protection system; Overload protection
8 ENGLISH Tool / battery protection system The tool is equipped with a tool/battery protection system. This system automatically cuts off power to the motor to extend tool and battery life. The tool will automatically stop during operation if the tool is placed under one of the following conditions:...
Page 9 - Speed adjusting
9 ENGLISH CAUTION: Never put your finger on the switch when carrying. The tool may start uninten - tionally and cause injury. NOTICE: Do not pull the switch trigger hard with- out pressing the lock-off lever. This can cause switch breakage. Press the main power button to turn on the tool. To turn of...
Page 10 - Reverse button for debris removal; Electronic function; ASSEMBLY; Installing or removing the shear
10 ENGLISH Reverse button for debris removal WARNING: If the entangled branches or debris cannot be removed by the reverse func- tion, switch off the tool and remove the bat - tery cartridge, and then remove the entangled branches or debris using tools such as pliers. Failure to switch off the tool ...
Page 14 - OPERATION
14 ENGLISH OPERATION WARNING: Keep hands away from shear blades. CAUTION: Avoid operating the tool in very hot weather as much as practicable. When operat- ing the tool, be careful of your physical condition. CAUTION: Be careful not to accidentally contact a metal fence or other hard objects while t...
Page 15 - MAINTENANCE; Cleaning the tool
15 ENGLISH If the chip receiver is attached to the shear blades, it gathers discarded leaves and makes clean-up after- ward much easier. To cut a hedge side evenly, cut from the bottom to top. When trimming to make a round shape (trimming box- wood or rhododendron, etc.), trim from the root to the t...
Page 17 - Grease lubrication; TROUBLESHOOTING
17 ENGLISH Grease lubrication Interval of lubrication: Every 50 operating hours 1. Remove the bolt from the hole for lubrication. 1 ► 1. Bolt 2. Remove the cap from the grease vessel. Align the outlet of the grease vessel with the hole on the cover, and then press the outlet of the grease vessel ont...
Page 18 - MAKITA LIMITED WARRANTY
18 ENGLISH OPTIONAL ACCESSORIES CAUTION: These accessories or attachments are recommended for use with your Makita tool specified in this manual. The use of any other accessories or attachments might present a risk of injury to persons. Only use accessory or attachment for its stated purpose. If you...
Page 19 - ESPECIFICACIONES; Cartucho de batería y cargador aplicables; Unidad portátil de alimentación eléctrica recomendada; ADVERTENCIAS DE; Advertencias generales de; Conserve todas las advertencias
19 ESPAÑOL ESPAÑOL (Instrucciones originales) ESPECIFICACIONES Modelo: GHU01 GHU02 GHU03 Longitud de la cuchilla 600 mm (23-5/8″) 750 mm (29-1/2″) Carreras por minuto 2 000 cpm / 3 000 cpm / 4 000 cpm 2 000 cpm / 3 600 cpm / 5 000 cpm Longitud total 1 123 mm (44-1/4″) 1 120 mm (44″) 1 262 mm (49-3/4...
Page 23 - GUARDE ESTAS; Símbolos
23 ESPAÑOL 3. No abra ni mutile la(s) batería(s). El electrolito liberado es una sustancia corrosiva y puede que cause daños a la piel y los ojos. Pueden ser tóxi - cos si se llegan a tragar. 4. No cargue la batería bajo la lluvia ni en lugares mojados. 5. No cargue la batería en exteriores. 6. No m...
Page 25 - Instalación o extracción del; Indicación de la capacidad restante
25 ESPAÑOL DESCRIPCIÓN DEL FUNCIONAMIENTO PRECAUCIÓN: Asegúrese siempre de que la herramienta esté apagada y el cartucho de batería haya sido extraído antes de realizar cualquier ajuste o comprobación en la herramienta. Instalación o extracción del cartucho de batería PRECAUCIÓN: Apague siempre la h...
Page 26 - Sistema de protección para la; Ajuste del ángulo del mango
26 ESPAÑOL Sistema de protección para la herramienta/batería La herramienta está equipada con un sistema de protección para la herramienta/batería. Este sistema corta automáticamente la alimentación al motor para prolongar la vida de la herramienta y la batería. La herramienta se detendrá automática...
Page 27 - Accionamiento del interruptor de encendido; Ajuste de velocidad
27 ESPAÑOL Accionamiento del interruptor de encendido ADVERTENCIA: Por su seguridad, esta herramienta está equipada con una palanca de desbloqueo para evitar que la herramienta se ponga en marcha accidentalmente. NUNCA use la herramienta si se pone en marcha simplemente al presionar la palanca del i...
Page 28 - Botón de inversión para la; MONTAJE
28 ESPAÑOL Para el GHU01 Indicador Modo Velocidad de carrera Alto 4 000 cpm Medio 3 000 cpm Bajo 2 000 cpm Botón de inversión para la eliminación de residuos ADVERTENCIA: Si las ramas o residuos enredados no pueden ser retirados con la función inversa, apague la herramienta, extraiga el cartu- cho d...
Page 31 - Instalación o extracción del colector
31 ESPAÑOL 12. Coloque el rodamiento y la barra. 1 2 3 ► 1. Barra 2. Orificio pequeño 3. Rodamiento AVISO: Aplique una pequeña cantidad de grasa a la periferia interior del orificio pequeño de la barra. AVISO: Asegúrese de que la protuberancia en las cuchillas de cizalla encaje en el orificio pequeñ...
Page 32 - OPERACIÓN
32 ESPAÑOL 2. Alinee los orificios del colector de residuos con los tornillos de las cuchillas de cizalla, y luego fije el colector de residuos a las cuchillas de cizalla de forma segura. 1 ► 1. Orificio AVISO: Asegúrese de que el colector de residuos no se encime en el receptáculo de ramas. 1 ► 1. ...
Page 33 - MANTENIMIENTO
33 ESPAÑOL Sostenga la herramienta con ambas manos, presione la palanca del interruptor y jale el gatillo interruptor mientras presiona la palanca de desbloqueo, y luego desplácela hacia adelante. Para la operación básica, incline las cuchillas de cizalla hacia la dirección del podado y desplácelas ...
Page 35 - Lubricación con grasa
35 ESPAÑOL 4. Retire el tornillo y luego extraiga el receptáculo de ramas. 1 2 ► 1. Tornillo 2. Receptáculo de ramas 5. Ajuste el ángulo de una lima a 45° (para el GHU02/GHU03) o a 50° (para el GHU01), y afile la cuchilla superior en 3 direcciones con la lima. 1 2 ► (1) Lima (2) 45° o 50° PRECAUCIÓN...
Page 36 - RESOLUCIÓN DE PROBLEMAS; ACCESORIOS OPCIONALES; GARANTÍA LIMITADA DE MAKITA; Ésta Garantía no aplica para México
36 ESPAÑOL RESOLUCIÓN DE PROBLEMAS Antes de solicitar alguna reparación, primero realice una inspección por su cuenta. Si detecta algún problema que no esté explicado en el manual, no intente desensamblar la herramienta. En vez de esto, solicite la reparación a un centro de servicio autorizado de Ma...
Page 40 - Makita Corporation
Makita Corporation 3-11-8, Sumiyoshi-cho, Anjo, Aichi 446-8502 Japan www.makita.com 885875A943 GHU01-1 EN, ESMX 20210125