Page 2 - PRODUCT REGISTRATION
2 PRODUCT REGISTRATION Thank you for purchasing a Magic Chef® product. The first step to protect your new product is to complete the product registration on our website: www.mcappliance.com/register. The benefits of registering your product include the following: 1. Registering your product will all...
Page 3 - CONTENTS
3 CONTENTS PRODUCT REGISTRATION . . . . . . . . . . . . . . . . . . . . . . . . . . . . . . . . . . . . . . . . . . . . . . . . . . . . . 2PRECAUTIONS . . . . . . . . . . . . . . . . . . . . . . . . . . . . . . . . . . . . . . . . . . . . . . . . . . . . . . . . . . . . . . . 4IMPORTANT SAFETY INSTR...
Page 4 - PRECAUTIONS; EXPLANATION OF SYMBOLS; THIS PRODUCT IS INTENDED FOR
4 PRECAUTIONS EXPLANATION OF SYMBOLS WARNING Hazards or unsafe practices which COULD result in severe personal injury or death. CAUTION Hazards or unsafe practices which COULD result in minor personal injury. THIS PRODUCT IS INTENDED FOR HOUSEHOLD USE ONLY WARNING : Read and understand all safety pr...
Page 6 - IMPORTANT SAFETY INSTRUCTIONS
6 IMPORTANT SAFETY INSTRUCTIONS WARNING : To reduce the risk of fire, electrical shock, injury to persons, or damage when using the oven, follow basic precautions. 1. The anti-tipping bracket must be installed and securely attached to the range. Check to ensure the anti-tipping bracket is securely a...
Page 8 - SPECIFICATIONS
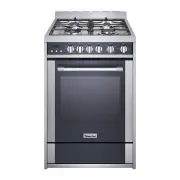
8 SPECIFICATIONS Height 35.5” (900 mm) Width 23.6” (600 mm) Depth 23.6” (600 mm) Depth with Backsplash 25.0” (635mm) Product Weight 132 lbs. y ti c a p a C e l b a s U / t e N y ti c a p a C l a t o T / s s o r G 35.5” (900 mm) 1.8’’ (46mm) 25.0” (635mm) 23.6” (600 mm) Figure 1 2.62 Cu. Ft. 2.96 Cu....
Page 9 - PARTS AND FEATURES; PRODUCT PARTS & ACCESSORIES
9 PARTS AND FEATURES PRODUCT PARTS & ACCESSORIES CONTROL PANEL Figure 2 Figure 3 c a b d e Function Buttons Clock and Timer Burner Controller Oven Controller a. Back Wall Plate (1) b. Gas Cooktop Grate (1) c. Control Panel (1) d. Oven Door Handle (1) e. Oven Window (1) f. Oven Racks (2) g. Grill...
Page 10 - BEFORE USE; COOKWARE AND THE CHARACTERISTICS
10 BEFORE USE WARNING : Failure to follow these instructions can result to serious injury or death. • DO NOT let the burner flames extend beyond the edge of the pan. • Turn off all controls when burners are not in use. • ALWAYS use the LITE position when igniting the top burners and make sure the bu...
Page 11 - OPERATION INSTRUCTIONS - GAS BURNER; BURNER GRATES; SEALED SURFACE BURNERS
11 Figure 4 Figure 5 OPERATION INSTRUCTIONS - GAS BURNER BURNER GRATES c d a b c a. Rapid Burner: The front left burner is designed to give maximum power when fully on. This burner is used to rapidly bring liquids to a boil and cook large quantities of food. b. Auxiliary Burner: The front right burn...
Page 12 - HOW TO LIGHT THE SURFACE BURNERS; IN CASE OF POWER FAILURE
12 Figure 6 Figure 7 HOW TO LIGHT THE SURFACE BURNERS 1. Push in and turn the control knob counterclockwise to the LITE position. All surface burners will click but only the burner with control knob turned to LITE will produce a flame. 2. After the burner ignites, turn the control knob to the desire...
Page 13 - OPERATION INSTRUCTIONS - OVEN; OVEN; COOKING MODES
13 Figure 8 OPERATION INSTRUCTIONS - OVEN OVEN POSITIONING RACKS AND BAKEWARE NOTE : To avoid damage to the porcelain finish, DO NOT place food or bakeware directly on the oven door or bottom. Positioning Oven Rack 1. Slightly tilt up the front edge of the rack and slide rack back until it clears th...
Page 16 - CARE AND MAINTENANCE; CLEANING COOKTOP
16 Figure 14 CARE AND MAINTENANCE CLEANING COOKTOP Removing Trivets1. The trivets located in the recessed area of the hob. 2. They can be removed for cleaning by carefully lifting them from the hob. 3. Clean by washing in warm soapy water. Make sure to dry thoroughly. 4. DO NOT drop the trivet into ...
Page 17 - OVEN LIGHT REPLACEMENT
17 Oven Door Exterior • It is recommended to use glass cleaner and paper towel or non-abrasive plastic scrubbing pad. • It is recommended to apply glass cleaner to soft cloth or sponge. • DO NOT apply directly to panel. Grates and End Caps • DO NOT clean until the grates and caps have cooled. • DO N...
Page 18 - TROUBLESHOOTING
18 TROUBLESHOOTING Cooktop Problem Possible Causes Solutions Burner does not ignite. There is no power to the cooker top. Check to see the unit is plugged in. Replace fuse or reset circuit breaker. Burner does not operate. Air may be in the gas line. To release air from the gas line, turn on any one...
Page 20 - LIMITED WARRANTY
20 LIMITED WARRANTY MC Appliance Corporation warrants each new Gas Range to be free from defects in material and workmanship, and agrees to remedy any such defect or to furnish a new part(s), at the company’s option, for any part(s) of the unit that has failed during the warranty period. Parts and l...
Page 21 - Printed in China
24 CNA International, Inc. d/b/a MC Appliance Corporation. All rights reserved. Magic Chef® logo is a registered trademark of CNA International, Inc. www.mcappliance.com Printed in China
Page 22 - LEA ESTE MANUAL ANTES DE UTILIZAR SU ESTUFA; Modelo MCSRG24S; A GAS Y GUÁRDELO; Manual del usuario
21 LEA ESTE MANUAL ANTES DE UTILIZAR SU ESTUFA Modelo MCSRG24S 2 A GAS Y GUÁRDELO PARA FUTURA REFERENCIA. Estufa a Gas Independiente de 24 pulgadas Manual del usuario
Page 23 - REGISTRACIóN DEL PRODUCTO
22 REGISTRACIóN DEL PRODUCTO Gracias por comprar el producto Magic Chef®. El primer paso para proteger su nuevo producto es completar la forma de registración en nuestra pagina web: www.mcappliance.com/register. Los beneficios de registrar su producto incluyen lo siguiente: 1. Al registrar su produc...
Page 24 - ÍNDICE
23 ÍNDICE REGISTRO DEL PRODUCTO . . . . . . . . . . . . . . . . . . . . . . . . . . . . . . . . . . . . . . . . . . . . . . . . . . . 22PRECAUCIONES . . . . . . . . . . . . . . . . . . . . . . . . . . . . . . . . . . . . . . . . . . . . . . . . . . . . . . . . . . . . . 24INSTRUCCIONES DE SEGURIDAD ...
Page 25 - PRECAUCIONES; ExPLICACIÓN DE LOS SÍMBOLOS; ESTE PRODUCTO ES SÓLO
24 PRECAUCIONES ExPLICACIÓN DE LOS SÍMBOLOS ADVERTENCIA Peligros o prácticas inseguras que PODRÍAN provocar lesiones personales graves o muerte. PRECAUCIóN Peligros o prácticas inseguras que PODRÍAN provocar lesiones personales leves. ESTE PRODUCTO ES SÓLO PARA USO DOMÉSTICO ADVERTENCIA : Lea y comp...
Page 27 - INSTRUCCIONES DE SEGURIDAD IMPORTANTES
26 INSTRUCCIONES DE SEGURIDAD IMPORTANTES ADVERTENCIA : Para reducir el riesgo de incendio, descarga eléctrica o lesiones personales al momento de utilizar el horno,sigas las precauciones básicas. 1. El soporte antivuelco debe ser instalado y firmemente sujetado a la estufa. Verifique para asegurars...
Page 29 - ESPECIFICACIONES
28 ESPECIFICACIONES Altura 35,5” (900 mm) Ancho 23,6” (600 mm) Profundidad 23,6” (600 mm) Profundidad con protector contra salpicaduras 25,0” (635mm) Peso del producto 132 libras. e l b a z il it U / a t e N d a d i c a p a C l a t o T / a t u r B d a d i c a p a C 35,5” (900 mm) 1,8’’ (46mm) 25,0” ...
Page 30 - PARTES Y FUNCIONES; ACCESORIOS & PARTES DEL PRODUCTO
29 PARTES Y FUNCIONES ACCESORIOS & PARTES DEL PRODUCTO PANEL DE CONTROL Figura 2 Figura 3 c a b d e Botones de funciones Reloj y temporizador Controlador del quemador Controlador del horno a. Placa de la pared posterior (1) b. Parrilla de la superficie de cocción de Gas (1) c. Panel de control (...
Page 31 - ANTES DE USAR; UTENSILIOS DE COCINA Y LAS CARACTERÍSTICAS
30 ANTES DE USAR ADVERTENCIA : No seguir estas instrucciones puede resultar en muerte, incendio o descarga eléctrica. • NO permita que las llamas del quemador se extiendan más allá del borde de la cacerola. • Apague todos los controles cuando los quemadores no estén en uso. • SIEMPRE utilice la posi...
Page 32 - INSTRUCCIONES DE FUNCIONAMIENTO - QUEMADOR DE GAS; PARRILLAS SOBRE LOS QUEMADORES; SUPERFICIE DE QUEMADORES SELLADA
31 Figura 4 INSTRUCCIONES DE FUNCIONAMIENTO - QUEMADOR DE GAS PARRILLAS SOBRE LOS QUEMADORES c d a b c a. Quemador rápido: El quemador delantero izquierdo está diseñado para dar máximo poder cuando está totalmente encendido. Este quemador se utiliza para llevar líquidos a ebullición en forma rápida ...
Page 33 - EN CASO DE FALLA DE ALIMENTACIÓN
32 Figura 6 Figura 7 CÓMO ENCENDER LOS QUEMADORES DE LA SUPERFICIE 1. Presiones y gire la perilla de control en el sentido de las agujas del reloj a la posición LITE. Todos los quemadores de la superficie harán clic pero sólo el quemador con la perilla de control colocada en LITE producirá una llama...
Page 34 - INSTRUCCIONES DE FUNCIONAMIENTO - HORNO; HORNO
33 Figura 8 INSTRUCCIONES DE FUNCIONAMIENTO - HORNO HORNO QUEMADORES COLOCACIÓN DE LAS PARRILLAS Y LOS IMPLEMENTOS PARA HORNEAR NOTA : Para evitar daños al terminado de porcelana, NO coloque alimentos o implementos para hornear directamente en la puerta del horno o el fondo. Colocación de la parrill...
Page 35 - MODOS DE COCCIÓN
34 MODOS DE COCCIÓN Precalentamiento (Preheating) • Precalentar significa llevar el horno hasta una temperatura específica antes de colocar el alimento en el horno. • Precaliente el horno según indique su receta. • El precalentado es genial para hornear pasteles, galletas, masas y panes. Hornear (Ba...
Page 37 - CUIDADO Y MANTENIMIENTO; LIMPIEZA DE LA SUPERFICIE DE COCCIÓN; LIMPIEZA DEL HORNO
36 Figura 14 CUIDADO Y MANTENIMIENTO LIMPIEZA DE LA SUPERFICIE DE COCCIÓN Remoción de los trébedes1. Los trébedes colocados en el área hueca del quemador. 2. Ellos pueden ser retirados para limpieza levantándolos cuidadosamente del quemador 3. Límpielos lavándolos con agua tibia jabonosa. Asegúrese ...
Page 38 - CAMBIO DE LA LUZ DEL HORNO
37 • Se recomienda utilizar detergente líquido o limpiador de múltiples usos. Enjuague bien con agua limpia y seque con un paño suave, sin pelusas. • Se recomienda restregar en la dirección del grano para evitar daños. Exterior de la puerta del horno • Se recomienda usar limpiador de vidrio y papel ...
Page 40 - SOLUCIóN DE PROBLEMAS
39 SOLUCIóN DE PROBLEMAS Superficie de cocción Problema Causas posibles Soluciones El quemador no se enciende. No hay energía a la superficie de cocción. Verifique que la unidad esté conectada. Reemplace el fusible o reestablezca el interruptor. El quemador no funciona correctamente. Puede haber air...
Page 43 - GARANTÍA LIMITADA
42 GARANTÍA LIMITADA MC Appliance Corporation garantiza que todas las Estufa a gas carecen de defectos en el material y la mano de obra y acuerda solucionar cualquiera de estos defectos o instalar la(s) parte(s) nueva(s) (a elección de la compañía) en caso de que la unidad haya fallado durante el pe...
Page 44 - Impreso en China
43 CNA International, Inc. realiza negocios bajo el nombre de MC Appliance Corporation. Derechos reservados. El logotipo Magic Chef® es una marca registrada de CNA International, Inc. www.mcappliance.com Impreso en China