LTMATE HDGTM714T - User Manual
LTMATE HDGTM714T Hob – User Manual, read for free online in PDF format. We hope this helps you resolve any issues you may have. If you have further questions, please contact us through the contact form.


Table of Contents:
- Page 2 – Safety Warnings
- Page 3 – Congratulations
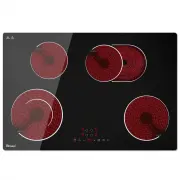
- Page 4 – Product Overview; Top View; Heating zone Power; Total Rating Power
- Page 5 – User interface
- Page 6 – Protection from over-heating; Power level
- Page 7 – Before using your New Ceramic Hob; Using the Touch Controls
- Page 8 – Using your Ceramic Hob; To start cooking
- Page 9 – Using Child Lock Function; To lock the controls; Using the Timer
- Page 10 – Using the Double ring zone
- Page 11 – Care and maintenance; Warning; Always switch off the electricity supply before
- Page 13 – Trouble shooting; Technical Specification; Cooking Hob; Zones; Supply Voltage
- Page 14 – Installation; Selection of installation equipment
- Page 15 – Before you install the hob,make sure that; When you have installed the hob,make sure that
- Page 16 – fi g
- Page 17 – Cautions; Connecting the hob to the mains power supply; All installation work must be carried out by a
- Page 18 – This appliance requires a 32 Amp Miniature Circuit Breaker.
Ceramic
Hob
Instruction
Manual
/
Installation
Manual
MODEL:
GTM724T
"Loading the manual" means you need to wait until the file loads and becomes available for online reading. Some manuals are very large, and the time they take to appear depends on your internet speed.
Summary
2 Safety Warnings Your safety is important to us.Please read this information before using your cooktop. The appliance is not to be used by persons (including children) with reduced physical, sensory or mental capabilities,or lack of experience and knowledge,unless they have been given supervision...
3 CAUTION:The cooking process has to be supervised.A short term cooking process has to be supervised continuously. WARNING:Unattended cooking on a hob with fat or oil can be dangerous and may result in a fire. If the supply cord is damaged,it must be replaced by the manufacturer,its service ag...
4 Product Overview Top View Heating zone Power Heating Zone Max.Power ( 220-240V~ 50/60Hz ) 2200W/1100W(230~) (Double ring) 1200W(230~) 2000W/1100W(230~) 1800W(230~) Total Rating Power 7200W(230~)