Lifespan Fitness LFEX-VCYCLE - User Manual
Lifespan Fitness LFEX-VCYCLE Exercise Bike – User Manual, read for free online in PDF format. We hope this helps you resolve any issues you may have. If you have further questions, please contact us through the contact form.


R
R
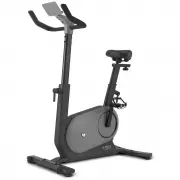
V-Cycle Smart Exercise
Bike with NeoWatt
USER MANUAL
NOTE:
Product may vary slightly from the item pictured due
to model upgrades. This manual may be subject to
updates or changes. Up to date manuals are available
through our website at
www.lifespanfitness.com.au
Read all instructions carefully before using
this product. Retain this owner’s manual for
future reference.
IMPORTANT
All nuts and bolts are to be checked and tightened on
a regular basis. This includes pedals and other moving
parts. Failure to do so may cause damage to your
threads and void your warranty.
WARNING: Read all instructions before using this machine.
It is important your machine receives regular maintenance to
prolong its useful life. Failing to regularly maintain your machine
may void your warranty.
Please keep this manual with you at all times.
•
The bike is for home use only.
•
Please correctly connect the power adapter before use.
•
To avoid injury, warm up before using the bike.
•
Incorrect or excessive training can result in serious injury.
•
To avoid accidents, keep the bike out of the reach of children and
pets.
•
To avoid getting hurt, keep your hands away from any moving
parts of the bike.
•
Use only original parts from the manufacturer. Changes or
modifications to this unit voids the warranty.
•
In case of malfunction, stop using the bike immediately.
•
Make sure to secure your feet with the pedal straps while using
the bike.
•
The bike should be placed on a solid, level and horizontal
surface.
•
Allow a clearance of 60cm on each side of the bike.
•
Perform regular maintenance for optimal performance and
longevity. To ensure safety, the bike must be checked for wear
and damage on a regular basis.
•
Children under the age of 14, persons with reduced physical,
sensory or mental capabilities, as well as persons with a lack of
knowledge must be given supervision or instruction before using
the bike. DO NOT allow children to perform maintenance without
supervision or to play with the bike.
•
This adapter has passed CQC certification and can be used with
this bike only. Do not use it with any other products. In case of
any damage, please consult the manufacturer or an authorized
agency for replacement.
I. IMPORTANT SAFETY INSTRUCTIONS
II. DAILY STORAGE AND MAINTENANCE
•
This bike is for indoor home use only. Do not store the bike
outdoors, near water, or at high humidity levels.
•
Please store in a place with shade and shelter to avoid any
damage to the surface.
•
Inspect regularly all screws or parts that need fastening.
•
Inspect bike seat regularly. Tighten the nuts whenever they
get loose. Inspect the cranks and pedals regularly. Tighten
them if necessary.
•
Clean the bike regularly.
Product name:
Model:
Color:
Display:
Wireless
connection:
Equitment type:
Resistance type:
Drive:
Adaptor Input:
Adaptor Output:
Rated voltage:
Max weight:
Height range:
Equipment class:
Dimension:
Net weight:
SPECIFICATION
AI-POWERED EXERCISE
BIKE
MG-C05
Gray
Nixie tube
Bluetooth
Crank training
Speed independent
Belt drive
AC 100-240V, 50-60Hz
DC 24V, 2A
DC 24V
120kg
150-190cm
HB
1020 x 510 x 1250 mm
35kg
III. EXPLODED DIAGRAM
1
2
5
6
7
8
11
15
16
18
3
4
9
10
12
13
14
17
Part No. Description
1
Console
2
Pad holder
3
Handlebar
4
USB port
5
Console post
6
Handlebar holder
7
Pedal
8
Crank
9
Front stabilizer
Part No.
Description
10
Transport wheels
11
Leveling feet
12
Rear stabilizer
13
Power port
14
Power Switch
15
Seatpost holder
16
Seatpost
17
Seat adjuster
18
Saddle
TOOLS
5mm socket
head wrench x 1
Power Adapter x 1
Bike Stabiliser
x 2
Pedals x 2
User Manual x 1
5mm socket
head wrench x 1
15mm Allen
wrench x 1
M6 screws x 4
M10 screws x 4
IV. ASSEMBLY INSTRUCTIONS
INSTALL THE PEDALS
STEP 7. Handlebar Height Adjustment
STEP 10. Set the Seat Height
STEP 1
Place the front and rear
stabilizer as indicated.
Manually tighten the
FOUR M10 screws.
Tighten with a 6mm Allen
wrench.
STEP 2
Connect the cord inside of
the handlebars to the cord
inside of the bike unit. Pay
attention to the direction
of the handlebars when
connecting.
STEP 3. Mount
Handlebars
First, manually spin the
FOUR M6 screws with
your hands as tight as
possible. Then, tighten
and lock in the FOUR M6
screws with the 5mm
Allen Wrench.
WARNING
: Make sure to
place the screw shim
properly, with the
cambered surface clung
to the post.
1
2
STEP 4. Install
Pedal Straps
Feed the left (L) and right
(R) Pedal Straps into the
matching pedals; notched
side facing inwards.
L
L
STEP 5. Install
Left Pedal
STEP 8. Seat
Adjustment
Install the Left Pedal
(marked with an L) onto the
left crank. First, manually
tighten the screw
with your hands (turning
counter—clockwise).
Then, use the 15 mm
Open- End Wrench to fully
tighten (turning counter-
clockwise).
L
L
STEP 6. Install
Right Pedal
Install the Right PedaI
(marked with an R) onto
the right crank. First,
manually tighten the
screw with your hands
(turning clockwise). Then,
use the 15 mm Open-end
Wrench to fully tighten
(turning clockwise).
1. Turn the handlebar holder
counterclockwise to loosen
the console post.
2. Adjust the handlebar to a
proper height.
3. Turn the handlebar holder
clockwise to tighten.
4. Pull the handlebar holder
outwards.
5. Turn the handlebar holder
to a vertically downward
direction.
Sit on the saddle and
place you heel on the
pedal. Make sure the
crank arm which is
currently supporting
your foot is point down
and in line with the
seatpost. You are at
the correct seat height
if your leg is fully
extended. That means
you leg is straight, but
without overextending
your knee.
N
P
O
Q
R
1. Turn the Seatpost holder
counterclockwise to loosen
the console post
2. Adjust the seatpost to a
proper height.
3. Turn the Seatpost holder
clockwise to tighten.
4. Pull the Seatpost holder
outwards.
N
P
O
Q
R
5. Turn the Seatpost holder to a vertically downward direction.
Caution: It is important to keep the Seatpost holder vertically
downwards as projecting handles with interfere with your
movements.
STEP 9. Seat
Adjustment
Maximum height.
For you safety, make sure to
keep STOP mark inside the
frame while adjusting the
seat height.
STEP 11. Seat
Depth Adjustment
Turn the Below
Seat Knob counter
clockwise to loosen.
Move the seat forward
or back. Turn the
knob clockwise to
tighten.
STEP 12.
Bike Stabillization
Rotate each leveling
foot until the bike
rests firmly on the
floor.
"Loading the manual" means you need to wait until the file loads and becomes available for online reading. Some manuals are very large, and the time they take to appear depends on your internet speed.