Page 3 - English; CMD + SHIFT CLICK TO CHANGE COPY; TABLE OF CONTENTS
3 English CMD + SHIFT CLICK TO CHANGE COPY MULTI-COOKER INSTRUCTIONS TABLE OF CONTENTS MULTI-COOKER SAFETY Important safeguards ������������������������������������������������������������������������������������������� 4 Electrical requirements ������������������������������������������������������...
Page 4 - IMPORTANT SAFEGUARDS; When using electrical appliances, basic safety
4 CMD + SHIFT CLICK TO CHANGE COPY CMD + SHIFT CLICK TO CHANGE COPY MULTI-COOKER SAFETY MULTI-COOKER SAFETY IMPORTANT SAFEGUARDS When using electrical appliances, basic safety precautions should always be followed to reduce the risk of fire, electric shock, and/or injury to persons including the fol...
Page 6 - PARTS AND FEATURES; Electrical requirements; SAVE THESE INSTRUCTIONS
6 MULTI-COOKER SAFETY PARTS AND FEATURES Electrical requirements Voltage: 220–240 VACFrequency: 50/60 HzWattage: 700 Watts NOTE: This Multi-Cooker has a grounded (earthed) plug� To reduce the risk of electrical shock, this plug will fit in an outlet only one way� If the plug does not fit in the outl...
Page 7 - Parts and accessories
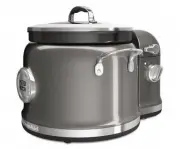
7 English MULTI-COOKER SAFETY PARTS AND FEATURES F Sear Parts and accessories Control panel Built-in lifting handles Tempered glass lid with integrated strainer/pour openings CERAMASHIELD nonstick cooking pot with pouring spout 2-in-1 Reversible steam basket/ roasting rack Flip for convenient roasti...
Page 8 - Controls
8 PARTS AND FEATURES COOKING MODES GUIDE Controls Sear F C h Temperature/ Time Display Cook Mode Display Timer adjust Temperature Adjust Select Power/Cancel Button Cooking Mode/ Option Select < and > Power on/ status light W10778323A_v05.indd 8 3/26/15 5:17 PM
Page 9 - COOKING METHODS
9 English PARTS AND FEATURES COOKING MODES GUIDE COOKING METHODS Cooking Method Preset Temp* in ° C Min. Temp Setting in ° C Max. Temp Setting in ° C Keep Warm Max. Cook time (hrs.) Sear 230 ° C 220 ° C 230 ° C Manual 2 Sauté 175 ° C 160 ° C 190 ° C Manual 2 Bake 175 ° C 165° C 190° C Manual 2 Boil/...
Page 11 - Soup
11 English COOKING METHODS STEP-BY-STEP COOKING MODES Step-by-step cooking modes use multiple cooking methods to cook different kinds of foods� Use the key to advance from step to step� If it is necessary to back up a step, press the key� Rice allows you to cook a variety of rice types, from white r...
Page 12 - Risotto
12 STEP-BY-STEP COOKING MODES STEP-BY-STEP COOKING MODES Risotto mode uses multiple preprogrammed steps to make preparing risotto a snap, from sautéing the meat or vegetables to simmering the rice to perfection�1� Press to scroll to Risotto mode� Press to select� 2� The Multi-Cooker will preheat to ...
Page 13 - Porridge; WARNING; Food Poisoning Hazard
13 English STEP-BY-STEP COOKING MODES STEP-BY-STEP COOKING MODES Use this mode to create delicious porridges quickly and easily, any time of day�1� Press to scroll to Porridge mode� Press to select� 2� The Multi-Cooker will preheat to Boil� If setting a cooking time, set the timer, then press to sta...
Page 14 - Manual Cooking Modes; Medium; Warm
14 ADDITIONAL FEATURES AND SETTINGS MANUAL COOKING Manual Cooking Modes Manual cooking mode has 6 preset ranges to allow you to cook like on a regular stove top: Warm, Low, Med-Lo, Medium, Med- Hi, and High� Each range is adjustable based on the chart below�To select and adjust a manual mode:1� Pres...
Page 15 - ADDITIONAL FEATURES AND SETTINGS; Changing between Fahrenheit and Celsius; Display Language; Langua
15 English ADDITIONAL FEATURES AND SETTINGS MANUAL COOKING Changing between Fahrenheit and Celsius To change between degrees Fahrenheit and degrees Celsius, press and hold the button for 3 seconds� F Sear Fh C Saute F Sear F h C Saute Display Language To adjust the displayed language:1� Scroll to Se...
Page 16 - Using the timer as a kitchen timer; Last selections used
16 ADDITIONAL FEATURES AND SETTINGS GETTING STARTED Using the timer as a kitchen timer The Multi-Cooker timer can be used as a kitchen timer when not in a cooking mode� F Sear F h C Set Tim 1 Press and hold � F Sear F h C Set Tim 2 Press or to adjust the time up or down� Pressing and holding or will...
Page 17 - Before first use
17 English ADDITIONAL FEATURES AND SETTINGS GETTING STARTED Before first use 1. Place the Multi-Cooker on a dry, flat, level surface such as a countertop or table� 2. Be sure the sides and back of the Multi-Cooker are at least 10 cm away from any walls, cabinets, or objects on the counter or table� ...
Page 18 - Setting a cooking mode
18 OPERATING THE MULTI-COOKER OPERATING THE MULTI-COOKER 6 Place ingredients in the cooking pot� Setting a cooking mode F Sear Sauté Fh C F Sear Sear Fh C F Sear Set Tim Fh C 2 Use or to scroll to the desired cooking mode or method� The default cooking temperature will be displayed� 1 Press � F Sear...
Page 19 - OPERATING THE MULTI-COOKER; When cooking is complete
19 English OPERATING THE MULTI-COOKER OPERATING THE MULTI-COOKER F Sear Keep W F h C 8 If using a Step Cooking mode, a tone will sound when the timer (if set) reaches 00:00� Press and the timer will begin counting down for the next Step� The Multi-Cooker will shut off automatically after the set tim...
Page 20 - Roasting with the roasting rack; Steaming with the steam basket
20 OPERATING THE MULTI-COOKER TIPS FOR GREAT RESULTS Roasting with the roasting rack 1 If cooking with the roasting rack, add any ingredients for regular cooking to cooking pot� F Sear 2 Lower roasting/steaming rack into cooking pot as shown and place ingredients to be roasted on rack� Cover with li...
Page 21 - Cooking tips; Searing and Sautéing:
21 English OPERATING THE MULTI-COOKER TIPS FOR GREAT RESULTS Cooking tips Refer to the following tips for getting the most out of the different cooking modes� Searing and Sautéing: • For best browning results, pat exterior surfaces of meat dry with paper towels before sautéing or searing� • It’s imp...
Page 23 - TIPS FOR GREAT RESULTS; Is the Multi-Cooker plugged into; If your Multi-Cooker malfunctions or fails to operate; TROUBLESHOOTING; Cleaning your Multi-Cooker
23 English TIPS FOR GREAT RESULTS CARE AND CLEANING • Is the Multi-Cooker plugged into a grounded (earthed) outlet? Plug the Multi-Cooker into a grounded (earthed) outlet� • Is the fuse in the circuit to the Multi-Cooker in working order? If you have a circuit breaker box, make sure the circuit is c...
Page 29 - This appliance is intended to be used in household
5 STIR TOWER ACCESSORY SAFETY STIR TOWER ACCESSORY SAFETY Electrical requirements Voltage: 220-240 VACFrequency: 50/60 HzWattage: 50 Watts NOTE: This Stir Tower is designed for use only with the KitchenAid Multi-Cooker� 18. This appliance is intended to be used in household and similar applications ...
Page 30 - SELECTING STIR SPEEDS; Stir speed selector
6 USING THE STIR TOWER PARTS AND FEATURES Parts and accessories Power ON indicator Side scraper attachment Constant stir speeds Intermittent stir modes Flip and stir attachment Your Stir Tower features 3 stir speeds and 2 intermittent stir modes� The power ON indicator will be lit whenever the Stir ...
Page 31 - Attaching the Stir Tower to the Multi-Cooker
7 USING THE STIR TOWER PARTS AND FEATURES SELECTING STIR SPEEDS Before first use 1. Remove all packaging materials, if present� 2. Wash the Side Scraper and Flip-and-Stir Wand attachments in hot, sudsy water� Dry thoroughly� Attaching the Stir Tower to the Multi-Cooker 4 Raise the stir arm by pressi...
Page 32 - Cooking with the Stir Tower
8 USING THE STIR TOWER USING THE STIR TOWER 6 Place the cooking pot in the Multi-Cooker, aligning the notch in the cooking pot with the stir arm� 5 With the lid removed, align the back of the Multi-Cooker with the front of the Stir Tower� Make sure the Stir Speed Selector is set to 0 (OFF) position ...
Page 33 - Tips and tricks
9 USING THE STIR TOWER USING THE STIR TOWER 3 When cooking has finished, set the Stir Tower to 0 (Off) and remove the lid from the pot using a hot pad or oven mitt� 4 Press down on the release lever and raise the stir arm before removing the cooking pot� Tips and tricks • For most food preparation, ...
Page 34 - Cleaning your Stir Tower; • Food not being stirred, or sticking to; If your Stir Tower malfunctions or fails to operate
10 CARE AND CLEANING TROUBLESHOOTING Cleaning your Stir Tower Remove the Stir Tower from the Multi- Cooker before cleaning�• Allow Stir Tower and accessories to cool completely before cleaning� • Do not use abrasive cleaners or metal scouring pads� They could scratch the surface� • Stir Tower arm fe...