Page 2 - Safety Precautions
Safety Precautions When the equipment is installed in a cabinet or on a shelf, make sure that it has sufficient space on all sides to allow for ventilation (10 cm or more on both sides, on top and at the rear).Do not block the ventilation holes.(If the ventilation holes are blocked by a newspaper, o...
Page 4 - Precautions on Playing Back 3D Images
Precautions on Playing Back 3D Images Images recorded in 2D mode can be converted to 3D and played back on this unit. You can enjoy realistic and powerful 3D images by playing back on a 3D compatible TV. Before use, please read the following precautions to ensure safe and comfortable viewing of the ...
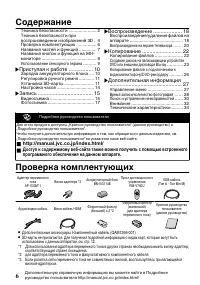
Page 6 - Contents; Verifying the Accessories
Contents Safety Precautions ............................... 2 Precautions on Playing Back 3D Images ............................................................. 4 Verifying the Accessories .................... 6 Names of Parts and Functions ............. 7 Names of Buttons and Functions on the LCD ...
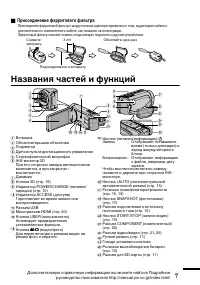
Page 7 - Attaching the Core Filter; Names of Parts and Functions
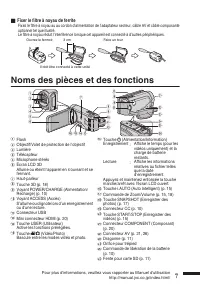
o Attaching the Core Filter Attach the core filter to the power cord of the AC adapter, AV Cable and optional Component Cable as shown in the illustration. The core filter reduces interference when this unit is connected to other devices. . To be connected to this unit Release the stopper. Wind once...
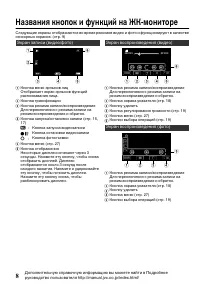
Page 8 - Names of Buttons and Functions on the LCD Monitor
Names of Buttons and Functions on the LCD Monitor The following screens are displayed during the video and still image modes, and operate as the touch screens. (p. 9) Recording Screen (Video/Still Image) 1 6 2 3 4 5 A Face Short Cut Menu Button Displays a short cut screen of face recognition functio...
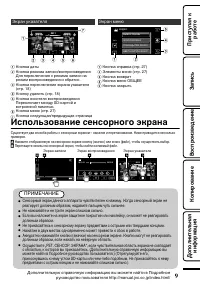
Page 9 - Using the Touch Screen; NOTE
Index Screen 2011 2011 1 2 4 3 5 6 7 A Date Button B Recording/Playback Mode Button Switches between recording and playback modes. C Index Screen Switching Button (p. 18) D Delete Button (p. 18) E Playback Media Button Switches between SD card and built-in memory. F Menu Button (p. 27) G Page Forwar...
Page 10 - Charging the Battery Pack; To detach the battery pack; Connect the DC connector.; Attach the battery pack.; Getting Started
Charging the Battery Pack (Base) To detach the battery pack Charging finished: Goes out Charging in progress: Blinks Charging Lamp Plug in the power. AC Adapter To AC Outlet(110 V 㨪 240 V) Cover Connect the DC connector. Mark Align the top of the battery with the mark on this unit, and slide in unti...
Page 11 - Grip Adjustment; Inserting an SD Card; Close the LCD monitor.; To remove the card
Grip Adjustment Pad Attach the pad Adjust the length of the belt Pull back the pad Inserting an SD Card To record to the card, it is necessary to perform media settings. (p. 13) When no card is available, set media settings to “BUILT-IN MEMORY” for recording. By default, it is set to “BUILT-IN MEMOR...
Page 13 - To use an SD card; To use SD cards that have been; All data on the card will be deleted
o To use an SD card Recording can be performed on a card when “REC MEDIA FOR VIDEO” or “REC MEDIA FOR IMAGE” of “COMMON” menu is set to “SD CARD”. A Open the LCD monitor. 0 The unit turns on. B Tap “MENU”. C Tap “ Q ”. D Tap “REC MEDIA FOR VIDEO” or “REC MEDIA FOR IMAGE”. REC MEDIA FOR IMAGE REC MED...
Page 14 - Clock Setting; To reset the clock; Open the LCD monitor.; To change the display language; Perform steps
Clock Setting 1 Open the LCD monitor. . 0 The unit turns on. When the LCD monitor is closed, the unit turns off. 2 Tap “YES” when “SET DATE/TIME!” is displayed. . NO YES SET DATE/TIME! 3 Set the date and time. . 1 2011 1 10 00 SET TIME DATE CLOCK SETTING 0 When the year, month, day, hour, or minute ...
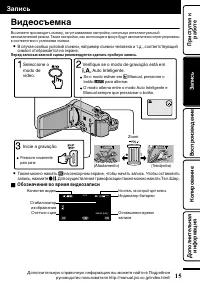
Page 15 - Video Recording; Indications during video recording; Recording
Video Recording You can record without worrying about the setting details by using the Intelligent Auto mode. Settings such as exposure and focus will be adjusted automatically to suit the shooting conditions. 0 In case of specific shooting scenes such as person etc., its icon is displayed on the sc...
Page 16 - Face registration
NOTE 0 The estimated recording time of the supplied battery pack is approximately 40 minutes. (p. 28) 0 Do not remove the battery pack, AC adapter, or SD card when the access lamp is lighted. The recorded data may become unreadable. 0 3D images are supported by the LCD monitor of this unit. To switc...
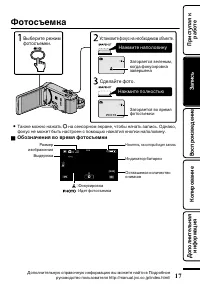
Page 17 - Still Image Recording; Press fully; Indications during still image recording
Still Image Recording Lights up during still image recording Press fully Take a still image. Lights up in green when focused Press halfway Set the focus on the subject. Select still image mode. 0 You can also tap Q on the touch screen to record. However, focus cannot be set by pressing halfway. o In...
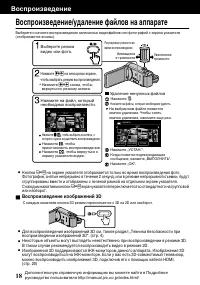
Page 18 - Playing Back/Deleting Files on this Unit; Playing back 3D images; Playback
Playing Back/Deleting Files on this Unit Select and play back the recorded videos or still images from an index screen (thumbnail display). . 2011 2011 REL ALL SEL ALL DELETE Tap “OK”. Tap “EXECUTE” when the confirma-tion message appears. A delete mark appears on the selected file. To remove the del...
Page 19 - To capture a still image during playback; Tap “; D display warnings
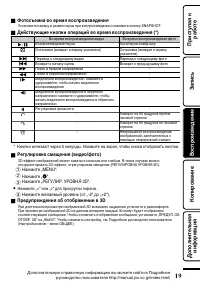
o To capture a still image during playback Pause the playback and press the SNAPSHOT button. o Usable operation buttons during playback (*) During video playback During still image playback d / e Playback/pause Start/pause slideshow u Stop (returns to index screen) Stop (returns to index screen) g A...
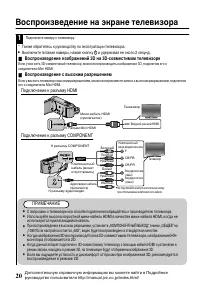
Page 20 - Playing Back on TV; Playing back 3D images on a 3D compatible TV; Connecting to the HDMI connector
Playing Back on TV 1 Connect to a TV. * Refer also to the instruction manual of the TV in use. 0 Turn off the camcorder by pressing the M button for about 2 seconds. o Playing back 3D images on a 3D compatible TV If you are using a 3D compatible TV, you can play back 3D images by connecting to the H...
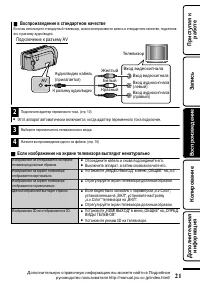
Page 21 - Playing back in standard quality; Connecting to the AV connector; When images look unnatural on the TV
o Playing back in standard quality If you are using a conventional TV, you can play back in standard quality by connecting to the AV connector. Connecting to the AV connector . AV Red White Yellow TV Audio Input (R) Audio Input (L) Video Input Video Input AV Cable (Provided) To AV Connector 2 Connec...
Page 22 - Copying Files; Copying
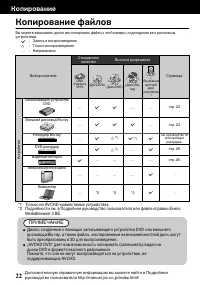
Copying Files You can create discs or copy the files on this unit by connecting it to various devices. I : Recordable and playable F : Playable only — : Not applicable Media Selection Standard Quality HD Quality Page . (VHS Tape) . (DVD Disc) . (DVD Disc) . (Blu-ray Disc) . (Device’s internal HDD) D...
Page 23 - Connect the USB cable provided with; To play back the created disc
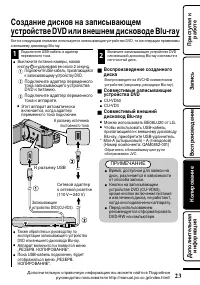
Creating Discs with a DVD Writer or External Blu-ray Drive While a DVD writer is used in the following explanation, the same operations apply for an external Blu-ray drive. 1 Connect the USB cable and the AC adapter. 0 Turn off the camcorder by pressing the M button for about 2 seconds. A Connect th...
Page 24 - Copying All Files; “YES”; When “DO YOU WANT TO
Copying All Files Select video or still image mode. 1 Tap “CREATE FROM ALL” (video) or “SAVE ALL” (still image). . CREATE FROM ALL VIDEO BACKUP You can change the media to save to by selecting “CHANGE REC. MEDIA”. (For details, refer to the Detailed User Guide.) 0 Selecting “Blu-ray DISC” enables yo...
Page 25 - Selecting Files to Copy; CREATE BY DATE/SAVE BY; Tap to select a recording date.; SELECT FROM SCENES/SELECT; After selecting all the files, tap “SAVE”.; To check the disc created
Selecting Files to Copy Select video or still image mode. 1 Tap “SELECT AND CREATE” (video) or “SELECT AND SAVE” (still image). . SELECT AND CREATE VIDEO BACKUP 0 You can change the media to save to by selecting “CHANGE REC. MEDIA”. (For details, refer to p. 24 or the Detailed User Guide.) 2 Tap on ...
Page 26 - Preparation on TV and VCR/DVD recorder
Dubbing Files by Connecting to a DVD Recorder or VCR You can dub videos in standard quality by connecting to a DVD recorder or VCR. Refer also to the instruction manuals of the TV, DVD recorder, VCR, etc. 1 Connect to a VCR/DVD recorder. 0 Turn off the camcorder by pressing the M button for about 2 ...
Page 27 - Operating the Menu; To exit the screen; For more information on the settings,; Further Information
Operating the Menu You can configure various settings using the menu. 1 Tap “MENU”. 0 The menu differs according to the mode in use. 0 Tap “ V ” to display the face short cut menu. 2 Tap the desired menu. . FOCUS ASSIST COLOR FOCUS ASSIST FOCUS SCENE SELECT VIDEO 0 Tap “ Q ” to display the “COMMON” ...
Page 28 - Recordable Time/Number of Images
Recordable Time/Number of Images You can check the video recording time by pressing the INFO button. Approximate Video Recording Time Quality Built-in Memory SDHC/SDXC Card 32 GB 4 GB 8 GB 16 GB 32 GB 48 GB 64 GB UXP 2 h 50 m 20 m 40 m 1 h 20 m 2 h 50 m 4 h 20 m 5 h 50 m XP 4 h 30 m 1 h 2 h 4 h 10 m...
Page 29 - D display on LCD monitor
Approximate Recording Time (Using Battery) o 3D display on LCD monitor Battery Pack Actual Recording Time Continuous Recording Time BN-VG114E 35 m 1 h BN-VG121E 50 m 1 h 30 m BN-VG138E 1 h 30 m 2 h 45 m o 2D display on LCD monitor Battery Pack Actual Recording Time Continuous Recording Time BN-VG114...
Page 30 - Troubleshooting; Refer to the FAQ of new products on JVC’s website.
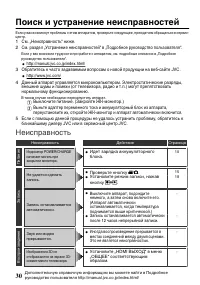
Troubleshooting If you encounter problems with this unit, check the following before requesting service. 1 Refer to “Trouble” below.2 Refer to the “Troubleshooting” section in the “Detailed User Guide”. If you have difficulties operating the unit, refer to the detailed descriptions in the “Detailed ...
Page 32 - Cautions
Cautions Battery Pack The supplied battery pack is a lithium-ion battery. Before using the supplied battery pack or an optional battery pack, be sure to read the following cautions: • To avoid hazards ... do not burn. ... do not short-circuit the terminals. Keep it away from metallic objects when no...
Page 34 - Specifications
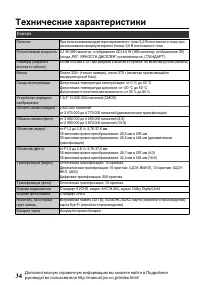
Specifications Camera Power supply Using AC adapter: DC 5.2 V, Using battery pack: DC 3.6 V Power consumption 4.1 W (LCD monitor 2D display) 4.6 W (LCD monitor 3D display) (when “MONITOR BRIGHTNESS” is set to “STANDARD”) Dimensions (W x H x D) 54 mm x 62 mm x 121 mm (W x H x D: excluding grip belt)M...
Page 36 - Index; TRA
Index A AC adapter ............................... 10, 32 AV Connection ......................... 21, 26 B Battery Pack ............................. 10, 32 C Clock Adjust ................................... 14 Component Connection ................. 20 D Date/Time Setting .......................... ...
Page 37 - ȗȝșȚȣȟȕȡȚȥȕ; Ɩˀʾw; ȟəɉɛɓɗɎəɜɓɗɋɗɍɚɛɋɗɘɗɔɥɐɗɋɉɛɎɔɨ; ⁄4ÊÊÆƓƭƭ÷ÄË·ÂƔÀÌ1Ɣ1ÅƔÀÆƭ¿Äo»ÎƔ3⁄4ÊÃÂƭ; RU FR
ȗȝșȚȣȟȕȡȚȥȕ Ɩˀʾʷ ȟəɉɛɓɗɎəɜɓɗɋɗɍɚɛɋɗɘɗɔɥɐɗɋɉɛɎɔɨ ȖɔɉɌɗɍɉəɑɕɋɉɚɐɉɘɗɓɜɘɓɜɍɉɖɖɗɌɗɘəɗɍɜɓɛɉƔȤɎəɎɍɑɚɘɗɔɥɐɗɋɉɖɑɎɕɘəɗɠɑɛɉɒɛɎɑɖɝɗəɕɉɟɑɧɘɗɛɎɞɖɑɓɎɊɎɐɗɘɉɚɖɗɚɛɑɑɕɎəɉɕɘəɎɍɗɚɛɗəɗɏɖɗɚɛɑƑɓɗɛɗəɉɨɑɐɔɗɏɎɖɉɖɉɚɛəƔʹɑɚɛəƔʺʹƑɠɛɗɊɤɌɉəɉɖɛɑəɗɋɉɛɥɊɎɐɗɘɉɚɖɗɎɑɚɘɗɔɥɐɗɋɉɖɑɎɍɉɖɖɗɌɗɘəɗɍɜɓɛɉƔ Ɣ ȤɗɍəɗɊɖɗɎəɜɓɗɋɗɍɚɛɋɗɘɗɔɥɐɗɋɉɛɎɔɨ șɔɨɦɛɗɌɗ...
Page 38 - ȧɎɞɖɑɓɉɊɎɐɗɘɉɚɖɗɚɛɑ
ȧɎɞɖɑɓɉɊɎɐɗɘɉɚɖɗɚɛɑ BHИMAHИE: ДЛЯ ПPEДOTВPAЩEHИЯ OПACHOCTИBOCПЛAMEHEHИЯ ИЛИ ЭЛEKTPИЧECKOГOУДAPA HE ПOДBEPГAЙTE ДAHHЫЙ AППAPATBOЗДEЙCTBИЮ ДOЖДЯ ИЛИ BЛAГИ. ПРИМЕЧАНИЯ: • Табличка с техническими данными и мерыпредосторожности расположены на нижнейи/или задней стороне основного устройства.Пластинка с се...
Page 41 - ȤɗɚɔɎɘəɗɚɕɗɛəɉɑɐɗɊəɉɏɎɖɑɒʺɖɎɗɊɞɗɍɑɕɗɞɗəɗɡɗɗɛɍɤɞɉɛɥƔ
ȡɎəɤɘəɎɍɗɚɛɗəɗɏɖɗɚɛɑ 4 ȠɧɍɨɕƑɚɛəɉɍɉɧɢɑɕɘɗɋɤɡɎɖɖɗɒɠɜɋɚɛɋɑɛɎɔɥɖɗɚɛɥɧɓɚɋɎɛɜƑɐɉɊɗɔɎɋɉɖɑɨɕɑɚɎəɍɟɉƑɑɔɑɓɗɛɗəɤɎɖɎɞɗəɗɡɗɚɎɊɨɠɜɋɚɛɋɜɧɛƑɚɛəɉɍɉɧɛɗɛɖɎɍɗɚɤɘɉɖɑɨƑɜɚɛɉɔɗɚɛɑɑɔɑɖɉɞɗɍɨɛɚɨɋɚɗɚɛɗɨɖɑɑɉɔɓɗɌɗɔɥɖɗɌɗɗɘɥɨɖɎɖɑɨƑɖɎəɎɓɗɕɎɖɍɜɎɛɚɨɘəɗɚɕɉɛəɑɋɉɛɥɑɐɗɊəɉɏɎɖɑɨʺƔ ȝɞɚɗɚɛɗɨɖɑɎɕɗɏɎɛɜɞɜɍɡɑɛɥɚɨƔ 4 ȚɚɔɑɜɋɉɚɎɚɛɥɘəɗɊɔɎɕɤɚɗɐəɎɖɑɎ...
Page 42 - ȦɗɍɎəɏɉɖɑɎ; ȤəɗɋɎəɓɉɓɗɕɘɔɎɓɛɜɧɢɑɞ
ȦɗɍɎəɏɉɖɑɎ ȧɎɞɖɑɓɉɊɎɐɗɘɉɚɖɗɚɛɑƔƔƔƔƔƔƔƔƔƔƔƔƔƔƔƔƔƔƔƔƔƔʹȧɎɞɖɑɓɉɊɎɐɗɘɉɚɖɗɚɛɑɘəɑɋɗɚɘəɗɑɐɋɎɍɎɖɑɑɑɐɗɊəɉɏɎɖɑɒʺƔ ʻȤəɗɋɎəɓɉɓɗɕɘɔɎɓɛɜɧɢɑɞƔƔƔƔƔƔƔƔƔƔƔƔƔƔƔƔʽȢɉɐɋɉɖɑɨɠɉɚɛɎɒɑɝɜɖɓɟɑɒƔƔƔƔƔƔƔƔƔƔƔƔƔƔʾȢɉɐɋɉɖɑɨɓɖɗɘɗɓɑɝɜɖɓɟɑɒɖɉțȟƖɕɗɖɑɛɗəɎƔƔƔƔƔƔƔƔƔƔƔƔƔƔƔƔƔƔƔƔƔƔƔƔƔƔƔƔƔƔƔƔƔƔƔƔƔƔƔƔƔƔƔƔʿȝɚɘɗɔɥɐɗɋɉɖɑɎɚɎɖɚɗəɖɗɌɗɦɓəɉɖɉƔƔƔƔƔƔƔƔƔƔˀ...
Page 43 - ȤəɑɚɗɎɍɑɖɎɖɑɎɝɎəəɑɛɗɋɗɌɗɝɑɔɥɛəɉ; ȢɉɐɋɉɖɑɨɠɉɚɛɎɒɑɝɜɖɓɟɑɒ
4 ȤəɑɚɗɎɍɑɖɎɖɑɎɝɎəəɑɛɗɋɗɌɗɝɑɔɥɛəɉ ȤəɑɚɗɎɍɑɖɑɛɎɝɎəəɑɛɗɋɤɒɝɑɔɥɛəɓɡɖɜəɜɘɑɛɉɖɑɨɉɍɉɘɛɎəɉɘɎəɎɕɎɖɖɗɌɗɛɗɓɉƑɉɜɍɑɗƭɋɑɍɎɗɓɉɊɎɔɨɑɍɗɘɗɔɖɑɛɎɔɥɖɗɌɗɓɗɕɘɗɖɎɖɛɖɗɌɗɓɉɊɎɔɨƑɓɉɓɘɗɓɉɐɉɖɗɖɉɑɔɔɧɚɛəɉɟɑɑƔȩɎəəɑɛɗɋɤɒɝɑɔɥɛəɚɖɑɏɉɎɛɘɗɕɎɞɑƑɓɗɌɍɉɉɘɘɉəɉɛɘɗɍɓɔɧɠɎɖɓɍəɜɌɑɕɜɚɛəɗɒɚɛɋɉɕƔ Ɣ Подсоединяется к аппарату Снимите заглушку. Обмота...
Page 44 - ȢɉɐɋɉɖɑɨɓɖɗɘɗɓɑɝɜɖɓɟɑɒɖɉțȟƖɕɗɖɑɛɗəɎ
ȢɉɐɋɉɖɑɨɓɖɗɘɗɓɑɝɜɖɓɟɑɒɖɉțȟƖɕɗɖɑɛɗəɎ ȦɔɎɍɜɧɢɑɎɦɓəɉɖɤɗɛɗɊəɉɏɉɧɛɚɨɋɗɋəɎɕɨəɎɏɑɕɗɋɋɑɍɎɗɑɝɗɛɗɑɝɜɖɓɟɑɗɖɑəɜɧɛɋɓɉɠɎɚɛɋɎɚɎɖɚɗəɖɤɞɦɓəɉɖɗɋƔƺɚɛəƔˀƻ ȲɓəɉɖɐɉɘɑɚɑƺɋɑɍɎɗƭɝɗɛɗƻ 1 6 2 3 4 5 ȟɖɗɘɓɉɕɎɖɧɨəɔɤɓɗɋɔɑɟȣɛɗɊəɉɏɉɎɛɦɓəɉɖɨəɔɤɓɗɋɝɜɖɓɟɑɒəɉɚɘɗɐɖɉɋɉɖɑɨɔɑɟɉƔ ȟɖɗɘɓɉɛəɉɖɚɝɗɓɉɟɑɑ ȟɖɗɘɓɉəɎɏɑɕɉɐɉɘɑɚɑƭɋɗɚɘəɗɑɐɋɎɍɎɖɑɨșɔɨɘɎəɎɓ...
Page 45 - ȝɚɘɗɔɥɐɗɋɉɖɑɎɚɎɖɚɗəɖɗɌɗɦɓəɉɖɉ; ȤȥȝȡȚȬȕȢȝȚ
ȲɓəɉɖɜɓɉɐɉɛɎɔɨ 2011 2011 1 2 4 3 5 6 7 ȟɖɗɘɓɉɍɉɛɤ ȟɖɗɘɓɉəɎɏɑɕɉɐɉɘɑɚɑƭɋɗɚɘəɗɑɐɋɎɍɎɖɑɨșɔɨɘɎəɎɓɔɧɠɎɖɑɨɚəɎɏɑɕɉɐɉɘɑɚɑɖɉəɎɏɑɕɋɗɚɘəɗɑɐɋɎɍɎɖɑɨɑɗɊəɉɛɖɗƔ ȟɖɗɘɓɉɘɎəɎɓɔɧɠɎɖɑɨɦɓəɉɖɉɜɓɉɐɉɛɎɔɨƺɚɛəƔʸʿƻ ȟɖɗɘɓɜɜɍɉɔɑɛɥƺɚɛəƔʸʿƻ ȟɖɗɘɓɉɖɗɚɑɛɎɔɨɋɗɚɘəɗɑɐɋɎɍɎɖɑɨȤɎəɎɓɔɧɠɉɎɛɕɎɏɍɜƖɓɉəɛɗɒɑɋɚɛəɗɎɖɖɗɒɘɉɕɨɛɥɧƔ ȟɖɗɘɓɉɕɎɖɧƺɚɛəƔʹʾƻ ȟ...
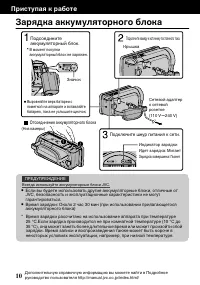
Page 46 - ȜɉəɨɍɓɉɉɓɓɜɕɜɔɨɛɗəɖɗɌɗɊɔɗɓɉ; Отсоединение аккумуляторного блока; Подключите шнур питания к сети.; Подключите камеру к источнику постоянного тока.; ȤəɑɚɛɜɘɉɨɓəɉɊɗɛɎ
ȜɉəɨɍɓɉɉɓɓɜɕɜɔɨɛɗəɖɗɌɗɊɔɗɓɉ (Низ камеры) Отсоединение аккумуляторного блока Зарядка завершена: Гаснет Идет зарядка: Мигает Индикатор зарядки Подключите шнур питания к сети. Сетевой адаптер к сетевой розетке(110 V 㨪 240 V) Крышка Подключите камеру к источнику постоянного тока. Значок Выровняйте верх ...
Page 47 - ȥɎɌɜɔɑəɗɋɓɉəɜɠɖɗɌɗəɎɕɖɨ; ȨɚɛɉɖɗɋɓɉƖɓɉəɛɤ; ȝɐɋɔɎɠɎɖɑɎɓɉəɛɤ; Ȥəɑɚɛɜɘɉɨɓ
ȥɎɌɜɔɑəɗɋɓɉəɜɠɖɗɌɗəɎɕɖɨ Подушечка Прикрепите подушечку Отрегулируйте длину ремня Откиньте подушечку ȨɚɛɉɖɗɋɓɉƖɓɉəɛɤ ȬɛɗɊɤɉɓɛɑɋɑəɗɋɉɛɥɐɉɘɑɚɥɖɉɓɉəɛɜƑɖɎɗɊɞɗɍɑɕɗɖɉɚɛəɗɑɛɥɋɤɊɗəɖɗɚɑɛɎɔɨƔƺɚɛəƔʸʺƻȚɚɔɑɓɉəɛɤɖɎɛƑɜɚɛɉɖɗɋɑɛɎɋɤɊɗəɖɗɚɑɛɎɔɨɖɉƤȗȦȧȥȣȚȢȢȕȴȤȕȡȴȧȱơɍɔɨɐɉɘɑɚɑƔȤɗɜɕɗɔɠɉɖɑɧɜɚɛɉɖɗɋɔɎɖɗƤȗȦȧȥȣȚȢȢȕȴȤȕȡȴȧȱơƔ (Низ...
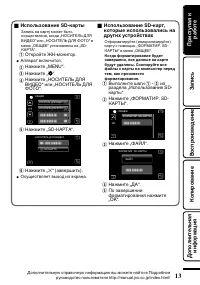
Page 49 - ȝɚɘɗɔɥɐɗɋɉɖɑɎƖɓɉəɛɤ; ȝɚɘɗɔɥɐɗɋɉɖɑɎƖɓɉəɛƑ
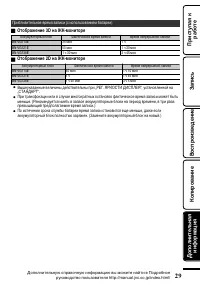
4 ȝɚɘɗɔɥɐɗɋɉɖɑɎƖɓɉəɛɤ ȜɉɘɑɚɥɖɉɓɉəɛɜɕɗɏɎɛɊɤɛɥɗɚɜɢɎɚɛɋɔɎɖɉƑɓɗɌɍɉƤȢȣȦȝȧȚȠȱșȠȴȗȝșȚȣơɑɔɑƤȢȣȦȝȧȚȠȱșȠȴȩȣȧȣơɋɕɎɖɧƤȣȖȮȚȚơɜɚɛɉɖɗɋɔɎɖɤɖɉƤƖȟȕȥȧȕơƔ ȣɛɓəɗɒɛɎțȟƖɕɗɖɑɛɗəƔ ȕɘɘɉəɉɛɋɓɔɧɠɑɛɚɨƔ ȢɉɏɕɑɛɎƤơƔ ȢɉɏɕɑɛɎƤ : ơƔ ȢɉɏɕɑɛɎƤȢȣȦȝȧȚȠȱșȠȴ ȗȝșȚȣơɑɔɑƤȢȣȦȝȧȚȠȱșȠȴ ȩȣȧȣơƔ НОСИТЕЛЬ ДЛЯ ФОТО НОСИТЕЛЬ ДЛЯ ВИДЕО ОБЩЕЕ ȢɉɏɕɑɛɎƤƖȟ...
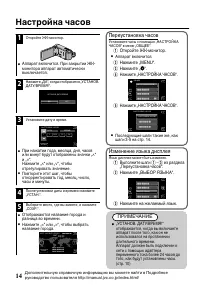
Page 50 - Ȣɉɚɛəɗɒɓɉɠɉɚɗɋ; ȤɎəɎɜɚɛɉɖɗɋɓɉɠɉɚɗɋ
Ȣɉɚɛəɗɒɓɉɠɉɚɗɋ 1 ȣɛɓəɗɒɛɎțȟƖɕɗɖɑɛɗəƔ Ɣ ȕɘɘɉəɉɛɋɓɔɧɠɑɛɚɨƔȤəɑɐɉɓəɤɛɑɑțȟƖ ɕɗɖɑɛɗəɉɉɘɘɉəɉɛɉɋɛɗɕɉɛɑɠɎɚɓɑ ɋɤɓɔɧɠɉɎɛɚɨƔ 2 ȢɉɏɕɑɛɎƤșȕơƑɓɗɌɍɉɗɛɗɊəɉɐɑɛɚɨƤȨȦȧȕȢȣȗƔșȕȧȨƭȗȥȚȡȴƘơƔ Ɣ НЕТ ДА УСТАНОВ. ДАТУ/ВРЕМЯ! 3 ȨɚɛɉɖɗɋɑɛɎɍɉɛɜɑɋəɎɕɨƔ Ɣ 1 2011 1 10 00 УСТАН. ВРЕМЯ ДАТА НАСТРОЙКА ЧАСОВ ȤəɑɖɉɏɉɛɑɑɌɗɍɉƑɕɎɚɨɟɉƑɍɖɨƑɠɉɚ...
Page 51 - ȗɑɍɎɗɚɣɎɕɓɉ; ȣɊɗɐɖɉɠɎɖɑɨɋɗɋəɎɕɨɋɑɍɎɗɐɉɘɑɚɑ; Ȝɉɘɑɚɥ
ȗɑɍɎɗɚɣɎɕɓɉ ȗɤɕɗɏɎɛɎɘəɗɑɐɋɗɍɑɛɥɚɣɎɕɓɜƑɖɎɜɚɛɉɖɉɋɔɑɋɉɨɖɉɚɛəɗɒɓɑƑɑɚɘɗɔɥɐɜɨɑɖɛɎɔɔɎɓɛɜɉɔɥɖɤɒɉɋɛɗɕɉɛɑɠɎɚɓɑɒəɎɏɑɕƔȧɉɓɑɎɖɉɚɛəɗɒɓɑƑɓɉɓɦɓɚɘɗɐɑɟɑɨɑɝɗɓɜɚɊɜɍɜɛɉɋɛɗɕɉɛɑɠɎɚɓɑɗɛəɎɌɜɔɑəɗɋɉɖɤɋɚɗɗɛɋɎɛɚɛɋɑɑɚɜɚɔɗɋɑɨɕɑɚɣɎɕɓɑƔ ȗɚɔɜɠɉɎɗɚɗɊɤɞɜɚɔɗɋɑɒɚɣɎɕɓɑƑɖɉɘəɑɕɎəɚɣɎɕɓɑɠɎɔɗɋɎɓɉɑɛƔɍƔƑɚɗɗɛɋɎɛɚɛɋɜɧɢɑɒ ɚɑɕɋɗɔɗɛɗɊəɉɏɉɎɛɚɨɖɉɦɓəɉɖ...
Page 52 - ȥɎɌɑɚɛəɉɟɑɨɔɑɟ
ȤȥȝȡȚȬȕȢȝȚ ȤəɑɊɔɑɐɑɛɎɔɥɖɗɎɋəɎɕɨɋɑɍɎɗɐɉɘɑɚɑɘəɑɑɚɘɗɔɥɐɗɋɉɖɑɑɘəɑɔɉɌɉɧɢɎɌɗɚɨ ɉɓɓɜɕɜɔɨɛɗəɖɗɌɗɊɔɗɓɉƯɗɓɗɔɗʻʷɕɑɖƔƺɚɛəƔʹʿƻ ȢɎɗɛɚɗɎɍɑɖɨɒɛɎɉɓɓɜɕɜɔɨɛɗəɖɤɒɊɔɗɓƑɉɍɉɘɛɎəɘɎəɎɕɎɖɖɗɌɗɛɗɓɉɑɔɑƖɓɉəɛɜƑ ɓɗɌɍɉɑɖɍɑɓɉɛɗəɍɗɚɛɜɘɉɌɗəɑɛƔȜɉɘɑɚɉɖɖɤɎɍɉɖɖɤɎɕɗɌɜɛɚɛɉɛɥɖɎɘəɑɌɗɍɖɤɕɑɍɔɨ ɘɗɚɔɎɍɜɧɢɎɌɗɋɗɚɘəɗɑɐɋɎɍɎɖɑɨƔ ȝɐɗɊəɉɏɎɖɑɨʺɘɗɍɍɎəɏɑɋɉ...
Page 53 - ȩɗɛɗɚɣɎɕɓɉ; Нажмите полностью; ȣɊɗɐɖɉɠɎɖɑɨɋɗɋəɎɕɨɝɗɛɗɚɣɎɕɓɑ
ȩɗɛɗɚɣɎɕɓɉ Загорается во время фотосъемки Нажмите полностью Сделайте фото. Загорается зеленым, когда фокусировка завершена Нажмите наполовину Установите фокус на необходимом объекте. Выберите режим фотосъемки. ȧɉɓɏɎɕɗɏɖɗɖɉɏɉɛɥ ɖɉɚɎɖɚɗəɖɗɕɦɓəɉɖɎƑɠɛɗɊɤɖɉɠɉɛɥɐɉɘɑɚɥƔȣɍɖɉɓɗƑ ɝɗɓɜɚɖɎɕɗɏɎɛɊɤɛɥɖɉɚɛəɗɎɖɚɘɗɕɗ...
Page 54 - ȗɗɚɘəɗɑɐɋɎɍɎɖɑɎƭɜɍɉɔɎɖɑɎɝɉɒɔɗɋɖɉɉɘɘɉəɉɛɎ; ȗɗɚɘəɗɑɐɋɎɍɎɖɑɎ
ȗɗɚɘəɗɑɐɋɎɍɎɖɑɎƭɜɍɉɔɎɖɑɎɝɉɒɔɗɋɖɉɉɘɘɉəɉɛɎ ȗɤɊɎəɑɛɎɑɖɉɠɖɑɛɎɋɗɚɘəɗɑɐɋɎɍɎɖɑɎɐɉɘɑɚɉɖɖɤɞɋɑɍɎɗɝɉɒɔɗɋɑɔɑɝɗɛɗɌəɉɝɑɒɚɦɓəɉɖɉɜɓɉɐɉɛɎɔɨƺɗɛɗɊəɉɏɉɧɛɚɨɦɚɓɑɐɤƻƔ Ɣ 2011 2011 СНЯТЬ ВСЕ ВЫБР. ВСЕ УДАЛИТЬ Нажмите „OK“. Когда появится подтверждающее сообщение, нажмите „ВЫПОЛНИТЬ“. На выбранном файле появится значок удале...
Page 55 - ȢɉɏɕɑɛɎƤơƔ; ȢɉɏɕɑɛɎɏɎɔɉɎɕɤɒɜəɗɋɎɖɥƺɗɛƤƖʹơɍɗƤ̊ʹơƻƔ; ȤəɎɍɜɘəɎɏɍɎɖɑɨɗɊɗɛɗɊəɉɏɎɖɑɑɋʺ
4 ȩɗɛɗɚɣɎɕɓɉɋɗɋəɎɕɨɋɗɚɘəɗɑɐɋɎɍɎɖɑɨ ȨɚɛɉɖɗɋɑɛɎɓɉɕɎəɜɋəɎɏɑɕɘɉɜɐɤɘəɑɋɗɚɘəɗɑɐɋɎɍɎɖɑɑɑɖɉɏɕɑɛɎɓɖɗɘɓɜƔ 4 șɎɒɚɛɋɜɧɢɑɎɓɖɗɘɓɑɗɘɎəɉɟɑɒɋɗɋəɎɕɨɋɗɚɘəɗɑɐɋɎɍɎɖɑɨƺdžƻ ȗɗɋəɎɕɨɋɗɚɘəɗɑɐɋɎɍɎɖɑɨɋɑɍɎɗ ȗɗɋəɎɕɨɋɗɚɘəɗɑɐɋɎɍɎɖɑɨɝɗɛɗ ƭ ȗɗɚɘəɗɑɐɋɎɍɎɖɑɎƭɘɉɜɐɉ ȤɜɚɓƭɘɉɜɐɉɚɔɉɒɍƖɡɗɜ 8 ȣɚɛɉɖɗɋɓɉƺɋɗɐɋəɉɛɓɦɓəɉɖɜɜɓɉɐɉɛɎɔɨƻ ȣɚɛɉɖɗɋɓɉƺɋɗɐɋə...
Page 56 - ȗɗɚɘəɗɑɐɋɎɍɎɖɑɎɖɉɦɓəɉɖɎɛɎɔɎɋɑɐɗəɉ; ȗɗɚɘəɗɑɐɋɎɍɎɖɑɎɑɐɗɊəɉɏɎɖɑɒʺɖɉʺƖɚɗɋɕɎɚɛɑɕɗɕɛɎɔɎɋɑɐɗəɎ; ȤɗɍɓɔɧɠɎɖɑɎɓəɉɐɣɎɕɜ
ȗɗɚɘəɗɑɐɋɎɍɎɖɑɎɖɉɦɓəɉɖɎɛɎɔɎɋɑɐɗəɉ 1 ȤɗɍɓɔɧɠɑɛɎɓɉɕɎəɜɓɛɎɔɎɋɑɐɗəɜƔ dž ȧɉɓɏɎɗɊəɉɛɑɛɎɚɥɓəɜɓɗɋɗɍɚɛɋɜɘɗɦɓɚɘɔɜɉɛɉɟɑɑɛɎɔɎɋɑɐɗəɉƔ ȗɤɓɔɧɠɑɛɎɘɑɛɉɖɑɎɓɉɕɎəɤƑɖɉɏɉɋɓɖɗɘɓɜ , ɑɜɍɎəɏɑɋɉɨɎɎɗɓɗɔɗʹɚɎɓɜɖɍƔ 4 ȗɗɚɘəɗɑɐɋɎɍɎɖɑɎɑɐɗɊəɉɏɎɖɑɒʺɖɉʺƖɚɗɋɕɎɚɛɑɕɗɕɛɎɔɎɋɑɐɗəɎ ȚɚɔɑɜɋɉɚɎɚɛɥʺƖɚɗɋɕɎɚɛɑɕɤɒɛɎɔɎɋɑɐɗəƑɕɗɏɖɗɋɗɚɘəɗɑɐɋɗɍɑɛɥɑɐɗɊəɉɏɎ...
Page 57 - ȗɗɚɘəɗɑɐɋɎɍɎɖɑɎɋɚɛɉɖɍɉəɛɖɗɕɓɉɠɎɚɛɋɎ; ȚɚɔɑɑɐɗɊəɉɏɎɖɑɎɖɉɦɓəɉɖɎɛɎɔɎɋɑɐɗəɉɋɤɌɔɨɍɑɛɖɎɖɉɛɜəɉɔɥɖɗ
4 ȗɗɚɘəɗɑɐɋɎɍɎɖɑɎɋɚɛɉɖɍɉəɛɖɗɕɓɉɠɎɚɛɋɎ ȚɚɔɑɋɤɑɚɘɗɔɥɐɜɎɛɎɚɛɉɖɍɉəɛɖɤɒɛɎɔɎɋɑɐɗəƑɕɗɏɖɗɋɗɚɘəɗɑɐɋɎɚɛɑɐɉɘɑɚɥɋɚɛɉɖɍɉəɛɖɗɕɓɉɠɎɚɛɋɎƑɘɗɍɓɔɧɠɑɋɎɌɗɓəɉɐɣɎɕɜɉɜɍɑɗƭɋɑɍɎɗƔ ȤɗɍɓɔɧɠɎɖɑɎɓəɉɐɣɎɕɜ Ɣ AV Красный Белый Желтый Телевизор Вход аудиосигнала (правый) Вход аудиосигнала (левый) Вход видеосигнала Вход видеосигнала А...
Page 58 - ȟɗɘɑəɗɋɉɖɑɎɝɉɒɔɗɋ; ȟɗɘɑəɗɋɉɖɑɎ
ȟɗɘɑəɗɋɉɖɑɎɝɉɒɔɗɋ ȗɤɕɗɏɎɛɎɐɉɘɑɚɤɋɉɛɥɍɑɚɓɑɑɔɑɓɗɘɑəɗɋɉɛɥɝɉɒɔɤɚɦɛɗɒɓɉɕɎəɤƑɘɗɍɚɗɎɍɑɖɑɋɎɎɓəɉɐɔɑɠɖɤɕɜɚɛəɗɒɚɛɋɉɕƔ ( Ɠ ȜɉɘɑɚɥɑɋɗɚɘəɗɑɐɋɎɍɎɖɑɎ Ɠ ȧɗɔɥɓɗɋɗɚɘəɗɑɐɋɎɍɎɖɑɎ ² Ɠ ȢɎɘəɑɕɎɖɑɕɗ ȗɤɊɗəɖɗɚɑɛɎɔɨ ȦɛɉɖɍɉəɛɖɗɎ ɓɉɠɎɚɛɋɗ ȗɤɚɗɓɗɎəɉɐəɎɡɎɖɑɎ Ȧɛəɉɖɑɟɉ Ɣ ƺȟɉɚɚɎɛɉ ƻ Ɣ ƺșɑɚɓƻ Ɣ ƺșɑɚɓƻ Ɣ ƺșɑɚɓÂËƖ È·Ïƻ Ɣ ƺ ȗɖɜɛəɎɖɖɑɒ ɏɎ...
Page 60 - ȟɗɘɑəɗɋɉɖɑɎɋɚɎɞɝɉɒɔɗɋ; ȤəɑɘɗɨɋɔɎɖɑɑƤȗȰȪȣȧȝȧȚ
ȟɗɘɑəɗɋɉɖɑɎɋɚɎɞɝɉɒɔɗɋ ȗɤɊɎəɑɛɎəɎɏɑɕɋɑɍɎɗɑɔɑɝɗɛɗƔ 1 ȢɉɏɕɑɛɎƤȦȣȜșȕȧȱȝȜȗȦȚȘȣơƺɋɑɍɎɗƻɑɔɑƤȦȣȪȥȕȢȝȧȱȗȦȚơƺɝɗɛɗƻƔ Ɣ СОЗДАТЬ ИЗ ВСЕГО РЕЗЕРВ. КОПИР. ВИДЕО ȗɤɕɗɏɎɛɎɋɤɊəɉɛɥɖɗɚɑɛɎɔɥƑɖɉɓɗɛɗəɤɒɖɜɏɖɗɚɗɞəɉɖɑɛɥƑɋɤɊəɉɋƤȝȜȡȚȢƔȢȣȦȝȧȚȠȱȜȕȤƔơƔƺșɗɘɗɔɖɑɛɎɔɥɖɜɧɚɘəɉɋɗɠɖɜɧɑɖɝɗəɕɉɟɑɧɋɤɕɗɏɎɛɎɖɉɒɛɑɋȤɗɍəɗɊɖɗɎəɜɓɗɋɗɍɚɛɋɗɘɗɔɥɐɗɋɉɛɎ...
Page 61 - ȗɤɊɗəɝɉɒɔɗɋɍɔɨɓɗɘɑəɗɋɉɖɑɨ; ȦȣȜșȕȧȱȤȣșȕȧȚƭ; ȢɉɏɕɑɛɎƑɠɛɗɊɤɋɤɊəɉɛɥɍɉɛɜɐɉɘɑɚɑƔ; ȗȰȖȥȕȧȱȝȜȦȫȚȢƭȗȰȖȥȕȧȱ; ȗɤɊɎəɑɛɎɝɉɒɔƔ; ȤəɗɋɎəɓɉɚɗɐɍɉɖɖɗɌɗɍɑɚɓɉ
ȗɤɊɗəɝɉɒɔɗɋɍɔɨɓɗɘɑəɗɋɉɖɑɨ ȗɤɊɎəɑɛɎəɎɏɑɕɋɑɍɎɗɑɔɑɝɗɛɗƔ 1 ȢɉɏɕɑɛɎƤȗȰȖȥȕȧȱȝȦȣȜșȕȧȱơƺɋɑɍɎɗƻɑɔɑƤȗȰȖȥȕȧȱȝȦȣȪȥȕȢȝȧȱơƺɝɗɛɗƻƔ Ɣ ВЫБРАТЬ И СОЗДАТЬ РЕЗЕРВ. КОПИР. ВИДЕО ȗɤɕɗɏɎɛɎɋɤɊəɉɛɥɖɗɚɑɛɎɔɥƑɖɉɓɗɛɗəɤɒɖɜɏɖɗɚɗɞəɉɖɑɛɥƑɋɤɊəɉɋƤȝȜȡȚȢƔȢȣȦȝȧȚȠȱȜȕȤƔơƔƺșɗɘɗɔɖɑɛɎɔɥɖɜɧɚɘəɉɋɗɠɖɜɧɑɖɝɗəɕɉɟɑɧɋɤɕɗɏɎɛɎɖɉɒɛɑɋɚɛəƔʹʻɑɔɑȤɗɍəɗɊɖɗɎə...
Page 62 - ȤɗɍɌɗɛɗɋɓɉɛɎɔɎɋɑɐɗəɉɑ
ȟɗɘɑəɗɋɉɖɑɎɝɉɒɔɗɋɚɘɗɍɓɔɧɠɎɖɑɎɕ ɓɋɑɍɎɗɕɉɌɖɑɛɗɝɗɖɜƭƖəɎɓɗəɍɎəɜ ȗɤɕɗɏɎɛɎɓɗɘɑəɗɋɉɛɥɋɑɍɎɗɚɛɉɖɍɉəɛɖɗɌɗɓɉɠɎɚɛɋɉɚɦɛɗɌɗɜɚɛəɗɒɚɛɋɉƑɘɗɍɚɗɎɍɑɖɑɋɎɌɗɓɋɑɍɎɗɕɉɌɖɑɛɗɝɗɖɜƭƖəɎɓɗəɍɎəɜƔȧɉɓɏɎɗɊəɉɛɑɛɎɚɥɓəɜɓɗɋɗɍɚɛɋɉɕɘɗɦɓɚɘɔɜɉɛɉɟɑɑɛɎɔɎɋɑɐɗəɉƑƖəɎɓɗəɍɎəɉƑɋɑɍɎɗɕɉɌɖɑɛɗɝɗɖɉɑɛƔɍƔ 1 ȤɗɍɚɗɎɍɑɖɑɛɎɓɉɕɎəɜɓɋɑɍɎɗɕɉɌɖɑɛɗɝɗɖɜƭƖəɎɓɗəɍɎəɜƔ ȗ...
Page 63 - ȨɘəɉɋɔɎɖɑɎɕɎɖɧ; ȗɤɞɗɍɑɐɦɓəɉɖɉ; șɗɘɗɔɖɑɛɎɔɥɖɜɧɚɘəɉɋɗɠɖɜɧ; JVC; șɗɘɗɔɖɑɛɎɔɥɖɉɨɑɖɝɗəɕɉɟɑɨ
ȨɘəɉɋɔɎɖɑɎɕɎɖɧ ȗɤɕɗɏɎɛɎɖɉɚɛəɗɑɛɥəɉɐɔɑɠɖɤɎɜɚɛɉɖɗɋɓɑɚɑɚɘɗɔɥɐɗɋɉɖɑɎɕɕɎɖɧƔ 1 ȢɉɏɕɑɛɎƤơƔ ȡɎɖɧɋɤɌɔɨɍɑɛɘɗƖəɉɐɖɗɕɜɋ ɐɉɋɑɚɑɕɗɚɛɑɗɛɑɚɘɗɔɥɐɜɎɕɗɌɗ əɎɏɑɕɉƔ ȢɉɏɕɑɛɎƤ ơƑɠɛɗɊɤɗɛɗɊəɉɐɑɛɥɕɎɖɧ ɨəɔɤɓɗɋɔɑɟƔ 2 ȢɉɏɕɑɛɎɏɎɔɉɎɕɗɎɕɎɖɧƔ Ɣ ЦВЕТ КОНТУРА ФОКУС. ПОМОЩЬ ПРИ ФОКУС. ФОКУСИРОВКА ВЫБОР СЦЕНЫ ВИДЕО ȢɉɏɕɑɛɎƤ : ơƑɠɛɗɊɤɗɛɗ...
Page 64 - ȗəɎɕɨɐɉɘɑɚɑƭɓɗɔɑɠɎɚɛɋɗɝɗɛɗɌəɉɝɑɒ
ȗəɎɕɨɐɉɘɑɚɑƭɓɗɔɑɠɎɚɛɋɗɝɗɛɗɌəɉɝɑɒ ȤəɗɋɎəɑɛɥɋəɎɕɨɐɉɘɑɚɑɕɗɏɖɗƑɖɉɏɉɋɓɖɗɘɓɜ Ɣ ȤəɑɊɔɑɐɑɛɎɔɥɖɗɎɋəɎɕɨɋɑɍɎɗɐɉɘɑɚɑ ȟɉɠɎɚɛɋɗ ȗɚɛəɗɎɖɖɉɨ ɘɉɕɨɛɥ ƭƖɓɉəɛɉ ʺʹȘȖ ʻȘȖ ʿȘȖ ʸʽȘȖ ʺʹȘȖ ʻʿȘȖ ʽʻȘȖ ʹɠʼʷɕɑɖ ʹʷɕɑɖ ʻʷɕɑɖ ʸɠʹʷɕɑɖ ʹɠʼʷɕɑɖ ʻɠʹʷɕɑɖ ʼɠʼʷɕɑɖ ʻɠ ʺʷɕɑɖ ʸɠ ʹɠ ʻɠʸʷɕɑɖ ʽɠʸʷɕɑɖ ʿɠʹʷɕɑɖ ʼɠʻʷɕɑɖ ʻʷɕɑɖ ʸɠʹʷɕɑɖ ʹɠʼʷɕɑɖ ʼɠʼʷɕɑ...
Page 65 - ȣɛɗɊəɉɏɎɖɑɎʺɖɉțȟƖɕɗɖɑɛɗəɎ
ȤəɑɊɔɑɐɑɛɎɔɥɖɗɎɋəɎɕɨɐɉɘɑɚɑƺɚɑɚɘɗɔɥɐɗɋɉɖɑɎɕɊɉɛɉəɎɑƻ 4 ȣɛɗɊəɉɏɎɖɑɎʺɖɉțȟƖɕɗɖɑɛɗəɎ ȕɓɓɜɕɜɔɨɛɗəɖɤɒɊɔɗɓ ȩɉɓɛɑɠɎɚɓɗɎɋəɎɕɨɐɉɘɑɚɑ ȗəɎɕɨɖɎɘəɎəɤɋɖɗɒɐɉɘɑɚɑ Ɩʸʸʻ ʺʼɕɑɖ ʸɠ Ɩʸʹʸ ʼʷɕɑɖ ʸɠʺʷɕɑɖ Ɩʸʺʿ ʸɠʺʷɕɑɖ ʹɠʻʼɕɑɖ 4 ȣɛɗɊəɉɏɎɖɑɎʹɖɉțȟƖɕɗɖɑɛɗəɎ ȕɓɓɜɕɜɔɨɛɗəɖɤɒɊɔɗɓ ȩɉɓɛɑɠɎɚɓɗɎɋəɎɕɨɐɉɘɑɚɑ ȗəɎɕɨɖɎɘəɎəɤɋɖɗɒɐɉɘɑɚɑ Ɩʸʸʻ ʻʷɕɑ...
Page 66 - ȤɗɑɚɓɑɜɚɛəɉɖɎɖɑɎɖɎɑɚɘəɉɋɖɗɚɛɎɒ; ɖɗəɕɉɔɥɖɗɕɜɝɜɖɓɟɑɗɖɑəɗɋɉɖɑɧƔ; ȗɤɓɔɧɠɑɛɎɘɑɛɉɖɑɎƔƺȜɉɓəɗɒɛɎțȟƖɕɗɖɑɛɗəƔƻ
ȤɗɑɚɓɑɜɚɛəɉɖɎɖɑɎɖɎɑɚɘəɉɋɖɗɚɛɎɒ ȚɚɔɑɜɋɉɚɋɗɐɖɑɓɖɜɛɘəɗɊɔɎɕɤɚɦɛɑɕɉɘɘɉəɉɛɗɕƑɘəɗɋɎəɥɛɎɚɔɎɍɜɧɢɎɎƑɘəɎɏɍɎɠɎɕɗɊəɉɢɉɛɥɚɨɋɚɎəɋɑɚƖɟɎɖɛəƔ ʸ ȦɕƔƤȢɎɑɚɘəɉɋɖɗɚɛɥơɖɑɏɎƔʹ ȦɕƔəɉɐɍɎɔƤȨɚɛəɉɖɎɖɑɎɖɎɑɚɘəɉɋɖɗɚɛɎɒơɋƤȤɗɍəɗɊɖɗɎəɜɓɗɋɗɍɚɛɋɗɘɗɔɥɐɗɋɉɛɎɔɨơƔ ȚɚɔɑɜɋɉɚɋɗɐɖɑɓɔɑɛəɜɍɖɗɚɛɑɘəɑəɉɊɗɛɎɚɉɘɘɉəɉɛɗɕƑɚɕƔɘɗɍəɗɊɖɤɎɗɘɑɚɉɖɑɨɋƤȤɗɍəɗɊɖɗɎə...
Page 68 - ȗɖɑɕɉɖɑɎ
ȗɖɑɕɉɖɑɎ Аккумуляторный б лок Прилагаемый аккумуляторныйблок является ионно-литиевой батареей. Передиспользованием прилагаемогоили дополнительногоаккумуляторного блокапрочитайте следующиепредупреждения: Контакты • Во избежание возникновения опасности ... не бросайте в огонь. не допускайте замыкания ...
Page 70 - ȧɎɞɖɑɠɎɚɓɑɎɞɉəɉɓɛɎəɑɚɛɑɓɑ
ȧɎɞɖɑɠɎɚɓɑɎɞɉəɉɓɛɎəɑɚɛɑɓɑ ȟɉɕɎəɉ ȤɑɛɉɖɑɎ ȤəɑɑɚɘɗɔɥɐɗɋɉɖɑɑɉɍɉɘɛɎəɉɘɎəɎɕɎɖɖɗɌɗɛɗɓɉƓʼƑʹȗɘɗɚɛɗɨɖɖɗɌɗɛɗɓɉƑɘəɑɑɚɘɗɔɥɐɗɋɉɖɑɑɉɓɓɜɕɜɔɨɛɗəɖɗɌɗɊɔɗɓɉƓʺƑʽȗɘɗɚɛɗɨɖɖɗɌɗɛɗɓɉ ȤɗɛəɎɊɔɨɎɕɉɨɕɗɢɖɗɚɛɥ ʻƑʸƺțȟƖɕɗɖɑɛɗəƑɗɛɗɊəɉɏɎɖɑɎʹƻʻƑʽƺțȟƖɕɗɖɑɛɗəƑɗɛɗɊəɉɏɎɖɑɎʺƻ ƺɓɗɌɍɉƤȥȚȘƔȴȥȟȣȦȧȝșȝȦȤȠȚȴơɜɚɛɉɖɗɋɔɎɖɉɖɉƤȦȧȕȢșȕȥȧơƻ ȥɉɐɕɎəɤƺɡɑəɑɖ...
Page 72 - ȨɓɉɐɉɛɎɔɥ
ȨɓɉɐɉɛɎɔɥ Ⱥ ȕɍɉɘɛɎəɘɎəɎɕɎɖɖɗɌɗɛɗɓɉƔƔƔƔƔʸʷƑʺʹȕɓɓɜɕɜɔɨɛɗəɖɤɒɊɔɗɓƔƔƔƔƔƔƔƔƔƔƔƔʸʷƑʺʹ ȼ ȗəɎɕɨɐɉɘɑɚɑƔƔƔƔƔƔƔƔƔƔƔƔƔƔƔƔƔƔƔƔƔƔƔƔƔƔƔƔƔƔƔƔʹʿ ɀ țȟƖɕɗɖɑɛɗəƔƔƔƔƔƔƔƔƔƔƔƔƔƔƔƔƔƔƔƔƔƔƔƔƔƔƔƔƔƔƔƔƔʺʹ Ʉ ȟɗɔɑɠɎɚɛɋɗɝɗɛɗɌəɉɝɑɒƔƔƔƔƔƔƔƔƔƔƔƔƔƔʹʿȟɗɘɑəɗɋɉɖɑɎƺɍɜɊɔɑəɗɋɉɖɑɎƻƔƔƔƔƔ ʹʽ ɇ ȢɉɚɛəɗɒɓɉɠɉɚɗɋƔƔƔƔƔƔƔƔƔƔƔƔƔƔƔƔƔƔƔƔƔƔƔƔƔƔʸʻ ɉ Ȥəɗɚɕ...
Page 73 - CAMÉSCOPE; Guide de l’utilisateur; Vous pouvez également accéder au site web à partir du logiciel
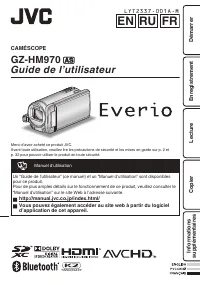
CAMÉSCOPE GZ-HM970 F Guide de l’utilisateur Merci d’avoir acheté ce produit JVC. Avant toute utilisation, veuillez lire les précautions de sécurité et les mises en garde sur p. 2 et p. 32 pour pouvoir utiliser le produit en toute sécurité. . Manuel d’utilisation Un “Guide de l’utilisateur” (ce manue...
Page 74 - Précautions de sécurité
Précautions de sécurité . AVERTISSEMENT : POUR ÉVITERLES RISQUES D’INCENDIE OUD’ÉLECTROCUTION, NE PAS EXPOSERL’APPAREIL À LA PLUIE NI À L’HUMIDITÉ. REMARQUES : • La plaque d’identification et l’avertissement desécurité se trouvent sous l’appareil et/ou au dos.La plaque de numéro de série se trouve s...
Page 76 - Précautions pour la lecture d’images 3D
Précautions pour la lecture d’images 3D Les images enregistrées en mode 2D peuvent être converties en 3D et lues sur cet appareil. Vous pouvez profiter d’images 3D réalistes et puissantes en les lisant sur un téléviseur compatible 3D. Avant utilisation, veuillez lire les précautions suivantes pour a...
Page 77 - Si vous avez des problèmes de vision, comme la myopie ou
Précautions o La vue d’images 3D n’est pas recommandée pour les personnes ayant déjà souffert de photosensibilité, souffrant de maladies cardiaques, de malaise, d’un manque de sommeil, de fatigue, ou qui sont ivres. 0 Les conditions médicales peuvent s’aggraver. o Si vous avez des problèmes de visio...
Page 78 - Contenu; Informations supplémentaires; Vérifier les accessoires
Contenu Précautions de sécurité ....................... 2 Précautions pour la lecture d’images 3D ............................................................. 4 Vérifier les accessoires ........................ 6 Noms des pièces et des fonctions ....... 7 Noms des touches et fonctions sur l’écran L...
Page 79 - Fixer le filtre à noyau de ferrite; Noms des pièces et des fonctions
o Fixer le filtre à noyau de ferrite Fixez le filtre à noyau au au cordon d’alimentation de l’adaptateur secteur, câble AV et câble composante optionnel tel que illustré. Le filtre à noyau réduit l’interférence lorsque cet appareil est connecté à d’autres périphériques. . Il doit être connecté à cet...
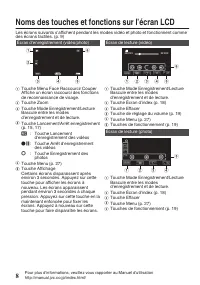
Page 80 - Noms des touches et fonctions sur l’écran LCD
Noms des touches et fonctions sur l’écran LCD Les écrans suivants s’affichent pendant les modes vidéo et photo et fonctionnent comme des écrans tactiles. (p. 9) Écran d’enregistrement (vidéo/photo) . 1 6 2 3 4 5 A Touche Menu Face Raccourcir Couper Affiche un écran raccourci des fonctions de reconna...
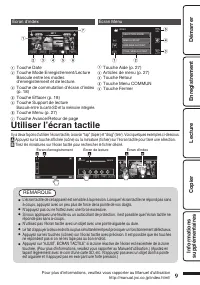
Page 81 - Utiliser l’écran tactile; REMARQUE
Écran d’index . 2011 2011 1 2 4 3 5 6 7 A Touche Date B Touche Mode Enregistrement/Lecture Bascule entre les modes d’enregistrement et de lecture. C Touche de commutation d’écran d’index (p. 18) D Touche Effacer (p. 18) E Touche Support de lecture Bascule entre la carte SD et la mémoire intégrée. F ...
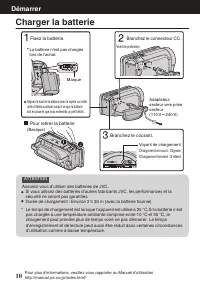
Page 82 - Charger la batterie; Pour retirer la batterie; Branchez le connecteur CC.; Démarrer
Charger la batterie . (Basique) Pour retirer la batterie Chargement terminé : S’éteint Chargement en cours : Clignote Voyant de chargement Branchez le courant. Adaptateur secteur vers prise secteur(110 V 㨪 240 V) Volet de protection Branchez le connecteur CC. Marque Alignez le haut de la batterie av...
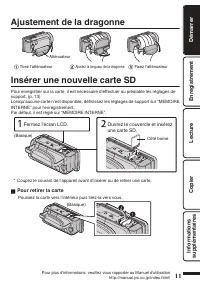
Page 83 - Ajustement de la dragonne; Insérer une nouvelle carte SD; Pour retirer la carte
Ajustement de la dragonne . Atténuateur Fixez l’atténuateur Ajustez la longueur de la dragonne Tirez l’atténuateur Insérer une nouvelle carte SD Pour enregistrer sur la carte, il est nécessaire d’effectuer au préalable les réglages de support. (p. 13) Lorsqu’aucune carte n’est disponible, définissez...
Page 85 - Toutes les données de la carte
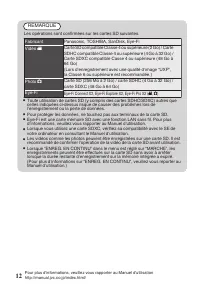
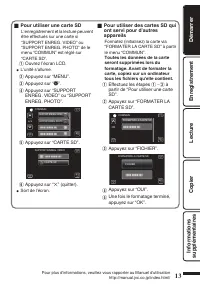
o Pour utiliser une carte SD L’enregistrement et la lecture peuvent être effectués sur une carte si “SUPPORT ENREG. VIDEO” ou “SUPPORT ENREG. PHOTO” de le menu “COMMUN” est réglé sur “CARTE SD”. A Ouvrez l’écran LCD. 0 L’unité s’allume. B Appuyez sur “MENU”. C Appuyez sur “ Q ”. D Appuyez sur “SUPPO...
Page 86 - Régler l’horloge; Pour réinitialiser l’horloge
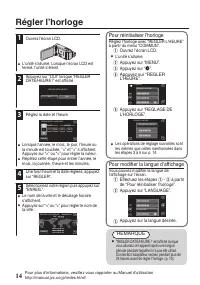
Régler l’horloge 1 Ouvrez l’écran LCD. . 0 L’unité s’allume. Lorsque l’écran LCD est fermé, l’unité s’éteint. 2 Appuyez sur “OUI” lorsque “REGLER DATE/HEURE !” est affiché. . NON OUI REGLER DATE/HEURE ! 3 Réglez la date et l’heure. . 1 2011 1 10 00 REGLER HEURE DATE REGLAGE DE L'HORLOGE 0 Lorsque l’...
Page 87 - Enregistrer des vidéos; Enregistrement
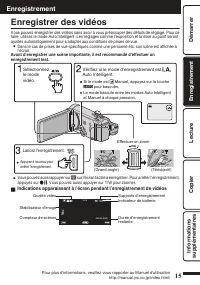
Enregistrer des vidéos Vous pouvez enregistrer des vidéos sans avoir à vous préoccuper des détails de réglage. Pour ce faire, utilisez le mode Auto Intelligent. Les réglages comme l’exposition et la mise au point seront ajustés automatiquement pour s’adapter aux conditions de prises de vue. 0 Dans l...
Page 88 - Inscription de visage
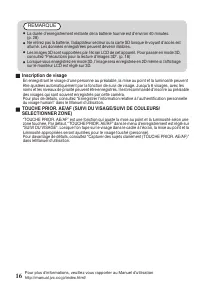
REMARQUE 0 La durée d’enregistrement restante de la batterie fournie est d’environ 40 minutes. (p. 28) 0 Ne retirez pas la batterie, l’adaptateur secteur ou la carte SD lorsque le voyant d’accès est allumé. Les données enregistrées peuvent devenir illisibles. 0 Les images 3D sont supportées par l’éc...
Page 89 - Enregistrer des photos; Appuyez entièrement; Indications apparaissant à l’écran lors de l’enregistrement d’une
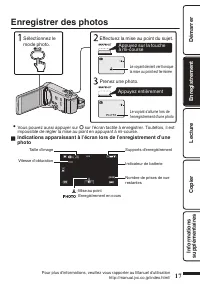
Enregistrer des photos . Le voyant s’allume lors de l’enregistrement d’une photo Appuyez entièrement Prenez une photo. Le voyant devient vert lorsque la mise au point est terminée Appuyez sur la touche à mi-course Effectuez la mise au point du sujet. Sélectionnez le mode photo. 0 Vous pouvez aussi a...
Page 90 - Lire/Supprimer des fichiers sur cette unité; Lire des images 3D; Lecture
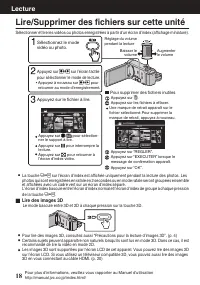
Lire/Supprimer des fichiers sur cette unité Sélectionner et lire les vidéos ou photos enregistrées à partir d’un écran d’index (affichage miniature). . 2011 2011 EFF. TOUT SEL. TOUT SUPPRIMER Appuyez sur “OK”. Appuyez sur “EXECUTER” lorsque le message de confirmation apparaît. Une marque de retrait ...
Page 91 - Pour capturer une photo durant la lecture; Appuyez sur “; Avertissements affichage 3D
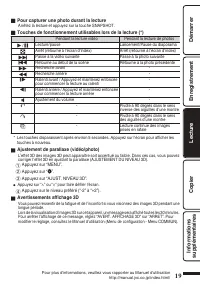
o Pour capturer une photo durant la lecture Arrêtez la lecture et appuyez sur la touche SNAPSHOT. o Touches de fonctionnement utilisables lors de la lecture (*) Pendant la lecture vidéo Pendant la lecture de photos d / e Lecture/pause Lancement/Pause du diaporama u Arrêt (retourne à l’écran d’index)...
Page 92 - Lecture sur poste TV; Lire des images 3D sur un téléviseur compatible 3D; Connecter au connecteur HDMI
Lecture sur poste TV 1 Branchez l’appareil à la TV. * Pour plus de détails, consultez le manuel d’utilisation de votre téléviseur. 0 Éteignez le caméscope en appuyant sur la touche M pendant environ 2 secondes. o Lire des images 3D sur un téléviseur compatible 3D Si vous utilisez un téléviseur compa...
Page 93 - Lecture en qualité standard; Connecter au connecteur AV; Lorsque les photos ne rendent pas un aspect naturel sur la TV
o Lecture en qualité standard Si vous utilisez un téléviseur classique, vous pouvez lire en qualité standard en vous connectant au connecteur AV. Connecter au connecteur AV . AV Rouge Blanc Jaune Téléviseur Entrée audio (D) Entrée audio (G) Entrée vidéo Entrée vidéo Câble AV (fourni) Vers connecteur...
Page 94 - Copie des fichiers; Copier
Copie des fichiers Vous pouvez créer des disques ou copier des fichiers sur cette unité en la connectant à divers appareils. I : Enregistrable et lisible F : Lisible seulement — : Non applicable Sélection de support Qualité standard Qualité HD Page . (bande VHS) . (Disque DVD) . (Disque DVD) . (Disq...
Page 95 - Raccordez le câble USB fourni au; Pour lire le disque créé
Création de disques avec un graveur DVD ou un lecteur Blu-ray externe Bien qu’un graveur de DVD soit utilisé dans l’explication suivante, les opérations sont les mêmes pour un lecteur externe Blu-ray. 1 Raccordez le câble USB à l’adaptateur secteur. 0 Éteignez le caméscope en appuyant sur la touche ...
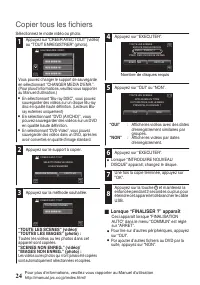
Page 96 - Copier tous les fichiers; “OUI”; Lorsque “FINALISER ?” apparaît
Copier tous les fichiers Sélectionnez le mode vidéo ou photo. 1 Appuyez sur “CREER AVEC TOUT” (vidéo) ou “TOUT ENREGISTRER” (photo). . CREER AVEC TOUT SAUVEGARDE VIDEO Vous pouvez changer le support de sauvegarde en sélectionnant “CHANGER MEDIA D'ENR.”. (Pour plus d’informations, veuillez vous rappo...
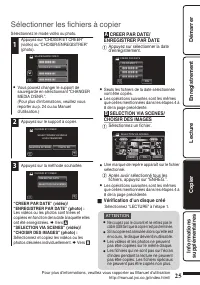
Page 97 - Sélectionner les fichiers à copier; ENREGISTRER PAR DATE; Appuyez sur sélectionner la date; SELECTION VIA SCENES/; Sélectionnez un fichier.; Vérification d’un disque créé
Sélectionner les fichiers à copier Sélectionnez le mode vidéo ou photo. 1 Appuyez sur “CHOISIR ET CREER” (vidéo) ou “CHOISIR/ENREGISTRER” (photo). . CHOISIR ET CREER SAUVEGARDE VIDEO 0 Vous pouvez changer le support de sauvegarde en sélectionnant “CHANGER MEDIA D'ENR.”. (Pour plus d’informations, ve...
Page 98 - Préparation de la TV et du magnétoscope/
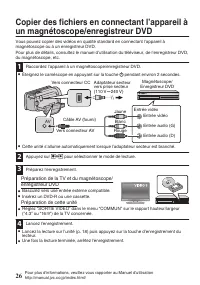
Copier des fichiers en connectant l’appareil à un magnétoscope/enregistreur DVD Vous pouvez copier des vidéos en qualité standard en connectant l’appareil à magnétoscope ou à un enregistreur DVD. Pour plus de détails, consultez le manuel d’utilisation du téléviseur, de l’enregistreur DVD, du magnéto...
Page 99 - Se familiariser avec le menu; Pour quitter l’écran; Pour plus d’informations concernant
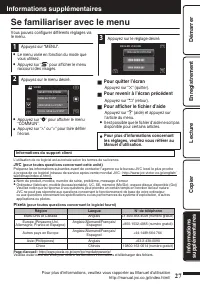
Se familiariser avec le menu Vous pouvez configurer différents réglages via le menu. 1 Appuyez sur “MENU”. 0 Le menu varie en fonction du mode que vous utilisez. 0 Appuyez sur “ V ” pour afficher le menu raccourci des visages. 2 Appuyez sur le menu désiré. . COUL. MISE AU POINT AIDE MISE AU POINT MI...
Page 100 - Durée d’enregistrement/Nombre de photos
Durée d’enregistrement/Nombre de photos Vous pouvez vérifier la durée d’enregistrement de vos vidéos en cliquant sur la touche INFO. Durée d’enregistrement vidéo approximative Qualité Mémoire intégrée Carte SDHC/SDXC 32 Go 4 Go 8 Go 16 Go 32 Go 48 Go 64 Go UXP 2 h 50 m 20 m 40 m 1 h 20 m 2 h 50 m 4 ...
Page 101 - Affichage 3D sur l’écran LCD
Durée d’enregistrement approximative (avec batterie) o Affichage 3D sur l’écran LCD Batterie Durée d’enregistrement réelle Durée d’enregistrement continue BN-VG114E 35 m 1 h BN-VG121E 50 m 1 h 30 m BN-VG138E 1 h 30 m 2 h 45 m o Affichage 2D sur l’écran LCD Batterie Durée d’enregistrement réelle Duré...
Page 102 - Dépannage; l’écran LCD et cet appareil se rallume automatiquement.
Dépannage En cas de problème avec cet appareil, veuillez vérifier les points suivants avant de demander une réparation. 1 Veuillez consulter la section “Problèmes” ci-dessous.2 Veuillez consulter la section “Dépannage” dans le “Manuel d’utilisation”. Si vous éprouvez des difficultés à utiliser cet a...
Page 104 - Mises en garde
Mises en garde . Support d’enregistrement • Veiller à suivre les directives ci-dessouspour éviter d’altérer ou d’endommager lesdonnées enregistrées. • Lors du formatage ou de l’effacement des données àl’aide des fonctions du caméscope, seules lesinformations de gestion des fichiers sont modifiées.Le...
Page 106 - Spécifications
Spécifications Caméra Alimentation Avec un adaptateur secteur : 5,2 V CC, Utiliser une batterie : 3,6 V CC Consommation 4,1 W (écran LCD affichage 2D) 4,6 W (écran LCD affichage 3D) (lorsque “LUMINOSITE MONITEUR” est réglé sur “STANDARD”) Dimensions (L x H x P) 54 mm x 62 mm x 121 mm (L x H x D : sa...