Page 2 - Safety Precautions
Safety Precautions . When the equ i p m ent i s i nstalled i n a cab i net or on a shelf, m ake sure that i t has suff i c i ent space on all s i des to allow for vent i lat i on (10 c m or m ore on both s i des, on top and at the rear) . Do not block the vent i lat i on holes . (If the vent i lat i...
Page 4 - Index; Learning About Advanced Operations; Verifying the Accessories
Index Safety Precautions .............................. 2Index ................................................... 4Verifying the Accessories .................... 4Names of Parts and Functions ............ 5 ▶ Getting Started .......................... 6 Charging the Battery Pack .................. ...
Page 5 - Names of Parts and Functions; ji
Names of Parts and Functions . AV 2345 1 67 8 90 s r t ji a bc f e d h g m o n l k q p A Flash B Lens/Electronic Lens Cover C Light D Remote Sensor E Stereo Microphone F LCD MonitorTurns the power on/off by opening andclosing. G SliderSelects an image or item. H OK ButtonConfirms the selected image ...
Page 6 - Charging the Battery Pack; To detach the battery pack; Be sure to use JVC battery packs.; Grip Adjustment; Getting Started
Charging the Battery Pack . 2 3 1 BATT . Attach the battery pack . * The battery pack is not charged at the time of purchase. Align the top of the battery with the mark on this unit, and slide in until the battery clicks into place. To detach the battery pack (Base) Plug i n the power . Charging in ...
Page 7 - Using as a Hand Strap; Clock Setting; Slider; Select
Using as a Hand Strap Remove the strap and loop it around your wrist.While pressing A , pull B and remove the strap. . Stopper Press and hold ● When attaching the hand strap, insert the stopper until it clicks into place. Clock Setting 1 Open the LCD monitor. . AV ● The unit turns on. When the LCDmo...
Page 8 - Touch; Select “LANGUAGE” and touch; NOTE; Touch the slider and buttons around the screen with your fingers.
■ To reset the clock Set the clock with “CLOCK ADJUST”from the menu. ① Display the menu. . Touch ② Select “CLOCK ADJUST” andtouch . . ? DISPLAY SETTINGS CLOCK ADJUST BASIC SETTINGS CONNECTION SETTINGS MEDIA SETTINGS VIDEO SET QUIT ③ Select “CLOCK SETTING” andtouch . . ? CLOCK ADJUST CLOCK SETTING AR...
Page 9 - Video Recording; Press; Indications during video recording; Recording
Video Recording You can record without worrying about the setting details by using the auto mode. Before recording an important scene, it is recommended to conduct a trialrecording . . AV Press Check i f the record i ng m ode i s 1 2 3 Touch Press Select v i deo m ode . Auto . the mode is Manual, to...
Page 10 - Still Image Recording; im; Indications during still image recording
Reducing Camera Shake (Video Recording) When the image stabilizer is set, camera shake during recording can be effectively reduced. . (White) : Image stabilizer (White) : OFF (Green) : Image stabilizer The setting switches with every touch. Touch A : Reduces camera shake. B : Reduces camera shake mo...
Page 11 - Inserting an SD card; To remove the card; Push the card inward once, then pull it out straight.; Operations are confirmed on the following SD cards.
Inserting an SD card When a commercially available SD card is inserted, recordings can still be made tothe card without stopping when the remaining recording time on the built-in memoryruns out. * To record to the card, it is necessary to perform media settings. ( P.12) When no card is available, se...
Page 12 - Copy all files
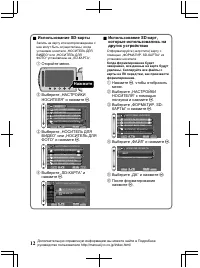
■ To use an SD card Recording and playback can beperformed on a card when “RECMEDIA FOR VIDEO” or “REC MEDIAFOR IMAGE” of media settings is setto “SD CARD”. ① Display the menu. . Touch ② Select “MEDIA SETTINGS” andtouch . . ? VIDEO DISPLAY SETTINGS CLOCK ADJUST BASIC SETTINGS CONNECTION SETTINGS MED...
Page 13 - Playing Back/Deleting Files on this Camera; To capture a still image during playback; Playback
Playing Back/Deleting Files on this Camera Select and play back the recorded videos or still images from an index screen(thumbnail display). The contents of the media selected in media settings ( P.12) aredisplayed on the index screen. . AV VIDEO PLAYBACK VIDEO PLAYBACK Select “YES” when the confirm...
Page 14 - Playing Back on TV; * Refer also to the instruction manual of the TV.; Playing back in HD quality; Connecting to the HDMI terminal; Connecting to the COMPONENT terminal; Use a High speed HDMI cable (category 2 cable) as the HDMI mini cable.
Playing Back on TV 1 Connect to a TV. * Refer also to the instruction manual of the TV. ● Press the Power button ( , ) for more than 2 seconds to turn off this unit. ■ Playing back in HD quality If you are using an HDTV, you can play back in HD quality by connecting to the HDMIterminal. Connecting t...
Page 15 - Playing back in standard quality; Connecting to the AV terminal; Select the TV input switch.; To play back with date/time display; Disconnect the cable and connect again.
■ Playing back in standard quality If you are using a conventional TV, you can play back in standard quality byconnecting to the AV terminal. Connecting to the AV terminal . AV AV Video Input Video Input Audio Input (L) Audio Input (R) TV AV Cable(Provided) White Red Yellow To AV Terminal 2 Connect ...
Page 16 - Copying Files; Standard Quality; Copying
Copying Files You can create discs or copy the files on this unit by connecting it to various devices. Device Standard Quality HD Quality Page . . . . . DVD Writer . - 3 3 - - P.17 External Blu-ray Drive . - 3 3 3 - P.17 Blu-ray Recorder . - *1 *1 *1 *1 - DVD Recorder . *1 3 - - *1 P.20 VCR . 3 - - ...
Page 17 - To play back the created disc
Creating Discs with a DVD Writer orExternal Blu-ray Drive 1 Close the LCD monitor and connect. ① Connect the AC adapter of this unit. ② Connect the AC adapter of the DVD writer. ③ Connect the USB cable provided with the DVD writer. . AV AC AdapterTo AC Outlet (110 V to 240 V) To DC Terminal To USB T...
Page 18 - Copying All Files
Copying All Files Select video or still image mode. 1 Select “CREATE FROM ALL” (video)or “SAVE ALL” (still image), andtouch . . ? VIDEO BACKUP CREATE FROM ALL SELECT AND CREATE PLAYBACK FINALIZE CHANGE REC . MEDIA SET You can change the media to save to byselecting “CHANGE REC. MEDIA”. (Fordetails, ...
Page 19 - Selecting Files to Copy; SAVE BY DATE; Select a recording date and touch; SELECT FROM IMAGES; To check the disc created
Selecting Files to Copy Select video or still image mode. 1 Select “SELECT AND CREATE”(video) or “SELECT AND SAVE”(still image), and touch . . ? VIDEO BACKUP CREATE FROM ALL SELECT AND CREATE PLAYBACK FINALIZE CHANGE REC . MEDIA SET You can change the media to save toby selecting “CHANGE REC. MEDIA”...
Page 21 - Using the Menu; Select the desired menu and touch; Select the desired setting and touch; To exit the screen; To return to the previous screen; Touch “; Touch “; Further Information
Using the Menu You can configure various settings usingthe menu. 1 Display the menu. . Touch ● The menu differs according to themode in use. 2 Select the desired menu and touch . . VIDEO SET QUIT ? REGISTER EVENT VIDEO QUALITY ZOOM GAIN UP HIGH SPEED RECORDING 3 Select the desired setting and touch ...
Page 22 - Recordable Time/Number of Images; Approximate Video Recording Time
Recordable Time/Number of Images You can check the video recording time by pressing the , (Power/Information) button. Approximate Video Recording Time Quality Built-in Memory (32 GB) SDHC Card 4 GB 8 GB 16 GB 32 GB UXP 2 h 57 m 21 m 44 m 1 h 29 m 2 h 58 m XP 4 h 9 m 31 m 1 h 2 m 2 h 5 m 4 h 12 m SP ...
Page 23 - Troubleshooting; Reset this unit when it does not function properly or when “; Trouble
● The above are values when “LIGHT” is set to “OFF” and “LCD BACKLIGHT” is setto “STANDARD”. ● The actual recording time may be shorter if zooming is used or if recording isstopped repeatedly. (It is recommended to prepare battery packs ready for threetimes the expected recording time.) ● When the b...
Page 24 - Other problems; Warning Indications
Other problems The lamp does not flash during battery pack charging. ● Check the remaining battery power. (When the battery pack is fully charged, the lamp does not flash.) P.9 ● When charging in either a hot or cold environment, ensure that battery is being charged within the permitted temperature ...
Page 25 - Cautions; Battery Pack; Record; LCD Mon
Cautions . Battery Pack The suppl i ed battery pack i s a l i th i u m - i on battery . Before us i ng the suppl i ed battery pack or an opt i onal battery pack, be sure to read the follow i ng caut i ons : • To avo i d hazards ... do not burn . ... do not short-c i rcu i t the ter mi nals . Keep i ...
Page 27 - Specifications; Camera
Specifications Camera Power supply Using AC adapter: DC 5.2 V, Using battery pack: DC 3.6 V Power consumption 3.2 W (when “LIGHT” is set to “OFF” and “LCD BACKLIGHT” is set to “STANDARD”) Dimensions (mm) 55 x 62 x 110 (W x H x D: excluding grip belt) Mass Approx. 260 g (camera only),Approx. 300 g (i...
Page 28 - Terms
Terms A AC adapter ...................................... 6AV Connection ......................... 15, 20 B Battery Pack .................................... 6BD/DVD Backup ............................ 17 C Clock Adjust ..................................... 7Component Connection ................. 14...
Page 29 - CAMÉSCOPE; Guide de l’utilisateur; Manuel d’utilisation
CAMÉSCOPE GZ-HM545 Guide de l’utilisateur Chers clients, Merci d’avoir acheté ce produit JVC.Avant toute utilisation, veuillez lire les précautions de sécurité et les mises en garde sur P.2 etP.25 pour pouvoir utiliser le produit en toute sécurité.Ce produit s’accompagne d’un “Guide de l’utilisateur...
Page 30 - Précautions de sécurité
Précautions de sécurité . AVERTISSEMENT : POUR É VITER LES RISQUES D’INCENDIE OU D’ É LECTROCUTION, NE PAS EXPOSER L’APPAREIL À LA PLUIE NI À L’HUMIDIT É . REMARQUES : • La plaque d ’i dent i ficat i on et l ’ avert i sse m ent de s é cur i t é se trouvent sous l ’ appare i l et/ou au dos . • La plaq...
Page 32 - En savoir plus sur les opérations avancées; Vérification des accessoires
Index Précautions de sécurité ....................... 2Index ................................................... 4Vérification des accessoires ................ 4Noms des pi è ces et des fonctions . . . . . . 5 ▶ Démarrer ................................... 6 Charger la batterie ........................
Page 33 - Noms des pièces et des fonctions
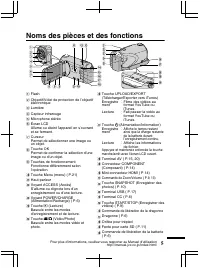
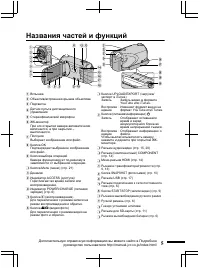
Noms des pièces et des fonctions . AV 2345 1 67 8 90 s r t ji a bc f e d h g m o n l k q p A Flash B Objectif/Volet de protection de l’objectifélectronique C Lumi è re D Capteur infrarouge E Microphone stéréo F É cran LCD Allume ou éteint l’appareil en s’ouvrantet se fermant. G CurseurPermet de séle...
Page 34 - Charger la batterie; Pour ret; Ajuster la poignée; Démarrer
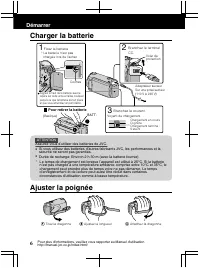
Charger la batterie . 2 3 1 BATT . Fixez la batterie. * La batterie n’est pas chargée lors de l’achat. Alignez le haut de la batterie avec le repère sur cette unité et faites coulisser jusqu'à ce que la batterie soit en place et que vous entendiez un petit déclic. Pour ret i rer la batter i e (Basiq...
Page 35 - Utiliser comme dragonne; Bouchon; Réglage de l; lect
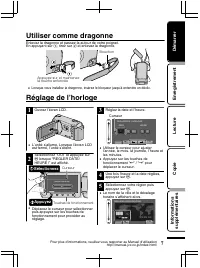
Utiliser comme dragonne Enlevez la dragonne et passez-la autour de votre poignet.En appuyant sur A , tirez sur B et enlevez la dragonne. . Bouchon Appuyez sur et maintenezla touche enfoncée ● Lorsque vous installez la dragonne, insérez le bloqueur jusqu’ à entendre un déclic. Réglage de l ’ horloge ...
Page 36 - Appuyez sur; REMARQUE
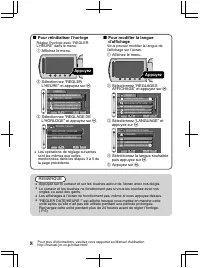
■ Pour réinitialiser l ’ horloge Réglez l’horloge avec “REGLERL'HEURE” dans le menu. ① Affichez le menu. . Appuyez ② Sélectionnez “REGLERL'HEURE” et appuyez sur . . ? REGLAGES AFFICHAGE REGLER L ' HEURE REGLAGES DE BASE REGLAGES CONNEXIONS REGLAGES DES MEDIA VIDEO REGLER FIN ③ Sélectionnez “REGLAGE ...
Page 37 - Enregistrer des vidéos; Vous pouvez enregistrer des vidéos sans avoir; Avant d; Appuyez; Indications apparaissant; Enregistrement
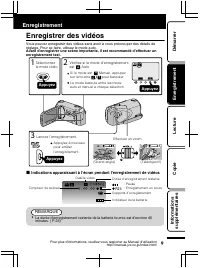
Enregistrer des vidéos Vous pouvez enregistrer des vidéos sans avoir à vous préoccuper des détails de réglage. Pour ce faire, utilisez le mode auto. Avant d ’ enregistrer une scène importante, il est recommandé d ’ effectuer un enregistrement test . . AV Appuyez Vérifiez si le mode d'enregistremente...
Page 38 - Réduit les secousses de la caméra.; Une stabilisation compl; Enregistrer des photos
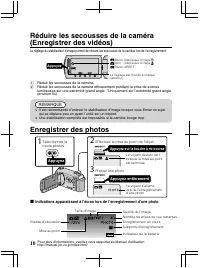
Réduire les secousses de la caméra(Enregistrer des vidéos) Le réglage du stabilisateur d’image permet de réduire les secousses de la caméra lors de l’enregistrement. . Appuyez (Blanc) : Stabilisateur d'image(Vert) : Stabilisateur d'image (Blanc) : ARRET Le réglage est modifié à chaquesélection. A : ...
Page 39 - Insérer une carte SD; Pour retirer la carte; Fabricant
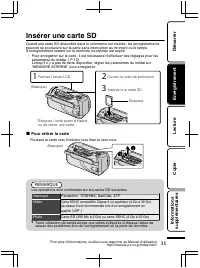
Insérer une carte SD Quand une carte SD disponible dans le commerce est insérée, les enregistrementspeuvent se poursuivre sur la carte sans interruption au moment où le tempsd’enregistrement restant sur la mémoire incorporée est expiré. * Pour enregistrer sur la carte, il est nécessaire d’effectuer ...
Page 40 - Pour utiliser une carte SD; L’enregistrement et la lecture peuvent; partir; Avant de formater la
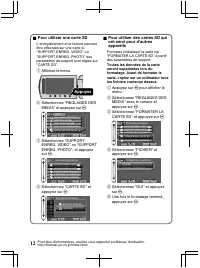
■ Pour utiliser une carte SD L’enregistrement et la lecture peuvent ê tre effectués sur une carte si “SUPPORT ENREG. VIDEO” ou“SUPPORT ENREG. PHOTO” desparam è tres de support sont réglés sur “CARTE SD”. ① Affichez le menu. . Appuyez ② Sélectionnez “REGLAGES DESMEDIA” et appuyez sur . . ? VIDEO REGL...
Page 41 - Lire/Supprimer des fichiers sur cette caméra; Pour capturer une photo durant la lecture; Lecture
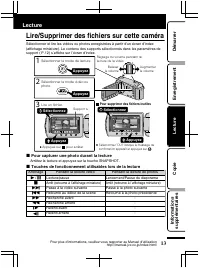
Lire/Supprimer des fichiers sur cette caméra Sélectionner et lire les vidéos ou photos enregistrées à partir d’un écran d’index (affichage miniature). Le contenu des supports sélectionnés dans les param è tres de support ( P.12) s’affiche sur l’écran d’index. . AV LECTURE VIDEO LECTURE VIDEO Sélecti...
Page 42 - Lecture sur poste TV; Lecture en qualité HD; Connecter au terminal HDMI; Connecter au terminal COMPONENT
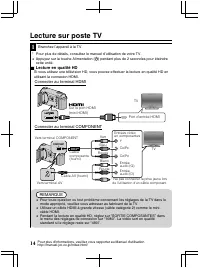
Lecture sur poste TV 1 Branchez l’appareil à la TV. * Pour plus de détails, consultez le manuel d’utilisation de votre TV. ● Appuyez sur la touche Alimentation ( , ) pendant plus de 2 secondes pour éteindre cette unité. ■ Lecture en qualité HD Si vous utilisez une télévision HD, vous pouvez effectue...
Page 43 - Lecture en qualité standard; Connecter au terminal AV; Sélectionner l’entrée d’alimentation de la TV.; Lire avec l; Déconnectez le c
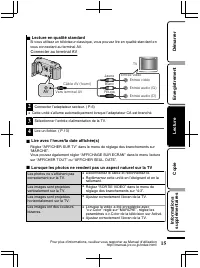
■ Lecture en qualité standard Si vous utilisez un téléviseur classique, vous pouvez lire en qualité standard envous connectant au terminal AV. Connecter au terminal AV . AV AV Entrée vidéo Entrée vidéo Entrée audio (G) Entrée audio (D) TV Câble AV (fourni) Blanc Rouge Jaune Vers terminal AV 2 Connec...
Page 44 - Copie des fichiers; Qualité standard; Copie
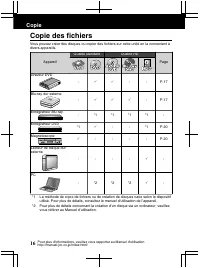
Copie des fichiers Vous pouvez créer des disques ou copier des fichiers sur cette unité en la connectant à divers appareils. Appareil Qualité standard Qualité HD Page . . . . . Graveur DVD . - 3 3 - - P.17 Blu-ray dur externe . - 3 3 3 - P.17 Enregistreur Blu-ray . - *1 *1 *1 *1 - Enregistreur DVD ....
Page 45 - Pour lire le disque créé
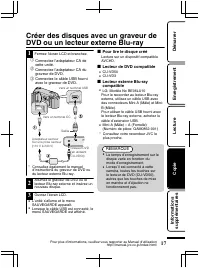
Créer des disques avec un graveur deDVD ou un lecteur externe Blu-ray 1 Fermez l’écran LCD et branchez. ① Connectez l’adaptateur CA decette unité. ② Connectez l’adaptateur CA dugraveur de DVD. ③ Connectez le c â ble USB fourni avec le graveur de DVD. . AV Adaptateur secteur Sur une prise secteur (11...
Page 46 - Copier tous les fichiers; Sélectionner le mode vidéo ou photo.; “SCENES NON ENREG; Lorsque “FINALISER ?” apparaît; Ceci appara
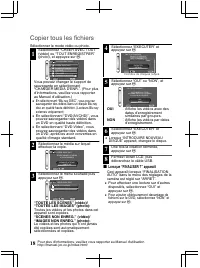
Copier tous les fichiers Sélectionner le mode vidéo ou photo. 1 Sélectionnez “CREER AVEC TOUT”(vidéo) ou “TOUT ENREGISTRER”(photo), et appuyez sur . . ? SAUVEGARDE VIDEO CREER AVEC TOUT CHOISIR ET CREER LECTURE FINALISER CHANGER MEDIA D ' ENR . REGLER Vous pouvez changer le support desauvegarde en s...
Page 47 - “CREER PAR L; ENREGISTRER PAR DATE; Sélectionnez un fichier.; Apr; Vérification d
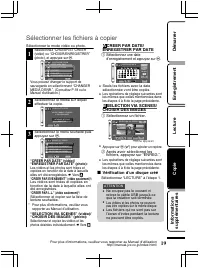
Sélectionner les fichiers à copier Sélectionner le mode vidéo ou photo. 1 Sélectionnez “CHOISIR ET CREER”(vidéo) ou “CHOISIR/ENREGISTRER”(photo), et appuyez sur . . ? SAUVEGARDE VIDEO CREER AVEC TOUT CHOISIR ET CREER LECTURE FINALISER CHANGER MEDIA D ' ENR . REGLER Vous pouvez changer le support des...
Page 48 - Préparation de cette unité
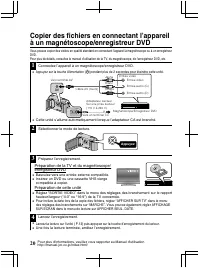
Copier des fichiers en connectant l ’ appareil à un magnétoscope/enregistreur DVD Vous pouvez copier des vidéos en qualité standard en connectant l’appareil à magnétoscope ou à un enregistreur DVD.Pour plus de détails, consultez le manuel d’utilisation de la TV, du magnétoscope, de l’enregistreur DV...
Page 49 - Via le menu; Pour plus d; Informations supplémentaires
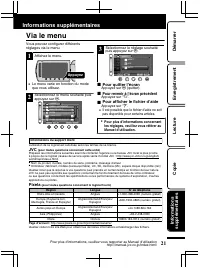
Via le menu Vous pouvez configurer différentsréglages via le menu. 1 Affichez le menu. . Appuyez ● Le menu varie en fonction du modeque vous utilisez. 2 Sélectionnez le menu souhaité puisappuyez sur . . VIDEO REGLER FIN ? ENREG . EVENEMENT QUALITE VIDEO ZOOM LUMINOSITE ENREG . HAUTE VITESSE 3 Sélect...
Page 50 - Durée d’enregistrement vidéo approximative
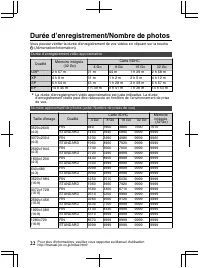
Durée d ’ enregistrement/Nombre de photos Vous pouvez vérifier la durée d’enregistrement de vos vidéos en cliquant sur la touche , (Alimentation/Information). Durée d’enregistrement vidéo approximative Qualité Mémoire intégrée (32 Go) Carte SDHC 4 Go 8 Go 16 Go 32 Go UXP 2 h 57 m 21 m 44 m 1 h 29 m ...
Page 51 - Durée d’enregistrement approximative (avec batterie); Dépannage; ” apparaît; Probl
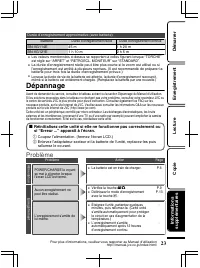
Durée d’enregistrement approximative (avec batterie) Batterie Durée d’enregistrement réelle Durée d’enregistrement continue BN-VG114E 45 m 1 h 20 m BN-VG121E 1 h 10 m 2 h 5 m ● Les valeurs mentionnées ci-dessus se rapportent à celles figurant lorsque “TORCHE” est réglé sur “ARRET” et “RETROECL. MONI...
Page 52 - Messages d’avertissement
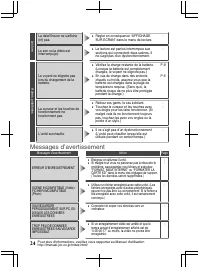
Lecture La date/l’heure ne s’affiche(nt) pas. ● Régler en conséquence “AFFICHAGESUR ECRAN” dans le menu de lecture. - Le son ou la vidéo estinterrompu(e). ● La lecture est parfois interrompue auxsections qui connectent deux sc è nes. Il ne s’agit pas d’un dysfonctionnement. - Autres probl è mes Le v...
Page 53 - Mises en garde
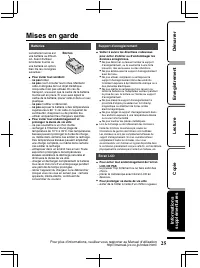
Mises en garde . Support d’enreg i stre m ent • Ve • Lors du for m atage ou de l ’ efface m ent des donn é es à l ’ a i de des fonct i ons du ca mé scope, seules les i nfor m at i ons de gest i on des f i ch i ers sont m od i f ié es . Les donn é es ne sont pas co m plète m ent effac é es du support...
Page 55 - Caractéristiques techniques; Caméra
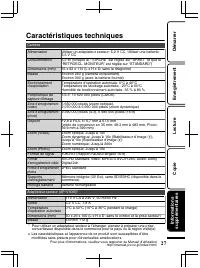
Caractéristiques techniques Caméra Alimentation Utiliser un adaptateur secteur: 5,2 V CC, Utiliser une batterie:3,6 V CC Consommation 3,2 W (lorsque la “TORCHE” est réglée sur “ARRET” et que le“RETROECL. MONITEUR” est réglée sur “STANDARD”) Dimensions (mm) 55 x 62 x 110 (L x H x D: sans la dragonne)...
Page 56 - Termes
Termes A Adaptateur secteur .......................... 6 B Batterie ............................................ 6BD/DVD de sauvegarde ................ 17Blu-ray dur externe ........................ 17Branchement composante ............. 14Branchement HDMI ....................... 14Branchement secte...
Page 57 - ВИДЕОКАМЕРА; Краткое; Подробное
ВИДЕОКАМЕРА GZ-HM545 Краткое руководство пользователя Уважаемые клиенты , Благодарим вас за покупку данного продукта JVC. Перед использованием прочитайте информацию по технике безопасности и мерам предосторожности , которая изложена на стр . 2 и стр . 25, чтобы гарантировать безопасное использование...
Page 60 - Указатель; DVD; Получение; Проверка; „Read Detailed User Guide“.
Указатель Техника безопасности ....................... 2 Указатель ........................................... 4 Проверка фурнитуры ........................ 4 Названия частей и функций ............. 5 ▶ Приступая к работе ................. 6 Зарядка аккумуляторного блока ...... 6 Регулировка ручного...
Page 62 - Отсоединение аккумуляторного блока; Приступая
Зарядка аккумуляторного блока . 2 3 1 BATT . Подсоедините аккумуляторный блок. * В момент покупки аккумуляторный блок не заряжен. Выровняйте верх батареи с пометкой на аппарате и вставляйте батарею, пока не услышите щелчок. Отсоединение аккумуляторного блока (Низ камеры) Подключите шнур питания к се...
Page 63 - Выберите
Использование ремня для ношения камеры на руке Отсоедините ремень и оберните его вокруг запястья . Нажав на A , потяните B и снимите ремень . . Фиксатор Нажмите и держите ● При присоединении ремня для ношения камеры на руке вставьте фиксатор так , чтобы раздался щелчок . Настройка часов 1 Откройте Ж...
Page 64 - Изменение; „LANGUAGE“; ПРИМЕЧАНИЕ
■ Переустановка часов Установите часы с помощью „ РЕГ . ЧАСОВ “ в меню . ① Откройте меню . . Нажмите ② Выберите „ РЕГ . ЧАСОВ “ и нажмите . . ? НАСТРОЙКИ ЭКРАНА РЕГ. ЧАСОВ ОСНОВНЫЕ НАСТРОЙКИ НАСТРОЙКИ СОЕДИНЕНИЯНАСТРОЙКИ НОСИТЕЛЯ ВИДЕО УСТАН. ВЫЙТИ ③ Выберите „ НАСТРОЙКА ЧАСОВ “ и нажмите . . ? РЕГ....
Page 65 - Видеосъемка; Нажмите; Обозначения; Запись
Видеосъемка Вы можете вести съемку , не устанавливая настройки , используя автоматический режим . Перед записью важной сцены рекомендуется сделать пробную запись . . AV Нажмите Убедитесь, что режим записи установлен на Авто . 1 2 3 Нажмите Нажмите Выберите режим видео. Если установлен режим Ручной н...
Page 66 - Фотосъемка; Установите фокус на необходимом
Снижение вибрации камеры ( видеосъемка ) Когда установлен стабилизатор изображения , вибрация камера во время съемки может быть значительно снижена . . Нажмите (Белый) : стабилизатор изображения (Зеленый) : стабилизатор изображения (Белый) : ВЫКЛ Установка переключается при каждом нажатии. A : Снижа...
Page 67 - Извлечение
Установка SD- карты При установке серийно выпускаемой SD- карты запись может быть продолжена на карту , когда встроенная память заполнится . * Для записи на карту необходимо выполнить установки носителя . ( стр . 12) Если карта отсутствует , установите для записи в установках носителя „ ВСТРОЕННАЯ П...
Page 69 - Удаление ненужных файлов; Воспроизведение
Воспроизведение / удаление файлов на аппарате Выберите и начните воспроизведение записанных видеофайлов или фотографий с экрана указателя ( отображаются эскизы ). Содержимое носителя , выбранного в установках носителя ( стр . 12), отображается на экране указателя . . AV ВОСПРОИЗ. ВИДЕО ВОСПРОИЗ. ВИД...
Page 70 - Подключение
Воспроизведение на экране телевизора 1 Подключите камеру к телевизору . * Также обратитесь к руководству по эксплуатации телевизора . ● Для выключения питания аппарата нажмите кнопку Вкл ./ выкл . ( , ) и удерживайте ее более 2 секунд . ■ Воспроизведение с высоким разрешением Если у вас есть телевиз...
Page 72 - Копирование
Копирование файлов Вы можете записывать диски или копировать файлы с этой камеры , подсоединив ее к различным устройствам . Устройство Стандартное качество Высокое разрешение Страниц а . . . . . Записывающее устройство DVD . - 3 3 - - стр . 17 Внешний дисковод Blu- ray . - 3 3 3 - стр . 17 Рекордер ...
Page 74 - При
Копирование всех файлов Выберите режим видео или фото . 1 Выберите „ СОЗДАТЬ ИЗ ВСЕГО “ ( Видео ) или „ СОХРАНИТЬ ВСЕ “ ( Неподвижное изображение ) и нажмите . . ? РЕЗЕРВ. КОПИР. ВИДЕО СОЗДАТЬ ИЗ ВСЕГО ВЫБРАТЬ И СОЗДАТЬ ВОСПРОИЗВЕДЕНИЕ ФИНАЛИЗИРОВАТЬ ИЗМЕН. НОСИТЕЛЬ ЗАП. УСТАН. Вы можете выбрать нос...
Page 77 - JVC; Дополнительная
Использование меню Вы можете настроить различные установки с использованием меню . 1 Откройте меню . . Нажмите ● Меню выглядит по - разному в зависимости от используемого режима . 2 Выберите необходимое меню и нажмите . . ВИДЕО УСТАН. ВЫЙТИ ? ЗАРЕГИСТР. СОБЫТИЕ КАЧЕСТВО ВИДЕО МАСШТАБ УВЕЛ. УСИЛ ВЫСО...
Page 81 - Внимание
Внимание . Аккумуляторный блок Прилагаемый аккумуляторный блок является ионно- литиевой батареей. Перед использованием прилагаемого или дополнительного аккумуляторного блока прочитайте следующие предупреждения: Контакты • Во избежание возникновения опасности ... не бросайте в огонь. ... не замыкайте...
Page 83 - Камера; Адаптер
Технические характеристики Камера Питание При использовании адаптера переменного тока : 5,2 В пост . тока , при использовании аккумуляторного блока : DC 3,6 В Потребляемая мощность 3,2 Вт ( когда „ ПОДСВЕТКА “, установленной на „ ВЫКЛ “, и „ РЕГ . ЯРКОСТИ ДИСПЛЕЯ “, установленной на „ СТАНДАРТ “) Ра...
Page 84 - Термины; ВИКТОР КОМПАНИ ОФ ДЖАПАН, ЛИМИТЕД
Термины А Адаптер переменного тока ............ 6 Аккумуляторный блок .................... 6 В Внешний дисковод Blu-ray ........... 17 Время записи ............................... 22 Выбор языка ................................... 8 Ж ЖК - мониторе ................................ 25 З Записывающее ...