Page 2 - General Safety Warnings; Work area safety; Keep work area clean and well lit.; Electrical safety
2 1.0 IMPORTANT SAFETY INSTRUCTIONS WARNING: Read all safety warnings, instructions, illustrations and specifications provided with this power tool. Failure to follow all instructions listed below may result in electric shock, fire and/or serious injury. Save all warnings and instructions for future...
Page 3 - Specific Safety Warnings for; Guarding related warnings; Never use a damaged or cut push stick.
3 • Store idle power tools out of the reach of children and do not allow persons unfamiliar with the power tool or these instructions to operate the power tool. Power tools are dangerous in the hands of untrained users. • Maintain power tools and accessories. Check for misalignment or binding of mov...
Page 4 - Kickback causes and related warnings; Align the fence to be parallel with the saw blade.; Table saw operating procedure warnings; The table saw must be secured.
4 • Never reach around or over a rotating saw blade. Reaching for a workpiece may lead to accidental contact with the moving saw blade. • Provide auxiliary workpiece support to the rear and/or sides of the saw table for long and/or wide workpieces to keep them level. A long and/or wide workpiece has...
Page 5 - Additional safety rules
5 • Always use saw blades with correct size and shape (diamond versus round) of arbor holes. Saw blades that do not match the mounting hardware of the saw will run off-center, causing loss of control. • Never use damaged or incorrect saw blade mounting means such as flanges, saw blade washers, bolts...
Page 6 - Table of contents; Section
6 2.0 Table of contents Section Page 1.0 IMPORTANT SAFETY INSTRUCTIONS ............................................................................................... 2 1.1 General Safety Warnings ..........................................................................................................
Page 7 - About this manual; or operation. Failure to comply may cause serious injury.
7 14.1.2 Motor and Trunnion – Parts List .................................................................................................. 29 14.2.1 Table and Cabinet– Exploded View ............................................................................................ 32 14.2.2 Table and Cabi...
Page 8 - Table Saw terminology
8 4.0 Table Saw terminology Arbor: Metal shaft that connects the drive mechanism to the blade. Bevel Edge Cut: Tilt of the saw arbor and blade between 0° and 45° to perform an angled cutting operation. Blade Guard: Mechanism mounted over the saw blade to prevent accidental contact with the cutting e...
Page 9 - Specifications
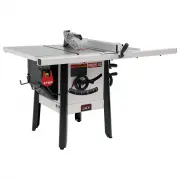
9 5.0 Specifications Table 1 Model number JPS2-115 JPS2-230 Stock number – saw only (see Table 2 below for kit configurations) 725000 725001 Motor and Electricals Motor type Totally enclosed, fan cooled, induction Horsepower 1.75 HP Motor phase 1 PH Motor voltage 120 V 230 V Cycle 60Hz Listed FLA (f...
Page 10 - Kit configurations; Stock numbers
10 Dust collection Dust port outside diameter 4 in. (102 mm) Recommended minimum extraction volume 400 CFM (0.5 CMM) General Dimensions Base footprint 23-1/2 x 24-1/2 in. (597 x 623 mm) Assembled, with 30-in. rail set, L x W x H 60 x 40 x 43 in. (1524 x 1016 x 1090 mm) Assembled, with 52-in. rail se...
Page 11 - Read and understand all; Setup and assembly; Shipping contents; Hardware package
11 Read and understand all assembly instructions before attempting assembly. Failure to comply may cause serious injury. 6.0 Setup and assembly 6.1 Shipping contents See Figures 6-1 and 6-2. NOTE: Some parts may have come pre-assembled to the table saw. 1 Table saw with on/off switch (not shown) 1 B...
Page 12 - Tools required for assembly; The main saw unit is heavy; Unpacking and cleanup; Leveling extension wings
12 6.2 Tools required for assembly Hex (Allen) wrenches: 4, 5, 6mm Open end wrenches: 10, 13mm Cross point (Phillips) screwdriver Straight edge Rubber mallet (or hammer with block of wood) Level Note: A ratchet wrench with sockets will speed assembly time. Additional tools may be needed for adjustme...
Page 14 - Use care when working around; Anti-kickback pawls
14 6.9 Wood extension table To install the optional wood table, consult manual M-725005, which accompanies your fence assembly, then proceed to sect. 6.11. 6.10 Switch bracket See Figure 6-8. Use two screws with washers (HP-11) to secure switch bracket to front rail. Figure 6-8 6.11 Dust collection ...
Page 15 - When installing or changing; Low profile riving knife
15 Figure 6-11 6.14 Blade guard See Figure 6-12. 1. Push up guard leaves (E, Figure 6-12) until they catch and hold on the peg (F). 2. Lower blade guard assembly onto riving knife and push it backward to seat it. 3. Tighten knob (G). 4. Pull down guard leaves (E) and allow them to drop to the table....
Page 16 - Table insert; Miter gauge; Calibration; Tool storage; Electrical connections; GROUNDING INSTRUCTIONS
16 6.17 Table insert See Figure 6-14. 1. Remove blade guard and riving knife. 2. Lower blade completely. 3. Place table insert into opening with notched end towards rear of table, as shown. 4. Adjust insert flush with table by turning four leveling setscrews (L) and using a straight edge at differen...
Page 17 - Check with a qualified; Overload reset button
17 Check with a qualified electrician or service personnel if the grounding instructions are not completely understood, or if in doubt as to whether the tool is properly grounded. Failure to comply may cause serious or fatal injury. Use only 3-wire extension cords that have 3-prong grounding plugs a...
Page 18 - Adjustments; Blade raising/tilt mechanism; Never try to force the tilting; Adjusting blade tilt stops
18 Figure 7-3 8.0 Adjustments 8.1 Blade raising/tilt mechanism Never try to force the tilting mechanism past the 45º or 90º stops. This may cause blade misalignment. See Figure 8-1. To raise or lower blade, loosen lock knob (A) and turn handwheel (B) on front of saw until desired height is reached. ...
Page 19 - Riving knife alignment; Lateral alignment
19 Figure 8-5 8.3 Riving knife alignment 8.3.1 Lateral alignment Saw blade and riving knife must be as closely aligned as possible (lateral alignment) for prevention of kickback. This should be checked upon initial blade guard and riving knife installation. Alignment should also be reaffirmed after ...
Page 21 - Kickbacks
21 9.0 Operations NOTE: The following Figures are general in nature and may not show your particular saw model. Familiarize yourself with the location and operation of all controls and adjustments and the use of accessories such as miter gauge and rip fence. 9.1 Kickbacks Serious injury can result f...
Page 22 - Rip sawing; Before starting a ripping cut,
22 9.2 Rip sawing Ripping is where the workpiece is fed with the grain into the saw blade using the fence as a guide and a positioning device to ensure the desired width of cut (Figure 9-3). Figure 9-3 Before starting a ripping cut, verify that fence is clamped securely and aligned properly. • Never...
Page 23 - never
23 Figure 9-6 When ripping long boards, use a support at front of table (A, Figure 9-6), such as a roller stand, and a support or "tailman" (B) at the rear. Never use the rip fence beyond the point where the carriage is flush with the end of the rails. Have the blade extend about 1/8" ab...
Page 24 - Bevel and miter operations
24 To improve the effectiveness of the miter gauge in crosscutting, some users mount an auxiliary wooden extension face (A, Figure 9-10) with a glued-on strip of sandpaper (B) to the miter gauge. Provide auxiliary support for any workpiece extending beyond the table top with a tendency to sag and li...
Page 25 - Never use a dado head in a; Safety devices; Feather board
25 Never use a dado head in a tilted position. Never operate the saw without the blade guard, riving knife and anti-kickback pawls for operations where they can be used. 10.0 Safety devices Feather board The feather board (Figure 10-1) should be made of straight grain hardwood approximately 1" t...
Page 26 - Always disconnect power to; Cleaning; Additional servicing; Optional accessories
26 11.0 User-maintenance Always disconnect power to the machine before performing maintenance. Failure to do this may result in serious personal injury. 11.1 Cleaning Clean the JPS2 according to the schedule below to ensure maximum performance. The schedule assumes the saw is being used every day. D...
Page 27 - Troubleshooting JPS2 ProShop II; Symptom Possible; Replacement Parts
27 13.0 Troubleshooting JPS2 ProShop II Symptom Possible Cause Correction Motor will not start Low voltage. Check power line for proper voltage. Open circuit in motor or loose connection. Inspect all lead connections on motor for loose or open connections. Motor will not start: fuses or circuit brea...
Page 28 - Motor and Trunnion – Exploded View
Page 29 - Motor and Trunnion – Parts List; Index No Part No
29 14.1.2 Motor and Trunnion – Parts List Index No Part No Description Size Qty 1 ................ 6291479 .................... Key, Dbl Rd Hd ........................................................ 5x5x30mm .................... 1 2 ................ JPS10TSC-102 ......... Motor Pulley ................
Page 32 - Table and Cabinet– Exploded View
Page 33 - Table and Cabinet– Parts List
33 14.2.2 Table and Cabinet– Parts List Index No Part No Description Size Qty 1 ................ JPS10TSC-201 ......... Cabinet .................................................................... ...................................... 1 2 ................ 725002 ...................... ProShop II St...
Page 36 - Blade Guard Assembly – Exploded View
Page 37 - Blade Guard Assembly – Parts List
37 14.5.2 Blade Guard Assembly – Parts List Index No Part No Description Size Qty 1 ................ JPS10TSC-501 ......... Right Side Blade Guard ........................................... ...................................... 1 2 ................ JPS10TSC-502 ......... Screw .......................
Page 39 - Electrical Connections for JPS2; MOTOR
39 15.0 Electrical Connections for JPS2 OVERLOAD PROTECTOR BL A CK 9AMP GR EE N WH IT E BL AC K BL AC K G R EEN /? WH IT E SJ T 14A W G *1C KJD17B-230V Magnetic Switch 230V SJT 14AWG*3C GR EE N WH IT E BL AC K SJ T 14 A W G *1C WH IT E G R EEN BL A CK BL A CK WH IT E G R EEN 18AMP BL AC K OVERLOAD P...
Page 40 - Warranty and Service
40 16.0 Warranty and Service JET ® warrants every product it sells against manufacturers’ defects. If one of our tools needs service or repair, please contact Technical Service by calling 1-800-274-6846, 8AM to 5PM CST, Monday through Friday. Warranty Period The general warranty lasts for the time p...