Page 2 - Warranty and Service
2 Warranty and Service Walter Meier (Manufacturing) Inc., warrants every product it sells. If one of our tools needs service or repair, one of our Authorized Service Centers located throughout the United States can give you quick service. In most cases, any of these W alter Meier Authorized Service ...
Page 3 - Table of Contents
3 Table of Contents Warranty and Service .............................................................................................................................. 2 Table of Contents .................................................................................................................
Page 4 - not
4 W arnings 1. Read and understand the entire owner's manual before attempting assembly or operation. 2. Read and understand the warnings posted on the machine and in this manual. Failure to comply with all of these warnings may cause serious injury. 3. Replace the warning labels if they become obsc...
Page 6 - Introduction; Specifications
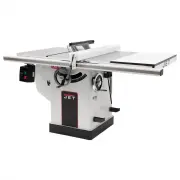
6 Introduction The JET XACTA ® Saw Deluxe table saw you hav e purchased is a high quality machine tool that will giv e you years of superior service. You will get maximum performance and enjoyment from your new table saw if you will take a few moments now to review the entire manual before beginning...
Page 7 - assembly or operation! Failure to comply may cause serious injury.; Shipping Contents; Unpacking; Do not connect the tablesaw; Cleaning
7 Read and understand the entire contents of this manual before attempting assembly or operation! Failure to comply may cause serious injury. Shipping Contents Unpacking Remove box and wood crating completely from around saw. Check for shipping damage. Report any damage immediately to your distribut...
Page 8 - Contents of the Shipping Container
8 Contents of the Shipping Container Main Saw Container 1 Table Saw (A) 1 Switch (B) 1 Table Insert (C) 1 Owner's Manual (D) 1 Warranty Card (not shown) Main Saw Container Extension Tables Two extension tables are packaged in individual boxes. Extension Tables Side Cover Box 1 Side Cover Contents of...
Page 9 - Assembly; Motor Cover; Miter Gauge and Fence Storage Hooks
9 Assembly Motor Cover Referring to Figures 1 and 2: • Tools: 17mm Wrench, 12mm Wrench 1. Remove shipping bracket (A) securing the motor (C) to table. 2. After the shipping bracket has been remov ed, install the screw (B) back into the motor support bracket. The upper screws will be used to later to...
Page 10 - Extension Wing; Blade Installation/Replacement; Use care when working with or
10 Extension Wing Referring to Figures 4 and 5: • Hardware: (6) 7/16”x1-1/2” Hex Cap Bolts, (6) 7/16” Lock Washers, (6) 7/16” Flat Washers & (2) Extension Wings • Tools: 17mm Wrench, Straight Edge 1. Attach the left extension wing (A) to the table (B) with three each hex cap screws (E), lock was...
Page 11 - Riving Knife and Guard Installation; proper alignment is very
11 Riving Knife and Guard Installation Description Referring to Figure 7: The complete riving knife and guard assembly is shown in A. Before installing onto the saw, the anti- kickback pawl (E) must be separated from the riving knife (H) as follows: 1. Press and hold the quick-release button (D) on ...
Page 12 - Electrical Connections
12 Mounting Rails & Extension Table With the extension wings properly aligned, the rail and fence assembly can now be mounted to the saw. Refer to the XACTA ® Fence II Commercial 30/50 Owner's Manual (Part No. M-708950Z) for mounting instructions for the rails, fence and optional wooden extensio...
Page 13 - Adjustments; Handwheel Adjustments; Insert Adjustment
13 Adjustments Handwheel Adjustments Referring to Figure 10: The front handwheel (B) controls the raising and lowering of the blade (blade height). The side handwheel (D) controls the blade tilt. The blade can be adjusted for a tilt between 90º (v ertical or a setting of 0º on the scale) and 45º lef...
Page 14 - Riving Knife Adjustment
14 Riving Knife Adjustment Lateral alignment The saw blade and riving knife must be in line as close as possible with each other ( lateral alignment) for the prev ention of kickback. Upon initial blade guard and riving knife installation no further adjustment should be necessary. Alignment should be...
Page 15 - Blade Alignment; Positive Stops
15 Blade Alignment • Tools: 8mm hex wrench, combination square, marker Blade alignment with the table is adjusted at the factory. After a period of use, or, after moving the saw to another location, the blade may no longer be aligned with the table. To check and align the blade (refer to Figure 16):...
Page 16 - Changing the Belt; Make all machine adjustments
16 5. If blade is not at 90 degrees, open the motor cov er door, loosen lock nut (A, Fig. 19) and turn adjusting stop screw (B, Fig. 19) on the front trunnion in, or out. The adjusting stop screw should stop against the front trunnion bracket when the blade is 90 ° to the table. 6. Tighten the lock ...
Page 17 - Maintenance; to do this may result in serious personal injury.
17 Maintenance Always disconnect power to the machine before performing maintenance. Failure to do this may result in serious personal injury. Cleaning Note: The following maintenance schedule assumes the saw is being used ev ery day. Daily: Wipe down the table surface and groov es with a rust pre...
Page 18 - Troubleshooting; Trouble Possible
18 Troubleshooting Trouble Possible Cause Solution Saw stops or will not start Overload tripped Saw unplugged from wall or motor Fuse blown or circuit breaker tripped Cord damaged Allow motor to cool and reset by pushing off switch Check all plug connections Replace fuse or reset circuit breaker Rep...
Page 19 - Optional Accessories; Stock No; Parts; Ordering Replacement Parts
19 Optional Accessories Stock No Description 708295 Tenoning Jig for 10” saws only: 708097 Dado Insert 708118 Univ ersal Mobile Base Parts Ordering Replacement Parts Replacement parts are listed on the following pages. To order parts or reach our serv ice department, call 1-800-274-6848, Monday thro...
Page 20 - Table & Cabinet Parts List
20 Table & Cabinet Parts List Index No. Part No. Description Size Qty 1 ............... JTAS10-1 .................Lock Knob ............................................................................................. 1 2 ............... JTAS10-2 .................Miter Gauge Body...................
Page 23 - Trunnion & Motor Parts List
23 Trunnion & Motor Parts List Index No. Part No. Description Size Qty 101 ........... JTAS10L-101 ...........Arbor Nut ............................................................................................... 1 102 ........... JTAS10-102 .............Arbor Flange ............................
Page 25 - Trunnion & Motor Assembly Drawing
Page 26 - Blade Guard Parts and Assembly
26 Blade Guard Parts and Assembly Index No. Part No. Description Size Qty 1 ............... JTAS10L-301 ...........Riving Knife .......................................................................................... 1 ................. JTAS10DX-BGA ......Blade Guard Assembly (Index #2 thru #16, #...
Page 27 - Wiring Diagrams