Page 2 - Welcome
to your new Instant ® Vortex ™ PRO! This Instant Vortex Pro Air Fryer can help you cook delicious meals with less oil and less hassle. We hope you fall in love with Instant air frying, and enjoy it in your kitchen for years to come! 1 Welcome Before using your new Vortex Pro, read all instructions, ...
Page 3 - CONTENTS
1 What’s in the box 2 Using your Vortex Pro 3 Initial set up 5 Cooking 7 Rotisserie cooking 13 Cleaning 18 Learn more 20 CONTENTS Instant-GSG_Vortex_10QT_PRO_manual_R7.indd 1 Instant-GSG_Vortex_10QT_PRO_manual_R7.indd 1 2021-06-28 9:35:03 AM 2021-06-28 9:35:03 AM
Page 4 - WHAT’S IN THE BOX; Air Fryer Oven
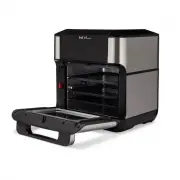
2 Get Started 3 Get Started WHAT’S IN THE BOX Air Fryer Oven Air Vents (rear) Control Panel Oven Door Cooking Chamber (inside) Power Cord (rear) Heating Element (inside) Illustrations are for reference only and may differ from the actual product. Remember to recycle! We designed this packaging with ...
Page 5 - USING YOUR VORTEX PRO; Control panel; We’ve designed the control panel to be simple to use and easy to read.
3 Get Started USING YOUR VORTEX PRO Control panel We’ve designed the control panel to be simple to use and easy to read. 1. Message Bar • Cooking time• Cooking temperature• Messages• Error codes 2. Temperature Control • Increase or decrease cooking temperature 3. Time Control • Increase or decrease ...
Page 6 - Turning the sound On/Off; Choosing the temperature scale; Start; Reset Smart Programs to original settings; Reset individual Smart Programs
4 Get Started 5 Get Started Turning the sound On/Off You can set notification sounds to ON or OFF. • When in Standby mode, press and hold Time - and Temp - for 5 seconds. Error alerts cannot be turned off. Choosing the temperature scale You can display cooking temperature in either Fahrenheit or Cel...
Page 7 - Initial set up; Unpack
5 Get Started Initial set up Unpack 1. Remove your new Vortex Pro from the box. 2. Remove all the packaging material from in and around the oven. 3. Make sure to remove all the accessories from inside the oven chamber. 4. Don’t remove the safety warning stickers or the rating label from the air frye...
Page 8 - Test run; To perform a test run:
6 Get Started 7 Get Started Test run Before using your new Instant Vortex Pro for the first time, you must perform a test to ensure the unit is working properly. To perform a test run: 1. Follow cooking instructions on page 9. 2. Insert the cooking basket into the unit, but do not add food to the ba...
Page 9 - COOKING; What to cook in; Prep
7 Get Started COOKING The Vortex Pro uses rapid air circulation to crisp or cook food, giving your meals all the rich, crispy flavor of deep frying, with little to no oil. What to cook in • Cooking trays are perforated for airflow and should be used for most foods, like wings and cauliflower bites. ...
Page 10 - Cook; End
8 Get Started 9 Get Started Cook 1. Place your food on the cooking utensil, according to your recipe 2. Insert the cooking utensil into the air fryer. 3. Close the door. 4. Press the button for the smart program you want to use. 5. Use the Temp + / - buttons to adjust the temperature. 6. Use the Tim...
Page 11 - SMART PROGRAMS; Air Fry; To air fry; Roast; To roast; Bake
9 Get Started SMART PROGRAMS Air Fry You can air fry foods like fries, cauliflower bites, wings, nuggets and more. Setting Default Minimum Maximum Temperature 400 ° F / 205 ° C 180 ° F / 82 ° C 400 ° F / 205 ° C Cooking Time 18 minutes (00:18) 1 minute(00:01) 1 hour (01:00) To air fry • Follow the b...
Page 12 - To bake; Broil; To broil
10 Get Started 11 Get Started You can bake foods like breads, cakes, pastries and buns, with the Vortex Pro as your own “mini oven”. Setting Default Minimum Maximum Temperature 365 ° F /185 ° C 180 ° F / 82 ° C 400 ° F / 205 ° C Cooking Time 30 minutes (00:30) 1 minute(00:01) 1 hour (01:00) To bake ...
Page 13 - Dehydrate; To dehydrate; Reheat; To reheat
11 Get Started Dehydrate Dehydrating uses low heat over a long period of time to safely dry out food items, like dried fruit, jerky and dried veggies. Setting Default Minimum Maximum Temperature 120 ° F /49 ° C 95 ° F / 41 ° C 175 ° F / 71 ° C Cooking Time 7 hours (07:00) 1 hour (01:00) 72 hours (07...
Page 14 - Proof; To proof; Toast; To toast
12 Get Started 13 Get Started Proof Proofing allows your dough to rest, then rise, to let the yeast do its job, for delicious loaves and rolls. Setting Default Minimum Maximum Temperature 90 ° F / 32 ° C 90 ° F / 32 ° C 120 ° F / 49 ° C Cooking Time 30 minutes (30:00) 30 minutes (30:00) 40 minutes (...
Page 15 - ROTISSERIE COOKING; The Vortex Pro uses EvenCrisp
13 Get Started ROTISSERIE COOKING The Vortex Pro uses EvenCrisp ™ Technology and rotates food while cooking, for delicious results. What to cook in • Rotisserie basket is perforated to allow maximum airflow for smaller foods. • Rotisserie spit and forks are perfect for roasting larger foods like who...
Page 16 - Using the rotisserie basket; Using the rotisserie spit and forks
14 Get Started 15 Get Started Cook 1. Place your food on the cooking utensil, according to your recipe 2. Insert the cooking utensil into the air fryer. 3. Close the door. 4. Press Air Fry or Roast . 5. Use the Temp + / - buttons to adjust the temperature. 6. Use the Time + / - buttons to adjust the...
Page 17 - Push your food onto the spit.; Placing the rotisserie basket or spit into the air fryer
15 Get Started 3. Push your food onto the spit. 4. Slide the forks onto both ends of the spit, making sure the prongs are inserted into the food item securely on both sides. 5. When the food is in place, tighten the setting screws to hold the forks in place. Placing the rotisserie basket or spit int...
Page 18 - Release the rotisserie catch lever.
16 Get Started 17 Get Started 4. Align the left side of the accessory with the hole in the rotisserie catch, and set the right end of the accessory in the notch on the right. 5. Release the rotisserie catch lever. 6. Rotate the accessory in place to make that it’s being held securely. The rotisserie...
Page 19 - Removing the rotisserie basket or spit from the air fryer
17 Get Started Removing the rotisserie basket or spit from the air fryer 1. Open the oven door. 2. Position the hooks on the rotisserie lift beneath the left and right arms of the accessory. 3. Move the rotisserie catch lever to the right and hold it in position to release the accessory. 4. Pull the...
Page 20 - CLEANING; DO NOT
18 Get Started 19 Get Started CLEANING Clean your Instant Vortex Pro after each use. Always let all parts cool to room temperature before cleaning. Before use or storing, make sure all surfaces are dry. Part Cleaning instructions Drip pan • Dishwasher safe. • Remove for cleaning. • To prevent smokin...
Page 21 - In the manual; For full details, read the User Manual, available at
19 Get Started Cooking chamber • Clean with a damp cloth and mild dish soap. • Always check the heating coil and cooking chamber walls for oil spatter and food debris, and clean as needed. • Ensure the heating coil is dry before turning on the air fryer oven. • To remove baked-on grease and food res...
Page 22 - LEARN MORE
20 Get Started 21 Get Started LEARN MORE There’s a whole world of Instant Vortex information and help just waiting for you. Here are some of the most helpful resources. Get the full User Manual Instanthome.com Register your product Instanthome.com/register Contact Consumer Care Instanthome.com[email...
Page 23 - PRODUCT SPECIFICATIONS
21 Get Started PRODUCT SPECIFICATIONS Model Volume Power Input Weight Dimensions Vortex Pro 10 10 Quart9.46 Litres 1500 watts 120V / 60Hz 7.95 kg 17.53 lbs. in: 13.78 D x 13.23 W x 14.37 Hcm: 35 D x 33.6 W x 36.5 H Instant-GSG_Vortex_10QT_PRO_manual_R7.indd 21 Instant-GSG_Vortex_10QT_PRO_manual_R7.i...
Page 24 - © 2021 Instant Brands Inc.
Instant Brands Inc. 495 March Road, Suite 200 Kanata, Ontario, K2K 3G1 Canada instanthome.com © 2021 Instant Brands Inc. 140-3002-01-0301 Instant-GSG_Vortex_10QT_PRO_manual_R7.indd 22 Instant-GSG_Vortex_10QT_PRO_manual_R7.indd 22 2021-06-28 9:35:11 AM 2021-06-28 9:35:11 AM