Page 5 - DEUTSCH; Entsorgung von Altgeräten
DEUTSCH 5 - Das Gerät ist ausschließlich zur Zubereitung von Nahrungsmitteln für private Haushalte konzipiert. Jeder hiervon abweichende Gebrauch ist nicht gestattet (z.B. das Heizen von Räumen). Der Hersteller übernimmt keine Verantwortung für Schäden aufgrund von unsachgemäßer oder falscher Verwen...
Page 6 - Zubehör
DEUTSCH 6 Produktbeschreibung Zubehör Rost 1x Kuchenblech 1x Fettpfanne 1x Selbstreinigende katalytische Wände 2x 1 Bedienfeld 2 Kühlgebläse 1) (nicht sichtbar) 3 Grillschutzvorrichtung 2) 4 Oberes Heizelement/Grill 5 Hintere Backofenbeleuchtung 6 Backofengebläse 7 Unteres Heizelement (nicht sichtba...
Page 7 - Einschieben der Roste und anderer
DEUTSCH 7 Einschieben der Roste und anderer Zubehörteile in den Backofen Der Rost und die anderen Zubehörteile sind mit einem Blockiersystem ausgestattet, das ein versehentliches Herausziehen verhindert. 1. Schieben Sie den Rost mit dem erhöhten Teil “A” nach oben zeigend waagerecht ein (Abb. 1). Ab...
Page 8 - C D; Inbetriebnahme des Backofens
DEUTSCH 8 A LED, automatische Türverriegelung B Bedienknopf zur Funktionswahl C Taste zur Programmierung: ("set") D Bestätigungstaste ("ok") E Taste zum Ändern der Zeiteinstellungen ("-" "+") F Thermostatknopf Bedienfeld Täglicher Gebrauch A B C D E F Inbetriebnahme d...
Page 9 - Änderung der Temperatur:
DEUTSCH 9 der Backofen schaltet sich ein. Die Anzeige neben erlischt, sobald die gewählte Temperatur erreicht ist. Änderung der Temperatur: 1. Drehen Sie den Bedienknopf F und wählen Sie die gewünschte Temperatur. Wichtiger Hinweis: Zur Aufhebung einer bereits gewählten Programmierung stellen Sie de...
Page 10 - und ein Signalton
DEUTSCH 10 schaltet der Ofen automatisch ab. Auf dem Display erscheint und ein Signalton ertönt. Warmhalten Diese Funktion ermöglicht eine konstante Ofentemperatur von 60°C. 1. Drehen Sie den Bedienknopf F, bis die Anzeige "P2", nach zwei Sekunden gefolgt von der Temperaturanzeige 60 °C, auf...
Page 13 - Art der Speise; Gartabellen
DEUTSCH 13 Art der Speise Betriebsart Vorheizen Einschubebene (von unten) Temperatur (°C) Garzeit (Min.) BACKWAREN, TEILCHEN USW. Hefekuchen X 2 150-175 35-90 X 1-3 150-170 30-90 Gefüllte Kuchen (Käsekuchen, Strudel, Obstkuchen) X 2 150-190 30-85 X 1-3 150-190 35-90 Plätzchen (Kekse), Törtchen X 2 1...
Page 16 - PFLEGE
DEUTSCH 16 • Nehmen Sie das gesamte Zubehör vor dem Ein- schalten der Pyrolysefunktion aus dem Backofen. • Nach einer gewissen Anzahl an Garvorgängen wird je nach Verschmutzungsgrad anhand einer Meldung auf dem Display empfohlen, einen Selbstreinigungszyklus durchzuführen. HINWEIS: Während des Pyrol...
Page 17 - Absenken des oberen Heizelements (nur bei
DEUTSCH 17 Einsetzen der Tür: 1. Setzen Sie die Scharniere in die Aussparungen ein. 2. Öffnen Sie die Backofentür vollständig. 3. Drücken Sie beide Schließhaken nach unten. 4. Schließen Sie die Gerätetür. Absenken des oberen Heizelements (nur bei einigen Modellen) 1. Nehmen Sie die seitlichen Führun...
Page 18 - Fehler
DEUTSCH 18 Störung - was tun? Fehler Mögliche Ursachen Abhilfemaßnahme Der Backofen funktioniert nicht: Keine Netzversorgung. Prüfen Sie, ob das Stromnetz Strom führt. Der Backofen ist nicht an das Stromnetz angeschlossen. Schließen Sie den Backofen an die Stromversorgung an. Der Bedienknopf steht a...
Page 19 - Bevor Sie den Kundendienst rufen:
DEUTSCH 19 Bevor Sie den Kundendienst rufen: 1. Versuchen Sie zuerst, die Störung anhand der in "Störung - was tun?" beschriebenen Anleitungen/Tabelle selbst zu beheben. 2. Schalten Sie das Gerät aus und wieder ein, um festzustellen, ob die Störung behoben ist. Falls nach den vorstehend besc...
Page 21 - Vorbereitung des Unterbauschranks; Aufstellung
DEUTSCH 21 Prüfen Sie nach dem Auspacken, dass das Gerät keine Transportschäden aufweist und die Backofentür richtig schließt. Bei auftretenden Problemen wenden Sie sich bitte an Ihren Händler oder rufen die nächste Kundendienststelle an. Um eventuellen Schäden vorzubeugen, sollten Sie das Gerät ers...
Page 22 - Sicherheitselement der Tür (Verriegelung); Näheres zum Öffnen der Tür mit dem
DEUTSCH 22 Sicherheitselement der Tür (Verriegelung) Näheres zum Öffnen der Tür mit dem Sicherheitselement siehe Abb. 1. Abb. 1 Das Sicherheitselement der Tür kann ausgebaut werden durch Befolgen der Anweisungen in den Bildern in der angegebenen Reihenfolge (siehe Abb. 2). Abb. 2
Page 23 - Entsorgung von Verpackungsmaterial; Umweltschutz
DEUTSCH 23 Entsorgung von Verpackungsmaterial - Das Verpackungsmaterial ist zu 100 % wieder verwertbar und trägt das Recycling-Symbol ( ). Werfen Sie das Verpackungsmaterial deshalb nicht einfach fort, sondern entsorgen Sie es auf die von den verantwortlichen Stellen festgelegte Weise. Entsorgung vo...
Page 28 - FRANÇAIS; Mise au rebut des appareils ménagers
FRANÇAIS 28 - Ce four est un appareil ménager destiné exclusivement à la cuisson des aliments. Toute autre utilisation (pour le chauffage d'une pièce, par exemple) est interdite. Le fabricant décline toute responsabilité en cas d'utilisation impropre de l'appareil ou de réglage incorrect des command...
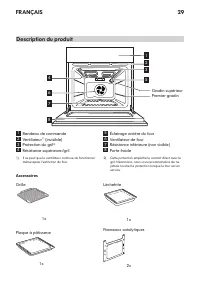
Page 29 - Accessoires
FRANÇAIS 29 Description du produit Accessoires Grille 1x Plaque à pâtisserie 1x Lèchefrite 1x Panneaux catalytiques 2x 1 Bandeau de commande 2 Ventilateur 1) (invisible) 3 Protection du gril 2) 4 Résistance supérieure/gril 5 Éclairage arrière du four 6 Ventilateur de four 7 Résistance inférieure (no...
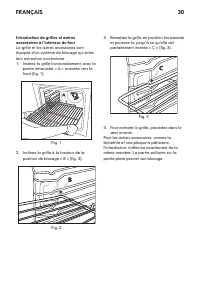
Page 30 - Introduction de grilles et autres
FRANÇAIS 30 Introduction de grilles et autres accessoires à l'intérieur du four La grille et les autres accessoires sont équipés d'un système de blocage qui évite leur extraction involontaire. 1. Insérez la grille horizontalement, avec la partie rehaussée « A » orientée vers le haut (fig. 1). Fig. 1...
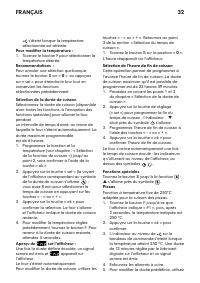
Page 31 - Mise en marche du four
FRANÇAIS 31 A Voyant de verrouillage automatique de la porte B Bouton de sélection des fonctions C Touche de programmation (« set ») D Touche de confirmation (« ok ») E Touches de programmation du temps (« - » « + ») F Bouton du thermostat Bandeau de commande Utilisation quotidienne A B C D E F Mise...
Page 32 - Pour modifier la température :
FRANÇAIS 32 s'éteint lorsque la température sélectionnée est atteinte. Pour modifier la température : 1. Tournez le bouton F pour sélectionner la température désirée. Recommandations : Pour annuler une sélection quelconque, tournez le bouton B sur « 0 ». ou appuyez sur « set » pour éteindre le four ...
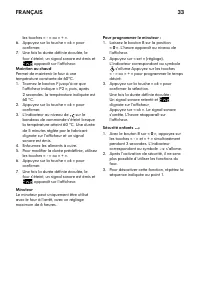
Page 33 - Maintien au chaud
FRANÇAIS 33 les touches « - » ou « + ». 6. Appuyez sur la touche « ok » pour confirmer. 7. Une fois la durée définie écoulée, le four s'éteint, un signal sonore est émis et apparaît sur l'afficheur. Maintien au chaud Permet de maintenir le four à une température constante de 60°C. 1. Tournez le bout...
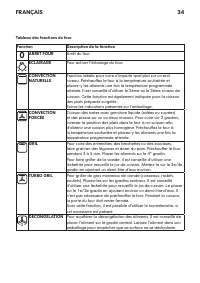
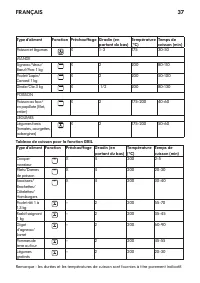
Page 36 - Type d’aliment; Tableaux de cuisson
FRANÇAIS 36 Type d’aliment Fonction Préchauffage Gradin (en partant du bas) Température (°C) Temps de cuisson (min) VIENNOISERIES, PÂTISSERIE, ETC. Gâteaux levés X 2 150-175 35-90 X 1-3 150-170 30-90 Tourtes fourrées (tarte au fromage blanc, crumble aux pommes, tarte aux fruits) X 2 150-190 30-85 X ...
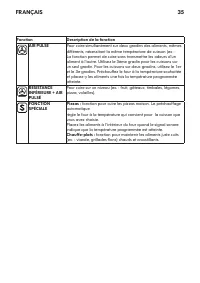
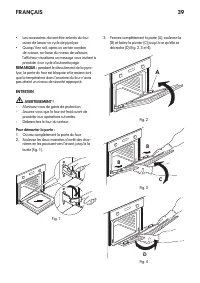
Page 39 - ENTRETIEN
FRANÇAIS 39 • Les accessoires doivent être enlevés du four avant de lancer un cycle de pyrolyse • Quoiqu'il en soit, après un certain nombre de cuisson, sur base du niveau de salissure, l'afficheur visualisera un message vous invitant à procéder à un cycle d'autonettoyage REMARQUE : pendant le dérou...
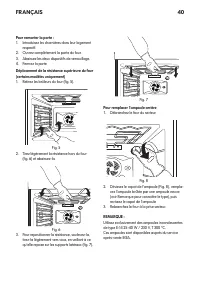
Page 40 - Pour remonter la porte :
FRANÇAIS 40 Pour remonter la porte : 1. Introduisez les charnières dans leur logement respectif. 2. Ouvrez complètement la porte du four. 3. Abaissez les deux dispositifs de verrouillage. 4. Fermez la porte Déplacement de la résistance supérieure du four (certains modèles uniquement) 1. Retirez les ...
Page 41 - Problème
FRANÇAIS 41 Diagnostic rapide Problème Cause possible Solution Le four ne marche pas : Pas d'alimentation électrique. Vérifiez qu'il n'y a pas de coupure de courant. Le four n'est pas branché à la prise secteur. Branchez le four à l'alimentation électrique. Le sélecteur est sur « 0 » . Tournez le sé...
Page 42 - Avant de faire appel au service après-
FRANÇAIS 42 Avant de faire appel au service après- vente : 1. Vérifiez en premier lieu si vous pouvez remédier au problème par vous-même à l'aide des suggestions de la section « Diagnostic rapide ». 2. Arrêtez le four puis remettez-le en marche pour vérifier si le problème a été éliminé. Si, après c...
Page 44 - Préparation du meuble pour; Montage
FRANÇAIS 44 Après avoir déballé le four, contrôlez que l'appareil n'a pas été endommagé pendant le transport et que la porte ferme parfaitement. En cas de problème, contactez votre revendeur ou le service après-vente le plus proche. Pour éviter un endommagement du four, il est recommandé de le retir...
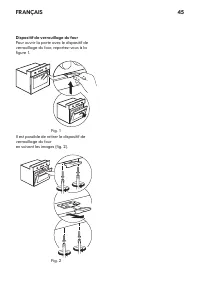
Page 45 - Dispositif de verrouillage du four; Pour ouvrir la porte avec le dispositif de
FRANÇAIS 45 Dispositif de verrouillage du four Pour ouvrir la porte avec le dispositif de verrouillage du four, reportez-vous à la figure 1. Fig. 1 Il est possible de retirer le dispositif de verrouillage du four en suivant les images (fig. 2). Fig. 2
Page 46 - Élimination des emballages; Considérations environnementales
FRANÇAIS 46 Élimination des emballages - Les matériaux d'emballage sont entièrement recyclables, comme l'indique le symbole de recyclage ( ). Par conséquent, ne les jetez jamais dans la nature et respectez les réglementations locales en vigueur en matière d'élimination des déchets. Mise au rebut de ...
Page 48 - Loi nationale applicable
FRANÇAIS 48 sauf s’il est prouvé que ces dommages sont dus à des vices de fabrication. • Les cas où aucun défaut n’est mis à jour par le technicien. • Les réparations qui ne sont pas effectuées par nos réparateurs désignés et/ou un partenaire contractuel autorisé ou lorsque des pièces autres que d’o...
Page 51 - ITALIANO; Smaltimento elettrodomestici
ITALIANO 51 - L'apparecchio è destinato esclusivamente ad uso domestico per la cottura di alimenti. Non sono consentiti altri usi (es. riscaldamento di ambienti). Il costruttore declina ogni responsabilità per usi non appropriati o per errate impostazioni dei comandi. - L'utilizzo dell'apparecchio n...
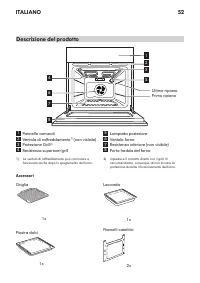
Page 52 - Accessori
ITALIANO 52 Descrizione del prodotto Accessori Griglia 1x Piastra dolci 1x Leccarda 1x Pannelli catalitici 2x 1 Pannello comandi 2 Ventola di raffreddamento 1) (non visibile) 3 Protezione Grill 2) 4 Resistenza superiore/grill 5 Lampada posteriore 6 Ventola forno 7 Resistenza inferiore (non visibile)...
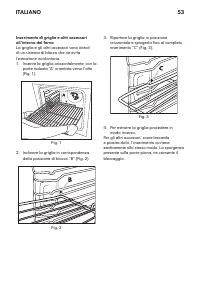
Page 53 - Inserimento di griglie e altri accessori
ITALIANO 53 Inserimento di griglie e altri accessori all’interno del forno La griglia e gli altri accessori sono dotati di un sistema di blocco che ne evita l’estrazione involontaria. 1. Inserire la griglia orizzontalmente, con la parte rialzata “A” orientata verso l’alto (Fig. 1). Fig. 1 2. Inclina...
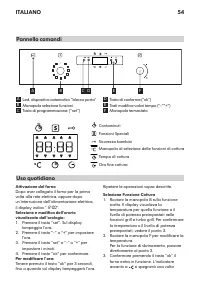
Page 54 - Attivazione del forno
ITALIANO 54 A Led, dispositivo automatico “blocca porta” B Manopola selezione funzioni C Tasto di programmazione: ("set") D Tasto di conferma (“ok”) E Tasti modifica valori tempo ("-""+") F Manopola termostato Pannello comandi Uso quotidiano A B C D E F Attivazione del forno ...
Page 55 - Per modificare la temperatura:
ITALIANO 55 raggiunta la temperatura selezionata. Per modificare la temperatura: 1. Ruotare la manopola F e selezionare di nuovo la temperatura desiderata. Avvertenze: per annullare una qualsiasi selezione effettuata, ruotare la manopola B sullo " 0 ". In alternativa premere il tasto “set”, ...
Page 56 - Mantenere in caldo
ITALIANO 56 6. Premere il tasto "ok" per confermare. 7. Allo scadere del tempo impostato il forno si spegne automaticamente, sul display appare ed entra in funzione un segnale acustico. Mantenere in caldo Permette di mantenere il forno ad una temperatura costante di 60°C. 1. Ruotare la manop...
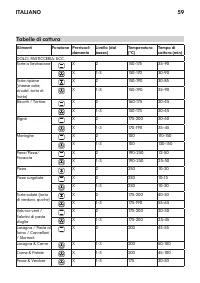
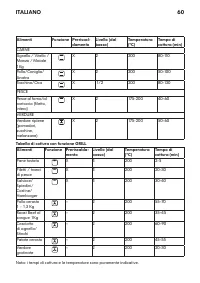
Page 59 - Alimenti; Tabelle di cottura
ITALIANO 59 Alimenti Funzione Preriscal- damento Livello (dal basso) Temperatura (°C) Tempo di cottura (min) DOLCI, PASTICCERIA, ECC. Torte a lievitazione X 2 150-175 35-90 X 1-3 150-170 30-90 Torte ripiene (cheese cake, strudel, torta di frutta) X 2 150-190 30-85 X 1-3 150-190 35-90 Biscotti / Tort...
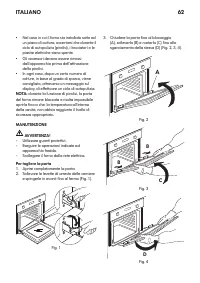
Page 62 - MANUTENZIONE
ITALIANO 62 • Nel caso in cui il forno sia installato sotto ad un piano di cottura, accertarsi che durante il ciclo di autopulizia (pirolisi), i bruciatori o le piastre elettriche siano spente. • Gli accessori devono essere rimossi dall’apparecchio prima dell’attivazione della pirolisi. • In ogni ca...
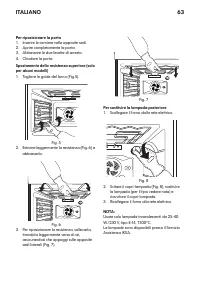
Page 63 - Per riposizionare la porta
ITALIANO 63 Per riposizionare la porta 1. Inserire le cerniere nelle apposite sedi. 2. Aprire completamente la porta. 3. Abbassare le due levette di arresto. 4. Chiudere la porta Spostamento della resistenza superiore (solo per alcuni modelli) 1. Togliere le guide del forno (Fig.5). Fig. 5 2. Estrar...
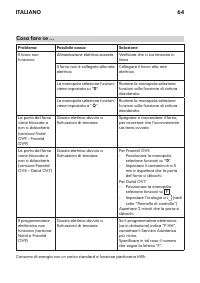
Page 64 - Problema
ITALIANO 64 Cosa fare se ... Problema Possibile causa Soluzione Il forno non funziona: Alimentazione elettrica assente. Verificare che ci sia tensione in linea Il forno non è collegato alla rete elettrica. Collegare il forno alla rete elettrica. La manopola selezione funzioni viene impostata su "...
Page 65 - Prima di contattare il Servizio Assistenza:
ITALIANO 65 Prima di contattare il Servizio Assistenza: 1. Verificare che non sia possibile risolvere da soli il problema sulla base dei punti descritti nella tabella "Cosa fare se". 2. Spegnere e riaccendere l'apparecchio per accertarsi che l'inconveniente sia stato ovviato. Se dopo i sudde...
Page 67 - Predisposizione del mobile per incasso; Installazione
ITALIANO 67 Dopo aver disimballato il forno, controllare che l’apparecchio non sia stato danneggiato durante il trasporto e che la porta si chiuda perfettamente. In caso di problemi, contattare il rivenditore o il Servizio Assistenza. Per prevenire eventuali danni, si consiglia di rimuovere il forno...
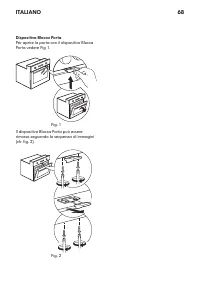
Page 68 - Dispositivo Blocca Porta; Per aprire la porta con il dispositivo Blocca
ITALIANO 68 Dispositivo Blocca Porta Per aprire la porta con il dispositivo Blocca Porta vedere Fig 1. Fig. 1 Il dispositivo Blocca Porta può essere rimosso seguendo la sequenza di immagini (cfr. fig. 2). Fig. 2
Page 69 - Smaltimento imballaggio; Preoccupazioni ambientali
ITALIANO 69 Smaltimento imballaggio - Il materiale di imballaggio è riciclabile al 100% ed è contrassegnato dal simbolo di riciclaggio ( ). Le diverse parti dell'imballaggio non devono essere disperse nell'ambiente, ma smaltite in conformità alle norme stabilite dalle autorità locali. Smaltimento pr...
Page 74 - ENGLISH; Scrapping of household appliances
ENGLISH 74 - During and after use, do not touch the heating elements or interior surfaces of the appliance - risk of burns. Do not allow the appliance to come into contact with cloths or other flammable materials until all the components have cooled sufficiently. - At the end of cooking, exercise ca...
Page 75 - Accessories
ENGLISH 75 Product description Accessories Wire Shelf 1x Baking tray 1x Drip tray 1x Catalytic panels 2x 1 Control panel 2 Cooling fan 1) (hidden) 3 Grill safety guard 2) 4 Upper heating element/Grill 5 Rear oven lamp 6 Oven fan 7 Bottom heating element (not visible) 8 Oven cool door 1) The cooling ...
Page 76 - Inserting wire shelves and other
ENGLISH 76 Inserting wire shelves and other accessories in the oven The wire shelf and other accessories are provided with a locking mechanism to prevent their unintentional removal. 1. Insert the wire shelf horizontally, with the raised part “A” upwards (Fig. 1). Fig. 1 2. Angle the wire shelf when...
Page 77 - Starting the oven
ENGLISH 77 A Led, automatic “door lock” device B Function selector knob C Setting button: (“set”) D Confirmation button (“ok”) E Buttons for changing time (“-” “+”) F Thermostat knob Control panel Daily use A B C D E F Starting the oven When the oven is connected to the power supply for the first ti...
Page 78 - Selecting the cooking time
ENGLISH 78 Important notes: To cancel any selection, turn knob B to “ 0 ”. Alternatively, press “set” to switch the oven off, maintaining the previously selected functions. Selecting the cooking time Select the cooking time (available with any function, except for the special functions) to turn the ...
Page 79 - Timer
ENGLISH 79 5 minutes flashes on the display and an acoustic signal sounds. 4. Place the food in the oven. 5. To change the preset time, use button “+” or “-”. 6. Press “ok” to confirm. 7. Once the set time has elapsed, the oven switches off, an acoustic signal is heard and appears on the display. Ti...
Page 81 - : function for baking homemade pizza. The oven
ENGLISH 81 Function Description of function SPECIAL FUNCTION Pizza : function for baking homemade pizza. The oven automatically preheats to the correct cooking temperature Place food in the oven when the required temperature is reached. Warm keeping : function for keeping just-cooked food (e.g. meat...
Page 82 - Type of food; Cooking tables
ENGLISH 82 Type of food Function Preheating Shelf (from the bottom) Temperature (°C) Cooking time (min) SWEETS, PASTRY, ETC Leavened cakes X 2 150-175 35-90 X 1-3 150-170 30-90 Filled pies (cheesecake, strudel, fruit pie) X 2 150-190 30-85 X 1-3 150-190 35-90 Biscuits/tartlets X 2 160-175 20-45 X 1-...
Page 85 - MAINTENANCE
ENGLISH 85 • In any case, after a certain number of uses and depending on how dirty the oven is, a message on the oven display advises you to run a self-cleaning cycle. NOTE: during the pyrolysis function, the oven door will not open; it will remain locked until the temperature inside the oven has r...
Page 86 - To refit the door
ENGLISH 86 To refit the door 1. Insert the hinges in their seats. 2. Open the door fully. 3. Lower the two catches. 4. Close the door Moving the top heating element (some models only) 1. Remove the oven runners (Fig. 5). Fig. 5 2. Pull the heating element out a little (Fig. 6) and lower it. Fig. 6 3...
Page 87 - Problem
ENGLISH 87 What to do if ... Problem Possible cause Solution The oven does not work: No electrical power supply. Verify the presence of mains electrical power The oven is not plugged into the mains socket. Connect the oven to the power supply. The selector knob is set to “0 ”. Turn the selector knob...
Page 90 - Preparing the housing unit; Installation
ENGLISH 90 After unpacking the oven, make sure that it has not been damaged during transport and that the oven door closes properly. In the event of problems, contact the dealer or your nearest After-sales Service. To prevent any damage, only remove the oven from its polystyrene foam base at the tim...
Page 91 - Door lock device; To open the door with the door lock device
ENGLISH 91 Door lock device To open the door with the door lock device see Fig 1. Fig. 1 The door lock device can be removed by following the sequence of images (see Fig. 2). Fig. 2
Page 92 - Disposal of packing material; Environmental concerns
ENGLISH 92 Disposal of packing material - The packing material is 100% recyclable and is marked with the recycle symbol ( ). The various parts of the packing must therefore be disposed of responsibly and in full compliance with local authority regulations governing waste disposal. Scrapping the prod...