Page 4 - ENGLISH; plastic film on the control panel and; Safety Information
ENGLISH 4 Before using the appliance Remove the accessories from the oven • and heat it at 200°C for about two hours to eliminate the smell of protective grease and insulating materials. It is advisable to keep the window open during this operation. Before use, remove: • stickers located on the fron...
Page 5 - Do not place flammable material in the
ENGLISH 5 Keep children away from: • the controls and the appliance in - general, especially during and immediately after use: risk of injury; packaging (bags, polystyrene, metal - parts, etc.); the appliance being scrapped. - Make sure that the electrical cables • of any other appliances used near ...
Page 6 - Cooktop
ENGLISH 6 6 1 5 789 10 11 2 3 4 Product description Cooktop 1 Rapid burner 2 Semirapid burner 3 Semirapid burner 4 Auxiliary burner 5 Triple ring burner Oven 6 Control panel 7 Ventilation opening 8 Grill heating element 9 Rear lamp 10 Fan 11 Oven door Accessories Wire shelves Grill Pan Set Drip tray...
Page 7 - Oven controls; Control panel
ENGLISH 7 1 2 3 4 5 6 7 8 9 Oven controls 1 Cooking time selector knob 2 Thermostat selector knob 3 Thermostat orange indicator 4 Function selector knob Cooktop controls 5 Front left burner control knob* 6 Rear left burner control knob* 7 Middle burner control knob* 8 Rear right burner control knob*...
Page 8 - Large flame
ENGLISH 8 How to operate the oven Turn the selector knob to the required • function. The oven light switches on. Turn the thermostat knob clockwise to • the required temperature. The orange thermostat led lights up, switching off again when the oven reaches the selected temperature. Cooking time sel...
Page 9 - nd and 4th levels, preheating the oven first.
ENGLISH 9 Daily use Oven functions Description of function LAMP To switch on the oven light. TOP + BOTTOM HEATING To cook any kind of dish on one shelf only. Use the 2nd level. Preheat the oven to the required temperature. The oven is ready for introducing food when the thermostat light goes off. ME...
Page 10 - How to read the cooking table:
ENGLISH 10 Advice and tips regarding use How to read the cooking table: The table indicates the best function to use for a given food, to be cooked on one or more shelves at the same time. Cooking times start from the moment food is placed in the oven, excluding preheating (where required). Cooking ...
Page 11 - Energy saving tips
ENGLISH 11 Energy saving tips The appliance hob is equipped with • burners of different diameters. Use pots and pans with bottom diameter equal to that of the burners or slightly larger. Only use flat-bottomed pots and pans. • Burner Max. diameter of pan Rapid (200 mm) 230 mm Semirapid (120 mm) 200 ...
Page 12 - Cooking tables
ENGLISH 12 Cooking tables Recipe Function Preheating Level (from the bottom) Temperature (°C) Cooking time (minutes) Leavened cakes Yes 2 160-180 30-90 Yes 2-4 160-180 30-90 Filled pies (cheesecake, strudel, fruit pie) Yes 2-4 160-200 35-90 Biscuits/Tartlets Yes 2 170-180 15-45 Yes 2-4 160-170 20-45...
Page 13 - Recipe
ENGLISH 13 Recipe Function Preheating Level (from the bottom) Temperature (°C) Cooking time (minutes) Turkey / Goose 3 kg Yes 1 / 2 190-200 80-130 Baked fish / en papillote (fillet, whole) Yes 2 180-200 40-60 Stuffed vegetables (tomatoes, courgettes, aubergines) Yes 2 180-200 50-60 Toast Yes 4 max. ...
Page 14 - Do not use flammable products.
ENGLISH 14 Cleaning and maintenance WARNING! Never use steam cleaning equipment. - Only clean the oven when it is cool to - the touch. Disconnect the appliance from the - power supply. Disconnect the appliance from the electrical power supply before carrying out any cleaning operation. Clean using a...
Page 15 - Removal of oven shelf carriers
ENGLISH 15 Removal of oven shelf carriers Interior: the oven shelf carriers can be • removed for easier cleaning. To do this, remove all the shelves and spring off the side carriers (Fig. 3). Fig. 3 Removing the door In case of removal of the door, make sure the oven is off and cool. Then, follow th...
Page 16 - After cleaning, refit the door correctly,
ENGLISH 16 After cleaning, refit the door correctly, carrying the removal procedure in reverse order, and reposition to hooks “A” inwards before closing the door (Fig. 5). Pay attention to the oven door hinges: danger of injuring hands. 2x A Fig. 5 Changing the rear oven lamp: Electrically disconnec...
Page 17 - PROBLEM
ENGLISH 17 PROBLEM POSSIBLE CAuSE SOLuTION The appliance does not work The main power supply and the appliance is not electrically connected Connect the product to the power supply The oven does not work The main power supply and the appliance is not electrically connected Connect the product to the...
Page 18 - Before calling the After-Sales Service
ENGLISH 18 Before calling the After-Sales Service See if you can solve the problem on your 1. own (see “What to do if ...” table). Switch the appliance off and on again to 2. see if the problem has disappeared. If the fault persists after the above checks, contact IkEA After Sales Service. Always sp...
Page 19 - Technical data
ENGLISH 19 Technical data Technical data FRAMTID CG7 N DÅTID CG7 N Dimension (internal) mm 330x410x691 330x410x691 Width mm 900 900 Height mm 850-910 850-910 Depth mm 600 600 Usable volume l 93.5 93.5 Oven lamp W 25 25 Defrost W 25 25 Top + Bottom heating W 2700 2700 Forced air W 2500 2500 Medium gr...
Page 20 - specified on the rating plate located on; Installation
ENGLISH 20 This appliance is in Class 1 (free standing appliance). The appliance must be used with the gas specified on the rating plate located on the back side of the appliance. Electrical and gas installation and maintenance of the appliance must be carried out by a qualified technician in compli...
Page 21 - configuration
ENGLISH 21 Insert part R (rawlplug) into holes F and screw hook G into part R (Fig. 3). 2x F R G Fig. 3 Secure the chain to hook G as shown in Fig. 4 position C. 2x G C C Fig. 4 INJECTORS TABLE i Class appliance: 1 Appliance Category II2H3+ Type of gas used Type of burner Injector marking Nominal he...
Page 22 - Gas connection
ENGLISH 22 Gas connection For information regarding gas connection instructions, see the injectors table and the “standard” relevant to your country. The gas supply system must comply with current local regulations. The appliance must be connected to the gas supply or gas bottle by means of a rigid ...
Page 23 - GAS CONNECTION TABLE
ENGLISH 23 Butane/Propane gas Use outlet connector B/P for Butane/ Propane gas. The rubber hose must be connected to the outlet connector and secured using hose clamp C (Fig. 5). C Fig. 5 The maximum length of the rubber hose is 2 m. It must be a standard hose and must be replaced within the date pr...
Page 24 - Gas adjustments
ENGLISH 24 Gas adjustments Use pressure regulators that are suitable for the gas pressure values indicated in the injectors table. If the appliance is arranged for a type of gas different from that available, it is necessary to change the injectors, adjust the minimum flame, change the outlet connec...
Page 25 - Room ventilation
ENGLISH 25 Room ventilation This appliance can only be installed and used in well-ventilated rooms, according to current regulations, with openings in the walls or with special ducts enabling proper natural or forced ventilation, thus ensuring permanent and adequate introduction of air necessary for...
Page 26 - the worktop height must
ENGLISH 26 i IMPORTANT: the worktop height must be at least 20 mm lower that the overall height of the cooker (including the pan stand grid) (see Fig. 2). 20 mm min. 400 mm min. 50 mm min. 50 mm min. 1 00 mm min. 550 mm Fig. 2
Page 27 - Door safety device
ENGLISH 27 Door safety device To open the door with the door safety device see Fig. 1. Fig. 1 The door safety device can be removed by following the sequence of images (see Fig. 2 and 3). Fig. 2 Fig. 3
Page 28 - Power supply; Electrical connection
ENGLISH 28 Before connecting the appliance, make sure that: the house electrical power supply 1. nominal voltage matches that of the appliance, as given on the rating plate; the power supply line to which the 2. appliance is connected is of adequate power with respect to the max. power absorbed by t...
Page 29 - Disposal of packing material; Environmental concerns
ENGLISH 29 Disposal of packing material The packing material is 100% recyclable - and is marked with the recycle symbol ( ). The various parts of the packing must therefore be disposed of responsibly and in full compliance with local authority regulations governing waste disposal. Scrapping the prod...
Page 31 - specific phone numbers listed on the
ENGLISH 31 transports the product to his home or another address, IKEA is not liable for any damage that may occur during transport. However, if IKEA delivers the product to the customer’s delivery address, then damage to the product that occurs during this delivery will be covered by IKEA. Cost for...
Page 32 - ESPAÑOL; superficie ya que se puede dañar el; Información sobre seguridad
ESPAÑOL 32 Antes de utilizar la placa de cocción Saque los accesorios del horno y • caliéntelo a 200 °C durante unas dos horas para eliminar el olor de la grasa protectora y los materiales aislantes. Se recomienda dejar las ventanas abiertas durante esta operación. Antes del uso, retire los elemento...
Page 33 - No coloque material inflamable dentro o
ESPAÑOL 33 secar las partes húmedas cuando el - horno se enfríe. i • IMPOrtAntE: El panel frontal y el asa de la puerta del horno se calientan cuando el aparato ha estado funcionando durante largo tiempo a temperatura elevada. No toque el aparato con las manos • mojadas ni lo utilice estando descalz...
Page 34 - Encimera de cocción
ESPAÑOL 34 6 1 5 789 10 11 2 3 4 Descripción del producto Encimera de cocción 1 Quemador rápido 2 Quemador semirrápido 3 Quemador semirrápido 4 Quemador auxiliar 5 Quemador de triple anillo Horno 6 Panel de mandos 7 Abertura para ventilación 8 Resistencia del grill 9 Luz posterior 10 Ventilador 11 P...
Page 35 - Mandos del horno; Panel de mandos
ESPAÑOL 35 1 2 3 4 5 6 7 8 9 Mandos del horno 1 Mando selector del tiempo de cocción 2 Mando selector del termostato 3 Indicador naranja del termostato 4 Mando selector de funciones Mandos de la encimera de cocción 5 Mando del quemador delantero izquierdo* 6 Mando del quemador trasero izquierdo* 7 M...
Page 36 - El selector permite fijar un tiempo de
ESPAÑOL 36 Cómo utilizar el horno Gire el mando selector para elegir la • función que desee. Se enciende la luz del horno. Gire el mando del termostato a • la derecha, hasta la temperatura adecuada. El LED naranja del termostato se enciende y apaga cuando se alcanza la temperatura seleccionada. Sele...
Page 38 - Funciones del horno
ESPAÑOL 38 Funciones del horno Descripción de la función rESIStEnCIA InFErIOr + VEntILADOr Para dar a los alimentos una consistencia muy suave y conseguir bases crujientes y doradas. También es útil para espesar salsas. Se aconseja colocar los alimentos en el 2º nivel. Precaliente el horno. DESCOnGE...
Page 39 - Cómo utilizar la tabla de cocción:
ESPAÑOL 39 recomendaciones sobre el uso Cómo utilizar la tabla de cocción: En la tabla se indica cuál es la mejor función para los alimentos que se cocinen en un nivel o en varios a la vez. El tiempo de cocción se inicia en el momento en que se introduce el alimento en el horno, excluido el precalen...
Page 40 - Pizza
ESPAÑOL 40 Para recoger los jugos de la cocción, - es conveniente colocar una bandeja colectora con medio litro de agua directamente debajo de la parrilla en la que se cocina la carne. Reponga el agua cuando sea necesario. Pizza Engrase ligeramente las bandejas para - que la pizza tenga una base cru...
Page 41 - flanes
ESPAÑOL 41 tablas de cocción receta Función Precalen- tamiento nivel (desde la base) temperatura (°C) tiempo de cocción (minutos) Bizcochos Sí 2 160-180 30-90 Sí 2-4 160-180 30-90 Tartas rellenas (tarta de queso, strudel, tarta de frutas) Sí 2-4 160-200 35-90 Galletas, tartaletas Sí 2 170-180 15-45 ...
Page 42 - receta
ESPAÑOL 42 receta Función Precalen- tamiento nivel (desde la base) temperatura (°C) tiempo de cocción (minutos) Pollo, conejo, pato 1 kg Sí 2 200-230 50-100 Pavo, oca 3 kg Sí 1 / 2 190-200 80-130 Pescado al horno/ en papillote (lomos, entero) Sí 2 180-200 40-60 Verduras rellenas (tomates, calabacine...
Page 43 - No emplee productos inflamables.
ESPAÑOL 43 Limpieza y mantenimiento ADVErtEnCIA! No utilice aparatos de limpieza con - vapor. Limpie el horno sólo cuando esté frío al - tacto. Desconecte el aparato de la red - eléctrica. Antes de realizar tareas de limpieza, desenchufe el aparato de la red eléctrica. Para limpiar utilice un paño h...
Page 44 - Extracción de las guías de bandeja del
ESPAÑOL 44 Limpie el cristal de la puerta con un • detergente líquido. Lave los accesorios en un lavavajillas o • en el fregadero, utilizando para ello un limpiador de hornos. Extracción de las guías de bandeja del horno Interior: las guías de bandeja del horno • se pueden extraer para facilitar la ...
Page 45 - Cambio de la bombilla del horno:
ESPAÑOL 45 C D 2x Fig. 3 Fig. 4 Una vez concluida la limpieza, vuelva a colocar la puerta correctamente, siguiendo el procedimiento inverso, y sitúe otra vez los ganchos “A” hacia dentro antes de cerrar la puerta (Fig. 5). Preste atención a las bisagras de la puerta: puede hacerse daño en las manos....
Page 46 - PrOBLEMA
ESPAÑOL 46 PrOBLEMA CAUSA POSIBLE SOLUCIÓn El aparato no funciona No hay conexión entre el aparato y la red eléctrica Conecte el producto a la red eléctrica El horno no funciona No hay conexión entre el aparato y la red eléctrica Conecte el producto a la red eléctrica El selector del horno está situ...
Page 47 - Antes de llamar al servicio técnico
ESPAÑOL 47 Antes de llamar al servicio técnico Intente resolver el problema (consulte 1. “Qué hacer si...”). Apague el aparato y vuelva a 2. encenderlo para comprobar si se ha solucionado el problema. Si el fallo persiste después de estas comprobaciones, póngase en contacto con el servicio técnico d...
Page 48 - Datos técnicos
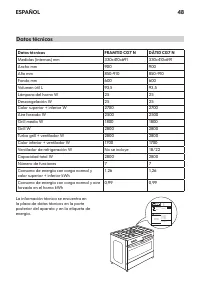
ESPAÑOL 48 Datos técnicos Datos técnicos FrAMtID CG7 n DÅtID CG7 n Medidas (internas) mm 330x410x691 330x410x691 Ancho mm 900 900 Alto mm 850-910 850-910 Fondo mm 600 600 Volumen útil L 93,5 93,5 Lámpara del horno W 25 25 Descongelación W 25 25 Calor superior + inferior W 2700 2700 Aire forzado W 25...
Page 49 - gas especificado en la placa de datos; Instalación
ESPAÑOL 49 Este aparato es de Clase 1 (aparato vertical independiente). El aparato debe utilizarse con el tipo de gas especificado en la placa de datos técnicos situada en la parte posterior del mismo. La instalación y el mantenimiento de los sistemas eléctrico y de gas deben ser ejecutados por un t...
Page 50 - Introduzca la pieza R (taco) en los orificios
ESPAÑOL 50 Introduzca la pieza R (taco) en los orificios F y el gancho de tornillo G en la pieza R (Fig. 3). 2x F r G Fig. 3 Fije la cadena al gancho G como se indica en la Fig. 4 posición C. 2x G C C Fig. 4 tABLA DE InYECtOrES i Aparato de clase: 1 Aparato de categoría II2H3+ tipo de gas empleado t...
Page 51 - Conexión del gas
ESPAÑOL 51 Conexión del gas Para ver las instrucciones sobre la instalación de gas, consulte la tabla de inyectores y la “norma” correspondiente a su país. El sistema de suministro de gas debe ser conforme con la normativa local. El aparato debe conectarse al suministro de gas o a una bombona median...
Page 52 - Gas natural
ESPAÑOL 52 Gas natural Utilice el conector de salida GN para gas natural o para una mezcla de propano-aire. El tubo de goma se debe instalar en el conector de salida y fijar con una abrazadera (C) (Fig. 4). C Fig. 4 Gas butano/propano Utilice el conector de salida B/P para el gas butano/propano. El ...
Page 53 - Ajustes para el gas
ESPAÑOL 53 Ajustes para el gas Utilice reguladores de presión adecuados para las presiones de gas que se indican en la tabla de inyectores. Si el aparato está configurado para un tipo de gas distinto del disponible, es necesario cambiar los inyectores, ajustar la llama mínima y cambiar el conector d...
Page 54 - Ventilación ambiental
ESPAÑOL 54 Ventilación ambiental Este aparato sólo debe instalarse y utilizarse en habitaciones bien ventiladas, de acuerdo con las normas vigentes, con aberturas en las paredes o con conductos especiales que faciliten la ventilación natural o forzada, de modo que se garantice la entrada permanente ...
Page 55 - la encimera de trabajo
ESPAÑOL 55 i IMPOrtAntE: la encimera de trabajo debe estar al menos 20 mm por debajo de la altura total de la cocina (incluida la rejilla de soporte de recipientes) (consulte la Fig. 2). 20 mm mín. 400 mm mín. 50 mm mín. 50 mm mín. 1 00 mm mín. 550 mm Fig. 2
Page 56 - Dispositivo de seguridad de la puerta
ESPAÑOL 56 Dispositivo de seguridad de la puerta Para abrir la puerta con el dispositivo de seguridad consulte la Fig. 1. Fig. 1 El dispositivo de seguridad de la puerta se puede quitar siguiendo la secuencia de las imágenes (consulte las Fig. 2 y 3). Fig. 2 Fig. 3
Page 57 - realizarla un técnico cualificado, de; Conexión eléctrica
ESPAÑOL 57 Antes de conectar el aparato, compruebe lo siguiente: el voltaje nominal de la alimentación 1. eléctrica de la vivienda coincide con el del aparato, indicado en la placa de datos técnicos; la línea de alimentación a la que se 2. conecta el aparato es de la potencia adecuada respecto a la ...
Page 58 - Eliminación del embalaje; Aspectos medioambientales
ESPAÑOL 58 Eliminación del embalaje El material de embalaje es 100% - reciclable y está marcado con el símbolo de reciclado ( ). Elimine los distintos tipos de material del embalaje conforme a la normativa local sobre eliminación de desechos. Eliminación del producto Este aparato está marcado de - c...
Page 59 - Como justificante de la compra, necesitará
ESPAÑOL 59 GARANTÍA IKEA ¿Qué plazo de validez tiene la garantía de IKEA? Esta garantía es válida por cinco (5) años a partir de la fecha original de compra del electrodoméstico en IKEA, excluyendo los aparatos denominados LAGAN, los cuales tienen solo dos (2) años de garantía. Como justificante de ...
Page 60 - las especificaciones de instalación.
ESPAÑOL 60 demuestre que tales daños hayan sido provocados por fallos en la producción. Casos en los que no se detecte ningún • fallo en el producto durante la visita de un técnico. Reparaciones no realizadas por nuestros • proveedores de servicios y/o un servicio autorizado por IKEA, o cuando se ut...
Page 61 - aparato específico para que el
ESPAÑOL 61 aparato específico para que el necesita asistencia. Además, indique siempre el número de producto, el código de 8 dígitos y el número de servicio de 12 dígitos del artículo de IKEA, que se encuentran en la placa de datos técnicos del aparato. i ¡GUARDE LA FACTURA O RECIBO DE COMPRA! Es la...
Page 62 - PORTUGUÊS; insuficientes, a menos que sejam; Informações de segurança
PORTUGUÊS 62 Antes de utilizar o aparelho Retire os acessórios do forno e aqueça- • os a 200°C durante cerca de duas horas para eliminar os cheiros e os fumos do material isolante e das gorduras de protecção. Recomenda-se que mantenha a janela aberta durante esta operação. Antes de utilizar, remova:...
Page 64 - Placa de fogão
PORTUGUÊS 64 6 1 5 789 10 11 2 3 4 Descrição do produto Placa de fogão 1 Queimador rápido 2 Queimador semi-rápido 3 Queimador semi-rápido 4 Queimador auxiliar 5 Queimador de triplo anel Forno 6 Painel de comandos 7 Abertura de ventilação 8 Resistência do grelhador 9 Lâmpada posterior 10 Ventoinha 11...
Page 65 - Comandos do forno; Painel de comandos
PORTUGUÊS 65 1 2 3 4 5 6 7 8 9 Comandos do forno 1 Botão de selecção do tempo de cozedura 2 Botão de selecção do termóstato 3 Indicador laranja do termóstato 4 Botão de selecção de funções Comandos da placa de fogão 5 Botão de comando do queimador dianteiro esquerdo* 6 Botão de comando do queimador ...
Page 66 - Para definir o tempo de cozedura, depois
PORTUGUÊS 66 Como utilizar o forno Rode o botão de selecção para a • função desejada. A lâmpada do forno acende-se. Rode o botão do termóstato para a • direita para a temperatura desejada. O indicador luminoso laranja do termóstato acende-se e apaga-se quando a temperatura seleccionada é atingida. B...
Page 69 - Como efectuar a leitura da tabela de
PORTUGUÊS 69 Conselhos de utilização e sugestões Como efectuar a leitura da tabela de cozedura: A tabela indica a melhor função a utilizar com um determinado alimento, a cozinhar numa ou em várias prateleiras em simultâneo. Os tempos de cozedura começam a partir do momento em que o alimento é coloca...
Page 70 - que a carne fique demasiado tostada
PORTUGUÊS 70 Carne Utilize qualquer tipo de panela ou de - prato pirex adequado ao tamanho do pedaço de carne a cozinhar. No caso de assados, coloque um pouco caldo no fundo da caçarola, e regue a carne durante a cozedura para obter um melhor sabor. Esteja atento ao vapor criado durante esta operaçã...
Page 73 - Não utilize produtos inflamáveis.
PORTUGUÊS 73 Limpeza e manutenção AVISO! Nunca utilize equipamentos de limpeza - a vapor. Limpe o forno apenas quando estiver - frio ao toque. Desligue o aparelho da corrente - eléctrica. Desligue o aparelho da corrente eléctrica antes de efectuar trabalhos de limpeza. Limpe com um pano humedecido e...
Page 74 - Remoção das calhas da prateleira do
PORTUGUÊS 74 Não utilize produtos abrasivos ou palha • de aço. Limpe o vidro da porta com um • detergente líquido. Lave os acessórios na máquina de • lavar loiça ou na banca, utilizando um produto de limpeza para fornos. Remoção das calhas da prateleira do forno Interior: as calhas da prateleira do ...
Page 75 - Substituição da lâmpada traseira do
PORTUGUÊS 75 C D 2x Fig. 3 Fig. 4 Após a limpeza, instale correctamente a porta, executando o procedimento de remoção no sentido inverso, e coloque os ganchos “A” novamente virados para dentro, antes de fechar a porta (Fig. 5). Esteja atento às dobradiças da porta do forno: perigo de lesões nas mãos...
Page 76 - PROBLEMA
PORTUGUÊS 76 PROBLEMA CAUSA PROVÁVEL SOLUÇÃO O aparelho não funciona O aparelho não está ligado à corrente eléctrica Ligue o produto à corrente eléctrica O forno não funciona O aparelho não está ligado à corrente eléctrica Ligue o produto à corrente eléctrica O selector do forno está na posição “0” ...
Page 77 - Antes de contactar o Serviço Pós-Venda
PORTUGUÊS 77 Antes de contactar o Serviço Pós-Venda Tente solucionar o problema sozinho 1. (consulte a secção “O que fazer se...”). Desligue e volte a ligar o aparelho para 2. verificar se o problema ficou resolvido. Se o problema persistir após essas verificações, contacte o Serviço Pós- Venda IKEA...
Page 78 - Especificações técnicas
PORTUGUÊS 78 Especificações técnicas Especificações técnicas FRAMTID CG7 n DÅTID CG7 n Dimensão (interna) mm 330x410x691 330x410x691 Largura mm 900 900 Altura mm 850-910 850-910 Profundidade mm 600 600 Volume utilizável l 93,5 93,5 Lâmpada do forno W 25 25 Descongelação W 25 25 Aquecimento superior ...
Page 79 - Este aparelho está classificado como sendo; Instalação
PORTUGUÊS 79 Este aparelho está classificado como sendo de Classe 1 (aparelho não encastrável). O aparelho deve ser utilizado com o tipo de gás especificado na chapa de características, situada na secção posterior do aparelho. A instalação e a manutenção eléctrica e do gás devem ser efectuadas por u...
Page 80 - Insira a peça R (buchalvazia) nos orifícios F; Configuração
PORTUGUÊS 80 Insira a peça R (buchalvazia) nos orifícios F e aparafuse o gancho G à peça R (Fig. 3). 2x F R G Fig. 3 Prenda a corrente ao gancho G, tal como indicado na Fig. 4, posição C. 2x G C C Fig. 4 TABELA DOS InJECTORES i Classe do aparelho: 1 Categoria do aparelho II2H3+ Tipo de gás utilizado...
Page 81 - Ligação do gás
PORTUGUÊS 81 Ligação do gás Para obter mais informações relativas às instruções de ligação do gás, consulte a tabela dos injectores e a “norma” relativa ao seu país. O sistema de abastecimento de gás deve estar em conformidade com as normas locais. O aparelho deve ser ligado ao sistema de abastecime...
Page 82 - Gás natural
PORTUGUÊS 82 Gás natural Utilize o conector de saída GN para o gás natural ou para uma mistura de propano- ar. A mangueira de borracha deve ser ligada ao conector de saída e presa com a braçadeira de fixação (C) (Fig. 4). C Fig. 4 Gás butano/propano Utilize o conector de saída B/P para o gás butano/...
Page 83 - Ajustes do gás
PORTUGUÊS 83 Ajustes do gás Utilize reguladores de pressão que sejam adequados para os valores da pressão do gás indicados na tabela dos injectores. Se o aparelho estiver preparado para funcionar com um tipo de gás diferente do disponível, será necessário trocar os injectores, ajustar a chama mínima...
Page 84 - Ventilação do compartimento; não ficar obstruída no interior ou no exterior
PORTUGUÊS 84 Ventilação do compartimento De acordo com as normas em vigor, este aparelho só pode ser instalado e utilizado em compartimentos bem ventilados, com aberturas nas paredes ou com saídas especiais que possibilitem uma ventilação natural ou forçada apropriada, assegurando assim a entrada pe...
Page 85 - a altura da bancada
PORTUGUÊS 85 i IMPORTAnTE: a altura da bancada deve ser pelo menos 20 mm inferior à altura geral do fogão (incluindo a grelha das panelas) (consulte a Fig. 2). 20 mm mín. 400 mm mín. 50 mm mín. 50 mm mín. 1 00 mm mín. 550 mm Fig. 2
Page 86 - Dispositivo de segurança da porta
PORTUGUÊS 86 Dispositivo de segurança da porta Para abrir a porta com o dispositivo de segurança da porta, consulte a Fig. 1. Fig. 1 O dispositivo de segurança da porta pode ser removido seguindo a sequência de imagens (consulte as Figs. 2 e 3). Fig. 2 Fig. 3
Page 87 - Antes de ligar o aparelho, certifique-se de; Ligação eléctrica
PORTUGUÊS 87 Antes de ligar o aparelho, certifique-se de que: a tensão eléctrica nominal da habitação 1. corresponde à tensão do aparelho, indicada na chapa de características; a linha eléctrica à qual o aparelho vai 2. ser ligado possui a potência adequada, relativamente à potência máxima absorvida...
Page 88 - Eliminação dos materiais da embalagem; Questões ambientais
PORTUGUÊS 88 Eliminação dos materiais da embalagem O material da embalagem é 100% - reciclável, conforme confirmado pelo símbolo de reciclagem ( ). Não deverá deitar as várias partes do material de acondicionamento ao lixo, devendo optar pela reciclagem das mesmas, em conformidade com as normas impo...
Page 89 - se verifiquem a partir da data de compra
PORTUGUÊS 89 GARANTIA IKEA Durante quanto tempo é válida a garantia IKEA? Esta garantia é válida durante cinco (5) anos, contados a partir da data de compra do seu aparelho na IKEA, excluindo os aparelhos denominados LAGAN, os quais têm apenas dois (2) anos de garantia. A factura ou talão de compra ...
Page 90 - cumpra as especificações de instalação.
PORTUGUÊS 90 botões, revestimentos e partes de revestimentos protectores. A menos que seja possível demonstrar que tais danos foram provocados por defeitos de fabrico. Casos em que não é detectada • qualquer avaria durante a visita do técnico. Reparações não efectuadas pelos • nossos prestadores de ...
Page 91 - específicos incluidos neste manual e
PORTUGUÊS 91 Como contactar-nos, se necessitar do nosso serviço? Na última página deste manual, encontrará a lista de Prestadores de Serviço designados pela IKEA e os respectivos números de telefone nacionais. i Para lhe proporcionarmos um serviço mais rápido, recomendamos a utilização dos números d...
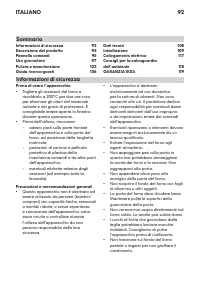
Page 92 - ITALIANO; consigliabile tenere aperta la finestra; Informazioni di sicurezza
ITALIANO 92 Prima di usare l'apparecchio Togliere gli accessori dal forno e • riscaldarlo a 200°C per due ore circa per eliminare gli odori del materiale isolante e dei grassi di protezione. È consigliabile tenere aperta la finestra durante questa operazione. Prima dell'utilizzo, rimuovere: • adesiv...
Page 93 - Non riporre materiale infiammabile
ITALIANO 93 La condensa residua, a cottura ultimata, • potrebbe danneggiare, nel tempo, il forno ed i mobili circostanti. Consigliamo di: impostare la temperatura più bassa; - coprire il cibo; - togliere il cibo dal forno; - asciugare le parti umide a forno - freddo. i • IMPOrTANTE: la mascherina e ...
Page 94 - Piano cottura
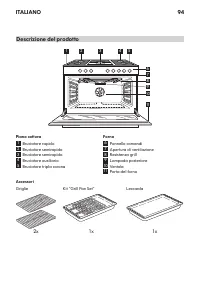
ITALIANO 94 6 1 5 789 10 11 2 3 4 Descrizione del prodotto Piano cottura 1 Bruciatore rapido 2 Bruciatore semirapido 3 Bruciatore semirapido 4 Bruciatore ausiliario 5 Bruciatore tripla corona Forno 6 Pannello comandi 7 Apertura di ventilazione 8 Resistenza grill 9 Lampada posteriore 10 Ventola 11 Po...
Page 95 - Comandi del forno; Pannello comandi
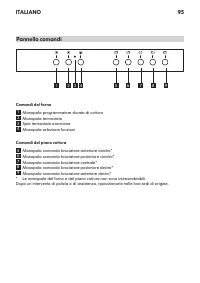
ITALIANO 95 1 2 3 4 5 6 7 8 9 Comandi del forno 1 Manopola programmatore durata di cottura 2 Manopola termostato 3 Spia termostato arancione 4 Manopola selezione funzioni Comandi del piano cottura 5 Manopola comando bruciatore anteriore sinistro* 6 Manopola comando bruciatore posteriore sinistro* 7 ...
Page 96 - in senso antiorario fino alla posizione di
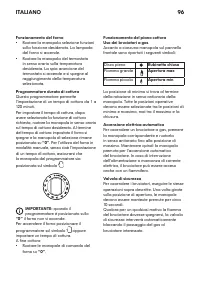
ITALIANO 96 Funzionamento del forno Ruotare la manopola selezione funzioni • sulla funzione desiderata. La lampada del forno si accende. Ruotare la manopola del termostato • in senso orario sulla temperatura desiderata. La spia arancione del termostato si accende e si spegne al raggiungimento della ...
Page 98 - Funzioni del forno
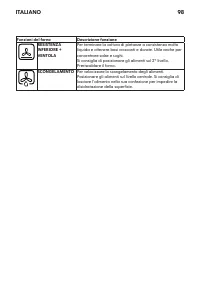
ITALIANO 98 Funzioni del forno Descrizione funzione rESISTENzA INFErIOrE + VENTOLA Per terminare la cottura di pietanze a consistenza molto liquida e ottenere basi croccanti e dorate. Utile anche per concentrare salse e sughi. Si consiglia di posizionare gli alimenti sul 2° livello. Preriscaldare il...
Page 99 - Come leggere la tabella di cottura:
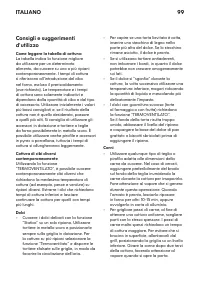
ITALIANO 99 Consigli e suggerimenti d'utilizzo Come leggere la tabella di cottura: La tabella indica la funzione migliore da utilizzare per un determinato alimento, da cuocere su uno o più ripiani contemporaneamente. I tempi di cottura si riferiscono all'introduzione del cibo nel forno, escluso il p...
Page 101 - Tabelle di cottura
ITALIANO 101 Tabelle di cottura Alimenti Funzione Preriscal- damento Livello (dal fondo) Temperatura (°C) Tempo di cottura (minuti) Torte a lievitazione Sì 2 160-180 30-90 Sì 2-4 160-180 30-90 Torte ripiene (cheese cake, strudel, torta di frutta) Sì 2-4 160-200 35-90 Biscotti / Tortine Sì 2 170-180 ...
Page 102 - Alimenti
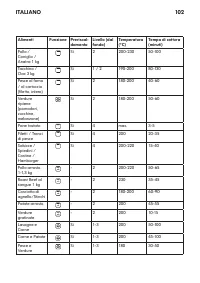
ITALIANO 102 Alimenti Funzione Preriscal- damento Livello (dal fondo) Temperatura (°C) Tempo di cottura (minuti) Pollo / Coniglio / Anatra 1 kg Sì 2 200-230 50-100 Tacchino / Oca 3 kg Sì 1 / 2 190-200 80-130 Pesce al forno / al cartoccio (filetto, intero) Sì 2 180-200 40-60 Verdure ripiene (pomodori...
Page 103 - Non utilizzare prodotti infiammabili.
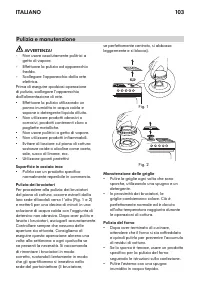
ITALIANO 103 Pulizia e manutenzione AVVErTENzA! Non usare assolutamente pulitrici a - getto di vapore. Effettuare la pulizia ad apparecchio - freddo. Scollegare l'apparecchio dalla rete - elettrica. Prima di eseguire qualsiasi operazione di pulizia, scollegare l'apparecchio dall'alimentazione di ret...
Page 104 - rimozione dei supporti dei ripiani del
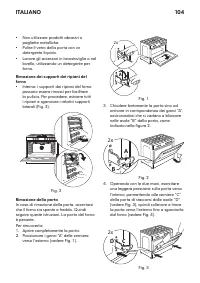
ITALIANO 104 Non utilizzare prodotti abrasivi o • pagliette metalliche. Pulire il vetro della porta con un • detergente liquido. Lavare gli accessori in lavastoviglie o nel • lavello, utilizzando un detergente per forno. rimozione dei supporti dei ripiani del forno Interno: i supporti dei ripiani de...
Page 105 - Sostituzione della lampada posteriore del
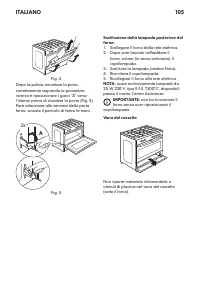
ITALIANO 105 Fig. 4 Dopo la pulizia rimontare la porta correttamente seguendo la procedura inversa e riposizionare i ganci “A” verso l'interno prima di chiudere la porta (Fig. 5). Fare attenzione alle cerniere della porta forno: sussiste il pericolo di ferirsi le mani. 2x A Fig. 5 Sostituzione della...
Page 106 - Guida ricerca guasti
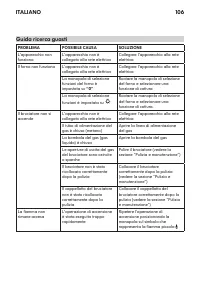
ITALIANO 106 PrOBLEMA POSSIBILE CAUSA SOLUzIONE L'apparecchio non funziona L'apparecchio non è collegato alla rete elettrica Collegare l'apparecchio alla rete elettrica Il forno non funziona L'apparecchio non è collegato alla rete elettrica Collegare l'apparecchio alla rete elettrica La manopola di ...
Page 107 - Prima di contattare il Servizio Assistenza
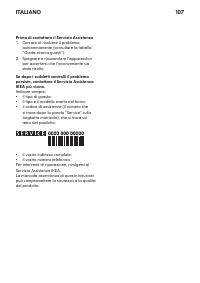
ITALIANO 107 Prima di contattare il Servizio Assistenza Cercare di risolvere il problema 1. autonomamente (consultare la tabella “Guida ricerca guasti”). Spegnere e riaccendere l'apparecchio 2. per accertarsi che l'inconveniente sia stato risolto. Se dopo i suddetti controlli il problema persiste, c...
Page 108 - Dati tecnici
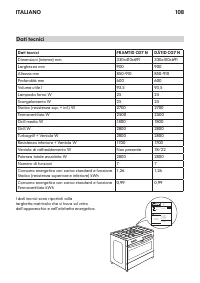
ITALIANO 108 Dati tecnici Dati tecnici FrAMTID CG7 N DÅTID CG7 N Dimensioni (interne) mm 330x410x691 330x410x691 Larghezza mm 900 900 Altezza mm 850-910 850-910 Profondità mm 600 600 Volume utile l 93,5 93,5 Lampada forno W 25 25 Scongelamento W 25 25 Statico (resistenza sup. + inf.) W 2700 2700 Ter...
Page 109 - Questo apparecchio è classificato in Classe; Installazione
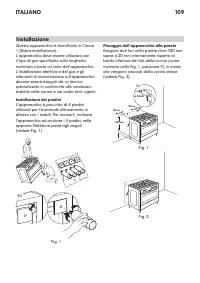
ITALIANO 109 Questo apparecchio è classificato in Classe 1 (libera installazione). L'apparecchio deve essere utilizzato con il tipo di gas specificato sulla targhetta matricola situata sul retro dell'apparecchio. L'installazione elettrica e del gas e gli interventi di manutenzione sull'apparecchio d...
Page 110 - Configu
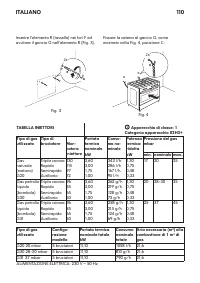
ITALIANO 110 Inserire l'elemento R (tassello) nei fori F ed avvitare il gancio G nell'elemento R (Fig. 3). 2x F r G Fig. 3 Fissare la catena al gancio G, come mostrato nella Fig. 4, posizione C. 2x G C C Fig. 4 TABELLA INIETTOrI i Apparecchio di classe: 1 Categoria apparecchio II2H3+ Tipo di gas uti...
Page 111 - Collegamento gas
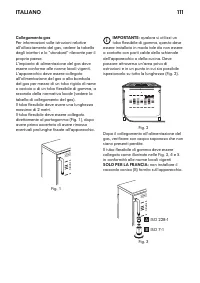
ITALIANO 111 Collegamento gas Per informazioni sulle istruzioni relative all'allacciamento del gas, vedere la tabella degli iniettori e lo “standard” rilevante per il proprio paese. L'impianto di alimentazione del gas deve essere conforme alle norme locali vigenti. L'apparecchio deve essere collegat...
Page 112 - Il tubo flessibile di gomma deve essere
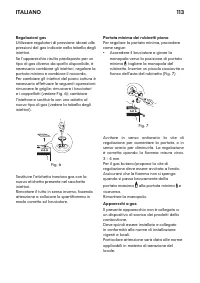
ITALIANO 112 Gas naturale Per il gas naturale o una miscela di aria e propano utilizzare il raccordo GN. Il tubo flessibile di gomma deve essere collegato al portagomma e bloccato con una fascetta stringitubo (C) (Fig. 4). C Fig. 4 Gas butano/propano Per il gas butano/propano utilizzare il raccordo ...
Page 113 - regolazioni gas
ITALIANO 113 regolazioni gas Utilizzare regolatori di pressione idonei alle pressioni del gas indicate nella tabella degli iniettori. Se l'apparecchio risulta predisposto per un tipo di gas diverso da quello disponibile, è necessario cambiare gli iniettori, regolare la portata minima e cambiare il r...
Page 114 - Ventilazione locali
ITALIANO 114 Ventilazione locali Il presente apparecchio può essere installato e utilizzato solo in locali ben ventilati, in conformità alla norme vigenti, con aperture nelle pareti o con appositi condotti che consentano una ventilazione naturale o forzata adeguata, in grado di assicurare l'immissio...
Page 115 - il piano di lavoro deve
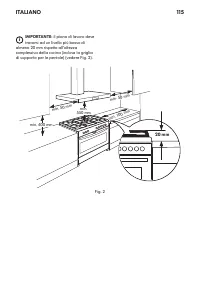
ITALIANO 115 i IMPOrTANTE: il piano di lavoro deve trovarsi ad un livello più basso di almeno 20 mm rispetto all'altezza complessiva della cucina (inclusa la griglia di supporto per le pentole) (vedere Fig. 2). 20 mm min. 400 mm min. 50 mm min. 50 mm min. 1 00 mm min. 550 mm Fig. 2
Page 116 - Dispositivo di sicurezza della porta
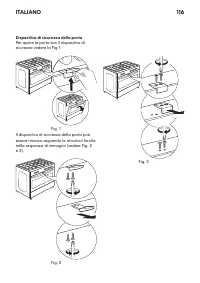
ITALIANO 116 Dispositivo di sicurezza della porta Per aprire la porta con il dispositivo di sicurezza vedere la Fig 1. Fig. 1 Il dispositivo di sicurezza della porta può essere rimosso seguendo le istruzioni fornite nella sequenza di immagini (vedere Fig. 2 e 3). Fig. 2 Fig. 3
Page 117 - Prima di collegare l'apparecchio, verificare; Collegamento elettrico
ITALIANO 117 Prima di collegare l'apparecchio, verificare che: la tensione di alimentazione nominale 1. dell'abitazione corrisponda a quella dell'apparecchio, come indicato sulla targhetta matricola; la linea di alimentazione alla quale è 2. collegato l'apparecchio fornisca una potenza adeguata risp...
Page 118 - essere trattato come rifiuto domestico,; Consigli per la salvaguardia dell'ambiente
ITALIANO 118 Smaltimento imballaggio Il materiale di imballaggio è riciclabile al - 100% ed è contrassegnato dal simbolo di riciclaggio ( ). Non disperdere le diverse parti dell'imballaggio nell'ambiente, ma smaltirle in conformità alle norme stabilite dalle autorità locali. Smaltimento prodotto Que...
Page 120 - Applicazione delle leggi nazionali
ITALIANO 120 batterie e lampadine Danni a parti non funzionali e decorative • che non influiscono sul normale uso dell’elettrodomestico, inclusi graffi e differenze di colore Danni accidentali causati da corpi o • sostanze estranee e danni causati da pulizia o eliminazione di ostruzioni da filtri, s...
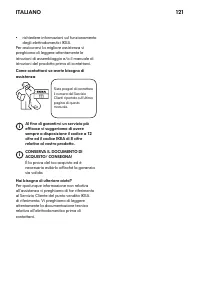
Page 121 - Alfinedigarantirviunserviziopiù
ITALIANO 121 richiedere informazioni sul funzionamento • degli elettrodomestici IKEA Per assicurarvi la migliore assistenza vi preghiamo di leggere attentamente le istruzioni di assemblaggio e/o il manuale di istruzioni del prodotto prima di contattarci. Come contattarci se avete bisogno di assisten...
Page 123 - ΕΛΛΗΝΙΚΑ
ΕΛΛΗΝΙΚΑ 123 Μη σέρνετε τα σκεύη και τα ταψιά, • καθώς μπορεί να προκληθούν χαρακιές στην επίστρωση. Οι συμπυκνωμένοι υδρατμοί που • παραμένουν μετά από το ψήσιμο μπορεί να προκαλέσουν ζημιά στο φούρνο και στα γύρω ντουλάπια. Συνιστάται: να επιλέγετε τη χαμηλότερη δυνατή - θερμοκρασία, να σκεπάζετε ...
Page 124 - Μονάδα εστιών
ΕΛΛΗΝΙΚΑ 124 6 1 5 789 10 11 2 3 4 Περιγραφή προϊόντος Μονάδα εστιών 1 Ταχύς καυστήρας 2 Ημι-ταχύς καυστήρας 3 Ημι-ταχύς καυστήρας 4 Βοηθητικός καυστήρας 5 Καυστήρας τριπλού δακτυλίου Φούρνος 6 Πίνακας διακοπτών 7 Άνοιγμα αερισμού 8 Αντίσταση γκριλ 9 Πίσω λαμπτήρας 10 Ανεμιστήρας 11 Πόρτα φούρνου Εξ...
Page 125 - Διακόπτες φούρνου; Πίνακας διακοπτών
ΕΛΛΗΝΙΚΑ 125 1 2 3 4 5 6 7 8 9 Διακόπτες φούρνου 1 Διακόπτης επιλογής χρόνου ψησίματος 2 Διακόπτης επιλογής θερμοστάτη 3 Πορτοκαλί ενδεικτική λυχνία θερμοστάτη 4 Διακόπτης επιλογής λειτουργιών Διακόπτες μονάδας εστιών 5 Μπροστινός αριστερός διακόπτης ελέγχου καυστήρα* 6 Πίσω αριστερός διακόπτης ελέγ...
Page 129 - Τρόπος χρήσης του πίνακα ψησίματος:
ΕΛΛΗΝΙΚΑ 129 συστάσεις και συμβουλές σχετικά με τη χρήση Τρόπος χρήσης του πίνακα ψησίματος: Ο πίνακας περιλαμβάνει τις βέλτιστες λειτουργίες για ένα συγκεκριμένο φαγητό που μπορείτε να ψήσετε σε ένα ή περισσότερα επίπεδα σχάρας ταυτόχρονα. Ο χρόνος ψησίματος υπολογίζεται από τη στιγμή τοποθέτησης τ...
Page 130 - Κρέας
ΕΛΛΗΝΙΚΑ 130 Κρέας Χρησιμοποιήστε ένα ταψί οποιουδήποτε - τύπου ή ένα ταψί πιρέξ κατάλληλο για το μέγεθος του κομματιού κρέατος που θα ψήσετε. Για ψητό κρέας, συνιστάται να προσθέσετε λίγο ζωμό στη βάση του ταψιού και να περιχύσετε το κρέας κατά τη διάρκεια του ψησίματος για καλύτερη γεύση. Απαιτείτ...
Page 133 - Επιφάνεια από ανοξείδωτο χάλυβα
ΕΛΛΗΝΙΚΑ 133 Καθαρισμός και συντήρηση ΠΡΟΕΙΔΟΠΟΙΗσΗ! Μη χρησιμοποιείτε ποτέ εξοπλισμό - καθαρισμού με ατμό. Καθαρίζετε το φούρνο μόνο όταν είναι - κρύος. Αποσυνδέετε τη συσκευή από την - ηλεκτρική τροφοδοσία. Πριν από οποιαδήποτε εργασία καθαρισμού, αποσυνδέστε τη συσκευή από την ηλεκτρική τροφοδοσί...
Page 134 - Καθαρισμός φούρνου
ΕΛΛΗΝΙΚΑ 134 Καθαρισμός φούρνου Μετά το ψήσιμο, περιμένετε μέχρι να • κρυώσει ο φούρνος και, στη συνέχεια, καθαρίστε τον ώστε να αποφευχθεί η συσσώρευση υπολειμμάτων. Για επίμονους λεκέδες, χρησιμοποιήστε • ένα ειδικό καθαριστικό φούρνου και ακολουθήστε τις οδηγίες που αναγράφονται στη συσκευασία. Κ...
Page 135 - Αντικατάσταση του πίσω λαμπτήρα
ΕΛΛΗΝΙΚΑ 135 C D 2x Εικ. 3 Εικ. 4 Μετά τον καθαρισμό, τοποθετήστε σωστά την πόρτα ακολουθώντας τη διαδικασία αφαίρεσης με την αντίστροφη σειρά. Τοποθετήστε ξανά τα άγκιστρα «A» προς τα μέσα πριν κλείσετε την πόρτα (εικ. 5). Απαιτείται ιδιαίτερη προσοχή στους μεντεσέδες της πόρτας του φούρνου: υπάρχε...
Page 136 - ΠΡΟΒΛΗΜΑ
ΕΛΛΗΝΙΚΑ 136 ΠΡΟΒΛΗΜΑ ΠΙΘΑΝΗ ΑΙΤΙΑ ΛύσΗ Η συσκευή δεν λειτουργεί Η συσκευή δεν είναι συνδεδεμένη στο δίκτυο ηλεκτρικής τροφοδοσίας Συνδέστε το προϊόν στο δίκτυο ηλεκτρικής τροφοδοσίας Ο φούρνος δεν λειτουργεί Η συσκευή δεν είναι συνδεδεμένη στο δίκτυο ηλεκτρικής τροφοδοσίας Συνδέστε το προϊόν στο δί...
Page 137 - Πριν επικοινωνήσετε με το κέντρο
ΕΛΛΗΝΙΚΑ 137 Πριν επικοινωνήσετε με το κέντρο εξυπηρέτησης πελατών Βεβαιωθείτε ότι δεν μπορείτε να λύσετε 1. μόνοι σας το πρόβλημα (βλ. ενότητα « Τι να κάνετε εάν … » ). Απενεργοποιήστε και ενεργοποιήστε 2. ξανά τη συσκευή, για να διαπιστώσετε εάν το πρόβλημα έχει λυθεί. Εάν το πρόβλημα παραμένει με...
Page 138 - Τεχνικά στοιχεία
ΕΛΛΗΝΙΚΑ 138 Τεχνικά στοιχεία Τεχνικά στοιχεία FRAMTID CG7 N DΕTID CG7 N Διαστάσεις (εσωτερικές) mm 330x410x691 330x410x691 Πλάτος mm 900 900 Ύψος mm 850-910 850-910 Βάθος mm 600 600 Ωφέλιμος όγκος l 93,5 93,5 Λαμπτήρας φούρνου W 25 25 Ξεπάγωμα W 25 25 Πάνω + κάτω αντίσταση W 2700 2700 Εξαναγκασμένο...
Page 139 - Τρόπος τοποθέτησης των ποδιών; Εγκατάσταση
ΕΛΛΗΝΙΚΑ 139 Η συσκευή αυτή είναι κατηγορίας 1 (αυτόνομη συσκευή). Η συσκευή πρέπει να χρησιμοποιείται με το αέριο που αναγράφεται στην πινακίδα τεχνικών στοιχείων στο πίσω μέρος της συσκευής. Η ηλεκτρική εγκατάσταση, η εγκατάσταση αερίου και η συντήρηση της συσκευής πρέπει να εκτελούνται από εξειδι...
Page 140 - Εισάγετε το εξάρτημα R (ούπα) στις οπές F
ΕΛΛΗΝΙΚΑ 140 Εισάγετε το εξάρτημα R (ούπα) στις οπές F και βιδώστε το άγκιστρο G στο εξάρτημα R (εικ. 3). 2x F R G Εικ. 3 Στερεώστε την αλυσίδα στο άγκιστρο G, όπως φαίνεται στην εικ. 4, σημείο C. 2x G C C Εικ. 4 ΠΙΝΑΚΑσ ΜΠΕΚ i Κλάση συσκευής: 1 Κατηγορία συσκευής II2H3+ Τύπος αερίου που χρησιμο - π...
Page 141 - σύνδεση αερίου
ΕΛΛΗΝΙΚΑ 141 σύνδεση αερίου Για οδηγίες σχετικά με τη σύνδεση του αερίου, ανατρέξτε στον πίνακα μπεκ και το σχετικό « πρότυπο » που ισχύει για τη χώρα σας. Το σύστημα παροχής αερίου πρέπει να πληροί τις απαιτήσεις των ισχυόντων τοπικών κανονισμών. Η συσκευή πρέπει να συνδεθεί στην παροχή αερίου ή στ...
Page 143 - Ρυθμίσεις αερίου
ΕΛΛΗΝΙΚΑ 143 Ρυθμίσεις αερίου Χρησιμοποιήστε ρυθμιστές πίεσης κατάλληλους για τις τιμές πίεσης αερίου που παρέχονται στον πίνακα μπεκ. Εάν η συσκευή έχει διαμορφωθεί για τύπο αερίου διαφορετικό από εκείνον που είναι διαθέσιμος, απαιτείται αλλαγή των μπεκ, ρύθμιση της ελάχιστης φλόγας και αλλαγή του ...
Page 144 - Αερισμός χώρου
ΕΛΛΗΝΙΚΑ 144 Αερισμός χώρου Η συσκευή αυτή πρέπει να εγκαθίσταται και να χρησιμοποιείται μόνο σε καλά αεριζόμενους χώρους, σύμφωνα με τους ισχύοντες κανονισμούς, με ανοίγματα στους τοίχους ή με ειδικούς αγωγούς που παρέχουν φυσικό ή εξαναγκασμένο αερισμό και, συνεπώς, διασφαλίζουν τη μόνιμη και επαρ...
Page 145 - το ύψος της επιφάνειας
ΕΛΛΗΝΙΚΑ 145 i σΗΜΑΝΤΙΚΟ: το ύψος της επιφάνειας εργασίας πρέπει να είναι τουλάχιστον 20 mm μικρότερο από το συνολικό ύψος της μονάδας εστιών (συμπεριλαμβανομένης της σχάρας βάσης σκευών) (βλ. εικ. 2). 20 m m 400 mm το ελάχ. 50 mm το ελάχ. 50 mm το ελάχ. 100 mm το ελάχ. 550 mm το ελάχ. Εικ. 2
Page 146 - Διάταξη ασφαλείας πόρτας
ΕΛΛΗΝΙΚΑ 146 Διάταξη ασφαλείας πόρτας Για να ανοίξετε την πόρτα με τη διάταξη ασφαλείας, ανατρέξτε στην εικ. 1. Εικ. 1 Η διάταξη ασφαλείας πόρτας μπορεί να αφαιρεθεί όπως φαίνεται στη σειρά εικόνων (βλ. εικ. 2 και 3). Εικ. 2 Εικ. 3
Page 148 - Απόρριψη υλικών συσκευασίας; Περιβαλλοντικά θέματα
ΕΛΛΗΝΙΚΑ 148 Απόρριψη υλικών συσκευασίας Τα υλικά της συσκευασίας είναι 100% - ανακυκλώσιμα και φέρουν το σύμβολο της ανακύκλωσης ( ). Τα διάφορα μέρη της συσκευασίας δεν πρέπει συνεπώς να απορρίπτονται στο περιβάλλον, αλλά να διατίθενται σύμφωνα με τους κατά τόπους κανονισμούς. Απόρριψη του προϊόντ...
Page 150 - Πώς εφαρμόζεται η εθνική νομοθεσία
ΕΛΛΗΝΙΚΑ 150 καθαρισμό ή την απόφραξη φίλτρων, συστημάτων αποστράγγισης ή θηκών απορρυπαντικού. Ζημιές στα παρακάτω εξαρτήματα: • υαλοκεραμικές επιφάνειες, πρόσθετα εξαρτήματα, σκεύη και καλάθια μαχαιροπίρουνων, σωλήνες παροχής και αποστράγγισης, λάστιχα στεγανοποίησης, λαμπτήρες και καλύμματα λαμπτ...
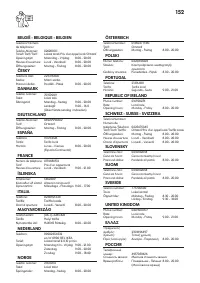
Page 152 - ITALIA; NEDERLAND
152 BELGIË - BELGIQUE - BELGIEN Telefoon/Numéro de téléphone/ Telefon-Nummer: 026200311 Tarief/Tarif/Tarif: Lokaal tarief/Prix d’un appel local/Ortstarif Openingstijd: Heures d’ouverture: Öffnungszeiten: Maandag - Vrijdag Lundi - Vendredi Montag - Freitag 8.00 - 20.00 8.00 - 20.00 8.00 - 20.00 ČESKY...