Page 2 - SAFETY RULES; II. GENERAL OPERATION
2 Look for this symbol to point out im- por tant safety precautions. It means CAUTION!!! BE COME ALERT!!! YOUR SAFE TY IS IN VOLVED. WARNING: In order to prevent ac ci den- tal starting when setting up, trans port- ing, ad just ing or making repairs, always dis con nect spark plug wire and place wir...
Page 3 - TABLE OF CONTENTS; IV. SAFE HANDLING OF GASOLINE
3 SAFETY RULES ........................................................ 2-3 PRODUCT SPECIFICATIONS ..................................... 4 CUSTOMER RESPONSIBILITIES ............................... 4 ASSEMBLY ................................................................ 4-5 OPERATION ................
Page 4 - ASSEMBLY; TO RE MOVE LAWN MOW ER FROM CAR TON; HOW TO SET UP YOUR LAWN MOW ER; CUSTOMER RESPONSIBILITIES
4 ASSEMBLY FIG. 1 OPERATOR PRESENCE CONTROL BAR UPPER HANDLE “STAR” KNOB LIFT UP LIFT UP LOWER HANDLE MOWING PO SI TION UPPER HANDLE LOWER HANDLE “STANDARD” KNOB Read these instructions and this man u al in its entirety before you attempt to assemble or operate your new lawn mow er. IMPORTANT : THIS...
Page 5 - TO ASSEMBLE GRASS CATCHER; TO INSTALL ATTACHMENTS
5 ASSEMBLY TO ASSEMBLE GRASS CATCHER (See Fig. 3) 1. Put grass catcher frame into grass bag with rigid part of bag on the bottom. Make sure the frame handle is outside of the bag top. 2. Slip vinyl bindings over frame. NOTE : If vinyl bindings are too stiff, hold them in warm water for a few minutes...
Page 6 - KNOW YOUR LAWN MOWER; MEETS CPSC SAFETY REQUIREMENTS; OPERATION
6 KNOW YOUR LAWN MOWER READ THIS OWNER'S MANUAL AND SAFETY RULES BEFORE OPERATING YOUR LAWN MOWER. Compare the illustrations with your lawn mower to familiarize yourself with the location of various controls and adjust- ments. Save this manual for future reference. MEETS CPSC SAFETY REQUIREMENTS Hus...
Page 7 - HOW TO USE YOUR LAWN MOWER; ENGINE SPEED; TO CONVERT MOWER
7 TO ADJUST CUTTING HEIGHT (See Fig. 7) Raise wheels for low cut and lower wheels for high cut, adjust cutting height to suit your requirements. Me di um position is best for most lawns. • To change cutting height, squeeze adjuster lever to ward wheel. Move wheel up or down to suit your re quire men...
Page 9 - TO STOP ENGINE; BEFORE STARTING ENGINE
9 Acidic gas can damage the fuel sys- tem of an engine while in storage. To avoid engine problems, the fuel system should be emptied before stor age of 30 days or longer. Empty the gas tank, start the engine and let it run until the fuel lines and carburetor are empty. Use fresh fuel next season. Se...
Page 10 - MOWING TIPS; MULCHING MOWING TIPS
10 MOWING TIPS CAUTION: Do not use de-thatcher blade attachments on your mower. Such attachments are hazardous, will damage your mower and could void your warranty. • Under certain conditions, such as very tall grass, it may be nec es sary to raise the height of cut to reduce pushing effort and to k...
Page 11 - BEFORE EACH USE; MAINTENANCE
11 LUBRICATION CHART GENERAL RECOMMENDATIONS The warranty on this lawn mower does not cover items that have been subjected to operator abuse or negligence. To receive full value from the warranty, operator must maintain mower as instructed in this manual. Some adjustments will need to be made period...
Page 12 - LAWN MOWER; TIRES
12 LAWN MOWER Always observe safety rules when performing any main- te nance. TIRES • Keep tires free of gasoline, oil, or insect control chem i- cals which can harm rubber. • Avoid stumps, stones, deep ruts, sharp objects and other hazards that may cause tire damage. DRIVE WHEELS Check wheels each ...
Page 13 - GRASS CATCHER; ENGINE; LUBRICATION
13 FIG. 15 CENTER HOLE BLADE 5/8" BOLT OR PIN MAINTENANCE GRASS CATCHER • The grass catcher may be hosed with water, but must be dry when used. • Check your grass catcher often for damage or de te- ri o ra tion. Through normal use it will wear. If catcher needs replacing, replace only with ap pr...
Page 14 - CLEANING
14 FITTING HOSE FIG. 18 MUFFLER Inspect and replace corroded muffler as it could create a fire hazard and/or damage. SPARK PLUG Replace spark plug at the beginning of each mowing season or after every 100 hours of operation, whichever occurs first. Spark plug type and gap setting are shown in the “P...
Page 15 - SERVICE AND ADJUSTMENTS; TO ADJUST CUTTING HEIGHT
15 SERVICE AND ADJUSTMENTS LAWN MOWER TO ADJUST CUTTING HEIGHT See “TO ADJUST CUTTING HEIGHT” in the Operation section of this manual. REAR DEFLECTOR The rear deflector, attached between the rear wheels of your mower, is provided to minimize the possibility that objects will be thrown out of the rea...
Page 17 - STORAGE
17 SERVICE AND ADJUSTMENTS ENGINE ENGINE SPEED Your engine speed has been factory set. CARBURETOR Your carburetor is not adjustable. IMPORTANT: NEVER TAMPER WITH THE ENGINE GOVERNOR, WHICH IS FACTORY SET FOR PROPER ENGINE SPEED. OVER SPEED ING THE ENGINE ABOVE THE FACTORY HIGH SPEED SETTING CAN BE D...
Page 18 - FUEL SYSTEM; ENGINE OIL; OTHER
18 STORAGE ENGINE FUEL SYSTEM IMPORTANT : IT IS IMPORTANT TO PREVENT GUM DEPOSITS FROM FORMING IN ESSENTIAL FUEL SYSTEM PARTS SUCH AS CARBURETOR, FUEL FILTER, FUEL HOSE, OR TANK DURING STORAGE. ALCOHOL BLENDED FUELS (CALLED GASOHOL OR USING ETHANOL OR METHANOL) CAN ATTRACT MOISTURE WHICH LEADS TO SE...
Page 19 - TROUBLESHOOTING POINTS
19 TROUBLESHOOTING POINTS Does not start 1. Dirty air filter. 1. Clean/replace air filter. 2. Out of fuel. 2. Fill fuel tank. 3. Stale fuel. 3. Empty fuel tank and refill tank with fresh, clean gasoline. 4. Water in fuel. 4. Empty fuel tank and refill tank with fresh, clean gasoline. 5. Spark plug w...
Page 20 - LIMITED WARRANTY
20 LIMITED WARRANTY What is covered. We warrant that this product is free from defects in material or workmanship under normal use and maintenance. Certain components, such as normal wear parts, engines, and transmissions are excluded from this warranty. We will, at our option, repair or replace any...
Page 21 - Product Registration
21 1 Ignition modules, tiller tines, fabricated decks, and trimmer shafts all have a “Limited Lifetime Warranty,” and are warranted for the life of the prod- uct or 7 (seven) years after the product's final production run, whichever comes first. Parts and labor are included in the initial warranty p...
Page 22 - II. FONCTIONNEMENT GÉNÉRAL; RÈGLES DE SÉCURITÉ
22 Ce symbole signale les points importants en matière de sé cu ri té. Il signifie - AT TEN TION !!!, SOYEZ PRUDENT !!! VOTRE SÉ CU RI TÉ EST EN JEU. ATTENTION : Débranchez toujours le fil de bougie d’allumage et pour prévenir les dé mar ra ges accidentels, posez-le de telle fa çon qu’il ne puisse p...
Page 23 - SOMMAIRE; III. FONCTIONNEMENT DANS LES PEN TES
23 RÈGLES DE SÉCURITÉ ........................................ 22-23 SPÉCIFICATIONS DU PRODUIT ............................... 24 RESPONSABILITÉS DU CLIENT ............................... 24 ASSEMBLAGE ...................................................... 24-25 UTILISATION.............................
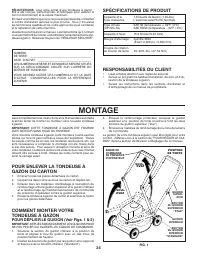
Page 24 - MONTAGE
24 MONTAGE FIG. 1 BARRE DE COMMANDE DE PRÉSENCE D’OPÉ RA TEUR BOUTON DU GUIDON SUPÉRIEUR “STAR” SOU L-E VEZ SOU L- E VEZ GUIDON IN FÉ RIEUR POSITION DE TONTE GUIDON SU PÉ R- IEUR BOUTON DU GUIDON INFÉRIEUR “STANDARD” Lisez complètement ces instructions et ce manuel dans sa totalité avant de tenter d...
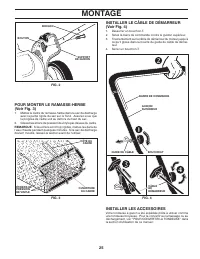
Page 25 - INSTALLER LES ACCESSOIRES; INSTALLER LE CÂBLE DE DÉMARREUR
25 MONTAGE FIG. 2 SUPPORT DE GUIDON BOULON BOUTON INSTALLER LES ACCESSOIRES Votre tondeuse à gazon a été expédiée prête à utiliser comme une tondeuse broyeuse. Pour la convertir au ramassage ou au déchargement, voir “POUR CONVERTIR LA TONDEUSE” dans la section d’utilisation de ce manuel. POUR MONTER...
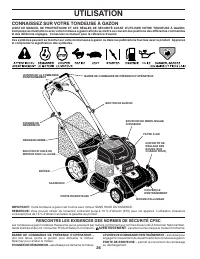
Page 26 - RENCONTRE LES EXIGENCES DES NORMES DE SÉCURITÉ CPSC; CONNAISSEZ SUR VOTRE TONDEUSE À GAZON; UTILISATION
26 RENCONTRE LES EXIGENCES DES NORMES DE SÉCURITÉ CPSC Les tondeuses à gazon rotatives Husqvarna qui se poussent par l’arrière conforment aux normes de sécurité d’American National Stan- dards Institute et de U.S. Consumer Product Safety Commission. AVERTISSEMENT: La lame tourne lorsque le moteur fo...
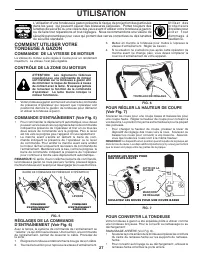
Page 27 - POUR RÉGLER LA HAUTEUR DE COUPE; COMMENT UTILISER VOTRE; COMMANDE DE LA VITESSE DE MOTEUR; POUR CONVERTIR LA TONDEUSE
27 UTILISATION POUR RÉGLER LA HAUTEUR DE COUPE (Voir Fig. 7) Soulevez les roues pour une coupe basse et baissez-les pour une coupe haute. Réglez la hauteur de coupe pour convenir à vos besoins. La position moyenne est la meilleure pour la plupart des pelouses.• Pour changer la hauteur de coupe, pres...
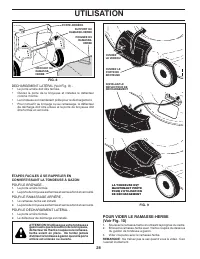
Page 28 - POUR VIDER LE RAMASSE-HERBE
28 POUR VIDER LE RAMASSE-HERBE (Voir Fig. 10) 1. Soulevez le ramasse-herbe en utilisant la poignée du cadre.2. Enlevez le ramasse-herbe avec l’herbe coupée du dessous du guidon de tondeuse à gazon. 3. Vider coupures avec le ramasse-herbe. REMARQUE : Ne traînez pas le sac quand vous le videz. Ceci l’...
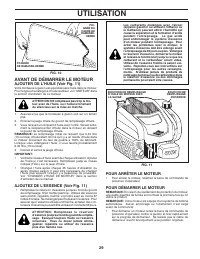
Page 29 - AVANT DE DÉMARRER LE MOTEUR; POUR ARRÊTER LE MOTEUR
29 Les carburants mélangés avec l’alcool (appelés gasohol ou utilisant l’éthanol ou le méthanol) peuvent attirer l’humidité qui cause la séparation et la formation d’acide pendant l’entreposage. Le gaz acide peut endommager le système d’essence d’un moteur pendant l’entreposage. Pour éviter les prob...
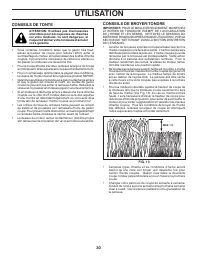
Page 30 - CONSEILS DE BROYER/TONDRE; CONSEILS DE TONTE
30 CONSEILS DE BROYER/TONDRE IMPORTANT: POUR LE MEILLEUR RENDEMENT, MAINTENEZ LE BOÎTIER DE TONDEUSE EXEMPT DE L’ACCUMULATION DE L’HERBE ET LES DÉBRIS. NETTOYEZ LE DESSOUS DU BOÎTIER DE TONDEUSE APRÈS CHAQUE UTILISATION. VOIR LA SECTION DE “NETTOYAGE” DANS LA SECTION D'ENTRETIEN DE CE MANUEL.• La la...
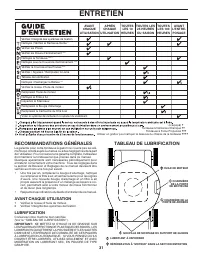
Page 31 - ENTRETIEN; RECOMMANDATIONS GÉNÉRALES; AVANT CHAQUE UTILISATION; TABLEAU DE LUBRIFICATION
31 ENTRETIEN Vérifiez l'intégrité des systèmes de fixation Nettoyez / Vérifiez le Ramasse-Herbe * Vérifier les Pneus Vérifier les Roues d'entraînement *** Nettoyez la Tondeuse **** Nettoyez sous le Couvercle d'entraînement *** Vérifiez la Courroie et les Poulies *** Vérifiez / Aiguisez / Remplacez l...
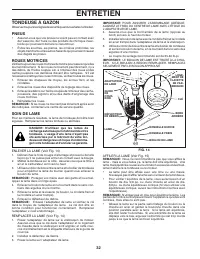
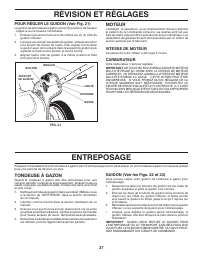
Page 32 - TONDEUSE À GAZON; PNEUS
32 TONDEUSE À GAZON Observez toujours les règles de sécurité quand vous faites l’entretien. PNEUS • Assurez-vous que vos pneus ne soient pas en contact avec de l’essence, de l’huile ou des produits de chimique insec- ticide qui pourraient détruire le caoutchouc. • Évitez les souches, les pierres, le...
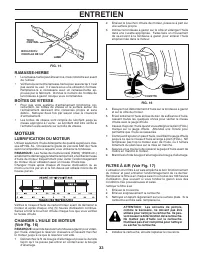
Page 33 - BOÎTES DE VITESSE; MOTEUR; LUBRIFICATION DU MOTEUR
33 FIG. 15 TROU CENTRAL LAME BOULON OU CHEVILLE DE 5/8" 2. Enlevez le bouchon d’huile de moteur, posez-le à part sur une surface propre. 3. Inclinez la tondeuse à gazon sur le côté et vidangez l’huile dans une cuvette appropriée. Faites faire un mouvement de va-et-vient à la tondeuse à gazon pou...
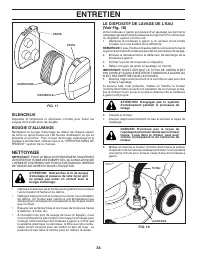
Page 34 - NETTOYAGE
34 LE DISPOSITIF DE LAVAGE DE L’EAU (Voir Fig. 18) Votre tondeuse à gazon est équipé d’un ajustage qui permet le nettoyage rapide et facile du dessous du logement. Pour employer ce dispositif, opérez comme suit:1. Déplacez la tondeuse à gazon à un secteur d’une herbe coupée ou d’une surface dure dif...
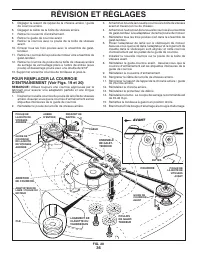
Page 35 - RÉVISION ET RÉGLAGES; POUR ENLEVER LA COURROIE
35 ATTENTION: AVANT D’EFFECTUER TOUS LES RÉVISION OU RÉGLAGES: 1. Relâchez la barre de commande et arrêtez le moteur. 2. Assurez-vous que la lame et toutes les pièces mobiles soient arrêtées com plè te ment. 3. Débranchez le fil de bougie d’allumage et posez-le de telle façon qu’il ne puisse pas ent...
Page 36 - POUR REMPLACER LA COURROIE
36 RÉVISION ET RÉGLAGES 5. Dégager la ressort de rappel de la chicane arrière / guide de courroie arrière. 6. Dégager la câble de la boîte de vitesses arrière.7. Retirez le couvercle d’entraînement.8. Retirez le guide de courroie avant.9. Retirez la courroie avec la poulie de la boîte de vitesses av...
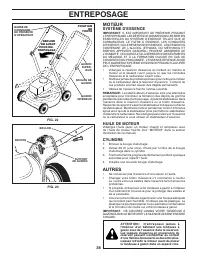
Page 37 - ENTREPOSAGE; VITESSE DE MOTEUR
37 ENTREPOSAGE Préparez immédiatement votre tondeuse à gazon pour d’en tre po sa ge à la fin de la saison ou si la tondeuse à gazon ne sera pas utilisée pour une période de 30 jours ou plus. MOTEUR L'entretien, la réparation, ou le remplacement d'aucun élément et systém de la commande émission, les ...
Page 38 - SYSTÈME D’ESSENCE; AUTRES
38 ENTREPOSAGE MOTEUR SYSTÈME D’ESSENCE IMPORTANT : IL EST IMPORTANT DE PRÉVENIR, PENDANT L’ENTREPOSAGE, LES DÉPÔTS DE GOMME DANS LES PARTIES ESSENTIELLES DU SYSTÈME D’ESSENCE TELLES QUE LE CARBURATEUR, LE FILTRE À ESSENCE, LES CONDUITES D’ESSENCE, OU LE RÉSERVOIR D’ESSENCE. LES ESSENCES CONTENANT D...
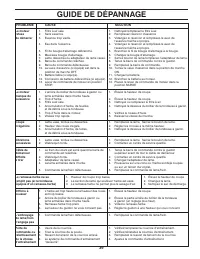
Page 39 - GUIDE DE DÉPANNAGE
39 Le moteur 1. Filtre à air sale 1. Nettoyez/remplacez le filtre à air. refuse 2. Sans essence. 2. Remplissez réservoir d’essence. de démarrer 3. Essence trop vieille. 3. Vidangez le réservoir et remplissez-le avec de l'essence fraîche et propre. 4. Eau dans l’essence. 4. Vidangez le réservoir et r...
Page 40 - GARANTIE LIMITÉE
40 GARANTIE LIMITÉE La couverture. Nous garantissons que ce produit est exempt de défauts de matériaux et de fabrication lors d’un usage et d'un entretien normaux. Certaines composantes, comme les pièces à usure normale, les moteurs et les transmissions, sont exclus de la présente Garantie. Nous rép...
Page 42 - SERVICE NOTES
Page 43 - REMARQUES D’ENTRETIEN


 Husqvarna HCS9, HCS13 Manual
 Husqvarna Hedge Master 320iHD60 User Manual
 Husqvarna HEDGE TRIMMER ATTACHMENT Manual
 Husqvarna HiCut 64 User Manual
 Husqvarna HU675AWD-96145001500 User Manual
 Husqvarna HU700H Manual
 Husqvarna HU775H / 961450007 Manual
 Husqvarna HU800AWD Manual
 Husqvarna HU800AWDH User Manual
 Husqvarna HU800BBC Manual
 Husqvarna Husqvarna PW 490 User Manual
 Husqvarna HUV4210-GXP Manual