Honeywell MN12CES - Manual

Honeywell MN12CES – Manual, read for free online in PDF format. We hope this helps you resolve any issues you may have. If you have further questions, please contact us through the contact form.


Table of Contents:
- Page 2 – INDEX
- Page 3 – Read and follow the instructions carefully.; THANK YOU
- Page 4 – USER TIPS; Follow installation instructions to set up the unit.
- Page 5 – SAFETY; WARNING; DO NOT cover the air intake and exhaust when in use.
- Page 7 – PARTS DESCRIPTION
- Page 8 – INSTALLATION
- Page 9 – Connect the window bracket to the window.
- Page 10 – RECOMMENDED
- Page 11 – Touch Screen Control Panel
- Page 12 – Do not place the remote control in direct sunlight.; Remote Control
- Page 13 – Caution
- Page 14 – CLEANING & MAINTENANCE; Appliance Maintenance:
- Page 15 – WATER CONDENSATION DRAINAGE; Manual Draining; Water Condensation Drainage; Water may need to be drained in high humidity areas
- Page 16 – TROUBLESHOOTING GUIDE
- Page 17 – TECHNICAL SPECIFICATIONS; Description of Product
- Page 18 – SERVICE AND WARRANTY; -YEAR LIMITED WARRANTY
- Page 19 – Model
8
OWNER’S MANUAL
Read these instructions before use
Voltage rating: 120V~60Hz
Power rating : 1100W (MN12CES)
Power rating : 900W (MN10CESWW)
Portable Air Conditioner
Model: MN12CES / MN10CESWW
Customer Support : 1-800-474-2147
For product inquiries or support : www.honeywellportableac.com
Made in China
"Loading the manual" means you need to wait until the file loads and becomes available for online reading. Some manuals are very large, and the time they take to appear depends on your internet speed.
Was this manual helpful?
About this manual
- Brand
- Honeywell
- Model
- MN12CES
- Document type
- Manual
- Language(s)
- English
- Pages
- 20
- File size
- 1.7 MB
- Format
Other Manuals for Honeywell MN12CES
Summary
THANK YOU..................................................................................................... INDEX .............................................................................................................. 123467 13 1516 USER TIPS...................................................
Congratulations on your purchase of this versatile Honeywell Portable Air Conditioner. Honeywell Portable Air Conditioners are ideal for spot cooling. The compressor, condenserand evaporator are housed in a compact unit. The air is filtered, dehumidified and cooled whilea flexible air outlet hose se...
3 USER TIPS To ensure optimal efficiency of the product, keep doors and windows closed when itis used as an air conditioner or dehumidifier. If the product is being used with the fan function only, an open window could improve air circulation. Important : Before installing the unit, place it UPRIGHT...
Ask a question
Related manuals
Popular Honeywell Other
More Honeywell Other models
 Honeywell ML8135 Manual
 Honeywell MM14CCS Manual
 Honeywell MM14CHCS Manual
 Honeywell MN09CES User Manual
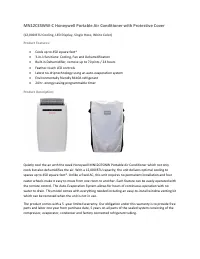 Honeywell MN10CES Installation Manual
 Honeywell MN10CESWW User Manual
 Honeywell MN12CESBB Installation Manual
- Honeywell MN12CESWW Installation Manual
 Honeywell Modutrol IV Motors Series 90 User Manual
 Honeywell Molded Fire/Water File Chest 1106 User Manual
 Honeywell MS-9600LS Manual
 Honeywell MS2xxx Manual