Page 2 - THANK YOU FOR MAKING GE APPLIANCES A PART OF YOUR HOME.; card included in the packing material.
2 49-3000295 Rev. 0 THANK YOU FOR MAKING GE APPLIANCES A PART OF YOUR HOME. Whether you grew up with GE Appliances, or this is your first, we’re happy to have you in the family. We take pride in the craftsmanship, innovation and design that goes into every GE Appliances product, and we think you wil...
Page 3 - IMPORTANT SAFETY INFORMATION; READ ALL INSTRUCTIONS BEFORE USING THE APPLIANCE; SAFETY; WARNING; READ AND SAVE THESE INSTRUCTIONS; Proper Disposal of your Appliance
49-3000295 Rev. 0 3 IMPORTANT SAFETY INFORMATION READ ALL INSTRUCTIONS BEFORE USING THE APPLIANCE SAFETY INFORMA TION To reduce the risk of death, fire, explosion, electric shock, or injury to persons when using your appliance, follow basic precautions, including the following: Ŷ Read all instructio...
Page 4 - PROPER INSTALLATION; WHEN NOT IN USE
4 49-3000295 Rev. 0 SAFETY INFORMA T ION READ AND SAVE THESE INSTRUCTIONS IMPORTANT SAFETY INFORMATION READ ALL INSTRUCTIONS BEFORE USING THE APPLIANCE PROPER INSTALLATION This washer must be properly installed and located in accordance with the Installation Instructions before it is used. Ŷ Ensure ...
Page 6 - Power
6 49-3000295 Rev. 0 Start/Pause Press Start to begin the cycle. NOTE: Unless Bulky cycle is selected, the lid must be closed for the washer to start cycle. If the lid is open, “Lid” will scroll across the display. During the load sensing portion of the cycle, the lid will lock and “SEnSing” will scr...
Page 7 - Display; Consumer Help Indicator
49-3000295 Rev. 0 7 USING THE W A SHER Getting started Display and Status Lights Display: The display shows the approximate time remaining until the end of the cycle. NOTE: The cycle time is affected by how long it takes the washer to fill. This depends on the water pressure in your home. The size o...
Page 8 - Wash Cycles-Cycle Selector Knob
8 49-3000295 Rev. 0 Getting started USING THE W A SHER D Items to Wash Cycle Wash Temp Soil Level Spin Selection (Duration) Options Disabled Cycle Details Cycle for normal, regular, or typical use for washing up to a full load of normally soiled cotton clothing. Colors Normal Hot Warm Colors Cool Co...
Page 9 - Getting started; Settings
49-3000295 Rev. 0 9 Getting started Items to Wash Cycle Wash Temp Soil Level Spin Selection (Duration) Options Disabled Cycle Details Towels Sheets Towels / Sheets Hot Warm Colors Cool Cold Tap Cold Heavy Heavy (-) Normal Light (+) Light Max ++ + Normal Off None Cycle designed washing towels or shee...
Page 11 - Adding Detergent to SmartDispenserTM
49-3000295 Rev. 0 11 USING THE W A SHER Getting started I When selected, this feature will automatically add detergent to the wash, eliminating the need to add detergent for each load. The detergent amount selection on the control panel will default to AUTO when first powering up the washing machine...
Page 12 - Liquid Bleach
12 49-3000295 Rev. 0 Getting started USING THE W A SHER Use a measuring cup to pour the bleach into the bleach dispenser. Measure liquid bleach carefully and DO NOT pour directly from the bleach bottle into the bleach dispenser. NOTE: The bleach dispenser is a single use dispenser and is NOT a bulk ...
Page 13 - Always follow fabric manufacturer’s care label when laundering.; Proper Use of Detergent; Automatic Load Sensing; Pretreatment
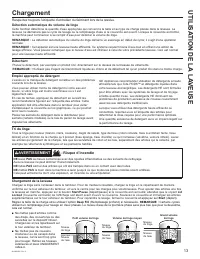
49-3000295 Rev. 0 13 USING THE W A SHER Loading Always follow fabric manufacturer’s care label when laundering. Proper Use of Detergent Using too little or too much detergent is a common cause of laundry problems. Use less detergent if you have soft water, a smaller load or a lightly soiled load.For...
Page 14 - Appliance communication; USING THE W
14 49-3000295 Rev. 0 Appliance communication WiFi Connect (For customers in the United States only - on some models) Your washer is GE Appliances WiFi Connect enabled. Visit www.GEAppliances.com/connect and enter your model number to show you the proper steps to connect your appliance. WiFi Connecti...
Page 15 - Exterior of the Washer; - Electrical Shock Hazard; Interior of the Washer
49-3000295 Rev. 0 15 Care and Cleaning CARE AND CLEANING Exterior of the Washer Immediately wipe off any spills with a damp cloth. Certain internal parts are intentionally not grounded and may present a risk of electric shock only during servicing. Service personnel – DO NOT contact the following pa...
Page 16 - Moving and Storage
16 49-3000295 Rev. 0 Care and Cleaning CARE AND CLEANING Ask the service technician to remove water from drain pump and hoses. Do not store the washer where it will be exposed to the weather. PTW905 and PTW900 models only: Do not move the washer with a full tank of detergent. If moving the washer wi...
Page 17 - If you have any questions, call GE Appliances at 800.GE.CARES; BEFORE YOU BEGIN; IMPORTANT –; Note to Installer –
49-3000295 Rev. 0 17 Installation Washer Instructions If you have any questions, call GE Appliances at 800.GE.CARES (800.432.2737) or visit our Website at: GEAppliances.com In Canada, call 800.561.3344 or visit GEAppliances.ca TOOLS REQUIRED FOR WASHER INSTALLATION Ŷ Pliers Ŷ Level PARTS SUPPLIED PA...
Page 18 - Installation Instructions; LOCATION OF YOUR WASHER; DO NOT Install the Washer:; IMPORTANT: Minimum Installation Clearances; UNPACKING THE WASHER
18 49-3000295 Rev. 0 Installation Instructions LOCATION OF YOUR WASHER DO NOT Install the Washer: 1. In an area exposed to dripping water or outside weather conditions. The ambient temperature should never be freezing or near freezing for proper washer operation. 2. In an area where it will come in ...
Page 20 - CONNECT TO DRAIN
20 49-3000295 Rev. 0 Installation Instructions 6 CONNECT TO DRAIN Install drain hose clip on rear panel of washer. Route drain hose through clip and insert free end into drain opening of your home. If water valves and drain are built into wall, fasten drain hose to one of the water hoses with cable ...
Page 21 - CONNECT POWER AND INSTALL; FINAL CHECKLIST
49-3000295 Rev. 0 21 ELECTRICAL REQUIREMENTS CIRCUIT – Individual, properly polarized and grounded 15 or 20 amp circuit breaker or time-delay fuse. POWER SUPPLY – 2 wire plus ground, 120 Volt, single phase, 60 Hz, alternating current. Outlet Receptacle – Properly grounded 3-prong receptacle to be lo...
Page 22 - TROUBLESHOOTING TIPS; Before you call for service; Problem
22 49-3000295 Rev. 0 TROUBLESHOOTING TIPS Troubleshooting Tips... Before you call for service Problem Possible Causes What To Do Small amount of water remaining in dispenser (on some models) at end of cycle Normal dispenser operation It is normal for a small amount of water to remain in dispenser af...
Page 25 - company; EXCLUSION OF IMPLIED WARRANTIES; LIMITED W; GE Appliances Washer Limited Warranty
49-3000295 Rev. 0 25 GEAppliances.com All warranty service is provided by our Factory Service Centers, or an authorized Customer Care ® technician. To schedule service online, visit us at geappliances.com/service , or call GE Appliances at 800.GE.CARES (800.432.2737). Please have your serial number ...
Page 27 - LAVEUSES
49-3000295 Rev. 0 12-21 GEA G035 LAVEUSES GUIDE DE L’UTILISATEUR ET INSTRUCTIONS D’INSTALLATION Inscrivez ici les numéros de modèle et de série : Modèle # ________________ Série # __________________ Vous pouvez les trouver sous le couvercle de la laveuse. MESURES DE SÉCURITÉ . . . . . . . . . . 3 UT...
Page 28 - NOUS VOUS REMERCIONS D’ACCUEILLIR GE APPLIANCES CHEZ VOUS; sommes heureux de vous accueillir dans notre famille.
2 49-3000295 Rev. 0 NOUS VOUS REMERCIONS D’ACCUEILLIR GE APPLIANCES CHEZ VOUS Que vous ayez grandi avec GE Appliances ou qu’il s’agisse de votre première acquisition, nous sommes heureux de vous accueillir dans notre famille. Nous sommes fiers du savoir-faire, de l’innovation et de l’esthétique qui ...
Page 29 - CONSIGNES DE SÉCURITÉ IMPORTANTES; LIRE TOUTES LES CONSIGNES AVANT D’UTILISER L’APPAREIL; INFORMA; AVERTISSEMENT; Mise au rebut adéquate de votre électroménager
49-3000295 Rev. 0 3 CONSIGNES DE SÉCURITÉ IMPORTANTES LIRE TOUTES LES CONSIGNES AVANT D’UTILISER L’APPAREIL INFORMA TION DE SÉCURITÉ LIRE ET CONSERVEZ CES DIRECTIVES Pour réduire les risques de décès, d'incendie, d'explosion, de choc électrique ou de blessures lorsque vous utilisez votre appareil, s...
Page 30 - INSTALLATION APPROPRIÉE; SÉQUENCE DE DÉMARRAGE; LORSQUE L’APPAREIL N’EST PAS UTILISÉ
4 49-3000295 Rev. 0 CONSIGNES DE SÉCURITÉ IMPORTANTES LIRE TOUTES LES CONSIGNES AVANT D’UTILISER L’APPAREIL INFORMA T ION DE SÉCURITÉ LIRE ET CONSERVEZ CES DIRECTIVES INSTALLATION APPROPRIÉE Cette laveuse doit être installée conformément aux instructions d’installation avant d’être utilisée. Ŷ Assur...
Page 33 - Indicateur d’aide au consommateur
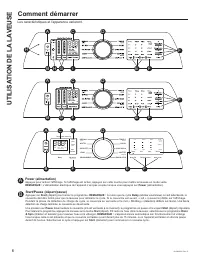
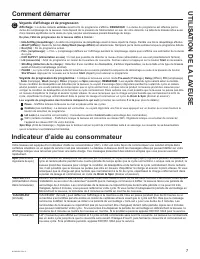
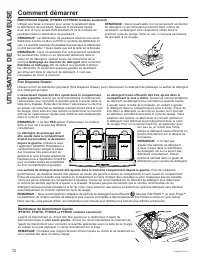
49-3000295 Rev. 0 7 Comment démarrer UTILISA T ION DE LA LAVEUSE Voyants d'affichage et de progression Affichage : La durée restante estimée avant la fin du programme s'affiche. REMARQUE : La durée du programme est affectée par la durée de remplissage de la laveuse. Cela dépend de la pression de l'a...
Page 34 - Comment démarrer
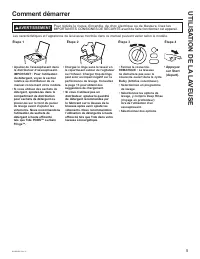
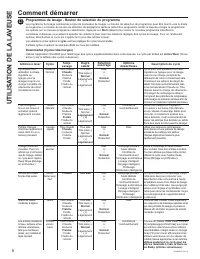
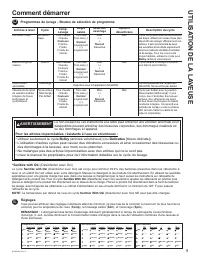
8 49-3000295 Rev. 0 Programmes de lavage - Bouton de sélection de programme Le programme de lavage commande le type de processus de lavage. Le bouton de sélection de programme peut être tourné vers la droite ou la gauche. La rotation du bouton de sélection de programme après le début d'un programme ...
Page 40 - - Risque de choc électrique
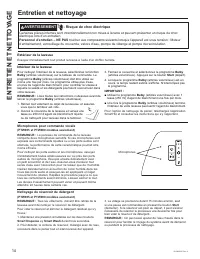
14 49-3000295 Rev. 0 Entretien et nettoyage ENTRETIEN ET NETT OY AGE Extérieur de la laveuse Essuyez immédiatement tout produit renversé à l’aide d’un chiffon humide. Intérieur de la laveuse Pour nettoyer l’intérieur de la laveuse, sélectionnez la fonction Bulky (articles volumineux) sur le tableau ...
Page 41 - Entretien et nettoyage; ENTRETIEN ET NETT
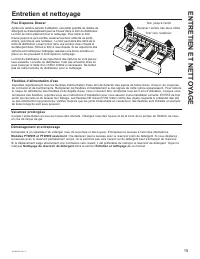
49-3000295 Rev. 0 15 Entretien et nettoyage ENTRETIEN ET NETT OYAGE Demandez à un réparateur de vidanger l’eau de la pompe et des tuyaux. Entreposez la laveuse à l’abri des intempéries. Modèles PTW905 et PTW900 seulement : Ne déplacez pas la laveuse avec le réservoir plein de détergent. Si vous dépl...
Page 43 - AVANT DE COMMENCER; IMPORTANT; Note à l’installateur; PIÈCES FOURNIES
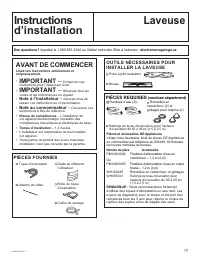
49-3000295 Rev. 0 17 Instructions Laveuse d’installation Des questions? Appelez le 1.800.561.3344 ou Visitez notre site Web à l’adresse : electromenagersge.ca AVANT DE COMMENCER Lisez ces instructions entièrement et soigneusement. • IMPORTANT – Conservez ces instructions pour l’inspecteur local. • I...
Page 44 - N’installez jamais votre laveuse :; DÉBALLAGE DE VOTRE LAVEUSE; Risque de choc; Instructions d’installation
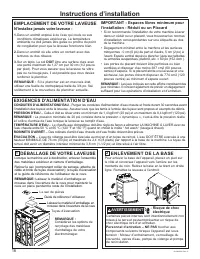
18 49-3000295 Rev. 0 LOCATION OF YOUR WASHER EMPLACEMENT DE VOTRE LAVEUSE N’installez jamais votre laveuse : 1. Dans un endroit exposé à de l’eau qui coule ou aux conditions climatiques extérieures. La température ambiante ne doit jamais être gelée ou proche du point de congélation pour que la laveu...
Page 46 - RACCORDEMENT AU DRAIN
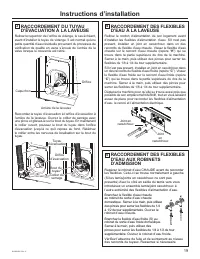
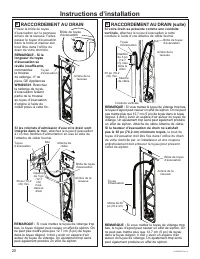
20 49-3000295 Rev. 0 Instructions d’installation 6 RACCORDEMENT AU DRAIN Posez la bride du tuyau d’évacuation sur le panneau arrière de la laveuse. Faites passer le tuyau d’évacuation dans la bride et insérez son bout libre dans l’orifice du drain de votre domicile. Si les robinets d’admission d’eau...
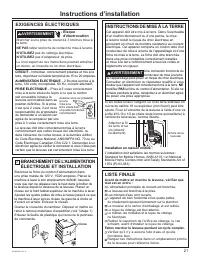
Page 47 - INSTRUCTIONS DE MISE À LA TERRE; LISTE FINALE; BRANCHEMENT DE L’ALIMENTATION; Risque
49-3000295 Rev. 0 21 Instructions d’installation Si les codes locaux l’exigent, un fil de terre extérieur en cuivre de calibre 18 ou supérieur (non fourni) peut être ajouté. Fixer à l’enceinte de la laveuse à l’aide d’une vis à tôle # 10-16 x 1/2 po (dans toute bonne quincaillerie) à l’arrière de la...
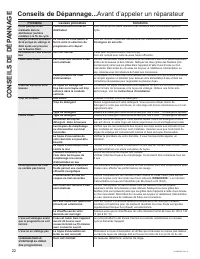
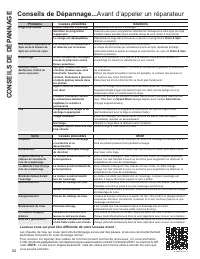
Page 48 - Avant d’appeler un réparateur; CONSEILS DE DÉP
22 49-3000295 Rev. 0 Conseils de Dépannage... Avant d’appeler un réparateur Problème Causes possibles Solutions Petite quantité d’eau résiduelle dans le distributeur (certains modèles) à la fin du cycle Fonctionnement normal du distributeur Il est normal qu’une petite quantité d’eau demeure dans le ...
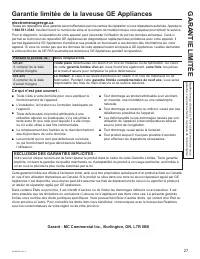
Page 53 - GARANTIE LIMITÉE; Garantie limitée de la laveuse GE Appliances
49-3000295 Rev. 0 27 electromenagersge.ca Toutes les réparations sous garantie seront effectuées par nos centres de réparation ou nos réparateurs autorisés. Appelez le 1.800.561.3344 . Veuillez fournir le numéro de série et le numéro de modèle lorsque vous appelez pour obtenir le service. Pour le di...
Page 55 - LAVADORAS
LAVADORAS MANUAL DEL PROPIETARIO E INSTALACIÓN Escriba el número de modelo y de serie aquí: N.º de modelo # __________ N.º de serie # ____________ Puede encontrarlos bajo la puerta de la lavadora. INSTRUCCIONES DE SEGURIDAD . . . . . . . . . . . . . . . . . . . . . . . . . 3 USAR LA LAVADORA Puesta ...
Page 56 - GRACIAS POR HACER QUE GE APPLIANCES SEA PARTE DE SU HOGAR.; tenerlo en la familia.
2 49-3000295 Rev. 0 GRACIAS POR HACER QUE GE APPLIANCES SEA PARTE DE SU HOGAR. Ya sea que haya crecido usando GE Appliances, o que ésta es su primera vez, nos complace tenerlo en la familia. Sentimos orgullo por el nivel de arte, innovación y diseño de cada uno de los electrodomésticos de GE Applian...
Page 57 - LEA TODAS LAS INSTRUCCIONES ANTES DE USAR; ADVERTENCIA; Forma adecuada de descartar su electrodoméstico
49-3000295 Rev. 0 3 INFORMACIÓN DE SEGURIDAD LEA Y GUARDE ESTAS INSTRUCCIONES INFORMACIÓN IMPORTANTE DE SEGURIDAD LEA TODAS LAS INSTRUCCIONES ANTES DE USAR Para reducir el riesgo de muerte, incendio, explosión, descargas eléctricas o lesiones sobre las personas al usar su electrodoméstico, siga las ...
Page 58 - INSTALACIÓN CORRECTA; CUANDO NO ESTÉ EN USO
4 49-3000295 Rev. 0 INFORMACIÓN DE SEGURIDAD LEA Y GUARDE ESTAS INSTRUCCIONES INFORMACIÓN IMPORTANTE DE SEGURIDAD LEA TODAS LAS INSTRUCCIONES ANTES DE USAR INSTALACIÓN CORRECTA La lavadora se debe instalar y colocar correctamente de acuerdo con las instrucciones de instalación, antes de utilizarla. ...
Page 61 - Indicador de Ayuda al Consumidor
49-3000295 Rev. 0 7 USAR LA LAV ADORA Puesta en Marcha Display and Status Lights (Pantalla y las Luces de Status (Estatus)) Pantalla: La pantalla muestra el tiempo restante aproximado hasta el final del ciclo. NOTA: El tiempo del ciclo es afectado por el tiempo que toma llenar la lavadora. Esto depe...
Page 62 - Perilla de Ciclos de Lavado-Selector de Ciclo
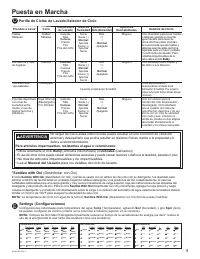
8 49-3000295 Rev. 0 Puesta en Marcha USAR LA LA V ADORA D Prendas a Lavar Ciclo Temperatura de Lavado Nivel de Suciedad Selección del Giro (Duración) Opciones deshabilitadas Detalles del Ciclo Ciclo para el uso normal, regular o típica para el lavado hasta una carga completa de ropa de algodón de su...
Page 63 - Puesta en Marcha
49-3000295 Rev. 0 Puesta en Marcha Prendas a Lavar Ciclo Temperatura de Lavado Nivel de Suciedad Selección del Giro (Duración) Opciones Deshabilitadas Detalles del Ciclo Toallas Sábanas Toallas/ Sábanas Caliente Tibio Colores Fresca Fría Fría del Grifo Sucia Sucia (-) Normal Apenas Sucia (+) Apenas ...
Page 64 - Smart Wash
49-3000295 Rev. 0 Puesta en Marcha USAR LA LA V ADORA Opciones de cicloDeep Fill (Relleno profunda) Seleccione la función de Deep Fill (Llenado Intense) para las cargas donde se desea más agua. La función de relleno intense se recomienda para cargas especiales, no para uso típico.Presione y libere e...
Page 65 - Agregue Detergente al DispensadorInteligenteTM
49-3000295 Rev. 0 11 USAR LA LAV ADORA Puesta en Marcha I Cuando sea seleccionada, de forma automática esta función agregará detergente al lavado, eliminando la necesidad de agregar detergente a cada carga. La selección de la cantidad de detergente en el panel de control estará en AUTO por omisión c...
Page 66 - Dispensador de Blanqueador Líquido
12 49-3000295 Rev. 0 Puesta en Marcha USAR LA LA V ADORA Use una taza con medidas para verter el blanqueador en el dispensador de blanqueador. Mida el blanqueador líquido cuidadosamente y NO vierta el mismo directamente desde la botella de blanqueador al dispensador de blanqueador. NOTA: El dispensa...
Page 67 - Uso correcto del detergente; Sensor de Carga Automático
49-3000295 Rev. 0 13 USAR LA LAV ADORA Carga Siempre siga las instrucciones del fabricante de la ropa cuando lave. Uso correcto del detergente El uso de demasiado poco o cantidades excesivas de detergente es causa común de problemas con la colada.Use menos detergente si tiene agua blanda, una carga ...
Page 68 - Comunicación del Electrodoméstico; USAR LA
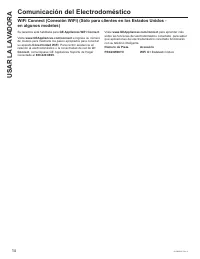
14 49-3000295 Rev. 0 Comunicación del Electrodoméstico WiFi Connect (Conexión WiFi) (Sólo para clientes en los Estados Unidos - en algunos modelos) Su lavadora está habilitada para GE Appliances WiFi Connect . Visite www.GEAppliances.com/connect e ingrese su número de modelo para mostrarle los pasos...
Page 69 - - Riesgo de Descarga Eléctrica; La parte exterior de la lavadora; Micrófonos de Control por Voz
49-3000295 Rev. 0 15 Cuidado y limpieza CUIDADO Y LIMPIEZA Ciertas piezas internas no tienen conexión a tierra en forma intencional y pueden presentar un riesgo de descarga eléctrica sólo durante la reparación. Personal de reparación – NO toque las siguientes piezas cuando el aparato esté recibiendo...
Page 70 - Desplazamiento y almacenamiento; Flex Dispense Drawer; Mangueras de suministro de aguas
49-3000295 Rev. 0 Cuidado y limpieza CUIDADO Y LIMPIEZA Desplazamiento y almacenamiento Vacaciones prolongadas Asegúrese de que el suministro de agua esté cortado desde todos los grifos. Drene toda el agua de las mangueras y el área de la bomba de filtro de agua si la temperatura puede llegar a bajo...
Page 71 - ANTES DE COMENZAR; IMPORTANTE; Nota al instalador; PIEZAS INCLUIDAS
49-3000295 Rev. 0 17 Instrucciones Lavadora de instalación ANTES DE COMENZAR Lea detenidamente todas las instrucciones. • IMPORTANTE – Guarde estas instrucciones para uso del inspector local. • IMPORTANTE – Cumpla todos los códigos y ordenanzas regulatorias. • Nota al instalador – Asegúrese de dejar...
Page 72 - Instrucciones de instalación; UBICACIÓN DE LA LAVADORA; NO instale la lavadora:; IMPORTANTE: Distancias mínimas de; DESEMBALAJE DE LA LAVADORA; Riesgo de Descarga
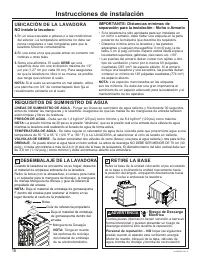
18 49-3000295 Rev. 0 Instrucciones de instalación UBICACIÓN DE LA LAVADORA NO instale la lavadora: 1. En un área expuesta a goteras o a las condiciones del exterior. La temperatura ambiente no debe ser nunca congelarse o casi congelarse para que la lavadora funcione correctamente. 2. En una zona en ...
Page 74 - CONECTE AL DRENAJE
49-3000295 Rev. 0 Instrucciones de instalación 6 CONECTE AL DRENAJE Instale el sujetador de la manguera de drenaje en el panel trasero de la lavadora. Oriente la manguera de drenaje a través del sujetador e inserte el extremo libre en la abertura del drenaje de su hogar. Si las válvulas de agua y el...
Page 75 - INSTRUCCIONES DE CONEXIÓN A; REQUISITOS ELÉCTRICOS; CONECTE LA CORRIENTE E INSTALE; LISTA DE VERIFICACIÓN FINAL
49-3000295 Rev. 0 21 Instrucciones de instalación Si los códigos locales lo requieren, se podrá agregar un cable a tierra externo de cobre de calibre 18 o más grande (no provisto). Adhiera el gabinete de la lavadora con un tornillo de chapa metálica Nº [ 1/2” (disponible en cualquier tienda de repue...
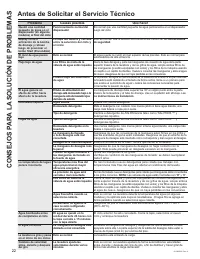
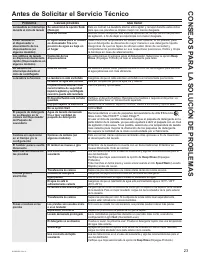
Page 77 - Antes de Solicitar el Servicio Técnico; CONSEJOS P
49-3000295 Rev. 0 23 Antes de Solicitar el Servicio Técnico CONSEJOS P ARA LA SOLUCIÓN DE PROBLEMAS Problema Causas posibles Qué hacer La lavadora se interrumpe durante el ciclo de lavado Se seleccionó la opción Soak (Remojo) Esto es normal. La lavadora alterna entre agitar y remojer durante estos c...
Page 79 - Qué No Cubrirá GE Appliances:; Haier; EXCLUSIÓN DE GARANTÍAS IMPLÍCITAS; GARANTÍA; Garantía limitada de la lavadora GE Appliances
49-3000295 Rev. 0 25 GEAppliances.com Todo el servicio de garantía es provisto por nuestros Centros de Servicio de Fabricación, o un técnico autorizado de Servicio al Cliente (Customer Care®). Para programar una visita del servicio técnico, visítenos a través de Internet en GEAppliances.com ROODPH*(...
Page 80 - Soporte para el Consumidor
49-3000295 Rev. 0 SOPORTE P ARA EL CONSUMIDOR Printed in the United States Soporte para el Consumidor Sitio Web de GE Appliances ¿Desea realizar una consulta o necesita ayuda con su electrodoméstico? ¡Intente a través del Sitio Web de GE Appliances las 24 horas del día, cualquier día del año! Usted ...