Page 2 - THANK YOU FOR MAKING GE APPLIANCES A PART OF YOUR HOME.; card included in the packing material.
2 49-3000230 Rev 0 THANK YOU FOR MAKING GE APPLIANCES A PART OF YOUR HOME. Whether you grew up with GE Appliances, or this is your first, we’re happy to have you in the family. We take pride in the craftsmanship, innovation and design that goes into every GE Appliances product, and we think you will...
Page 4 - READ ALL INSTRUCTIONS BEFORE USING THE APPLIANCE; READ AND SAVE THESE INSTRUCTIONS; WARNING
4 49-3000230 Rev 0 SAFETY INFORMA T ION IMPORTANT SAFETY INFORMATION READ ALL INSTRUCTIONS BEFORE USING THE APPLIANCE READ AND SAVE THESE INSTRUCTIONS To reduce the risk of death, fire, explosion, electric shock, or injury to persons when using your appliance, follow basic precautions, including the...
Page 5 - PROPER INSTALLATION; WHEN NOT IN USE; IMPORTANT SAFETY INFORMATION; SAFETY
49-3000230 Rev 0 5 READ AND SAVE THESE INSTRUCTIONS PROPER INSTALLATION This unit must be properly installed and located in accordance with the Installation Instructions before it is used. Ŷ Ensure that the hot water hose is connected to the “H” valve and the cold water hose is connected to the “C” ...
Page 6 - Getting started; Introduction; Quick Start; USING THE COMBO W
6 49-3000230 Rev 0 Throughout this manual, features and appearance may vary from your model. • Loosely add items. Overloading may negatively impact wash and dry performance. See page 15 for suggested loading examples. • Close door.NOTE: Unit will not start with door open. Step 2 Step 3 Step 5 Step 1...
Page 7 - Controls; Display and Status Lights
49-3000230 Rev 0 7 Getting started Controls A Power Press to “wake up” the display. If the display is active, press to put the unit into standby mode. NOTE: Pressing Power does not disconnect the appliance from the power supply. Display and Status Lights The display shows cycle status ( DRY COOL WAS...
Page 11 - Soil; Temp; Spin; Spin
49-3000230 Rev 0 11 Soil Changing the Soil level increases or decreases the wash time to remove different amounts of soil.To change the Soil level, press the Soil level pad until you have reached the desired setting. You can choose between Extra Light, Light, Normal, Heavy or Extra Heavy soil. C Soi...
Page 12 - Lock; Signal; Delay Wash
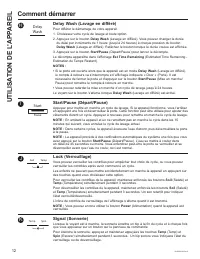
12 49-3000230 Rev 0 Getting started USING THE COMBO W A SHER/DR YER I Start/Pause Press to start a wash cycle. If the unit is running, pressing it once will pause the unit and unlock the door. This function can be used to add garments during a cycle. Press again to restart the wash cycle. NOTE: If t...
Page 14 - Dispenser Drawer; Detergent Compartment
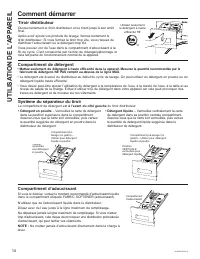
14 49-3000230 Rev 0 Getting started Dispenser Drawer Slowly open the dispenser drawer by pulling it out until it stops. After adding laundry products, slowly close the dispenser drawer. Closing the drawer too quickly could result in early dispensing of the fabric softener or detergent.You may see wa...
Page 15 - Loading; Always follow fabric manufacturer’s care label when laundering.; Sorting and Loading; Loading Examples; Loading to Dry
49-3000230 Rev 0 15 Loading Always follow fabric manufacturer’s care label when laundering. DO NOT wash fabrics soiled with flammable liquids or cleaning solvents. No washer can completely remove oil. DO NOT wash or dry anything that has been soaked in or spotted with any type of oil (including cook...
Page 16 - Exterior; Water Supply Hoses; Door Gasket
16 49-3000230 Rev 0 Care and cleaning CARE AND CLEANING Pump Filter Clean EVERY MONTH to remove any items that may have been caught in the filter or housing. Due to the nature of the front-load unit, it is sometimes possible for small articles to pass to the pump. The unit has a filter to capture lo...
Page 17 - Dispenser Drawer Area; Moving and Storage
49-3000230 Rev 0 17 CARE AND CLEANING Care and cleaning Dispenser Drawer Area Detergent and fabric softener may build up in the dispenser drawer. Residue should be removed once or twice a month. • Remove the drawer by first pulling it out until it stops. Then reach back into the rear of the drawer c...
Page 18 - If you have any questions, call GE Appliances at 800.GE.CARES; BEFORE YOU BEGIN; IMPORTANT –; Note to Installer –; DO NOT Install the Unit:; LOCATION OF YOUR UNIT
18 49-3000230 Rev 0 Installation Combo Washer/Dryer Instructions If you have any questions, call GE Appliances at 800.GE.CARES (800.432.2737) or visit our Website at: GEAppliances.com In Canada, call 800.561.3344 or visit GEAppliances.ca TOOLS REQUIRED FOR UNIT INSTALLATION Ŷ Level Ŷ Wrench (provide...
Page 19 - Installation Instructions; CONNECTION DIMENSIONS
49-3000230 Rev 0 19 Installation Instructions CONNECTION DIMENSIONS ROUGH-IN DIMENSIONS FRONT *NOTE: Leveling legs retracted = 33-1/4” (84.5 cm)Leveling legs extended = 33-3/4” (85.5 cm)Stacked = 66-1/2” (169.0 cm) BACK 21-3/4” (55.25 cm) 4-3/4” (12 cm) 2-1/16” (5.24 cm) 31-1/32” (78.82 cm) 29-3/4” ...
Page 20 - UNPACKING THE UNIT
20 49-3000230 Rev 0 Installation Instructions 1. Cut and remove all packaging straps. 2. While it is in the carton, carefully lay the unit on its side. DO NOT lay the unit on its front or back. 3. Turn down the bottom flaps. Remove all base packaging including the styrofoam base. 4. Carefully return...
Page 21 - ELECTRICAL REQUIREMENTS; GROUNDING INSTRUCTIONS; DRAIN REQUIREMENTS
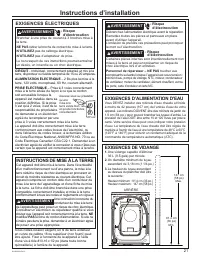
49-3000230 Rev 0 21 Installation Instructions ELECTRICAL REQUIREMENTS CIRCUIT – Individual, properly polarized and grounded 15 or 20 amp circuit breaker or time-delay fuse. POWER SUPPLY – 2 wire plus ground, 120 Volt, single phase, 60 Hz, alternating current. Outlet Receptacle – Properly grounded 3-...
Page 22 - INSTALLING THE UNIT; REPLACEMENT PARTS
22 49-3000230 Rev 0 Installation Instructions 1. Run some water from the hot and cold faucets to flush the water lines and remove particles that might clog the water valve screens. 2. Remove the inlet hoses from the plastic bag. Remove black rubber washers from bag and insert into hose fitting befor...
Page 23 - Before you call for service; TROUBLESHOOTING TIPS; Problem
49-3000230 Rev 0 23 Troubleshooting Tips... Before you call for service TROUBLESHOOTING TIPS Problem Possible Cause What To Do Not draining Not spinning Not tumbling Load is out of balance Redistribute clothes and run Rinse+Spin . Increase load size if washing small load containing heavy and light i...
Page 31 - GE Appliances Washer/Dryer Limited Warranty; In the United States:; Company; EXCLUSION OF IMPLIED WARRANTIES
49-3000230 Rev 0 31 LIMITED W ARRANTY GE Appliances Washer/Dryer Limited Warranty Staple your receipt here. Proof of the original purchase date is needed to obtain service under the warranty . GEAppliances.com All warranty service is provided by our Factory Service Centers, or an authorized Customer...
Page 33 - Laveuse à vapeur et sécheuse à condensation à chargement frontal; COMBINAISON
GUIDE DE L’UTILISATEUR ET INSTRUCTIONS D’INSTALLATION Inscrivez ici les numéros de modèle et de série : Modèle # ________________ Série # __________________ Vous les trouverez sur une étiquette placée à intérieur de la porte. GFQ14 CONSIGNES DE SÉCURITÉ . . . . . . 3 UTILISATION DE LA APPAREIL Comme...
Page 34 - NOUS VOUS REMERCIONS D’ACCUEILLIR GE APPLIANCES CHEZ VOUS; sommes heureux de vous accueillir dans notre famille.
2 49-3000230 Rev 0 NOUS VOUS REMERCIONS D’ACCUEILLIR GE APPLIANCES CHEZ VOUS Que vous ayez grandi avec GE Appliances ou qu’il s’agisse de votre première acquisition, nous sommes heureux de vous accueillir dans notre famille. Nous sommes fiers du savoir-faire, de l’innovation et de l’esthétique qui c...
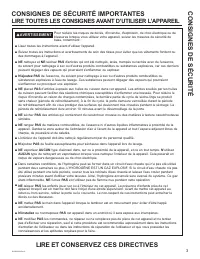
Page 35 - LIRE TOUTES LES CONSIGNES AVANT D’UTILISER L’APPAREIL; LIRE ET CONSERVEZ CES DIRECTIVES; AVERTISSEMENT
49-3000230 Rev 0 3 CONSIGNES DE SÉCURITÉ CONSIGNES DE SÉCURITÉ IMPORTANTES LIRE TOUTES LES CONSIGNES AVANT D’UTILISER L’APPAREIL LIRE ET CONSERVEZ CES DIRECTIVES Pour réduire les risques de décès, d'incendie, d'explosion, de choc électrique ou de blessures lorsque vous utilisez votre appareil, suive...
Page 37 - INSTALLATION APPROPRIÉE; LORSQUE L’APPAREIL N’EST PAS UTILISÉ; CONSIGNES DE SÉCURITÉ
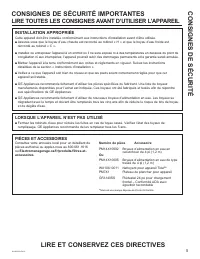
49-3000230 Rev 0 5 LIRE ET CONSERVEZ CES DIRECTIVES INSTALLATION APPROPRIÉE Cette appareil doit être installée conformément aux instructions d’installation avant d’être utilisée. Ŷ Assurez-vous que le boyau d’eau chaude est raccordé au robinet « H » et que le boyau d’eau froide est raccordé au robin...
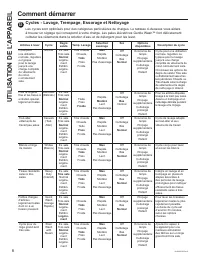
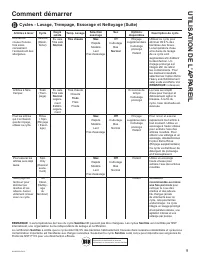
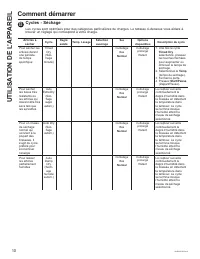
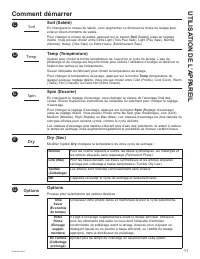
Page 38 - Comment démarrer; Étape 2; Étape 4; UTILISA
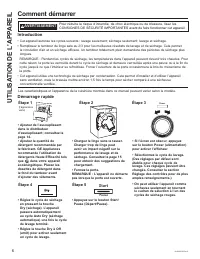
6 49-3000230 Rev 0 Les caractéristiques et l'apparence de la cuisinière montrée dans ce manuel peuvent varier selon le modèle. Pour réduire le risque d’incendie, de choc électrique ou de blessure, lisez les CONSIGNES DE SÉCURITÉ IMPORTANTES avant de faire fonctionner cet appareil. AVERTISSEMENT Comm...
Page 39 - Contrôles; Affichage et voyants d’état
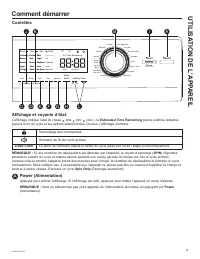
49-3000230 Rev 0 7 Comment démarrer Contrôles A Power (Alimentation) Appuyez pour activer l’affichage. Si l’affichage est actif, appuyez pour mettre l’appareil en mode d’attente. REMARQUE : Vous ne débranchez pas votre appareil de l’alimentation électrique en appuyant sur Power (Alimentation). Affic...
Page 46 - Tiroir distributeur; Compartiment de détergent
14 49-3000230 Rev 0 Comment démarrer Tiroir distributeur Ouvrez lentement le tiroir distributeur en le tirant jusqu’à son arrêt final.Après avoir ajouté vos produits de lavage, fermez lentement le tiroir distributeur. Si vous fermez le tiroir trop vite, vous risquez de distribuer l’adoucissant ou le...
Page 47 - Chargement; Le tri et le chargement; Exemples de brassées; Chargement à sec
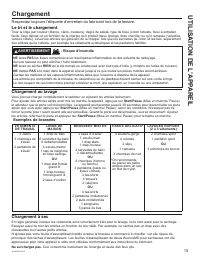
49-3000230 Rev 0 15 Chargement Respectez toujours l’étiquette d’entretien du fabricant lors de la lessive. NE lavez PAS les tissus contaminés avec des liquides inflammables ou des solvants de nettoyage. Aucune laveuse ne peut éliminer l’huile totalement. NE lavez ou séchez RIEN qui a été trempé ou é...
Page 48 - Filtre de la pompe; Extérieur; Flexibles d’alimentation d’eau; Joint d’étanchéité de la porte
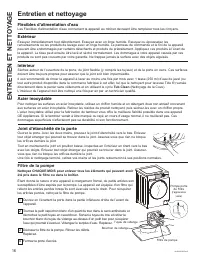
16 49-3000230 Rev 0 Entretien et nettoyage ENTRETIEN ET NETT OY AGE Filtre de la pompe Nettoyez CHAQUE MOIS pour enlever tous les éléments qui peuvent avoir été pris dans le filtre ou dans le boîtier. Étant donné la nature d’une appareil à chargement frontal, de petits articles sont susceptibles d’ê...
Page 49 - Emplacement du tiroir distributeur; Déménagement et rangement; Longues vacances
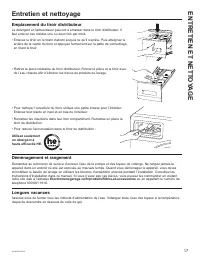
49-3000230 Rev 0 17 ENTRETIEN ET NETT OYAGE Entretien et nettoyage Emplacement du tiroir distributeur Le détergent et l’adoucisseur peuvent s’amasser dans le tiroir distributeur. Il faut enlever ces résidus une ou deux fois par mois. • Enlevez le tiroir en le tirant d’abord jusqu’à ce qu’il s’arrête...
Page 50 - Instructions; Combinaison Laveuse / Sécheuse; d’installation; AVANT DE COMMENCER; IMPORTANT; Note à l’installateur; EMPLACEMENT DE VOTRE APPAREIL; N’installez jamais votre appareil :; INSTALLATION EN MAISON MOBILE :
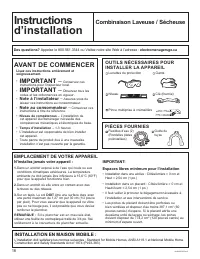
18 49-3000230 Rev 0 Instructions Combinaison Laveuse / Sécheuse d’installation Des questions? Appelez le 800.561.3344 ou Visitez notre site Web à l’adresse : electromenagersge.ca AVANT DE COMMENCER Lisez ces instructions entièrement et soigneusement. • IMPORTANT – Conservez ces instructions pour l’i...
Page 51 - Instructions d’installation
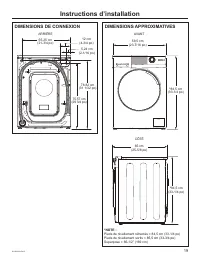
49-3000230 Rev 0 19 DIMENSIONS DE CONNEXION DIMENSIONS APPROXIMATIVES ARRIÈRE AVANT 55,25 cm (21-3/4 po) 12 cm (4-3/4 po) 5,24 cm (2-1/16 po) 78.82 cm (31 1/32 po) 75.57 cm (29 3/4 po) 59,5 cm (23-7/16 po) * 84,5 cm (33-1/4 po) CÔTÉ 65 cm (25-5/8 po) * 84,5 cm (33-1/4 po) Instructions d’installation...
Page 52 - DÉBALLAGE DE VOTRE APPAREIL
20 49-3000230 Rev 0 Instructions d’installation 1. Coupez et enlevez toutes les sangles d’emballage. 2. Alors qu’elle est dans le carton, posez avec soin la appareil sur son côté. NE LAISSEZ JAMAIS reposer la appareil sur son avant ou son arrière. 3. Tournez vers le bas les rebords du bas–enlevez to...
Page 53 - EXIGENCES DE VIDANGE; INSTRUCTIONS DE MISE À LA TERRE
49-3000230 Rev 0 21 Instructions d’installation 1. Une vidange capable d’éliminer 36 L (9.5 gals) par minute. 2. Un diamètre minimum de tuyau ascendant de 3,18 cm (1 1/4 po.) 3. La hauteur du tuyau ascendant au dessus du plancher doit être la suivante : Hauteur minimum : 91.4 cm (36 po.) Hauteur max...
Page 54 - INSTALLATION DE LA APPAREIL
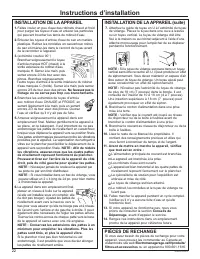
22 49-3000230 Rev 0 Instructions d’installation 1. Faites couler un peu d’eau des robinets chaud et froid pour purger les tuyaux d’eau et enlever les particules qui peuvent boucher les tamis de robinet d’eau. 2. Enlevez les tuyaux d’entrée d’eau du sac en matière plastique. Retirez les rondelles en ...
Page 55 - Avant d’appeler un réparateur; CONSEILS DE DÉP; Problème
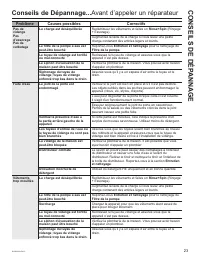
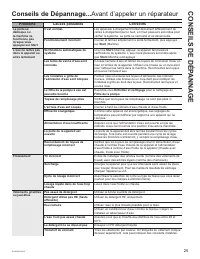
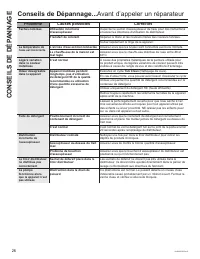
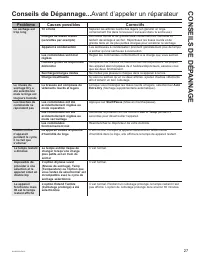
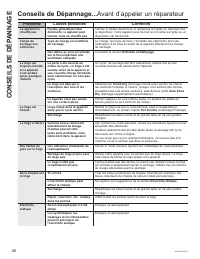
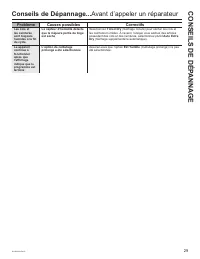
49-3000230 Rev 0 23 Conseils de Dépannage... Avant d’appeler un réparateur CONSEILS DE DÉP ANNAGE Problème Causes possibles Correctifs Pas de vidange Pas d’essorage Pas de culbutage La charge est déséquilibrée Redistribuez les vêtements et faites un Rinse+Spin (Rinçage + Essorage).Augmentez la taill...
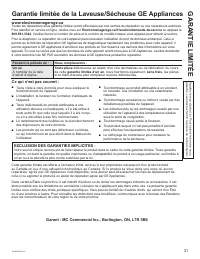
Page 63 - GARANTIE LIMITÉE; Garantie limitée de la Laveuse/Sécheuse GE Appliances; EXCLUSION DES GARANTIES IMPLICITES :; Ce qui n’est pas couvert :
49-3000230 Rev 0 31 www.electromenagersge.ca Toutes les réparations sous garantie limitée seront effectuées par nos centres de réparation ou nos réparateurs autorisés. Pour planifier un service en ligne, rendez-vous sur Electromenagersge.ca/fr/soutien/demande-de-service ou appelez le 800.561.3344 . ...
Page 65 - Lavadora a Vapor y Secadora por Condensación de Carga Frontal; COMBINACIÓN
MANUAL DEL PROPIETARIO E INSTALACIÓN Escriba el número de modelo y de serie aquí: N.º de modelo # __________ N.º de serie # ____________ Usted puede encontrarlos en una etiqueta dentro de la puerta. INFORMACIÓN DE SEGURIDAD . . . . . . . . . . . . . . . . . . . . . 3 USAR LA UNIDAD Puesta en Marcha ...
Page 66 - GRACIAS POR HACER QUE GE APPLIANCES SEA PARTE DE SU HOGAR.; tenerlo en la familia.
2 49-3000230 Rev 0 GRACIAS POR HACER QUE GE APPLIANCES SEA PARTE DE SU HOGAR. Ya sea que haya crecido usando GE Appliances, o que ésta es su primera vez, nos complace tenerlo en la familia. Sentimos orgullo por el nivel de arte, innovación y diseño de cada uno de los electrodomésticos de GE Applianc...
Page 67 - LEA TODAS LAS INSTRUCCIONES ANTES DE USAR; LEA Y GUARDE ESTAS INSTRUCCIONES; ADVERTENCIA
49-3000230 Rev 0 3 INFORMACIÓN DE SEGURIDAD INFORMACIÓN IMPORTANTE DE SEGURIDAD LEA TODAS LAS INSTRUCCIONES ANTES DE USAR LEA Y GUARDE ESTAS INSTRUCCIONES Para reducir el riesgo de muerte, incendio, explosión, descargas eléctricas o lesiones sobre las personas al usar su electrodoméstico, siga las p...
Page 69 - INSTALACIÓN CORRECTA; CUANDO NO ESTÉ EN USO; INFORMACIÓN DE SEGURIDAD
49-3000230 Rev 0 5 LEA Y GUARDE ESTAS INSTRUCCIONES INSTALACIÓN CORRECTA La unidad se debe instalar y colocar correctamente de acuerdo con las instrucciones de instalación, antes de utilizarla. Ŷ Asegúrese de que la manguera de agua caliente esté conectada a la válvula “H” y que la manguera de agua ...
Page 70 - Puesta en Marcha; Introducción; Inicio rápido; USAR LA
6 49-3000230 Rev 0 Es posible que las funciones y apariencias varíen con relación a su modelo a lo largo del manual. Para reducir el riesgo de incendios, descargas eléctricas o heridas, lea las INFORMACIÓN IMPORTANTE DE SEGURIDAD antes de utilizar este electrodoméstico. ADVERTENCIA Puesta en Marcha ...
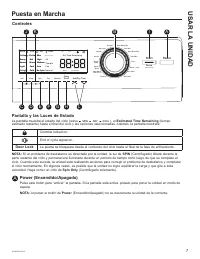
Page 71 - Controles; Pantalla y las Luces de Estado
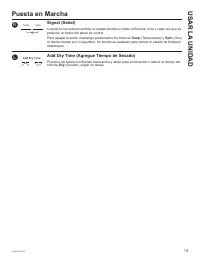
49-3000230 Rev 0 7 Puesta en Marcha Controles A Power (Encendido/Apagado) Pulse este botón para “activar” la pantalla. Si la pantalla está activa, púlselo para poner la unidad en modo de espera. NOTA: Al pulsar el botón de Power (Encendido/Apagado) no se desconecta la unidad de la corriente. Pantall...
Page 78 - Depósito de detergente; Compartimento para el detergente
14 49-3000230 Rev 0 Puesta en Marcha Depósito de detergente Abra lentamente el depósito de detergente tirando de él hasta que se detenga.Tras añadir los productos de lavado, ciérrelo despacio. Si cierra el depósito demasiado rápido, puede provocar que el suavizante o el detergente se administren ant...
Page 79 - Carga; Clasificación y Carga; Ejemplos de carga; Cargando para secar
49-3000230 Rev 0 15 Carga Siempre siga las instrucciones del fabricante de la ropa cuando lave. Clasificación y Carga Separe por color (blancos, claros, colores), nivel de suciedad, tipo de tela (algodones rústicos, limpieza fácil, delicados) y si la tela produce pelusa (tela de toalla, felpilla) o ...
Page 80 - Filtro de la bomba; Mangueras de suministro de aguas
16 49-3000230 Rev 0 Cuidado y limpieza CUIDADO Y LIMPIEZA Filtro de la bomba Limpie CADA MES para eliminar los elementos que se hayan podido quedar en el filtro o en la carcasa. Debido a la naturaleza de la unidad de carga frontal, es posible que a veces pasen partículas pequeñas a la bomba. La unid...
Page 81 - Zona del depósito de detergente; Desplazamiento y almacenamiento
49-3000230 Rev 0 17 CUIDADO Y LIMPIEZA Cuidado y limpieza Zona del depósito de detergente El detergente y el suavizante pueden acumularse en el depósito de detergente. Los residuos deben eliminarse una o dos veces al mes. • Saque el depósito tirando de él hasta que se detenga. Luego acerque la mano ...
Page 82 - Instrucciones; Combinación de Lavadora / Secadora; de instalación; ANTES DE COMENZAR; IMPORTANTE; Nota al instalador; UBICACIÓN DE LA UNIDAD; NO instale la unidad:; instalación; INSTALACIÓN EN CASAS RODANTES
18 49-3000230 Rev 0 Instrucciones Combinación de Lavadora / Secadora de instalación ANTES DE COMENZAR Lea detenidamente todas las instrucciones. • IMPORTANTE – Guarde estas instrucciones para uso del inspector local. • IMPORTANTE – Cumpla todos los códigos y ordenanzas regulatorias. • Nota al instal...
Page 83 - Instrucciones de instalación; DIMENSIONES DE CONEXIÓN
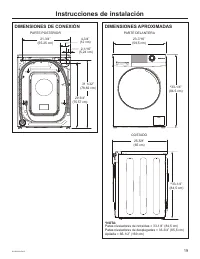
49-3000230 Rev 0 19 Instrucciones de instalación DIMENSIONES DE CONEXIÓN DIMENSIONES APROXIMADAS *NOTA: Patas niveladoras de retraídas = 33-1/4” (84,5 cm)Patas niveladoras de desplegadas = 33-3/4” (85,5 cm)Apilada = 66-1/2” (169 cm) PARTE POSTERIOR 21-3/4” (55,25 cm) 4-3/4” (12 cm) 2-1/16” (5,24 cm)...
Page 84 - DESEMBALAJE DE LA UNIDAD
20 49-3000230 Rev 0 Instrucciones de instalación 1. Corte y elimine todas las cintas de embalaje. 2. Mientras se encuentre dentro de la caja, coloque con cuidado la unidad sobre el costado de la misma. NO la tumbe por la parte delantera ni trasera. 3. Abra las tapas inferiores y retire todo el embal...
Page 86 - INSTALACIÓN DE LA UNIDAD
22 49-3000230 Rev 0 Instrucciones de instalación 1. Deje correr un poco de agua de los grifos de agua caliente y fría para purgar las tuberías de agua y eliminar las partículas que puedan obstruir los filtros de la válvula de agua. 2. Saque las tuberías de entrada de la bolsa de plástico. Quite las ...
Page 87 - Consejos para la solución de problemas; ANTES DE SOLICIT; Problema
49-3000230 Rev 0 23 Consejos para la solución de problemas ANTES DE SOLICIT AR EL SER VICIO TÉCNICO Problema Causas posibles Solución No hay drenajeNo hay rotaciónNo hay giro La carga está desequilibrada Redistribuya las prendas y accione el Rinse+Spin (Enjuague+Centrifugado).Aumente el tamaño de la...
Page 95 - Garantía limitada la lavadora / secadora GE Appliances; Haier; company; EXCLUSIÓN DE GARANTÍAS IMPLÍCITAS; Qué No Cubrirá GE Appliances:
49-3000230 Rev 0 31 GEAppliances.com Todo el servicio de garantía es provisto por nuestros Centros de Servicio de Fabricación, o un técnico autorizado de Servicio al Cliente (Customer Care®). Para programar una visita del servicio técnico, visítenos a través de Internet en GEAppliances.com/service ,...


 GE PTW700BPTDG User Manual
 GE PTW700BSTWS User Manual
 GE PTW705BPTDG User Manual
 GE PTW705BSTWS User Manual
 GE PTW900BPTRS User Manual
 GE GFW148SSMWW User Manual
 GE GFW550SSNWW User Manual
 GE GFW650SSNWW User Manual
 GE GFW850SPNRS User Manual
 GE GNW128PSMWW User Manual
 GE GNW128SSMWW User Manual
 GE GTW335ASNWW User Manual