Page 3 - TABLE OF CONTENTS
GB 1 Dear Customer, we would like to thank you and congratulate you on your choice. This new product has been carefully designed and built using top quality materials, and meticulously tested to ensure that it meets all your culinary requirements. Please read and observe these simple instructions, w...
Page 4 - SAFETY INSTRUCTIONS; it from the mains and call service.; - This appliance is not intended for use by persons; - Children may not perform cleaning and maintenance unsupervised.; Failure to do so could result in electrical shock or burns.
GB 2 SAFETY INSTRUCTIONS - Do not disassemble any parts prior to having disconnected the oven from the mains. - Do not use the appliance if any part is broken (for example a glass). Disconnect it from the mains and call service. - Before using the oven, it is recommended to make it operate at noload...
Page 5 - REMOVABLE GUIDES
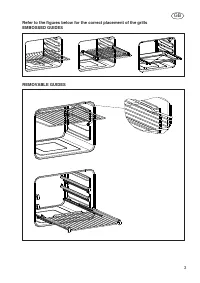
GB 3 Refer to the figures below for the correct placement of the grills EMBOSSED GUIDES REMOVABLE GUIDES
Page 6 - INSTALLATION OF THE OVEN; WARNING; Electricals; Maximum absorbed power:
GB 4 INSTALLATION OF THE OVEN To install the oven into the kitchen a cutout should be made in accordance with the dimensions shown in Fig. 1. The apparatus is to be fastened to the top by means of the two screws provided in the kit through the holes made on the oven uprights. The cabinet in which th...
Page 7 - Respect for the environment
GB 5 Respect for the environment The documentation for this appliance is printed on paper bleached without chlorine or recycled paper to contribute to protecting the environment. The packaging was designed to prevent damage to the environment; they are ecological products that can be recovered or re...
Page 8 - Min
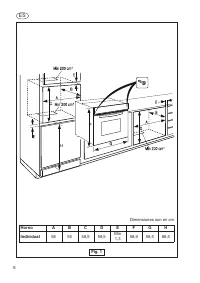
GB 6 H Appliances A B C D E F G H Single oven 56 55 58,5 59,5 Min 1,3 58,9 59,5 86,5 Dimensions are in centimeters Fig. 1
Page 9 - Connection to the electrical power mains; type
GB 7 Connection to the electrical power mains WARNING This apparatus must be earthed. The oven is only for domestic use. The feed voltage and the absorbed power are as indicated on the data plate attached to the left-hand side upright, which can be seen when the oven door is open. Connecting must be...
Page 10 - INSTRUCTIONS FOR USE; Oven Racks; Place rear of rack between
GB 8 INSTRUCTIONS FOR USE Oven Racks WARNING Never use aluminum foil to cover the oven racks or to line the oven. It can cause damage to the oven liner if heat is trapped under the foil. WARNING Make sure you do not force it to avoid damage to the enamel. The oven has rack guides at four levels. Rac...
Page 13 - to select the language you want; Demonstration mode
GB 11 Introduction to the oven Dear Customer, your new oven is controlled by an electronic board that constantly monitors its operation to improve its performance.The touch controls are state-of-the-art, precise and reliable.The interface is elegant, orderly and discrete, more intuitive than ever!A ...
Page 14 - the control; Setting the clock; for at least 3 seconds
GB 12 5 sec.!! PIZZA To disable the demonstration mode, touch the light symbol for five seconds: the control will go to normal operation and ready for turning on.Now you can set the time but it is not necessary for turning on the oven. Setting the clock PIZZA The oven will signal that it is connected...
Page 15 - ACTIONS THAT ARE POSSIBLE WITH THE OVEN OFF; - Change the Language
GB 13 ACTIONS THAT ARE POSSIBLE WITH THE OVEN OFF - Turn on oven light PIZZA The oven light is turned on/off by touching the symbol as shown in the figure. - Change the Language When the oven is off, you can change the language of the display by simultaneously selecting and the + in the lower right f...
Page 16 - button for at least 3 seconds.; key for at least 3 seconds.
GB 14 Key function (keypad lock) PIZZA The key function is activated/deactivated by pressing the button for at least 3 seconds. You can activate and deactivate the operating mode of the oven at any time. If the key symbol is ABSENT, it means that the KEYPAD LOCK function is not active. If the key sy...
Page 17 - The cooking functions
GB 15 MAIN FUNCTIONS Overview of the command panel Cooking functions Special function Temperature Clock Oven ON/OFFLock oven ON/OFF Programmin theoven Keypad lock Door lock PIZZA The cooking functions The provides eleven specific cooking functions!To activate a function, just touch the corresponding ...
Page 18 - Cooking functions; Each type of oven is provided for various cooking systems.; Icon; The light is on only.
GB 16 Cooking functions Each type of oven is provided for various cooking systems. Icon Mode Description Used for… The light is on only. --- In this mode only the fan inside of the chamber is running. This mode is used to defrost deepfrozen food. In this mode both upper (top) and lower (bottom) oven...
Page 20 - Instructions for use; Conventional cooking
GB 18 Instructions for use Conventional cooking A classic system that uses upper and lower heat suitable for cooking a single dish.It is a good idea to insert the food when the oven has reached its preset temperature, i.e., when the °C is locked and you have heard the beep.If you need to lower or ra...
Page 22 - Special functions; PIZZA MODE
GB 20 Eco-Bake This function is defined in order to obtain a consistent energy saving. The cooling fan is initially off and turns on only when the inner parts temperature gets high, then it works with the heating elements. Cooking might be a little bit slower than the standard Bake, especially when t...
Page 23 - DOUGH BASE PREPARATION; Pizza
GB 21 The secret to a good pizza is in the simplicity of a well-leavened dough, prepared and cooked well: use a small quantity of good quality toppings. DOUGH BASE PREPARATION Once you have a ball of leavened dough, slam it on the work surface to improve its elasticity, spread it with your fingertips...
Page 24 - Self clean; Turn on the oven with the power button and then press “CLEAN” key; Touch
GB 22 Self clean (only available in some models) PYRO or self-cleaning mode. The oven is cleaned by burning cooking residues at high temperature (about 475 °C) for from 1.5 to 3 hours. During the self-cleaning cycle, all the fumes produced are filtered and then vented outside. Turn on the oven with t...
Page 25 - the status of the latch mechanism at any time:; Oven light control
GB 23 the status of the latch mechanism at any time: ¾ Door unlocked, ; ¾ Door locked, . ¾ Latch moving, transition in progress, lock symbol flashing. Oven light control The light control is active on all the cooking functions and is independent, meaning that it can be switched on or off to suit your...
Page 26 - Simple cooking commands; MAX; Setting the temperature; and the setting range varies from +50 °C to MAX.
GB 24 Simple cooking commands Thanks to state-of-the-art controls, only two touches are required to set a cooking mode: turn on the oven and select the most suitable function for the dish you are about to cook… you choose it and you touch it! PIZZA MAX PIZZA The control suggests a temperature for ea...
Page 27 - Note: It is not possible to program preset recipes.
GB 25 Residual heat While cooking food, the structure of the oven stores heat. This heat is kept isolated from the rest of the kitchen thanks to generous heat insulation and certain construction techniques.This heat is gradually dissipated over time and can still be a resource in the kitchen, if it ...
Page 28 - Timer programming: cooking time; “Program finished remove the dish”
GB 26 Timer programming: cooking time Touch the timer symbol once and the relative symbol will light up. Plus, the clock display will replace the current time: The separator dots flash to indicate that you can program the cooking time. Once the cooking time is entered, the display will flash the curre...
Page 29 - Timer programming: delayed cooking; Prepare the roast for cooking and put it in the oven
GB 27 Set the end-of-cooking time by touching the “+” and “-” symbols. Once the end-of-cooking time is entered, the display will flash the current time again and the “end-of-cooking time” symbol will be lit. The countdown starts now. When the set time has been reached, the oven will beep and the heat...
Page 30 - The oven goes to standby mode, turning off the oven light.; Programming the timer: cancelling the program
GB 28 Now, set the end-of-cooking time: the control normally adds the cooking time to the current time, so it proposes an end-of-cooking time, which in our case would be 10:30 (8:30+2:00). Change the end-of-cooking time to what you want, in our example 13:00 The oven goes to standby mode, turning of...
Page 31 - Automatic functions: recipes
GB 29 Automatic functions: recipes To access the recipe function, proceed as follows: Turn on the oven with ; Select the AUTOMATIC function The display shows the 2 options:- personal recipes;- preset recipes Choose the desired setting with the buttons; using the button, confirm the choice;the followi...
Page 32 - Personalising recipes
GB 30 When finished with the settings, the display summarizes the recipe set. The colon in the cooking time (00:30) will be flashing to indicate that it can be changed.To change it, use the - + buttons. Or select the function directly and, in this way, the cooking program starts with a countdown of th...
Page 35 - DOOR LOCKING SYSTEM; When the door is fully locked
GB 33 DOOR LOCKING SYSTEM Automatic door locking during pyrolytic cycle For safety reasons, the door is locked automatically as soon as self-clean mode is selected. The door is also unlocked automatically when the clean time has expired but only after the temperature has fallen below the safety thre...
Page 36 - CLEANING AND MAINTENANCE; When the cycle is finished and the oven has
GB 34 CLEANING AND MAINTENANCE Prior to taking any action for cleaning, make sure the apparatus is cut-out from the mains. It is recommended that the oven interior be frequently cleaned. In particular, it should be cleaned every time the grill is used to prevent excessive fouling of the oven interio...
Page 37 - Oven door removal; To
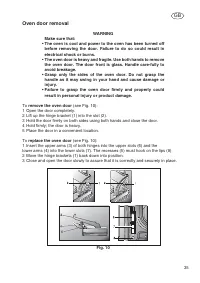
GB 35 Oven door removal WARNING Make sure that:• The oven is cool and power to the oven has been turned off before removing the door. Failure to do so could result in electrical shock or burns. • The oven door is heavy and fragile. Use both hands to remove the oven door. The door front is glass. Han...
Page 38 - Removing the “FULL GLASS” panoramic door
GB 36 Removing the “FULL GLASS” panoramic door WARNING Make sure that:• The oven is cool and power to the oven has been turned off before removing the door. Failure to do so could result in electrical shock or burns. • The oven door is heavy and fragile. Use both hands to remove the oven door. The d...
Page 40 - Replacement of the oven light; hands can damage the bulb when it becomes hot.
GB 38 Replacement of the oven light WARNING Make sure that: • The oven and lights are cool and power to the oven has been turned off before replacing the light bulb(s). Failure to do so could result in electrical shock or burns. • The lenses must be in place when using the oven. • The lenses serve t...
Page 41 - TABLE DES MATIERES
F 1 Cher Client, Vous venez d’acheter l’un de nos produits et nous vous en remercions vivement. Ce nouveau produit, minutieusement conçu et construit avec des matériaux de tout premier choix, a été soigneusement testé afin de satisfaire chacune de vos exigences en matière de cuisson. Nous vous prions...
Page 42 - GÉNÉRALITÉS; - Cet appareil n’est pas sensé être utilisé par des personnes; (y compris enfants de plus de 8; la lèchefrite ou d’autres choses.
F 2 GÉNÉRALITÉS - Avant de procéder au démontage d’une pièce, prenez soin de débrancher le câble du réseau électrique. - N’utilisez pas l’appareil si quelquesunes de ses parties sont cassées (par ex. La vitre). Débranchezle du réseau électrique et appelez l’assistance technique. - Avant de passer à ...
Page 43 - GLISSIÈRES DÉMONTABLES
F 3 Consulter les figures ci-dessous pour l’introduction correcte des grilles.GLISSIÈRES EMBOUTIES GLISSIÈRES DÉMONTABLES
Page 44 - INSTALLATION DU FOUR; ATTENTION; Caractéristiques électriques; Voltage d’alimentation:
F 4 INSTALLATION DU FOUR Pour encastrer le four dans le meuble, il suffira de faire une découpe ayant les dimensions indiquées en Fig. 1. Le four doit être fixé au meuble au moyen des deux vis fournies à cet effet dans les trous prévus sur les montants du four.La partie arrière de la niche ou le four ...
Page 45 - Respect de l’environnement
F 5 Respect de l’environnement La documentation relative à cet appareil est réalisée avec du papier blanchi, sans chlore, ou du papier recyclé, dans le but de contribuer à la protection de l’environnement. Les emballages sont conçus de manière à ne pas polluer la nature ; il s’agit de produits écolo...
Page 47 - Branchement du four au réseau électrique; Pour le branchement, utiliser un câble flexible du
F 7 Branchement du four au réseau électrique ATTENTION Cet appareil doit être relié à la terre. Le four est prévu exclusivement pour usage domestique. La tension d’alimentation et la puissance absorbée sont indiquées sur la plaquette située sur le montant de gauche, visible lorsque la porte est ouve...
Page 48 - INSTRUCTIONS POUR L’UTILISATION; Grilles de four
F 8 INSTRUCTIONS POUR L’UTILISATION Grilles de four ATTENTION N’utilisez jamais de feuilleen aluminium pour couvrir les grilles ou le fond du four. La chaleur coincée sous l’aluminium peut causer des dégâts au four. ATTENTION Veillez à ne pas forcer pour éviter d’endommager l’émail. Le four est pour...
Page 49 - Toujours enlever la grille rallonge avant l’autonettoyage.
F 9 Grille rallonge (si inclus) Cette grille facilite l’accès aux aliments cuisants. Elle s’allonge plus que la grille standard pour rapprocher les aliments de l’utilisateur. ATTENTION Assurez-vous: • Lorsque la grille est hors du four, les bras latéraux ne se verrouillent pas, ils peuvent s’allonge...
Page 51 - , sélectionner la langue; La modalità dimostrazione.; La modalité « démontration »
F 11 Présentation du four Cher Client, votre nouveau four est géré par une carte électronique qui en surveille le fonctionnement à tout instant, afin d’améliorer toutes les performances.Le contrôle touch control est de dernière génération, précis et fiable.L’interface est élégante, ordonnée et discrèt...
Page 52 - le contrôle fonctionne dans; Réglage de l’horloge; pendant au moins 3 secondes.
F 12 5 sec.!! PIZZA Pour désactiver la modalité «démonstration», appuyer pendant cinq secondes sur le symbole de l’éclairage: le contrôle fonctionne dans le mode normal: il est prêt pour la mise sous tension.À présent, il est possible (mais non nécessaire) de régler l’heure pour allumer le four. Rég...
Page 53 - - Changement de langue
F 13 ACTIONS POSSIBLES LORSQUE LE FOUR EST ÉTEINT - Tourner la lampe du four PIZZA On allume/éteint l’éclairage du four en effleurant le symbole d’après la figure. - Changement de langue Lorsque le four est éteint, on peut sélectionner la langue sur l’afficheur en sélectionnant simultanément et la touc...
Page 54 - pendant au moins
F 14 Fonction clé (blocage du clavier) PIZZA On active/désactive la fonction clé en appuyant sur la touche pendant au moins 3 secondes.Le mode de fonctionnement du four peut être activé/désactivé à tout moment. Le symbole clé ABSENT indique que la fonction BLOCAGE CLAVIER n’est pas active. Le symbol...
Page 55 - Les fonctions de cuisson
F 15 FONCTIONS PRINCIPALES: Vue d’ensemble du bandeau de commande Fonctions cuisson Procédures spéciales Température Horloge On/Off fourOn/Off blocage four Programmation dufour Blocage clavier Blocage porte PIZZA Les fonctions de cuisson Le contrôle met à disposition onze fonctions de cuisson spécifi...
Page 56 - Fonction de cuisson; Tout type de four offre des possibilités variées de cuisson.; Icône; Seulement l’éclairage est en fonction.
F 16 Fonction de cuisson Tout type de four offre des possibilités variées de cuisson. Icône Mode Description Utilisé pour… Seulement l’éclairage est en fonction. --- Dans ce mode de fonctionnement, seul le ventilateur interne de la cavité est en fonction. Ce mode sert à décongeler les aliments surge...
Page 58 - Instructions pour le fonctionnement; Cuisson conventionnelle
F 18 Instructions pour le fonctionnement Cuisson conventionnelle Système classique qui utilise la chaleur supérieure et inférieure indiquée pour la cuisson d’un seul plat.Il est bon que les aliments soient introduits quand le four a atteint la température préétablie, à savoir quand le °C s’est bloqu...
Page 60 - Cuisson éco; Fonctions spéciales; MODE PIZZA
F 20 Cuisson éco Cette fonction a été conçue pour assurer une économie d’énergie significative. Le ventilateur de refroidissement est initialement éteint et ne s’allume que quand la température des éléments internes s’élève, et il travaille alors avec les éléments chauffants. La cuisson pourra être u...
Page 61 - Introduire avant le
F 21 Le secret d’une bonne pizza réside dans la simplicité d’une pâte bien fermentée, bien fermentée et bien cuite : peu de garniture, mais de bonne qualité. Une fois que vous avez obtenu une boule de pâte levée, battez-la sur le plan de travail pour renforcer sa structure, étendez-la des bouts des ...
Page 62 - Self clean (disponible sur certains modèles seulement); Allumez le four puis appuyer sur la touche “CLEAN”.; sélectionnez la durée souhaitée en fonction de la saleté qui s’est
F 22 Self clean (disponible sur certains modèles seulement) PYRO ou en mode d’auto-nettoyage. Le four se nettoie en brûlant les résidus de cuisson à haute température (475°C environ) ; l’opération dure entre une heure et demie et trois heures. Toutes les fumées produites pendant le cycle d’auto-nett...
Page 63 - Porte déverrouillée,; Contrôle de la lumière du four
F 23 Le système verrouille aussi immédiatement la porte pour garantir la sécurité de l’utilisateur car la température à l’intérieur est très élevée. Un voyant de verrouillage sur l’affichage de température montre le statut du mécanisme de verrouillage à tout moment: ¾ Porte déverrouillée, ; ¾ Porte v...
Page 64 - Des gestes simples pour cuisiner; Réglage de la température; et le champ de réglage varie de +50°
F 24 Des gestes simples pour cuisiner La programmation du four met à votre disposition trois modalités pour le contrôle de la durée de cuisson. Celles-ci sont disponibles en étant couplées aux fonctions normales de cuisson, mais elles sont désactivées si vous utilisez la sonde à viande (voir chapitr...
Page 65 - Chaleur résiduelle; PROGRAMMATION DU FOUR
F 25 Chaleur résiduelle Pendant la cuisson des aliments, la structure du four emmagasine de la chaleur qui est maintenue isolée du reste de la cuisine grâce à un isolement thermique généreux et certains détails de construction.Cette chaleur est graduellement dispersée dans le temps et peut représent...
Page 66 - Programmation temporisateur: temps de cuisson; “Programme terminé, enlever le plat”; Programmation temporisateur: heure de fin de cuisson
F 26 Programmation temporisateur: temps de cuisson Effleurer une fois le symbole du temporisateur: le symbole correspondant s’allume. En outre, l’afficheur de l’horloge remplace l’indication de l’heure actuelle: Iles points de séparation clignotent, indiquant qu’il est possible de programmer le temps ...
Page 67 - Programmation temporisateur: cuisson différée; Préparez le rôti pour la cuisson et enfournez-le.
F 27 Programmer l’heure de fin de cuisson en effleurant les symboles « + » et « - ». Une fois que l’heure de fin de cuisson a été définie, l’afficheur indique encore l’heure actuelle et le symbole «fin cuisson» s’allume. À présent, le compte à rebours commence. Lorsque le temps sélectionné s’est écoulé, l...
Page 69 - Fonctions automatiques: recettes
F 29 Fonctions automatiques: recettes Pour avoir accès à la fonction recettes, exécutez la procédure suivante: Allumez le four à l’aide de la touche ; Sélectionnez la fonction AUTOMATIQUE L’afficheur indique les 2 options:- recettes personnelles;- recettes programmées Choisir la sélection souhaitée a...
Page 70 - Personnalisation des recettes
F 30 Au terme de la programmation, l’afficheur récapitule la recette sélectionnée.Les deux points de durée de la cuisson (00 :30) clignoteront.Modifier en effleurant les touches - + . Ou bien sélectionner directement la fonction ; le programme et le compte à rebours du temps sélectionné sur l’afficheur ...
Page 73 - SYSTÈME DE VERROUILLAGE DE PORTE; lorsque la porte est bien verrouillée
F 33 SYSTÈME DE VERROUILLAGE DE PORTE Verrouillage automatique porte pendant le cycle de pyrolyse Pour des raisons de sécurité, la porte est fermée automatiquement dès que le mode d’auto-nettoyage est sélectionné. La porte est aussi déverrouillée automatiquement lorsque la durée de nettoyage est exp...
Page 74 - NETTOYAGE ET ENTRETIEN; Lorsque le cycle est fini et que le four est; COMPLÈTEMENT REFROIDI; résidus brûlés du cycle d’auto-nettoyage avec un chiffon humide.
F 34 NETTOYAGE ET ENTRETIEN Avant de commencer tout nettoyage, soyez sûr que l’appareil n’est plus soustension. Il est recommandé de nettoyer fréquemment l’intérieur du four. En particulier, il devrait être nettoyé chaque fois que le grill est utilisé pour empêcher un encrassement excessif de l’inté...
Page 75 - Retrait de la porte du four; Pour
F 35 Retrait de la porte du four ATTENTION Assurez-vous que: • Le four est froid et qu’il est bien éteint avant d’enlever la porte sinon vous pouvez vous électrocuter ou vous brûler. • La porte du four est lourde et fragile. Utilisez vos deux mains pour enlever la porte du four. Le devant est en ver...
Page 76 - Dépose de la porte panoramique « FULL GLASS »
F 36 Dépose de la porte panoramique « FULL GLASS » ATTENTION Assurez-vous que: • Le four est froid et qu’il est bien éteint avant d’enlever la porte sinon vous pouvez vous électrocuter ou vous brûler. • La porte du four est lourde et fragile. Utilisez vos deux mains pour enlever la porte du four. Le...
Page 77 - que la partie esthétique ne se raye.
F 37 Comment démonter les vitres internes de la porte panoramique« FULL GLASS » 1. Mettre des gants de protection.2. Placer la porte sur un plan horizontal ; mettre une toile douce dessous pour éviter que la partie esthétique ne se raye. 3. Presser simultanément le bouton des deux bouchons latéraux ...
Page 78 - Pour remplacer une ampoule
F 38 Pour remplacer une ampoule ATTENTION Assurez-vous que: • Le four et que les lumières sont froides et que le four est bien éteint avant de remplacer les ampoules. Sinon vous risquez de vous électrocuter ou de vous brûler. • Les lentilles doivent être remises en place lorsque vous utilisez le fou...
Page 79 - INDICE
IT 1 Caro Cliente, sentitamente La ringraziamo e ci congratuliamo per la scelta da Lei fatta.Questo nuovo prodotto, accuratamente progettato e costruito con materiali di primissima qualità, e stato accuratamente collaudato per poter soddisfare tutte le Sue esigenze di una perfetta cottura.La preghia...
Page 80 - AVVERTENZE IMPORTANTI; Scollegarlo dalla rete elettrica e chiamare il servizio tecnico.; circa un’ora onde eliminare l’odore del materiale isolante.; all’interno del forno.; l’apparecchio in presenza di bambini.; superiori agli 8 anni); con ridotte capacità sensoriali o facoltà mentali, o mancanza di
IT 2 AVVERTENZE IMPORTANTI - Non smontare alcuna parte prima di aver scollegato il forno dalla rete elettrica. - Non usare l’apparecchio se qualche sua parte risulta rotta (p. es.: un vetro). Scollegarlo dalla rete elettrica e chiamare il servizio tecnico. - Prima di utilizzare il forno, è opportuno...
Page 81 - GUIDE SMONTABILI
IT 3 Fare riferimento alle figure sotto per il corretto inserimento delle griglieGUIDE STAMPATE GUIDE SMONTABILI
Page 82 - INSTALLAZIONE DEL FORNO; ) lasciare un passaggio d’aria di almeno 200; ATTENZIONE; CARATTERISTICHE ELETTRICHE; NOTA
IT 4 INSTALLAZIONE DEL FORNO Per l’installazione del forno nel mobile della cucina basta praticare un vano di incasso con le dimensioni indicate nella Fig. 1 (le dimensioni sono in mm). L’apparecchio deve essere fissato al mobile tramite le due viti fornite in dotazione, attraverso i fori praticati s...
Page 83 - Rispetto per l’ambiente
IT 5 Rispetto per l’ambiente La documentazione del presente apparecchio utilizza carta sbiancata, senza cloro, oppure carta ricilata allo scopo di contribuire alla protezione dell’ambiente.Gli imballaggi sono concepiti per non danneggiare l’ambiente; possono essere recuperati o riciclati essendo pro...
Page 85 - Collegamento del forno alla rete elettrica; ricordandosi di
IT 7 Collegamento del forno alla rete elettrica ATTENZIONE L’apparecchio deve essere collegato a terra. Il forno è solo per uso domestico.La tensione di alimentazione e la potenza assorbita sono indicate sulla targhetta posta sul montante sinistro, visibile a porta aperta. Il collegamento deve esser...
Page 86 - ISTRUZIONI PER L’USO; Griglie del forno; in avanti e toglierla.
IT 8 ISTRUZIONI PER L’USO Griglie del forno ATTENZIONE Non usare mai fogli di alluminio per coprire le griglie del forno o per rivestire il forno. Ciò può danneggiare il rivestimento del forno se il calore viene intrappolato sotto il foglio. ATTENZIONE Assicurarsi di non forzare la griglia per evita...
Page 87 - Griglie del forno allungabili (se presenti)
IT 9 Griglie del forno allungabili (se presenti) La griglia allungabile consente di accedere più facilmente ai cibi in cottura. Si allunga oltre la griglia piatta standard, portando il cibo più vicino all’utilizzatore. ATTENZIONE Rispettare le istruzioni fornite di seguito.• Quando la griglia è fuor...
Page 89 - selazionare la lingua desiderata; La modalità dimostrazione - DEMO MODE
IT 11 Presentazione del forno Caro Cliente, il suo nuovo forno è gestito da una scheda elettronica che si occupa di monitorarne in ogni istante il funzionamento per migliorarne le prestazioni, tutte.Il controllo touch control è di ultima generazione, preciso, affidabile.L’interfaccia è elegante, ordi...
Page 90 - Regolazione dell’orologio; per
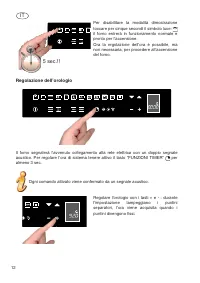
IT 12 5 sec.!! PIZZA Per disabilitare la modalità dimostrazione toccare per cinque secondi il simbolo luce: il forno entrerà in funzionamento normale e pronto per l’accensione.Ora la regolazione dell’ora è possibile, ma non necessaria, per procedere all’accensione del forno. Regolazione dell’orologi...
Page 91 - - Cambio della Lingua
IT 13 AZIONI POSSIBILI A FORNO SPENTO - Accensione luce del forno PIZZA La luce forno viene attivata/disattivata digitando il simbolo come in figura. - Cambio della Lingua A forno spento è possibile cambiare la Lingua nel display selezionandocontemporaneamente e il tasto + in basso a destra per almen...
Page 92 - per almeno 3 secondi.
IT 14 Funzione chiave (blocco tastiera) PIZZA La funzione chiave viene attivata/disattivata digitando il tasto per almeno 3 secondi. Si può attivare e disattivare in qualsiasi momento e modo di funzionamento del forno. Il simbolo della chiave ASSENTE specifica che la funzione DI BLOCCO TASTIERA non è...
Page 93 - Le funzioni di cottura
IT 15 FUNZIONI PRINCIPALI Panoramica del frontalino comandi Funzioni cottura Funzioni speciali Temperatura Orologio On/Off fornoOn/Off blocco forno Programmazionedel forno Blocco tastiera Blocco porta PIZZA Le funzioni di cottura Il controllo mette a disposizione ben tredici funzioni specifiche di co...
Page 94 - Funzioni cottura; Ogni tipo di forno è provvisto di vari modi cotture.; Icone
IT 16 Funzioni cottura Ogni tipo di forno è provvisto di vari modi cotture. Icone Modalità di utilizzo Utilizzi per Solo la lamapdina interna è in funzione --- In questa modalità solo la Ventola interna della cavità è in funzione. Questo modo è utilizzato per lo scongelamento dei cibi. In questo mod...
Page 96 - Istruzioni di funzionamento; Cottura convenzionale
IT 18 Istruzioni di funzionamento Cottura convenzionale Sistema classico che utilizza calore superiore ed inferiore adatto per la cottura di un solo piatto.E’ bene che il cibo venga inserito quando il forno ha raggiunto la temperatura prestabilita, cioè quando si è bloccato il °C e avete udito un bi...
Page 98 - Funzioni speciali
IT 20 Eco-Bake Questa funzione serve a ottenere un notevole risparmio di energia. Il ventilatore di raffreddamento all’inizio è spento e si accende solo quando la temperatura delle parti interne diventa alta, quindi funziona con gli elementi riscaldanti. La cottura potrebbe essere un po’ più lenta r...
Page 100 - Self clean (disponibile solo in alcuni modelli); Sfiorare il tasto
IT 22 Self clean (disponibile solo in alcuni modelli) PYRO o in modalità di auto-pulizia. Il forno viene pulito bruciando i residui di cottura ad alta temperatura (circa 475 ° C) la durata va da 1.30 h a 3 h. Durante il ciclo di auto-pulizia tutti i fumi prodotti vengono filtrati e poi espulsi in amb...
Page 101 - blocco attivato, operazione in corso, spia di blocco lampeggiante.; Controllo della luce forno
IT 23 Inoltre, la porta del forno si blocca immediatamente per garantire la sicurezza dell’utilizzatore, dato che la temperatura all’interno diventa caldissima. Un’icona con un lucchetto sul display della temperatura mostra lo stato del meccanismo di blocco: ¾ porta sbloccata, ; ¾ porta bloccata, . ...
Page 102 - Semplici gesti per cucinare; Regolazione della temperatura; e il campo di regolazione
IT 24 Semplici gesti per cucinare Bastano due semplici gesti per impostare una cottura grazie alla logica di controllo di ultima generazione: accendere il forno e scegliere la funzione più idonea alla pietanza che state per cucinare…la scegliete e semplicemente la toccate! PIZZA MAX PIZZA Il control...
Page 103 - NB: non è possibile programmare le ricette preimpostate.
IT 25 Calore residuo Durante la cottura dei cibi la struttura del forno immagazzina calore, questo calore è mantenuto isolato dal resto della cucina grazie ad un isolamento termico generoso e ad alcuni accorgimenti di costruzione.Questo calore viene disperso gradualmente nel tempo e può rappresentar...
Page 104 - Programmazione timer: tempo di cottura; Programma terminato estrarre la pietanza; Programmazione timer: ora di fine cottura
IT 26 Programmazione timer: tempo di cottura Toccare una volta il simbolo timer, si accenderà il simbolo relativo. Inoltre il display dell’orologio sostituirà l’indicazione dell’ora corrente. I puntini separatori lampeggiano ad indicare che è possibile programmare il tempo di cottura Una volta defini...
Page 105 - Programmazione timer: cottura posticipata; Preparate l’arrosto per la cottura, infornatelo
IT 27 Impostare l’ora di fine cottura toccando i simboli “+” e “-“. Una volta definita l’ora di fine cottura, il display visualizzerà ancora l’ora corrente, il simbolo “fine cottura” sarà acceso. A partire da ora inizia il conteggio. Raggiunta l’ora impostata, il forno lo segnalerà acusticamente, le res...
Page 107 - Funzioni automatiche: ricette
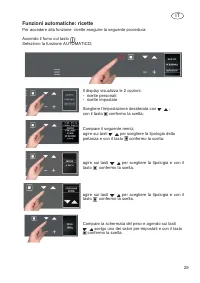
IT 29 Funzioni automatiche: ricette Per accedere alla funzione ricette eseguire la seguente procedura: Accendo il forno col tasto ; Seleziono la funzione AUTOMATICO; Il display visualizza le 2 opzioni:- ricette personali;- ricette impostate Scegliere l’impostazione desiderata con ; con il tasto conf...
Page 108 - Personalizzazione delle ricette; “Ricetta salvata POS. 001, e così via in numero crescente
IT 30 Al termine delle impostazioni il display riassume la ricetta impostata.I due punti del tempo durata cottura (00:40) saranno lampeggianti ad indicare la possibilità di poterlo modificare.Per modificarlo agire sui tasti - + . Oppure seleziono direttamente la funzione che sta lampeggiando e così in...
Page 111 - SISTEMA DI BLOCCO DELLA PORTA; Quando la porta è completamente bloccata.
IT 33 SISTEMA DI BLOCCO DELLA PORTA Blocco automatico della porta durante il ciclo pirolitico Per motivi di sicurezza, la porta si blocca automaticamente non appena viene selezionata la modalità auto-pulizia. La porta viene sbloccata automaticamente anche quando il tempo di pulizia è scaduto, ma sol...
Page 112 - PULIZIA E MANUTENZIONE; utilizzare
IT 34 PULIZIA E MANUTENZIONE Prima di effettuare tali operazioni è sempre opportuno, per ragioni di sicurezza, scollegare l’apparecchio dalla rete elettrica.È bene effettuare la pulizia all’interno del forno frequentemente e particolarmente dopo ogni utilizzazione del grill per evitare la formazione...
Page 113 - Rimozione della porta del forno
IT 35 Rimozione della porta del forno ATTENZIONE Rispettare le istruzioni fornite di seguito.• Il forno deve essere freddo e l’alimentazione scollegata prima di togliere la porta. In caso contrario, si potrebbero verificare ustioni o scossa elettrica. • La porta del forno è pesante e fragile. Usare e...
Page 114 - Rimozione della porta panoramica “FULL GLASS”
IT 36 Rimozione della porta panoramica “FULL GLASS” ATTENZIONE Rispettare le istruzioni fornite di seguito.• Il forno deve essere freddo e l’alimentazione scollegata prima di togliere la porta. In caso contrario, si potrebbero verificare ustioni o scossa elettrica. • La porta del forno è pesante e fr...
Page 115 - evitare graffi sulla parte estetica.
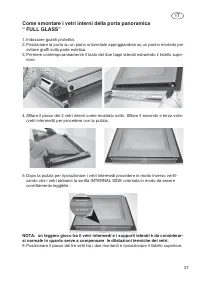
IT 37 Come smontare i vetri interni della porta panoramica“ FULL GLASS” 1. Indossare guanti protettivi.2. Posizionare la porta su un piano orizzontale appoggiandola su un panno morbido per evitare graffi sulla parte estetica. 3. Premere contemporaneamente il tasto dei due tappi laterali estraendo il ...
Page 116 - Sostituzione della luce del forno
IT 38 Sostituzione della luce del forno ATTENZIONE Rispettare le istruzioni fornite di seguito.• Il forno e le luci devono essere fredde e l’alimentazione deve essere scollegata prima di sostituire le lampadine. In caso contrario si potrebbero verificare ustioni o scossa elettrica. • I paraluce devon...
Page 118 - ADVERTENCIAS GENERALES; Desconectarlo de la red eléctrica y llamar la Asistencia técnica.; apagar el horno, mientras el mismo esté caliente.
ES 2 ADVERTENCIAS GENERALES - No desmontar ninguna parte antes de haber desconectado el aparato de la toma de corriente. - No utilizar el aparato si alguna suya está rota (por ejemplo el bindrio). Desconectarlo de la red eléctrica y llamar la Asistencia técnica. - Antes de poner en servicio el horno...
Page 119 - GUÍAS DESMONTABLES
ES 3 Para la colocación correcta de las rejas, consultar las figuras siguientesGUÍAS EMBUTIDAS GUÍAS DESMONTABLES
Page 120 - INSTALACION DEL HORNO; ATENCIÓN; Caracteristicas electricas; Potencia máxima absorbida:
ES 4 INSTALACION DEL HORNO Para instalar el horno en el mueble de las cocinas basta hacer un hueco en las mismas de las dimensiones indicadas en la Fig. 1.El aparato debe fijarse al mueble mediante los dos tornillos en dotación, a través de los agujeros hechos en los montantes del horno.El hueco de e...
Page 121 - Respeto por el medio ambiente
ES 5 Respeto por el medio ambiente La documentación del presente aparato utiliza papel blanqueado, sin cloro, o papel reciclado con la finalidad de contribuir en la protección del medio ambiente. Los embalajes se han concebido de forma que no perjudiquen el medio ambiente; se pueden recuperar o recic...
Page 123 - Conexion del horno a la red electrica; Para la conexión usar un cable flexible tipo
ES 7 Conexion del horno a la red electrica ATENCIÓN El aparato debe ser conectado a tierra. El horno es apto sólo para uso doméstico.La tensión de alimentación y la potencia absorbida están indicadas en la placa colocada sobre el montante izquierdo, visible con la puerta abierta.La conexión debe ser...
Page 124 - INSTRUCCIONES DE USO; Rejillas del horno; Agarre la rejilla y empújela ha-
ES 8 INSTRUCCIONES DE USO Rejillas del horno ATENCIÓN Nunca utilice papel de aluminio para tapar las rejillas del horno o para forrar el horno. El calor atrapado por debajo del papel de aluminio puede dañar el revestimiento del horno. ATENCIÓN Asegúrese de que no la ha forzado para evitar daños ales...
Page 127 - seleccione el idioma deseado con la tecla confirme la selección; modalidad; La modalidad demostración
ES 11 Presentación del horno Estimado cliente, su nuevo horno dispone de una tarjeta electrónica de gestión que se ocupa de monitorar en todo momento el funcionamiento para mejorar todas sus prestaciones.El sistema de control táctil es de última generación, preciso y fiable.La interfaz es elegante, o...
Page 128 - el sistema de control entrará en; Ajuste del reloj; durante por lo menos 3 segundos.
ES 12 5 sec.!! PIZZA Para desactivar la modalidad demostración toque durante cinco segundos el símbolo de la luz: el sistema de control entrará en funcionamiento normal y estará listo para el encendido.ahora el ajuste de la hora es posible, pero no es necesaria para encender el horno. Ajuste del rel...
Page 129 - - Configuración función temporizador “cuentaminutos”
ES 13 ACCIONES POSIBLES CON EL HORNO APAGADO - Encendido de la luz del horno PIZZA La luz del horno se activa/desactiva introduciendo mediante el teclado el símbolo tal como se muestra en la figura. - Cambio de idioma Con el horno apagado es posible cambiar el idioma en la pantalla de visualización s...
Page 130 - durante por lo menos 3
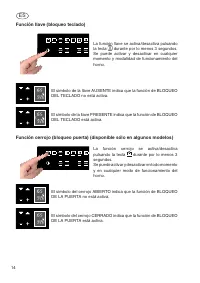
ES 14 Función llave (bloqueo teclado) PIZZA La función llave se activa/desactiva pulsando la tecla durante por lo menos 3 segundos. Se puede activar y desactivar en cualquier momento y modalidad de funcionamiento del horno. El símbolo de la llave AUSENTE indica que la función de BLOQUEO DEL TECLADO ...
Page 131 - Las funciones de cocción
ES 15 FUNCIONES PRINCIPALES Panorámica del frontal de los controles Funciones de cocción Funciones especiales Temperatura Reloj On/Off hornoOn/Off bloqueo horno Programación del horno Bloqueo teclado Bloqueo puerta PIZZA Las funciones de cocción El sistema de control pone a su disposición nada menos...
Page 132 - Sistemas de cocción; Cada modelo de horno cuenta con varios sistemas de cocción.; Icono
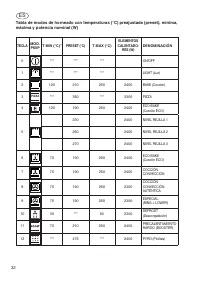
ES 16 Sistemas de cocción Cada modelo de horno cuenta con varios sistemas de cocción. Icono Descripción de la función Se utiliza para… Solo la luz del horno está en funcionamiento. --- En esta modalidad, solamente está en función el Ventilador interno de la cavidad. Esta función se utiliza para desc...
Page 134 - Instrucciones de funcionamiento; Cocción convencional
ES 18 Instrucciones de funcionamiento Cocción convencional Sistema clásico que utiliza calor superior e inferior, adecuado para la cocción de un único plato.Se recomienda introducir los alimentos cuando el horno ha alcanzado la temperatura deseada, es decir, cuando se bloquea el °C y se oye un bip s...
Page 136 - Horneado Eco; Funciones especiales; MODO PIZZA
ES 20 Horneado Eco Esta función ha sido concebida para ofrecer un ahorro de energía significativo. El ventilador de enfriamiento está apagado inicialmente, y solamente se enciende cuando sube la temperatura de los elementos internos, y después trabaja con los elementos calentadores. La cocción podrá ...
Page 138 - Self clean (disponible sólo en algunos modelos); Active el horno con la tecla de encendido y pulse la tecla “CLEAN”.; en función de la
ES 22 Self clean (disponible sólo en algunos modelos) PYRO o en modalidad de auto-limpieza. El horno se limpia quemando los residuos de cocción a temperatura elevada (aprox. 475 ° C) . La operación dura entre hora y media y tres horas. Durante el ciclo de auto-limpieza, todos los humos producidos se...
Page 139 - Puerta desbloqueada,; Control de la luz del horno
ES 23 El sistema también bloquea automáticamente la puerta para garantizar la seguridad del usuario ya que la temperatura en el interior es muy alta. Un icono que representa un cerrojo situado en el display de la temperatura muestra el estado del mecanismo de cerrojo en todo momento: ¾ Puerta desblo...
Page 140 - Gestos sencillos para cocinar; Ajuste de la temperatura; y el campo
ES 24 Gestos sencillos para cocinar Son suficientes dos sencillos gestos para configurar una cocción gracias a la lógica del sistema de control de última generación: encienda el horno y seleccione la función más adecuada al plato que quiere cocinar... selecciónela y tóquela... facilísimo! PIZZA MAX PI...
Page 141 - Nota: no es posible programar la recetas preprogramadas.
ES 25 Calor residuo Durante la cocción de los alimentos la estructura del horno almacena calor, este calor se mantiene aislado del resto de la cocina gracias a un aislamiento térmico generoso y a algunos detalles de la construcción.Este calor se dispersa gradualmente en el tiempo y puede representar...
Page 142 - Programación del temporizador: tiempo de cocción; “Programa terminado,; Programación del temporizador: hora de final de cocción
ES 26 Programación del temporizador: tiempo de cocción Toque una vez el símbolo temporizador, se encenderá el símbolo correspondiente. Además, la pantalla de visualización del reloj sustituirá la indicación de la hora corriente: los puntos separadores parpadean para indicar que es posible programar ...
Page 143 - Programación del temporizador: cocción aplazada; Prepare el asado para la cocción y colóquelo en el horno.
ES 27 Configure la hora de final de cocción tocando los símbolos “+” y “-”. Cuando haya establecido la hora de final de cocción, la pantalla de visualización visualizará todavía la hora corriente y el símbolo de “final de cocción” estará encendido. A partir de ahora empieza el cómputo. Cuando se haya al...
Page 145 - Funciones automáticas: recetas
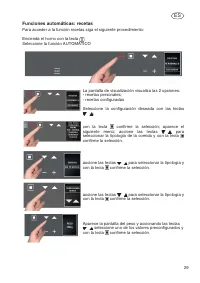
ES 29 Funciones automáticas: recetas Para acceder a la función recetas siga el siguiente procedimiento: Encienda el horno con la tecla ; Seleccione la función AUTOMÁTICO La pantalla de visualización visualiza las 2 opciones:- recetas personales;- recetas configuradas Seleccione la configuración desead...
Page 146 - Personalización de las recetas
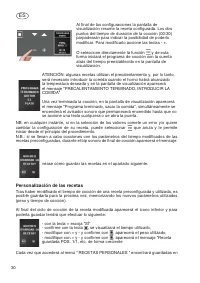
ES 30 Al final de las configuraciones la pantalla de visualización resume la receta configurada. Los dos puntos del tiempo de duración de la cocción (00:30) parpadearán para indicar la posibilidad de poderlo modificar. Para modificarlo accione las teclas - +. O seleccione directamente la función y de est...
Page 149 - SISTEMA DE BLOQUEO DE LA PUERTA; Cuando la puerta está totalmente bloqueada.
ES 33 SISTEMA DE BLOQUEO DE LA PUERTA Bloqueo automático de la puerta durante el ciclo por pirólisis Por razones de seguridad, la puerta se bloquea automáticamente en cuanto se selecciona la función de autolimpieza. La puerta se desbloquea automáticamente cuando el tiempo de limpieza termina pero so...
Page 150 - LIMPIEZA Y MANTENIMIENTO; Cuando termine el ciclo y el horno se haya; ENFRIADO COMPLETAMENTE,; elimine
ES 34 LIMPIEZA Y MANTENIMIENTO Antes de realizar cualquier operación de limpieza, asegúrese de que el equipo está desconectado. Le recomendamos que limpie el interior del horno frecuentemente. En especial, es necesario limpiarlo cada vez que se usa el grill para evitar que se formen demasiadas incru...
Page 151 - Quitar la puerta del horno; Para
ES 35 Quitar la puerta del horno ATENCIÓN Asegúrese de que:• El horno esté frío y de que se haya apagado la corriente antes de quitarla puerta. De otro modo podría causar una descarga eléctrica o quemaduras. • La puerta del horno es pesada y frágil. Use ambas manos para quitar la puerta. La parte fr...
Page 152 - Desmontaje de la puerta panorámica «FULL GLASS»
ES 36 Desmontaje de la puerta panorámica «FULL GLASS» ATENCIÓN Asegúrese de que:• El horno esté frío y de que se haya apagado la corriente antes de quitarla puerta. De otro modo podría causar una descarga eléctrica o quemaduras. • La puerta del horno es pesada y frágil. Use ambas manos para quitar l...
Page 153 - ve para evitar rayar la parte estética.
ES 37 Cómo desmontar los cristales internos de la puerta panorámica «FULL GLASS» 1. Ponerse guantes de protección.2. Poner la puerta encima de un plano horizontal, colocándola encima de un paño sua- ve para evitar rayar la parte estética. 3. Apretar simultáneamente las teclas de los dos tapones late...
Page 154 - Sustitución de la lámpara del horno; grasa de las manos podría dañar la bombilla cuando se calienta.
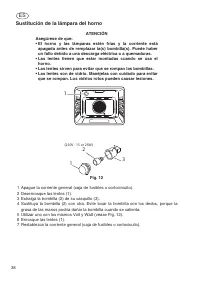
ES 38 Sustitución de la lámpara del horno ATENCIÓN Asegúrese de que:• El horno y las lámparas estén frías y la corriente está apagada antes de remplazar la(s) bombilla(s). Puede haber un fallo debido a una descarga eléctrica o a quemaduras. • Las lentes tienen que estar montadas cuando se usa el hor...
Page 155 - INDEX
DE 1 Sehr verehrte Kundin, sehr verehrter Kunde, wir danken Ihnen und beglückwünschen Sie zu Ihrer Wahl. Dieses neue, sorgfältig konzipierte und aus erstklassigen Materialien hergestellte Produkt wurde akkurat kontrolliert, um allen Ihren Bedürfnissen für das perfekte Kochen zu entsprechen. Wir bitt...
Page 156 - ACHTUNG; Stromnetz und wenden Sie sich an den technischen Kundendienst.; Herd bereits ausgeschaltet ist.; der Innenseite des Ofens.; besonders vorsichtig sein.; (einschließlich Kinder über 8
DE 2 ACHTUNG - Entfernen Sie keine Herdkomponenten, ohne vorher den Netzstecker zu ziehen.- Das Geraet nicht mit gebrochenen Teilen benutzen (z.B. das Glas). Loese es von dem Stromnetz und wenden Sie sich an den technischen Kundendienst. - Es wird empfohlen, den Herd vor dem ersten Gebrauch im leere...
Page 157 - AUSBAUBARE SCHIENEN
DE 3 ür das korrekte Einsetzen der Gitter wird auf die darunterliegenden Abbildungen verwiesenGEFORMTE SCHIENEN AUSBAUBARE SCHIENEN
Page 158 - DER EINBAU DES HERDES; Zum Einbau des Herdes wird ein Ausschnitt mit den in; ELEKTRISCHE ANGABEN; Maximale Leistungsaufnahme:
DE 4 DER EINBAU DES HERDES Zum Einbau des Herdes wird ein Ausschnitt mit den in Abb. 1 angegebenen Abmessungen benötigt (die Abmessungen sind in mm angegeben).Der Herd wird mit Hilfe der zwei mitgelieferten Schrauben gesichert, die durch die Löcher in der Herdoberseite geführt werden.Der Schrank, in...
Page 159 - Umweltverträglichkeit
DE 5 Umweltverträglichkeit Zum Schutz der Umwelt wurde für die Unterlagen zu diesem Geräts chlorfrei gebleichtes Papier oder Recyclingpapier verwendet. Die Verpackung wurde aus umweltfreundlichen Produkten hergestellt und kann daher wieder verwendet oder recycelt werden.Das Recyceln der Verpackung t...
Page 161 - Elektrischer anschluss; - Entfernen Sie etwa 12 cm der
DE 7 Elektrischer anschluss ACHTUNG Dieses gerät muss geerdet werden. Der Herd ist ausschließlich für den häuslichen Gebrauch konzipiert.Angaben zur Speisespannung und zur Leistungsaufnahme finden Sie auf dem Leistungsschild, das bei geöffneter Herdtür oben links am Herd zu erkennen ist. Der elektris...
Page 162 - GEBRAUCHSANWEISUNGEN; Grillroste des Backofens; Den Grillrost nach vorne
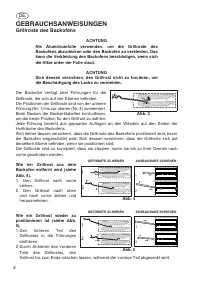
DE 8 GEBRAUCHSANWEISUNGEN Grillroste des Backofens ACHTUNG Nie Aluminiumfolie verwenden, um die Grillroste des Backofens abzudecken oder den Backofen zu verkleiden. Das kann die Verkleidung des Backofens beschädigen, wenn sich die Hitze unter der Folie staut. ACHTUNG Sich dessen versichern, den Gril...
Page 163 - Ausziehbare Grillroste des Backofens (wenn vorhanden)
DE 9 Ausziehbare Grillroste des Backofens (wenn vorhanden) Der ausziehbare Grillrost ermöglicht einen leichteren Zugang zu den Speisen, die gerade gebacken werden. Er wird über den flachen Standardgrillrost hinaus verlängert und bringt die Speise näher an den Verwender. ACHTUNG Die im Folgenden gelie...
Page 165 - )Tasten wird die gewünschte Sprache gewählt und mit der Taste ( ) die; Danach beginnt die Vorführungsfunktion.; Die Vorführungsfunktion
DE 11 Vorstellung des Ofens Geehrter Kunde, Ihr neuer Ofen wird von einer Leiterplatine gesteuert, die für eine ständige Verbesserung der Leistungen den Betrieb überwacht.Das Berührungsbedienfeld der letzten Generation ist präzise und zuverlässig.Die Schnittstelle ist elegant, unauffällig, geordnet ...
Page 166 - Einstellung der Uhrzeit; mindestens
DE 12 5 sec.!! PIZZA Zum Deaktivieren des Vorführungsmodus muss das Lichtsymbol fünf Sekunden betätigt werden, wonach die Steuerung in den Normalbetrieb übergeht und einschaltbereit ist. Nun kann auf Wunsch die Uhrzeit für die Einschaltung des Ofens eingestellt werden. Einstellung der Uhrzeit PIZZA ...
Page 167 - - Einstellen der Timerfunktion „Minutenzähler“
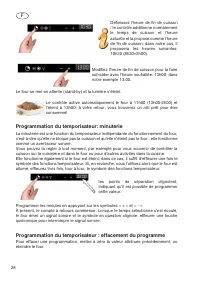
DE 13 MÖGLICHE TÄTIGKEITEN BEI ABGESCHALTETEM OFEN - Einschalten des Ofenlichtes PIZZA Bei Betätigung des Symbols (siehe Abb.) wird das Ofenlicht ein- bzw. abgeschaltet. - Sprachenänderung Bei ausgeschaltetem Ofen können Sie die Display-Sprache ändern, wenn Sie gleichzeitig und die Taste + unten rec...
Page 168 - mindestens 3
DE 14 Sperrfunktion (Tastensperre) PIZZA Die Sperrfunktion wird freigegeben/deaktiviert, wenn die Taste mindestens 3 Sekunden betätigt wird. Diese Funktion kann jederzeit und in jeder Betriebweise des Ofens aktiviert und deaktiviert werden. Wenn das Schlüsselzeichen NICHT leuchtet, dann ist die TAST...
Page 169 - Die Garfunktionen
DE 15 HAUPTFUNKTIONEN Übersicht über das Bedienfeld Garfunktionen Sonderfunktionen Temperatur Uhrzeit Ofen EIN/AUSOfensperre EIN/AUS Programmierendes Ofens Tastensperre Türverriegelung PIZZA Die Garfunktionen Die Steuerung hat elf verschiedene Garfunktionen!Zum Schalten einer Funktion genügt es, wen...
Page 170 - Kochmodi; Symbol; Nur das Licht ist an.
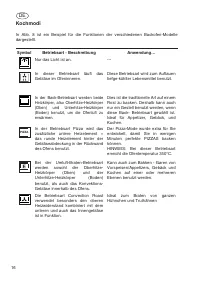
DE 16 Kochmodi In Abb. 8 ist ein Beispiel für die Funktionen der verschiedenen Backofen-Modelle dargestellt. Symbol Betriebsart - Beschreibung Anwendung… Nur das Licht ist an. --- In dieser Betriebsart läuft das Gebläse im Ofeninneren. Diese Betriebsart wird zum Auftauen tiefge-kühlter Lebensmittel ...
Page 172 - Betriebsanleitung; Konventionelles backen
DE 18 Betriebsanleitung Konventionelles backen Klassisches System mit Ober- und Unterhitze, das für das Garen eines einzigen Gerichts geeignet ist.Es empfiehlt sich, das Gericht in den Ofen zu schieben, wenn dieser die vorbestimmt Temperatur erreicht hat, also wenn die Gradzahl fix leuchtet und ein Si...
Page 174 - Sonderfunktionen
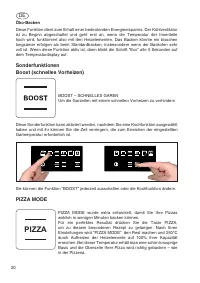
DE 20 Öko-Backen Diese Funktion dient zum Erhalt einer bedeutenden Energieersparnis. Der Kühlventilator ist zu Beginn abgeschaltet und geht erst an, wenn die Temperatur der Innenteile hoch wird, funktioniert also mit den Heizelementen. Das Backen könnte ein bisschen langsamer erfolgen als beim Stand...
Page 176 - Self clean (nur bei einigen Modellen vorhanden); ederzeit die Taste
DE 22 Self clean (nur bei einigen Modellen vorhanden) PYRO oder in Betriebsart Selbstreinigung (Pyrolyse). Der Ofen wird durch Verbrennen der Lebensmittelreste bei hoher Temperatur (circa 475 ° C) gereinigt. Der Vorgang dauert zwischen 1.30 h und 3 h. Während der Pyrolyse werden alle entstehenden Dä...
Page 177 - Steuerung der Ofenbeleuchtung
DE 23 Geschwindigkeit, wenn die Innenteile heiß werden. Die Backofentemperatur wird automatisch auf 475°C eingestellt, um den Hohlraum perfekt zu reinigen.Außerdem blockiert die Tür des Backofens sofort, um die Sicherheit des Bedieners zu gewährleiten, angesichts dessen, dass die Innentemperatur seh...
Page 178 - Ofenprogrammierung; Restwärme; und Sie
DE 24 Ofenprogrammierung Die Programmierung des Ofens bietet Ihnen drei Möglichkeiten zur Steuerung der Garzeit. Diese sind in Kombination mit den normalen Garfunktionen verfügbar. Wenn Sie das Bratenthermometer benutzen, werden sie hingegen deaktiviert (siehe entsprechendes Kapitel). PIZZA MAX PIZZ...
Page 180 - Timerprogrammierung: Garzeit; Gericht herausnehmen”; Timerprogrammierung: Garzeitende
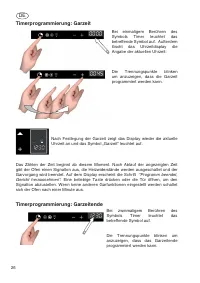
DE 26 Timerprogrammierung: Garzeit Bei einmaligem Berühren des Symbols Timer leuchtet das betreffende Symbol auf. Außerdem löscht das Uhrzeitdisplay die Angabe der aktuellen Uhrzeit: Die Trennungspunkte blinken um anzuzeigen, dass die Garzeit programmiert werden kann. Nach Festlegung der Garzeit zei...
Page 181 - Timerprogrammierung: Verzögerung des Garbeginns; Den Braten vorbereiten und in den Ofen schieben.
DE 27 Danach kann durch Berühren der Symbole “+” und “-” die Uhrzeit für das Garende eingestellt werden. Sobald das Garzeitende festgelegt wurde, zeigt das Display wieder die aktuelle Uhrzeit an und das Symbol „Garende“ leuchtet auf. Ab diesem Zeitpunkt beginnt die Zeitzählung. Nach Ablauf der angeg...
Page 183 - Automatische funktionen: rezepte
DE 29 Automatische funktionen: rezepte Für den Zugriff auf die Rezeptfunktion gehen Sie bitte folgendermaßen vor: Schalten Sie den Ofen ein mit der Taste ; Wählen Sie die Funktion AUTOMATIK Das Display zeigt die 2 OptionenAuf dem Display werden 2 Optionen angezeigt:- eigene Rezepte- eingestellte Rez...
Page 184 - Individuelle rezeptgestaltung; “ Rezept gespeichert POS. 001”, und so weiter mit steigender Zahl
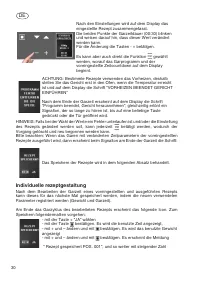
DE 30 Nach den Einstellungen wird auf dem Display das eingestellte Rezept zusammengefasst.Die beiden Punkte der Garzeitdauer (00:30) blinken und weisen darauf hin, dass dieser Wert verändert werden kann. Für die Änderung die Tasten - + betätigen. Es kann aber auch direkt die Funktion gewählt werden,...
Page 187 - SPERRSYSTEM DER TÜR; Wenn die Tür vollständig gesperrt ist.
DE 33 SPERRSYSTEM DER TÜR Automatische Sperrung der Tür während des Pyrolysezyklus Aus Sicherheitsgründen sperrt die Tür automatisch, sobald die Funktionsweise der Selbstreinigung gewählt wird. Die Tür wird auch automatisch entsperrt, wenn die Reinigungszeit vorbei ist, aber erst, nachdem die Temper...
Page 188 - SÄUBERUNG UND WARTUNG; WARNUNG; Wenn der Zyklus beendet und der Backofen; VOLLSTÄNDIG ABGEKÜHLT
DE 34 SÄUBERUNG UND WARTUNG Vor jeder Säuberung bzw. Wartung muss sichergestellt werden, dass die Stromzufuhr unterbrochen ist. Der Innenraum des Backofens sollte regelmäßig gesäubert werden. Insbesondere der Grill sollte nach jedem Grillvorgang gründlich gereinigt werden, damit schlechte Gerüche od...
Page 189 - Entfernen der Backofentür; in der richtigen und sicheren Position befindet.
DE 35 Entfernen der Backofentür ACHTUNG Die im Folgenden gelieferten Anweisungen einhalten.• Der Backofen muss kalt und der Netzstecker muss gezogen sein, bevor die Tür entfernt wird. Ansonsten könnten Verbrennungen oder elektrische Schläge auftreten. • Die Tür des Backofens ist schwer und zerbrechl...
Page 190 - Entfernung der Panoramatür „FULL GLASS“; richtigen und sicheren Position befindet.
DE 36 Entfernung der Panoramatür „FULL GLASS“ ACHTUNG Die im Folgenden gelieferten Anweisungen einhalten.• Der Backofen muss kalt und der Netzstecker muss gezogen sein, bevor die Tür entfernt wird. Ansonsten könnten Verbrennungen oder elektrische Schläge auftreten. • Die Tür des Backofens ist schwer...
Page 192 - Ersetzen des Backofenlichts
DE 38 Ersetzen des Backofenlichts ACHTUNG Die im Folgenden gelieferten Anweisungen einhalten.• Der Backofen und die Lichter müssen kalt sein und der Netzstecker muss gezogen sein, bevor die Glühbirnen ersetzt werden. Ansonsten könnten Verbrennungen oder elektrische Schläge auftreten. • Die Lampensch...
Page 193 - ÍNDICE
PT 1 Prezado Cliente, Agradecemos e congratulamo-nos pela sua escolha. Este novo produto, cuidadosamente projectado e fabricado com materiais de primeiríssima qualidade, foi meticulosamente testado para poder satisfazer todas as suas exigências para uma perfeita cozedura. Portanto, pedimos-lhe que l...
Page 194 - ADVERTÊNCIAS IMPORTANTES; Desconecta-o da linha eléctrica e chame a assistência técnica.; aprox. uma hora, para eliminar o cheiro do material isolante.; nem depois de ter estado a funcionar, salvo que se tomem precauções.
PT 2 ADVERTÊNCIAS IMPORTANTES - Não desmontar nenhuma parte antes de desligar o aparelho da tomada de corrente eléctrica. - Não use o aparelho se alguma das susas partes estiver partida (por ex. o vidro). Desconecta-o da linha eléctrica e chame a assistência técnica. - Antes de utilizar o forno acon...
Page 195 - GUIAS REMOVÍVEIS
PT 3 Utilize as figuras abaixo como referência para a correta introdução das grelhas GUIAS EM RELEVO GUIAS REMOVÍVEIS
Page 196 - INSTALAÇÃO DO FORNO; ATENÇÃO; Características eléctricas; Potência máxima absorvida:
PT 4 INSTALAÇÃO DO FORNO Para instalar o forno no móvel da cozinha, basta ter um espaço no mesmo com as dimensões indicadas na Fig. 1.O aparelho deve ser fixado ao móvel com os dois parafusos fornecidos, através dos orifícios feitos nos montantes do forno.O espaço para engastar o forno deve ter a par...
Page 197 - Respeito pelo ambiente
PT 5 Respeito pelo ambiente A documentação deste aparelho é realizada com papel embranquecido sem cloro ou papel reciclado com a finalidade de contribuir para a protecção do meio ambiente. As embalagens forem projectadas para não prejudicar o meio ambiente; podem ser recuperadas ou recicladas, pois s...
Page 199 - Ligação do forno à corrente eléctrica; min
PT 7 Ligação do forno à corrente eléctrica ATENÇÃO O aparelho deve ser ligado à terra. O forno só é apropriado para uso doméstico.A tensão de alimentação e a potência absorvida estão indicadas na placa colocada sobre o montante esquerdo, visível com a porta aberta. A ligação deve ser efectuada por p...
Page 200 - INSTRUÇÕES DE UTILIZAÇÃO; Prateleiras de forno; Coloque a parte de trás da
PT 8 INSTRUÇÕES DE UTILIZAÇÃO Prateleiras de forno ATENÇÃO Nunca use folha de alumínio para cobrir as prateleiras ou para revestir o forno. Pode danificar o revestimento se o calor ficar aprisionado por baixo do alumínio. ATENCIÓN Certifique-se de que não a força para evitar danos no esmalte. O forno t...
Page 201 - Prateleiras extensíveis de forno (caso existam)
PT 9 Prateleiras extensíveis de forno (caso existam) A prateleira extensível permite um acesso mais fácil aos cozinhados. Prolonga-se para além da prateleira plana standard para permitir aproximar mais os cozinhados do utilizador. ATENÇÃO Certifique-se de que:• Quando a prateleira está fora do forno,...
Page 203 - , seleccione o idioma; A modalidade de demonstração
PT 11 Apresentação do forno Caro Cliente, o seu novo forno é controlado por uma placa electrónica que monitora, a cada instante, o funcionamento, para melhorar o seu rendimento.O controlo touch control é de última geração, preciso e fiável.A interface é elegante, organizada e discreta, altamente intu...
Page 204 - controlo passará ao; Regulação do relógio; durante pelo menos 3 seg.
PT 12 5 sec.!! PIZZA Para desabilitar a modalidade de demonstração, prima durante cinco segundos o símbolo luz: controlo passará ao funcionamento normal e estará pronto para ser accionado.Então, regular a hora será possível, mas não necessário, para prosseguir com o accionamento do forno. Regulação ...
Page 205 - escolha o idioma e confirme a escolha com .; - Configuração da função temporizador “contagem dos minutos”; O forno é activado mediante o símbolo
PT 13 ACÇÕES POSSÍVEIS COM O FORNO DESLIGADO - Activação da luz do forno PIZZA A luz do forno é activada/desactivada tocando o símbolo, como mostrado na figura. - Mudança do Idioma Com o forno desligado é possível modificar a Língua no ecrã premendo, simultaneamente, e a tecla +, em baixo à direita, d...
Page 206 - durante pelo menos 3; durante pelo menos
PT 14 Função chave (bloqueio do teclado) PIZZA A função chave é activada/desactivada com a pressão da tecla durante pelo menos 3 segundos. Pode ser activada ou desactivada a qualquer momento e com qualquer modo de funcionamento do forno. O símbolo da chave AUSENTE indica que a função DE BLOQUEIO DO ...
Page 207 - As funções de cozedura
PT 15 FUNÇÕES PRINCIPAIS Panorâmica do painel de comandos Funções de cozedura Funções especiais Temperatura Relógio On/Off fornoOn/Off bloqueio do forno Programaçãodo forno Bloqueiodo teclado Bloqueio da Porta PIZZA As funções de cozedura O controlo deixa à disposição onze funções específicas de coze...
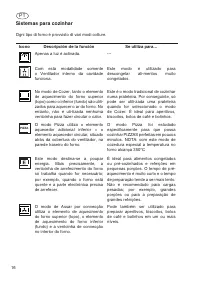
Page 208 - Sistemas para cozinhar; Apenas a luz é activada.
PT 16 Sistemas para cozinhar Ogni tipo di forno è provvisto di vari modi cotture. Icono Descripción de la función Se utiliza para… Apenas a luz é activada. --- Com esta modalidade somente o Ventilador interno da cavidade funciona. Este modo é utilizado para descongelar ali-mentos muito congelados. N...
Page 210 - Instruções de funcionamento; Modo convencional
PT 18 Instruções de funcionamento Modo convencional Sistema clássico que utiliza calor superior e inferior, apropriado para a cozedura de um único prato. O alimento deve ser introduzido quando o forno tiver alcançado a temperatura preestabelecida, ou seja, quando o °C estiver bloqueado e após a emis...
Page 212 - Funções especiais
PT 20 Cozedura-Eco Essa função é seleccionada para obter uma poupança energética consistente. O ventilador de refrigeração é inicialmente mantido desligado e é accionado apenas quando a temperatura das partes internas for alta; a partir de então passa a trabalhar com os elementos de aquecimento. A c...
Page 213 - (nunca utilizar papel vegetal ou outro suporte); e configurar o tipo de pizza preparada,; Fina; Grelha PIZZA; Inserir antes do
PT 21 O segredo de uma boa pizza está na simplicidade de uma massa bem fermentada, curada e bem cozida: qualquer ingrediente colocado sobre ela deve ser em pouca quantidade e de boa qualidade. Depois de obter uma bola de massa fermentada, sová-la contra a superfície de trabalho para reforçar a sua e...
Page 214 - Self clean (disponível apenas em alguns modelos); Prima o botão
PT 22 Self clean (disponível apenas em alguns modelos) PYRO ou modalidade de autolimpeza. A limpeza do forno é feita queimando os resíduos de cozedura a alta temperatura (cerca de 475 ° C) durante um período que varia de 1.30 h a 3 h. Durante o ciclo de autolimpeza, todos os fumos produzidos são filt...
Page 215 - Mudança de estado, transição em curso, led da trava a piscar.; Controlo da luz do forno
PT 23 A temperatura do forno é automaticamente configurada como 475°C para limpar perfeitamente a cavidade.O controlo também trava a porta imediatamente para garantir a segurança do utilizador, pois a temperatura interna é muito alta. Um ícone que representa um cadeado, no ecrã da temperatura, exibe ...
Page 216 - Simples gestos para cozinhar; Regulação da temperatura
PT 24 Simples gestos para cozinhar Bastam dois simples gestos para configurar uma cozedura graças à lógica de controlo de última geração: activar o forno e escolher a função adequada para o prato a cozinhar… escolha a função e simplesmente toque-a! PIZZA MAX PIZZA O controlo propõe uma temperatura pa...
Page 217 - Nota: não é possível programar as receitas predefinidas.
PT 25 Calor residual Durante a cozedura dos alimentos, a estrutura do forno armazena calor e este calor é mantido isolado do resto da cozinha graças a um bom isolamento térmico e a algumas técnicas de fabricação.Este calor é disperso gradualmente com o passar do tempo e, ainda, pode se tornar um rec...
Page 218 - Programação do temporizador: tempo de cozedura; “Programa terminado, extrair o prato”; Programação do temporizador: hora de término da cozedura
PT 26 Programação do temporizador: tempo de cozedura Toque uma vez o símbolo temporizador, o respectivo símbolo acenderá. Ainda, o ecrã do relógio substituirá a indicação da hora corrente: Os dois pontos piscam para indicar que é possível programar o tempo de cozedura. Depois de definido o tempo de c...
Page 219 - Programação do temporizador: cozedura temporizada; Prepare a carne a ser cozida e coloque-a no forno.
PT 27 Programe a hora de término da cozedura tocando os símbolos “+” e “-“ Depois de definida a hora de término da cozedura, o ecrã exibirá de novo a hora corrente e o símbolo “término da cozedura” acenderá. A partir de então começará a contagem. Depois de alcançada a hora programada, o forno emitirá...
Page 221 - Funções automáticas: receitas
PT 29 Funções automáticas: receitas Para ter acesso às funções das receitas, realize o seguinte procedimento: Ligue o forno com a tecla ; Seleccione a função AUTOMÁTICA ; No ecrã são exibidas as 2 opções:- receitas pessoais;- receitas programadas Escolha a programação desejada com as teclas ; com a ...
Page 222 - Personalização das receitas
PT 30 Ao terminar as programações, no ecrã é exibida a receita programada. Os dois pontos do tempo de duração da cozedura (00:30) piscam, para indicar a possibilidade de modificá-lo. Para modificá-lo utilize as teclas - + . Ou seleccione directamente a função para iniciar, assim, o programa de cozedur...
Page 225 - SISTEMA DE BLOQUEIO DA PORTA; Quando a porta está totalmente bloqueada
PT 33 SISTEMA DE BLOQUEIO DA PORTA Bloqueio automático da porta durante o ciclo pirolítico Por motivos de segurança, a porta é bloqueada automaticamente assim que o modo de auto-limpeza é seleccionado. A porta também é desbloqueada automaticamente quando o tempo de limpeza terminar, mas só depois de...
Page 226 - LIMPEZA E MANUTENÇÃO; Quando o ciclo terminar e o forno tiver; ARREFECIDO POR COMPLETO
PT 34 LIMPEZA E MANUTENÇÃO Antes de proceder a qualquer acção de limpeza, certifique-se de que o aparelho está desligado da alimentação eléctrica.Recomenda-se que o interior do forno seja limpo com frequência. Em particular, deve ser limpo sempre que a grelha for utilizada, para impedir incrustações ...
Page 227 - Retirar a porta do forno
PT 35 Retirar a porta do forno ATENÇÃO Certifique-se de que:• O forno está frio e que o forno foi desligado da alimentação antes de retirar a porta. Caso contrário, pode sofrer um choque eléctrico ou queimaduras. • A porta do forno é pesada e frágil. Utilize ambas as mãos para retirar a porta do forn...
Page 228 - Remoção da porta panorâmica “FULL GLASS”
PT 36 Remoção da porta panorâmica “FULL GLASS” ATENÇÃO Certifique-se de que:• O forno está frio e que o forno foi desligado da alimentação antes de retirar a porta. Caso contrário, pode sofrer um choque eléctrico ou queimaduras. • A porta do forno é pesada e frágil. Utilize ambas as mãos para retirar...
Page 229 - Como desmontar os vidros da porta panorâmica “FULL GLASS”; para evitar riscos na parte estética.
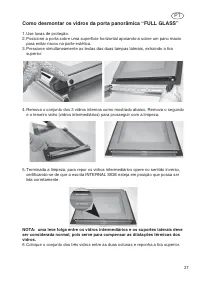
PT 37 Como desmontar os vidros da porta panorâmica “FULL GLASS” 1. Use luvas de proteção.2. Posicione a porta sobre uma superfície horizontal apoiando-a sobre um pano macio para evitar riscos na parte estética. 3. Pressione simultaneamente as teclas das duas tampas laterais, extraindo a tira superio...
Page 230 - Substituir a lâmpada do forno; natural das mãos poderá danificar a lâmpada quando estaaquecer.
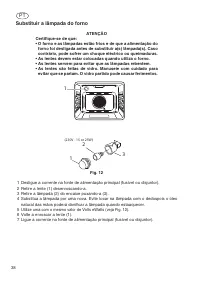
PT 38 Substituir a lâmpada do forno ATENÇÃO Certifique-se de que:• O forno e as lâmpadas estão frios e de que a alimentação do forno foi desligada antes de substituir a(s) lâmpada(s). Caso contrário, pode sofrer um choque eléctrico ou queimaduras. • As lentes devem estar colocadas quando utiliza o fo...
Page 232 - WAARSCHUWING; van het stroomnet en wend u zich tot de technische klantendienst.; is – zelfs nadat de oven is uitgeschakeld.; uit de buurt gehouden worden.; - Dit toestel is niet bedoeld om te worden gebruikt door mensen; (met inbegrip van kinderen; krassen op het glas kunt maken waardoor het kan gaan barsten.
NL 2 WAARSCHUWING - Voor u een onderdeel demonteert, moet u controleren of de kabel van het netwerk is losgekoppeld. - Het toestel niet met gebroken onderdelen gebruiken (vb. het glas). Ontkoppel het van het stroomnet en wend u zich tot de technische klantendienst. - Voor u de oven voor de eerste ke...
Page 233 - UITNEEMBARE GELEIDERS
NL 3 Men verwijst naar de tekeningen onderaan voor een juiste plaatsing van de roostersUITSTEKENDE GELEIDERS UITNEEMBARE GELEIDERS
Page 234 - INSTALLATIE VAN DE OVEN; OPGELET; ELEKTRISCHE EIGENSCHAPPEN; Geabsorbeerd vermogen:
NL 4 INSTALLATIE VAN DE OVEN Om de oven in het meubel in te bouwen, volstaat het om een uitsnijding te maken met de afmetingen die in Afb. 1 staan vermeld (de afmetingen zijn in mm weergegeven). De oven moet aan het meubel worden vastgemaakt met behulp van de twee meegeleverde schroeven, die in de g...
Page 235 - Respect voor het milieu
NL 5 Respect voor het milieu De documentatie van dit apparaat bestaat uit chloorvrij gebleekt papier, of gerecycleerd papier teneinde bij te dragen tot de bescherming van het milieu.De verpakkingen zijn ontworpen om schade aan het milieu te voorkomen; deze kunnen worden teruggewonnen of gerecycleerd...
Page 237 - - Verwijder ongeveer 12 cm van de
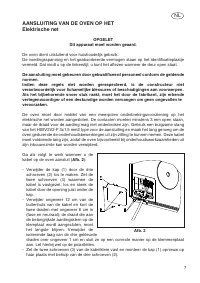
NL 7 AANSLUITING VAN DE OVEN OP HETElektrische net OPGELET Dit apparaat moet worden geaard. De oven dient uitsluitend voor huishoudelijk gebruik. De voedingsspanning en het geabsorbeerde vermogen staan op het identificatieplaatje vermeld. Dat vindt u op de linkerstijl; u kunt het aflezen wanneer de de...
Page 238 - GEBRUIKSAANWIJZINGEN; Ovenbakplaten
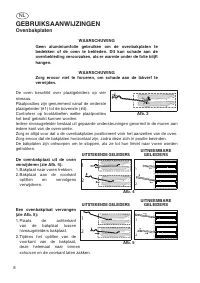
NL 8 GEBRUIKSAANWIJZINGEN Ovenbakplaten WAARSCHUWING Geen aluminiumfolie gebruiken om de ovenbakplaten te bedekken of de oven te bekleden. Dit kan schade aan de ovenbekleding veroorzaken, als er warmte onder de folie blijft hangen. WAARSCHUWING Zorg ervoor niet te forceren, om schade aan de lakverf ...
Page 239 - Verlengbare ovenbakplaten (indien aanwezig)
NL 9 Verlengbare ovenbakplaten (indien aanwezig) Met de verlengbare bakplaat wordt de toegang tot het koken van gerechten vergemakkelijkt. Deze is langer dan de standaard platte bakplaat en brengt het eten dichterbij de gebruiker. WAARSCHUWING Controleer of:• de schuifarmen niet vergrendelen, wannee...
Page 241 - de gewenste taal selecteren; demonstratiemodus in werking.; De demonstratiemodus - DEMO MODE
NL 11 Voorstelling van de oven Beste klant, uw nieuwe oven wordt bediend door een elektronische fiche die zorgt voor een automatische en voortdurende monitoring van het functioneren ervan, om op die manier alle prestaties ervan te verbeteren.De touch controle bediening is heel recent, precies en betr...
Page 242 - de oven zal; Het afstellen van de klok; gedurende tenminste 3 seconden
NL 12 5 sec.!! PIZZA Om de demonstratiemodus ongeschikt te maken, het lichtsymbool gedurende vijf seconden ingedrukt houden: de oven zal in normale werking gaan en is klaar om te starten.De tijdinstelling is nu mogelijk, maar niet noodzakelijk om over te gaan tot het opstarten van de oven. Het afste...
Page 243 - - Wijzigen van de taal
NL 13 MOGELIJKE HANDELINGEN MET DE OVEN UITGESCHAKELD - Inschakelen van het licht in de oven PIZZA De ovenverlichting wordt ingeschakeld / uitgeschakeld door het symbool in te drukken zoals afgebeeld. - Wijzigen van de taal Met de oven uitgeschakeld, kunt u de taal op het display wijzigen doortegeli...
Page 244 - in te drukken
NL 14 Lock-functie (blokkering toetsenbord) PIZZA De lock-functie wordt ingeschakeld / uitgeschakeld door de toets in te drukken gedurende minstens 3 seconden.Kan in- en uitgeschakeld worden op elk gewenst moment en bij elke wijze van functioneren van de oven. Het symbool van de AFWEZIGE sleutel spe...
Page 245 - De kookfuncties
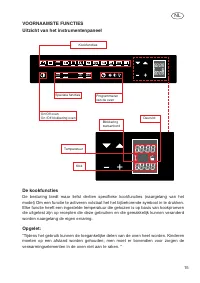
NL 15 VOORNAAMSTE FUNCTIES Uitzicht van het instrumentenpaneel Kookfuncties Speciale functies Temperatuur Klok On/Off ovenOn /Off blokkering oven Programmerenvan de oven Blokkeringtoetsenbord Deurslot PIZZA De kookfuncties De besturing biedt maar liefst dertien specifieke kookfuncties (naargelang van...
Page 246 - Kookprogramma’s; alleen het lampje is aan.
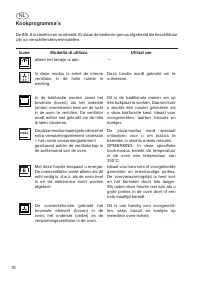
NL 16 Kookprogramma’s De Afb. 8 is slechts een voorbeeld. Er staan de bedienin-gen op afgebeeld die beschikbaar zijn op verschillendeovenmodellen. Icone Modalità di utilizzo Utilizzi per alleen het lampje is aan. --- In deze modus is enkel de interne ventilator in de holle ruimte in werking. Deze fu...
Page 248 - Gebruiksaanwijzing
NL 18 Gebruiksaanwijzing Gebruiksaanwijzing Een klassieke manier van koken dat warmte aan de boven-en onderkant gebruikt, voor het bereiden van een enkel gerecht.Het is aangeraden het gerecht pas in de oven te plaatsen als de oven op de ingestelde temperatuur is gekomen, dat betekent als de ° C gebl...
Page 250 - Speciale functies
NL 20 Eco-Bake Deze functie is gedefinieerd om een aanzienlijke energiebesparing te bereiken. De koelventilator staat oorspronkelijk uit en wordt alleen ingeschakeld, als de temperatuur van de interne delen hoog wordt, het werkt dan met de verwarmingselementen. Het koken kan iets langzamer gaan dan b...
Page 252 - Self clean (alleen beschikbaar in bepaalde modellen); is het mogelijk de gewenste duur te selecteren volgens het
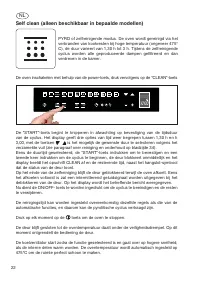
NL 22 Self clean (alleen beschikbaar in bepaalde modellen) PYRO of zelfreinigende modus. De oven wordt gereinigd via het verbranden van kookresten bij hoge temperatuur (ongeveer 475° C), de duur varieert van 1,30 h tot 3 h. Tijdens de zelfreinigende cyclus worden alle geproduceerde dampen gefiltreerd...
Page 253 - Controle van het ovenlicht
NL 23 Het deurtje wordt ook meteen gesloten door de bediening om de veiligheid van de gebruiker te garanderen, gezien het feit dat de binnentemperatuur erg hoog wordt. Een vergrendelicoon op het temperatuurdisplay toont de status van het klinkmechanisme op ieder moment. ¾ deur ontgrendeld ; ¾ deur o...
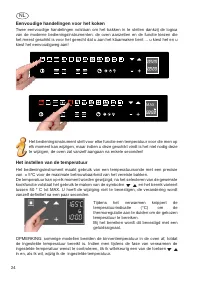
Page 254 - Eenvoudige handelingen voor het koken; Het instellen van de temperatuur; en het bereik varieert
NL 24 Eenvoudige handelingen voor het koken Twee eenvoudige handelingen volstaan om het bakken in te stellen dankzij de logica van de moderne bedieningsinstrumenten: de oven aanzetten en de functie kiezen die het meest geschikt is voor het gerecht dat u aan het klaarmaken bent ... u kiest het en u k...
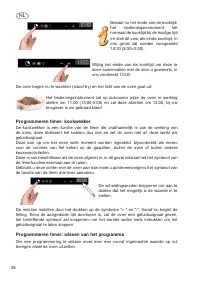
Page 256 - Programmeren timer: kooktijd; Programma beëindigd, het gerecht; Programmering timer: einde kooktijd
NL 26 Programmeren timer: kooktijd Eenmaal het symbool van de timer aanraken, het betreffende symbool zal aangaan. Bovendien zal het display van de klok de aanduiding van het huidige uur vervangen: De scheidingspunten knipperen om aan te duiden dat het mogelijk is de kooktijd te programmeren Eens de...
Page 257 - Programmering timer: uitgestelde kookstart; Maak het gebraad klaar voor het bakken en plaats het in de oven
NL 27 Het einde van de kooktijd instellen door het indrukken van de symbolen “+” en “-“ Eens het einde van de kooktijd is bepaald, zal het display nog steeds het huidige uur afbeelden, het symbool “einde kooktijd” zal aan zijn. Vanaf nu begint de telling. Eens het ingestelde uur bereikt is zal de ov...
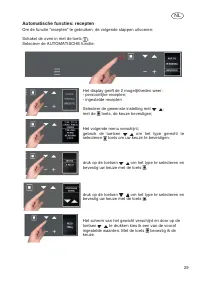
Page 259 - Automatische functies: recepten
NL 29 Automatische functies: recepten Om de functie “recepten” te gebruiken, de volgende stappen uitvoeren: Schakel de oven in met de toets ; Selecteer de AUTOMATISCHE functie; Het display geeft de 2 mogelijkheden weer:- persoonlijke recepten; - ingestelde recepten Selecteer de gewenste instelling m...
Page 260 - Persoonlijke recepten
NL 30 Wanneer alles is ingesteld, geeft het display weer wat is ingesteld. De twee punten van de tijd kooktijd (00:40) zullen knipperen om de mogelijkheid weer te geven dat deze kunnen worden veranderd.Om te wijzigen de -+ toetsen gebruiken. Of ik selecteer rechtstreeks de functie die knippert en zo...
Page 261 - NEE staan
NL 31 Elke keer als ik inlog op het menu “PERSOONLIJKE RECEPTEN” zal ik mijn opgeslagen recepten terugvinden. Als het geheugen van de persoonlijke recepten onvoldoende blijkt zal het display de volgende melding geven: “GEHEUGEN VOL, ONMOGELIJK OM OP TE SLAAN”. Vooraleer u het recept kan opslaan moet...
Page 263 - VERGRENDELINGSSYSTEEM DEUR; Bij volledig vergrendelde deur
NL 33 VERGRENDELINGSSYSTEEM DEUR Automatische deurvergrendeling tijdens pyrolytische cyclus Om veiligheidsredenen wordt de deur automatisch vergrendeld zodra de zelfreinigingsmodus geselecteerd wordt. De deur wordt ook automatisch ontgrendeld, als de reinigingstijd verlopen is, maar alleen nadat de ...
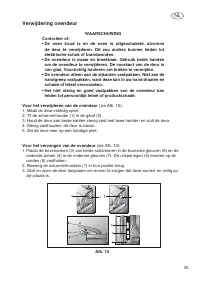
Page 264 - REINIGEN EN ONDERHOUD; Voordat u begint te reinigen, moet de stroom uit wordengezet.; Ovens met een hete-luchtsysteem worden minder vuil.; OPMERKING; Als de cyclus beëindigd is en de oven; VOLLEDIG IS AFGEKOELD; , de verbrande resten
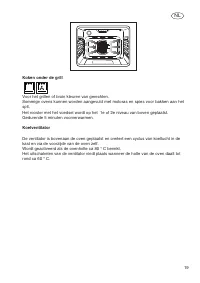
NL 34 REINIGEN EN ONDERHOUD Voordat u begint te reinigen, moet de stroom uit wordengezet. Wij raden aan de binnenkant van de oven regelmatig te reinigen. In het bijzonder dient u de oven te reinigen telkens als u de grill gebruikt om te voorkomen dat er te veel vuil in de oven blijft zitten dat rook...
Page 265 - Verwijdering ovendeur
NL 35 Verwijdering ovendeur WAARSCHUWING Controleer of:• De oven koud is en de oven is uitgeschakeld, alvorens de deur te verwijderen. Dit zou anders kunnen leiden tot elektrische schok of brandwonden. • De ovendeur is zwaar en breekbaar. Gebruik beide handen om de ovendeur te verwijderen. De voorka...
Page 266 - Verwijderen van de panoramische deur “FULL GLASS”
NL 36 Verwijderen van de panoramische deur “FULL GLASS” WAARSCHUWING Controleer of:• De oven koud is en de oven is uitgeschakeld, alvorens de deur te verwijderen. Dit zou anders kunnen leiden tot elektrische schok of brandwonden. • De ovendeur is zwaar en breekbaar. Gebruik beide handen om de ovende...
Page 267 - doek om krassen te vermijden op het esthetisch gedeelte.
NL 37 Hoe de binnenste vensters van de panoramische deur“FULL GLASS” demonteren 1. Beschermingshandschoenen aantrekken 2. De deur op een horizontaal vlak plaatsen en deze laten steunen op een vochtige doek om krassen te vermijden op het esthetisch gedeelte. 3. Gelijktijdig de toetsen van de twee zij...
Page 268 - Vervanging van de ovenlamp
NL 38 Vervanging van de ovenlamp WAARSCHUWING Controleer of:• De oven en lampen koud zijn en de oven is uitgeschakeld, alvorens de gloeilamp(en) te vervangen. Dit zou anders kunnen leiden tot elektrische schok of brandwonden. • De lenzen moet zich op hun plaats bevinden tijdens het gebruik van de ov...
Page 270 - FULGOR MILANO
FULGOR MILANO ® Meneghetti S.p.a. Via Borgo Lunardon, 8 • 36027 Rosà (Vicenza) - Italy http://www.fulgor-milano.com • e-mail: [email protected] 09FL6831 - 04-15