Page 4 - Principio di funzionamento
4 I Induzione Il riscaldamento per induzione è la forma più efficiente, disponibile, per cucinare.Il calore viene prodotto, con un campo elettromagnetico, direttamente sul fondo della pentola o padella utilizzata. La superficie non coinvolta nel contatto rimane pressoché fredda; una volta terminata ...
Page 5 - Istruzioni per l’utente
5 Istallazione Tutte le operazioni relative all’stallazione (allacciamento elettrico) devono essere eseguite da personale qualificato secondo le norme vigenti.Per le istruzioni specifiche vedi parte riservata all’istallatore. NON FISSARE INTENSAMENTE I LED E I DISPLAY. Utilizzazione Per prima cosa p...
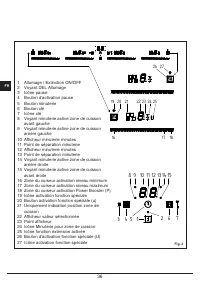
Page 8 - Accensione di una zona cottura
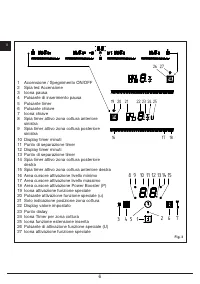
8 I Fig. 5 Accensione/Spegnimento del piano cottura Il piano cottura si accende premendo il tasto “centrale” On/Off (1), si sente un breve bip e si accendono i 4 display a sette segmenti mostrando uno “0”.Se una zona cottura “scotta”, il display mostra in alternanza “H” e “0”.Dopo l’accensione il to...
Page 10 - Funzioni speciali
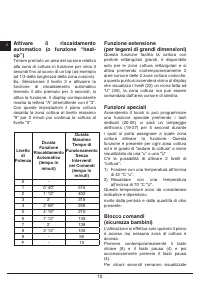
10 I Funzione estensione(per tegami di grandi dimensioni) Questa funzione facilita la cottura con pentole rettangolari grandi, è disponibile solo per le zone cottura rettangolari e si attiva premendo contemporaneamente 2 aree cursore delle 2 zone cottura coinvolte, a questo punto si accenderà vicino...
Page 11 - Chiave
11 I le lettere “L” nei display, dopo di che si spegneranno i dislay.Tentando di accendere il piano cottura dal fasto On/Off (1) il piano mostrerà nuovamente le lettere “L” e non sarà possibile cucinare. Sbloccaggio/disattivazione sicurezza bambini Ci sono 2 tipi di sbloccaggio:1) Sbloccaggio per un...
Page 15 - Installazione; Istruzioni per l’installatore
15 I Installazione Le presenti istruzioni sono rivolte all’installatore qualificato quale guida all’installazione, regolazione e manutenzione secondo le leggi e le normative in vigore. Gli interventi devono sempre essere effettuati ad apparecchiatura disinserita elettricamente. Posizionamento (Fig. ...
Page 20 - Operating principle
20 GB Induction Heating by induction is the most efficient form of cooking available.The heat is generated by an electromagnetic field, directly on the bottom of the pan or pot used. The surface which is free from contact remains virtually cold. When the cooking time is up and the container is remov...
Page 21 - User instructions
21 GB 21 Installation All installation operations (electrical connection) must be carried out by people qualified in compliance with the laws in force. For specific instructions, see the installation section. DO NOT FOCUS INENSEL ON THE LEDS AND DISPLAYS. Use First of all, position the pan in the ch...
Page 24 - Turning on a cooking area
24 GB Turning the cooking surface on and off The cooking surface is turned on by pressing the “centre” On/Off button (1), you will hear a short beep and the 4 seven-segment displays light up showing “0”.If a cooking zone is “hot”, the display will alternate between “H” and “0”.After switching on, th...
Page 26 - Special functions
26 GB 1) Melting with a temperature of approximately 42 °C “u”. 2) Heating with a temperature of approximately 70 °C “U”. These temperatures are approximate and are greatly dependent on the pot and the quantity of food. Control lock(child safety) It is only activated when the cooking surface is on b...
Page 27 - Independent timer
27 GB Key This cooking surface allows setting a keypad lock using the lock button (6). It may be useful to lock the keypad during operation, for example for cleaning the control area or, in any case, if you do not want to change any settings.The On/Off button (1) still has priority. Pause This cooki...
Page 28 - Turning off/changing the timer
28 GB - Activate the cooking area by selecting the cursor (16-17) then press the timer button (5). In this way, you can set a countdown to turn off the cooking area. Illuminated clock icons (24) will light up next to the cooking area display. To set To set the timer on a cooking area when there is m...
Page 30 - Installation; Installation instructions
30 GB Installation these instructions are aimed at qualified fitters as a guide to installation, adjustment and maintenance in compliance with the laws and standards in force. The operations must always be carried out with the appliance disconnected from the electricity supply. Positioning (Fig. 6-7...
Page 34 - Principe de fonctionnement
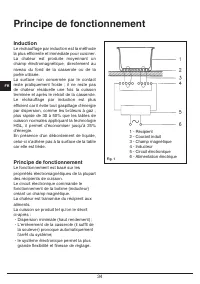
34 FR Induction Le réchauffage par induction est la méthode la plus efficiente et immédiate pour cuisiner.La chaleur est produite moyennant un champ électromagnétique, directement au niveau du fond de la casserole ou de la poêle utilisée. La surface non concernée par le contact reste pratiquement fr...
Page 35 - Instructions pour l’utilisateur
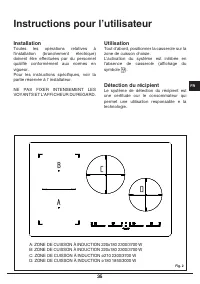
35 FR 35 Installation Toutes les opérations relatives à l’installation (branchement électrique) doivent être effectuées par du personnel qualifié conformément aux normes en vigueur. Pour les instructions spécifiques, voir la partie réservée à l’ installateur. NE PAS FIXER INTENSEMENT LES VOYANTS ET ...
Page 40 - Fonctions spéciales
40 FR d’autres niveaux de cuisson éventuels. Réchauffage automatique(ou fonction «heat-up») Cette fonction facilite la cuisson. Il n’est pas nécessaire d’être présent de façon permanente durant la cuisson : le plan chauffe automatiquement à la pleine puissance et revient au niveau de puissance sélec...
Page 41 - Clé
41 FR secondes au cours desquelles on pourra choisir la zone de cuisson pour activer la fonction. Cette fonction est présente pour chaque zone de cuisson et elle est en mesure d’»aider la cuisson» ; elle est affichée par un «u» ou par un «U».On peut activer 2 niveaux de «cuisson» :1) Fondre à une te...
Page 42 - Fonction de Minuterie; Minuterie autonome
42 FR faut sélectionner une zone du curseur dans un délai de 10 secondes. De cette manière, le plan reprend la cuisson et la minuterie redémarre à partir du point où elle s’était arrêtée. Fonction de Minuterie La fonction minuterie est réalisée en deux versions : - Une Minuterie autonome, de 1 minut...
Page 43 - Éteindre/modifier la minuterie
43 FR appuiera sur une touche. L’afficheur cesse de clignoter et s’éteint. Éteindre/modifier la minuterie - La minuterie peut être modifiée ou éteinte à tout moment en activant de nouveau le touch si aucune zone de cuisson n’est allumée, en actionnant la touche minuterie (5) pour sélectionner la min...
Page 45 - Instructions pour l’installateur
45 FR Installation Les présentes instructions s’adressent aux installateurs qualifiés et représentent un guide à l’installation, au réglage et à l’entretien, conformément aux lois et aux normes en vigueur. Toujours débrancher l’appareil avant toute intervention. Positionnement (Fig. 6-7) L’appareil ...
Page 50 - Funktionsprinzip
50 DE Induktion Das Erwärmen mit Induktion ist die wirkungsvollste verfügbare Form des Kochens.Die Wärme wird mit einem elektromagnetischen Feld direkt auf dem Boden des benutzten Topfs oder Pfanne erzeigt. Die nicht berührte Oberfläche bleibt fast kalt. Nach dem Ende des Kochvorgangs und wenn der T...
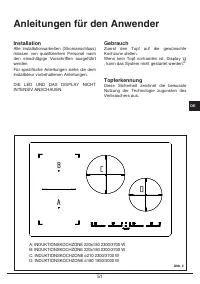
Page 51 - Anleitungen für den Anwender
51 DE Installation Alle Installationsarbeiten (Stromanschluss) müssen von qualifiziertem Personal nach den einschlägige Vorschriften ausgeführt werden.Für spezifische Anleitungen siehe die dem Installateur vorbehaltenen Anleitungen. DIE LED UND DAS DISPLAY NICHT INTENSIV ANSCHAUEN. Gebrauch Zuerst d...
Page 56 - Spezialfunktionen
56 DE Kochzonen aktivierbar. Die Priorität hat jedoch der zuletzt aktivierte Booster, wobei etwaige andere Kochstufen reduziert werden. Automatische Erhitzung(bzw. „Heat-up“-Funktion) Diese Funktion erleichtert den Kochvorgang. Es ist nicht notwendig, während des Kochvorgangs ständig präsent zu sein...
Page 57 - Schlüssel
57 DE Sie unterstützt den Kochvorgang und wird durch ein „u“ oder ein „U“ angezeigt.Es können 2 Kochstufen aktiviert werden:1) Schmelzen mit einer Temperatur von ungefähr 42°C „u“. 2) Erhitzen mit einer Temperatur von ungefähr 70 °C „U“. Diese Temperaturen sind Richtwerte, die starkvom Kochtopf und ...
Page 58 - Timerfunktion; Unabhängiger Timer
58 DE er stehen geblieben ist. Timerfunktion Die Timerfunktion ist in zwei Ausführungen verfügbar:- Als unabhängiger Timer: einstellbar zwischen 1 und 99 Minuten, gibt nach Ablauf der Zeit einen Warnton ab. Diese Funktion ist auch verfügbar, wenn Kochzonen eingeschaltet sind. - Timer pro Kochzone: e...
Page 59 - Timer abschalten/ändern
59 DE Timer abschalten/ändern - Der Timer kann jederzeit durch erneutes Aktivieren des Touchscreens verändert oder abgeschaltet werden, wenn keine Kochzone eingeschaltet ist. Zur Wahl des Timers die Timertaste (5) betätigen. Danach einen beliebigen Kursorenbereich der Mindeststufe (16) betätigen den...
Page 61 - Anleitungen für den Monteur
61 DE Installation Diese Anleitungen sind für den qualifizierten Installateur bestimmt und sollen als Installations-, Einstellungs- und Instandhaltungsanleitung gemäß den einschlägigen Gesetzen und Vorschriften dienen. Die Arbeiten müssen immer bei elektrisch abgetrenntem Gerät ausgeführt werden. Po...
Page 66 - Principio de funcionamiento
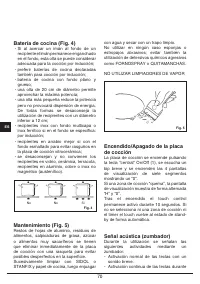
66 ES Inducción El calentamiento por inducción es la forma más eficiente, disponible en la actualidad, para cocinar.El calor se produce, con un campo electromagnético, directamente debajo de la olla o de la sartén utilizada. La superficie no interesada en el contacto permanece casi fría; después de ...
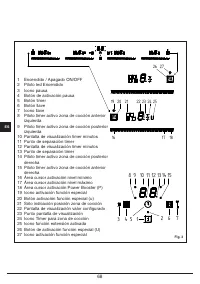
Page 67 - Instrucciones para el usuario
67 ES 67 Instalación Todas las operaciones relativas a la instalación (conexión eléctrica) tiene que efectuarlas personal cualificado según las normas vigentes.Para las instrucciones específicas véase la parte reservada al instalador. NO OBSERVAR INTENSAMENTE LOS LED Y LOS DISPLAY. Utilización Para ...
Page 72 - Funciones especiales
72 ES reduciendo otros eventuales niveles de cocción. Calentamiento automático(o función “heat-up”) Esta función facilita la cocción. No es necesario estar presente de forma permanente durante la cocción, la placa se calienta de forma automática a plena potencia y vuelve luego al nivel de potencia s...
Page 73 - Llave
73 ES durante los cuales se podrá asignar en qué zona de cocción activar la función. Esta función se encuentra presente para cada zona de cocción, es capaz de “ayudar en la cocción” y se muestra mediante una “u” o una “U” Es posible activar 2 niveles de “cocción”:1) Fundir con una temperatura de apr...
Page 74 - Función de Timer; Timer autónomo
74 ES seleccionar un área del cursor. De esta forma la placa reanuda la cocción y el timer sigue contando desde el mismo punto en el que se había detenido. Función de Timer La función timer se realiza en dos versiones:- Un Timer autónomo, de 1 hasta 99 minutos: señal sonora cuando el tiempo ha venci...
Page 75 - Apagar/modificar el timer
75 ES Apagar/modificar el timer - El timer se puede modificar o apagar en cualquier momento encendiendo de nuevo el touch si ninguna zona de cocción está encendida y luego accionando la tecla timer (5) para seleccionar el timer y colocarlo a “0” pulsando en una cualquiera de las áreas curso nivel mí...
Page 77 - Instalación; Instrucciones para el instalador
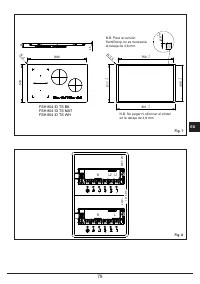
77 ES Instalación Las presentes instrucciones están dirigidas al instalador cualificado como guía para la instalación, regulación y mantenimiento según las leyes y las normativas en vigor. Las intervenciones tienen que efectuarse siempre con el equipo desconectado de la corriente eléctrica. Emplazam...
Page 82 - Principio de funcionamento
82 PT Indução O aquecimento por indução é a forma mais eficiente e disponível para cozinhar. O calor é produzido com um campo electromagnético, directamente no fundo do recipiente, tacho ou frigideira, utilizado. A superfície não envolvida no contacto permanece quase fria; uma vez terminada a cozedu...
Page 83 - Instruções para o utilizador
83 PT 83 Instalação Todas as operações relativas à instalação (ligação eléctrica) devem ser realizadas por pessoal qualificado segundo as normas em vigor. Para as instruções específicas ver a parte reservada ao instalador. NÃO FIXAR INTENSAMENTE OS LEDS E OS DISPLAYS. Utilização Em primeiro lugar po...
Page 87 - Aquecimento automático
87 PT aumentar o nível de cozedura (17) ou para a esquerda diminuí-lo (16). Desativação de uma zona de cozedura Uma zona de cozedura específica pode ser desligada diretamente selecionando a posição “0” deslizando o dedo para a esquerda na área do cursor correspondente à zona de cozedura em função.As...
Page 88 - Bloqueio dos comandos
88 PT Função de extensão (para panelas de grandes dimensões) Esta função facilita a cozedura com panelas retangulares grandes, está disponível apenas para as zonas de cozedura retangulares e é ativada pressionando simultaneamente 2 áreas do cursor das 2 zonas de cozedura em questão. Então, acenderá ...
Page 93 - Instalação; Instruções para o instalador
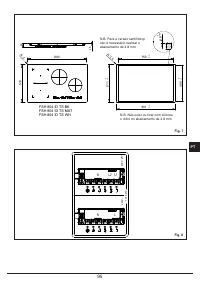
93 PT Instalação As presentes instruções dirigem-se ao instalador qualificado como guia para a instalação, regulação e manutenção, segundo as leis e as normativas em vigor. As intervenções devem sempre ser efectuadas com a aparelhagem desligada electricamente. Posicionamento (Fig. 6-7) O aparelho es...
Page 96 - note
Page 100 - FULGOR MILANO
FULGOR MILANO ® Meneghetti S.p.a. Via Borgo Lunardon, 8 • 36027 Rosà (Vicenza) - Italy http://www.fulgor-milano.com • e-mail: [email protected] Cod. 1.009.74.0