Page 3 - IMPORTANTE; INDICE; Istruzioni per l’utente
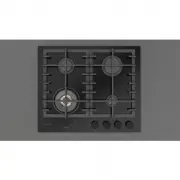
IT 1 Caro Cliente, sentitamente La ringraziamo e ci congratuliamo per la scelta da Lei fatta. Questo nuovo prodotto, accuratamente progettato e costruito con materiali di primissima qualità, è stato accuratamente collaudato per poter soddisfare tutte le Sue esigenze di una perfetta cottura. La pregh...
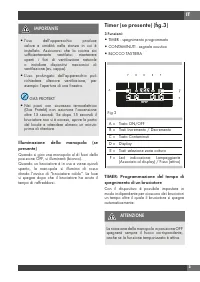
Page 5 - Illuminazione della manopola (se; ATTENZIONE
IT 3 IMPORTANTE • l’uso dell’apparecchio produce calore e umidità nella stanza in cui è installato. Assicurarsi che la cucina sia sufficientemente ventilata; mantenere aperti i fori di ventilazione naturale o installare dispositivi meccanici di ventilazione (es. cappa). • L’uso prolungato dell’appar...
Page 6 - CONTAMINUTI: Solo segnale acustico; Blocco tastiera
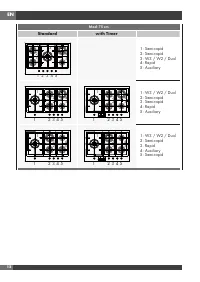
IT 4 Programmazione Premere il tasto ON/OFF, nella parte superiore del tasto si accenderà il led che ne indica l’attivazione. Nel pannello comandi, dove sono rappresentate le zone di ogni bruciatore, premere il tasto corrispondente alla zona per cui si vuole impostare lo spegnimento automatico, l’in...
Page 7 - Manutenzione
IT 5 Prima di ogni operazione disinserire elettricamente l’apparecchiatura. Per una maggiore durata dell’apparecchiatura è indispensabile eseguire periodicamente un’accurata pulizia generale tenendo presente quanto segue: • le parti in vetro, acciaio e/o smaltate devono essere pulite con prodotti id...
Page 8 - Istruzioni per l’installatore
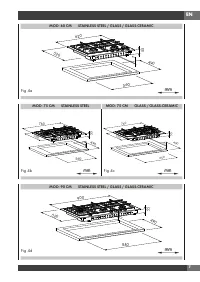
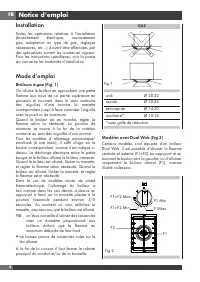
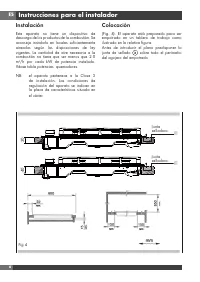
IT 6 Installazione Questo apparecchio non è provvisto di un dispositivo di scarico dei prodotti della combustione. Si raccomanda che sia installato in locali sufficientemente areati secondo le disposizioni di legge vigenti. La quantità d’aria necessaria alla combustione non deve essere inferiore a 2...
Page 10 - Collegamento gas; Allacciamento metallico rigido/; Collegamento elettrico
IT 8 Collegamento gas (Fig. 5) Collegare l’apparecchiatura alla bombola o all’impianto secondo le prescrizioni delle norme in vigore accertandosi preventivamente che l’apparecchiatura sia predisposta al tipo di gas disponibile. In caso contrario vedi: “Adattamento a diverso tipo di gas”. Verificare ...
Page 11 - SINGOLO
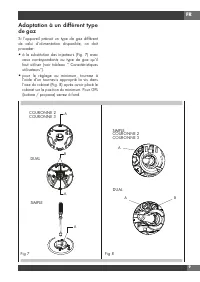
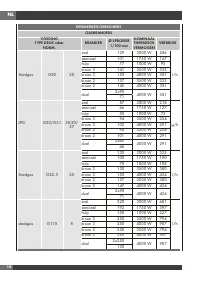
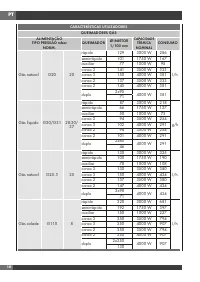
IT 9 Adattamento a diverso tipo di gas Se l’apparecchiatura risulta predisposta per un diverso tipo di gas da quello di alimentazione disponibile, si deve procedere: • alla sostituzione degli iniettori (Fig. 7) con i corrispondenti al tipo di gas da utilizzare (vedi tabella “Caratteristiche utilizza...
Page 17 - IMPORTANT; INDEX; Instructions for use
EN 1 Dear customer, We thank you and congratulate you on your choice. This new carefully designed product, manufactured with the highest quality materials, has been carefully tested to satisfy all your cooking demands. We would therefore request you to read and follow these easy instructions which w...
Page 19 - TIMER: Programming of the time to switch; ATTENTION
EN 3 IMPORTANT • use of the appliance produces heat and moisture in the room where it is installed. Make sure the kitchen is sufficiently ventilated; keep natural ventilation holes open or install mechanical ventilation devices (such as a hood). • Prolonged use of the appliance may require additiona...
Page 20 - TIMER: Acoustic signal only; Keypad lock
EN 4 Programming Press the ON/OFF button. In the upper part of the button the LED indicating activation will light up. In the control panel, where the zones of each burner are represented, press the button corresponding to the zone for which the automatic switch-off is to be set; the burner indicato...
Page 21 - Maintenance
EN 5 Prior to any operation, disconnect the appliance from the electrical system. For long-life to the equipment, a general cleaning operation must take place periodically, bearing in mind the following: • the glass, steel and/or enamelled parts must be cleaned with suitable non-abrasive or corrosiv...
Page 22 - Instructions for the installer
EN 6 Installation This appliance is not provided with a combustion product discharge. It is recommended that it be installed in sufficiently aerated places, in terms of the laws in force. The quantity of air which is necessary for combustion must not be below 2.0 m 3 /h for each kW of installed powe...
Page 24 - Gas connection; Rigid/semi rigid metal connection; Electrical connection
EN 8 Gas connection (Fig. 5) Connect the appliance to the gas cylinder or to the installation according to the prescribed standards in force, and ensure beforehand, that the appliance matches the type of gas available. Otherwise, see “Adaptation to various types of gas”. Furthermore, check that the ...
Page 31 - Notice d’emploi
FR 1 Cher client, Merci et sincères félicitations pour le choix que vous avez fait. Ce nouveau produit, développé avec soin et fabriqué avec des matières de toute première qualité, a été soigneusement rodé pour satisfaire toutes Vos exigences d’une cuisson parfaite. Veuillez lire attentivement les i...
Page 33 - TEMPORISATEUR : Programmation du
FR 3 IMPORTANT • L’utilisation de l’appareil produit de la chaleur et de l’humidité dans le local d’installation. S’assurer que la cuisine est suffisamment aérée ; ne pas obstruer les orifices d’aération naturelle ou installer des dispositifs mécaniques d’aération (ex. une hotte). • L’utilisation pr...
Page 34 - COMPTEURS MINUTES : Signal sonore; Blocage clavier
FR 4 Programmation Frapper la touche ON/OFF, sur sa partie supérieure, la LED qui indique son actionnement s’allume. Sur le panneau de commande, où sont représentées les zones de chaque brûleur, appuyer sur la touche correspondante à la zone dont on désire programmer l’arrêt automatique, l’indicateu...
Page 35 - Entretien
FR 5 Avant de toute opèration, débrancher l’appareil du reseau électrique. Pour assurer une longue vie á l’appareil il faut absolument effectuer de temps en temps un nettoyage général soigneux en gardant à l’esprit ce qui suit: • les parties en vitre, acier et/ou émaillées doivent etre nettoyées ave...
Page 36 - Modalités d’installation
FR 6 Installation Cet appareil n’est pas pourvu de dispositif d’évacuation des produits de la combustion. On doit donc l’installer dans des endroits suffisamment aerés suivant les dispositions des lois en vigueur. La quantitè d’air nécéssaire à la combustion ne doit pas etre inférieure à 2.0 m 3 /h ...
Page 38 - Connexion gaz; Branchement métallique rigide/; Branchement électrique
FR 8 Connexion gaz (Fig. 5) Effectuer la connexion de l’appareil à la bouteille ou à l’installation selon les prescriptions des normes en vigueur s’assurant à l’avance que l’appareil est reglé pour le type de gaz disponible. En cas contraire voir: “Adaptation à un type de gaz différent”. Verifier au...
Page 45 - WICHTING; Anweisungen für den Benutzer; Wartung; Anleitungen für den Installateur
DE 1 Sehr geehrter Kunde, Wir danken Ihnen und beglückwünschen uns für Ihre Wahl. Dieses neue Produkt, sorgfältig entworfen und mit erstklassigen Materialien hergestellt, wurde genau geprüft um alle Ihre Forderungen an ein perfektes Kochen zu erfüllen. Wir bitten Sie deshalb die einfachen Anweisunge...
Page 47 - TIMER: Einstellen der Ausschaltzeit eines; ACHTUNG
DE 3 WICHTING • Beim Gebrauch des Geräts entwickeln sich in dem Raum Wärme und Feuchtigkeit. Sicherstellen, dass die Küche ausreichend belüftet ist. Die natürlichen Lüftungsöffnungen offen halten oder mechanische Abzugsvorrichtungen (z.B. Dunstabzugshaube) installieren. • Bei längerem Gebrauch des G...
Page 48 - MINUTENZÄHLER: Nur akustisches; Tastatursperre
DE 4 Einstellen Die Taste ON/OFF drücken. Im oberen Bereich der Taste schaltet sich eine LED ein, die auf die Aktivierung hinweist. Am Bedienfeld, wo die Bereiche jedes Brenners dargestellt sind, die entsprechende Taste für den Bereich, für den das automatische Abschalten eingestellt werden soll, dr...
Page 52 - Gasanschluß; Anschluß mit Metallanschlußstutzen und; Elektroanschluß; WICHTIG
DE 8 Gasanschluß (s. Abb. 5) Das Gerät an die Gasflasche oder an das Gasversorgungsnetz nach den geltenden Vorschriften anschließen und dabei sicherstellen, daß das Gerät auf den vorhandenen Gastyp eingestellt ist (wenn es nicht der Fall sein sollte, wird auf das Kapitel “Anpassung an einen anderen ...
Page 59 - Instrucciones para el usuario
ES 1 Estimado Cliente, Le agradecemos mucho y le felicitamos por su elección. Este nuevo producto, cuidadosamente estudiado y construido con materiales de primera calidad, ha sido probado esmeradamente para poder satisfacer todas sus exigencias de una perfecta cocción. Por lo tanto le rogamos lea y ...
Page 61 - TIMER: Programación del tiempo de; ATENCIÓN
ES 3 IMPORTANTE • la utilización del aparato produce calor y humedad enla habitación en la que se instala. Asegurarse de que la ventilación de la cocina sea suficiente; mantener abiertos los agujeros de ventilación natural o instalar equipos mecánicos de ventilación (por ej.: campana). • El uso prol...
Page 62 - CONTADOR DE MINUTOS: Solo señal; Bloqueo teclado
ES 4 Programación Presionar la tecla ON/OFF, en la parte superior de la tecla se encenderá el led que indica la activación. En el panel de mandos, donde están representadas las zonas de cada quemador, presionar la tecla correspondiente a la zona para la cual se quiere configurar el apagado automátic...
Page 63 - Mantenimiento
ES 5 Antes de cualquier operación desconectar eléctricamente el aparato. Para una mayor duración del aparato es indispensable efectuar periódicamente una cuidadosa limpieza general teniendo en cuenta lo siguiente: • las partes en vidrio, de acero y/o esmaltadas tienen que ser limpiadas con productos...
Page 64 - Instrucciones para el instalador
ES 6 Instalación Este aparato no tiene un dispositivo de descarga de los productos de la combustión. Se aconseja instalarlo en locales suficientemente aireados según las disposiciones de ley vigentes. La cantidad de aire necesaria a la combustión no tiene que ser menos que 2.0 m 3 /h por cada kW de ...
Page 66 - Conexión gas; Conexión metálica rígida/ semirígida; Conexión eléctrica
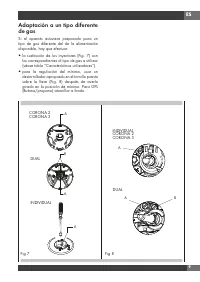
ES 8 Conexión gas (Fig. 5) Conectar el aparato a la bombona o a la instalación según las prescripciones de las normas vigentes comprobando antes que el aparato esté preparado para el tipo de gas disponible. En caso contrario véase: “Adaptación a un distinto tipo de gas”. Además comprobar que la pres...
Page 73 - BELANGRIJK; Instructies voor de gebruiker
NL 1 Geachte klant, Wij danken u en feliciteren ons met de door u gedane keuze. Dit nieuwe produkt, zorgvuldig ontworpen en geconstrueerd uit materialen van de allerbeste kwaliteit, is gedegen uitgetest om al uw eisen voor een perfect kookresultaat te kunnen bevredigen. Wij verzoeken u daarom de een...
Page 75 - Verlichting van de knop (indien; OPGELET
NL 3 BELANGRIJK • Het gebruik van het apparaat produceert warmte en vocht in de kamer waar deze geïnstalleerd is. Controleer of de keuken voldoende geventileerd is; houd de natuurlijke ventilatiegaten open of installeer mechanische ventilatie-inrichtingen (bv. afzuigkap). • Bij langdurig gebruik van...
Page 76 - MINUTENTELLER: Alleen geluidssignaal; Toetsenvergrendeling
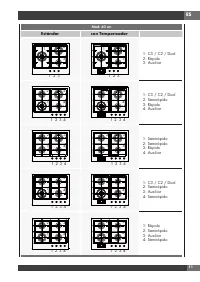
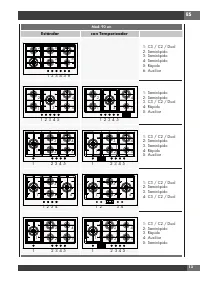
NL 4 Programmering Druk op de toets ON/OFF; de led bovenop de toets gaat branden om de activering aan te geven. Druk op het bedieningspaneel, waar de zones van alle branders zijn aangegeven, op de toets van de zone waarvoor de automatische uitschakeling moet worden ingesteld. De indicator (led) van ...
Page 77 - Onderhoud
NL 5 Voor iedere handeling de apparatuur elektrisch uitschakelen. Voor een lange levensduur van de apparatuur is het onontbeerlijk periodiek een degelijke algemene schoonmaak uit te voeren en daarbij rekening te houden met het volgende: • de glasdelen, de stalen en/ of geglazuurde gedeelten moeten s...
Page 78 - Instructies voor de installateur
NL 6 Installatie Dit apparaat is niet voorzien van een afvoermogelijkheid voor de verbrandingsprodukten. Het wordt aanbevolen het apparaat te installeren in een voldoende geventileerde ruimte volgens de geldende wettelijke voorzieningen. De voor de verbranding benodigde hoeveelheid lucht mag niet mi...
Page 80 - Gasaansluiting; Stijve/halfstijve metalen aansluiting; Elektrische aansluiting
NL 8 Gasaansluiting (Afb. 5) Sluit de apparatuur aan op de gasfles of de gasleiding volgens de van kracht zijnde voorschriften, zich er vantevoren van overtuigend dat de apparatuur geschikt is voor het beschikbare type gas. Is dit niet het geval zie dan: “Aanpassing aan een ander type gas”. Ga boven...
Page 87 - ÍNDICE; Instruções para o utilizador
PT 1 Ex.mo. Sr. Cliente, Agradecemos, muito sinceramente a sua escolha, e aproveitamos da ocasião para o felicitar. Este novo produto, que foi projectado com grande atenção e construído com os melhores materiais, foi verificado e aprovado, de maneira a darlhe imensa satisfação para um cozinhado perf...
Page 88 - Modelos com queimador Duplo Wok
PT 2 Instalação Todas as operações relativas à instalação (ligação eléctrica, ligação de gás, adaptação ao tipo de gás, regulações subsequentes, etc.) terão de ser efectuadas por pessoal qualificado, segundo as normas em vigor. Para instruções específicas, vejase a parte reservada para o técnico ins...
Page 89 - TEMPORIZADOR: Programação do tempo; ATENÇÃO
PT 3 IMPORTANTE • O uso do aparelho produz calor e humidade no local em que foi instalado. Certifiquese que a cozinha seja suficientemente ventilada; mantenha as aberturas de ventilação natural abertas ou instale dispositivos mecânicos de ventilação (por ex. exaustores). • O uso prolongado do aparel...
Page 90 - Bloqueio teclado
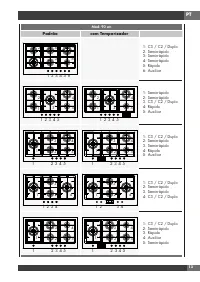
PT 4 Programação Prima a tecla ON/OFF, na parte superior da tecla irá acender-se o LED que indica a ativação. No painel de comandos onde são representadas as zonas de cada queimador, prima a tecla correspondente à zona para a qual se pretende configurar o desligamento automático, o indicador do quei...
Page 91 - Manutenção
PT 5 Antes de qualquer operação, desligue o aparelho da corrente eléctrica. Para uma maior duração, é indispensável executar periódicamente uma esmerada limpeza geral ao aparelho tomando sempre em consideração o que segue: • as partes em vidro, aço e/ou esmaltadas terão de ser limpas com produtos ap...
Page 92 - Instruções para o instalador
PT 6 Instalação Este aparelho não possui um dispositivo de descarga do produto da combustâo. Recomendase por conseguinte, que venha instalado em lugares suficientemente arejados segundo as disposições das leis em vigor. A quan- tidade necessária de ar para a combustão, não deverá ser inferior a 2.0 ...