Page 4 - DANGER AND WARNINGS; You Must Read This Owner’s Guide Before Operating Your Gas Grill.
DANGER AND WARNINGS You Must Read This Owner’s Guide Before Operating Your Gas Grill. WARNING: Leaking gas may cause a fire or explosion, which can cause serious bodily injury or death, or damage to property. WARNING: Follow all leak-check procedures carefully in this manual prior to barbecue operat...
Page 6 - For Installation In Canada; • Details of 20lb LP cylinder
• Do not use with charcoal fuel. • The areas around the LP cylinder must be free and clear from debris. • If it’s evident there is excessive abrasion or wear, or the hose is cut, it must be replaced prior to the outdoor cooking appliance being put into operation. Replacement pressure regulators and ...
Page 7 - Storage And / Or Non Use; and the LP cylinder stored outdoors in a well-ventilated space.; Operating
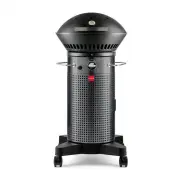
Storage And / Or Non Use • The gas must be turned off at the liquid propane cylinder when the gas barbecue is not in use. • When the gas barbecue is stored indoors, the gas supply must be DISCONNECTED and the LP cylinder stored outdoors in a well-ventilated space. • LP cylinder must be stored outdoo...
Page 8 - Product View
Page 9 - Exploded View
Page 10 - Installation
Installation Parts List NO. Description QTY F21C-H F21S-H 1 Temperature Gauge 1 x x 2 Grill Lid 1 x x 3 Lid Handle 1 x x 4 Electrode Assembly 1 x x 5 Silicon Cushion 6 x x 6 Cast Iron Grate 1 x x 7 Diffuser Panel 1 x x 8 Dual-Zone Burner Ring 1 x x 9 Fire-Bowl Assembly 1 x x 10 Residue Tray 1 x x 11...
Page 11 - Parts Included
Parts Included Tools Needed (Not Included) Door Clasp Control Knob Tank Hook x1 M5 Screws x8 Black (A) Phillips Head Screw Driver Temperature Gauge AA Battery Utility Knife / Box Cutter M5 Screws x8 SS (C) M6 Screws x8 (B) 5.5mm SS Washer x8 (E) 5.5mm SS Lock Washer x8 (G) M6 Wingnut x2 (D) 6.5mm Bl...
Page 12 - Step 1
Quick Set-up Guide Step 1 A: Fasten rear panel grill base with four screws (M5) B: Assemble tank hook to marked label with two screws (M6) C: Assemble door clasp to rear panel into fixed screw inserts (M6) *Note: Install all screws loose before tightening any screw completely.
Page 13 - Step 2; Insert the AA battery into the battery pack with the + end facing the
Step 2 Insert the control knob onto the control valve. Insert the AA battery into the battery pack with the + end facing the battery pack cap.
Page 14 - Step 3
Step 3 Place control assembly upside down on the floor or low flat surface. Place assembled rear door and grill base onto the control assembly with four screws (M5)
*Note: Install all screws loose before tightening any screw completely. A x4 (M5)
Page 15 - Step 4
Step 4 A: Slide support spine onto control assembly. B: Insert support spine to firebox support top. C: Fasten two screws (M6) to grill base. (B) D: Fasten two screws (M6) to the support spine. (B) E: Now the grill can be flipped onto its wheels. B x4 (M6) B B
Page 16 - Step 5; depress top spring-hinge and release once aligned into position.
Step 5 Install front panel: insert bottom hinge first, then use your finger to depress top spring-hinge and release once aligned into position.
Page 18 - Step 7; space between the burner knob and the firebowl.
Step 7 A: Place diffuser panel, cast iron grate, and grill lid in place. Please note that the grill grate should be positioned with the “FACE DOWN” writing as the bottom side of the grate. B: Install the heat reflector panel in the residue tray and place in the space between the burner knob and the ...
Page 19 - Step 8; for this step. You will tighten all screws in step 9.
Step 8 Install the upper hinge to the lid. Please note to install each screw loose for this step. You will tighten all screws in step 9. C C
Page 20 - Step 9; assembly to the firebowl.
Step 9 Place the lid on top of the cooking grate and install the lower hinge assembly to the firebowl. Please note to install all screws loose to begin. Once all screws have been installed loosely, please center the lid on the cooking grate and tighten all x8 screws to the lid and firebowl assembly....
Page 21 - hook) and connect the LP gas hose with regulator assembly to the LP
Step 10 Gas hook up (LP gas is Standard). Open the front door, install a standard 20lb LP cylinder (Type 1) into the opening of the grill base (Note: the tank must be hanging from the tank hook) and connect the LP gas hose with regulator assembly to the LP cylinder. Proper procedures for gas leakage...
Page 22 - Hook lighting rod onto spine louver of firebox support-top.
Step 11 Hook lighting rod onto spine louver of firebox support-top.
Page 23 - Lighting Instruction Manual
Lighting Instruction Manual Warning : Before Lighting, please make sure that the control knob is in the off position and the regulator assembly is in good condition. Control Knob. IMPORTANT Do not leave items on or against the barbecue. Keep flammable product and sprays away. For outdoor use only. S...
Page 25 - LP Gas Hook-Up for Type 1 or QCC1 Regulator
LP Gas Hook-Up for Type 1 or QCC1 Regulator LP Tank Requirements: A dented or rusted LP tank may be hazardous and should be checked by your local supplier. Never use a cylinder with a damaged valve. The cylinder used must include a collar to protect the cylinder valve. Always check for leaks after e...
Page 26 - Leak Testing
Leak Testing To Test: Make sure all control valves are in the “OFF” position. Turn the gas supply “ON”. Check all connections from the supply line, or LP cylinder up to and including the manifold pipe assembly. Apply the soap solution around the connection, valve, tubing and end of the manifold. Soa...
Page 27 - Maintenance
Maintenance WARNING: IMPORTANT! Before lighting, inspect the gas supply piping or hose prior to turning the gas “on”. If there is evidence of cuts, wear or abrasion, it must be replaced prior to use. Grill Burner: Remove grill lid, diffuser panel, grate, and burner. Remove the screws holding burner ...
Page 31 - Limited Warranty Information:
Limited Warranty Information: Fuego Living LLC (“Seller”) and the person or entity that acquires these goods from Seller (“Purchaser”) hereby agree to the following terms and conditions of the sale: Shipping fees are the responsibility of the Purchaser whether freight prepaid or freight collect. Sel...