Emerson UP310 - User Manual
Emerson UP310 Thermostat – User Manual, read for free online in PDF format. We hope this helps you resolve any issues you may have. If you have further questions, please contact us through the contact form.


Table of Contents:
- Page 2 – GUIDE CONTENTS; WARNING
- Page 3 – This package should contain the following items:
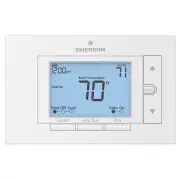
- Page 6 – The display; Next (Menu button) is used to navigate within
- Page 8 – REMOVING OLD THERMOSTAT; changing the temperature on your old thermostat.; or
- Page 9 – Remove the old thermostat cover; be released by using a screwdriver.; CAUTION; high energy bill or damage to your heating and cooling system.
- Page 10 – Terminal labeling reference chart
- Page 11 – Terminal labeling reference chart, contʼd.
- Page 14 – Remove old thermostat base
- Page 15 – thermostat base to the wall, if necessary.; Leveling Thermostat; Leveling is for appearance only and will not
- Page 16 – Connect wires to corresponding terminal blocks
- Page 17 – Identify system configuration; Thermostat Terminals
- Page 19 – AC2: setting of the item; installer menu
- Page 21 – section 3.3 for your old thermostat’s wiring.; valve as “B” at this step
- Page 22 – CHECK THERMOSTAT OPERATION
- Page 24 – and the Cool On icon will disappear.; USING YOUR THERMOSTAT
- Page 25 – early so your programmed tempera-
- Page 27 – Thermostat operation; Set Current Time and Day
- Page 28 – press and hold and the Menu button for 3 seconds.; Thermostat schedule; Note: Thermostat can be programmed on or off the subbase
- Page 36 – other reproductive harm.; CONTACT US
Model # UP310
Made in China
Universal Thermostat
with
scheduling
37-7577B
Install Guide
Want to install the easy way?
"Loading the manual" means you need to wait until the file loads and becomes available for online reading. Some manuals are very large, and the time they take to appear depends on your internet speed.
Summary
2 GUIDE CONTENTS Preparations ........................................................................ 3 Thermostat details ............................................................... 5 Removal of your old thermostat........................................... 8 Mounting, wiring, and configuring ...
3 1. PREPARATIONS Precautions • Do not exceed the specification ratings.• All wiring must conform to local and national electrical codes and ordinances. 1.1 Check package contents This package should contain the following items: 1.2 Gather tools • Thermostat• Mounting screws and wall anchors (x2)• 2...
6 The display Next (Menu button) is used to navigate within a menuSet the correct time, access the schedule and customize thermostat settings.Back (Fan button) is used to navigate within a menuExit (Hold/Run button) returns to the home screenThermostat is protecting the equipment from short cycling ...