Dimplex DCP16C - User Manual
Dimplex DCP16C Air Conditioner – User Manual, read for free online in PDF format. We hope this helps you resolve any issues you may have. If you have further questions, please contact us through the contact form.


Table of Contents:
- Page 2 – IMPORTANT; THESE INSTRUCTIONS SHOULD BE READ CAREFULLY AND; Note also the information presented on the appliance
- Page 3 – may lead to a risk of fire or electric shock.; WARNING; drop or insert any object or fingers into any openings.; ON
- Page 5 – Specification
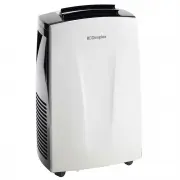
- Page 6 – Parts; Control panel; x Exhaust hose
- Page 7 – Tank full
- Page 8 – Installation; functions, the exhaust hose must be installed.
- Page 9 – EXHAUST HOSE INSTALLATION; switch OFF when the internal water tank is full.
- Page 10 – WINDOW KIT INSTALLATION
- Page 11 – Functions; The exhaust hose needs to be installed for this mode.
- Page 12 – has been set, choose what settings you'd like the unit to operate
- Page 13 – SWING FUNCTION; Vertical louvres by hand until they are in the desired position.; OFF; and disconnected from the power outlet when adjust-
- Page 14 – Error Codes; ERROR CODES; This unit is fitted with an overheat prevention device. If the; WATER DRAINAGE METHOD; and the tank full error code; Water Drainage; Switch off and unplug the unit.
- Page 15 – Remote Control; Temp increase/decrease buttons
- Page 16 – Using the Remote Control; Do not dispose of batteries in fire. Batteries may explode or leak.
- Page 17 – Cleaning; • Always unplug the unit before cleaning or servicing.
- Page 18 – Maintenance; Warranty; Australia
Fo r d o m e st i c h o u s e h o l d u s e o n l y.
INSTRUCTION MANUAL
Portable Air Conditioner
Model: DCP16C
"Loading the manual" means you need to wait until the file loads and becomes available for online reading. Some manuals are very large, and the time they take to appear depends on your internet speed.
Summary
IMPORTANT THESE INSTRUCTIONS SHOULD BE READ CAREFULLY AND RETAINED FOR FUTURE REFERENCE. Note also the information presented on the appliance CAUTION: FAILURE TO FOLLOW THESE INSTRUCTIONS MAY CAUSE INJURY AND/OR DAMAGE AND MAY INVALIDATE YOUR WARRANTY Please read the operating instructions carefully...
may lead to a risk of fire or electric shock. • Only operate this appliance with a minimum of 50cm clearance all around i.e. away from walls, furniture and overhanging objects such as curtains or a shelf. • WARNING : To avoid danger of suffocation please remove all packaging materials particularly p...
Model no. DCP16C Colour White/Black Power supply 220-240V~, 50Hz Operating temperature 5-43°C Thermostat range 17-30°C Rated Input Power 1.8kW Cooling Capacity 4.5kW Dehumidification Capacity 70L/day Noise Level Minimum (Lo) 68dB(A) Noise Level Maximum (Hi) 70dB(A) Air Volume (Hi/Med/Lo) Refrigerant...