Dell OptiPlex FX170 - User Manual

Dell OptiPlex FX170 – User Manual, read for free online in PDF format. We hope this helps you resolve any issues you may have. If you have further questions, please contact us through the contact form.


Table of Contents:
- Page 3 – C o n t e n t s
- Page 4 – Windows or Linux system with access to the Internet
- Page 5 – Run the executable as an administrator.; User Account Control; Click; I Agree; in the EULA screen to continue.
- Page 6 – Show All Drives; If you want to format the drive, click the checkbox titled; Format; . This will erase everything else from your key.; Create
- Page 7 – Yes; will cancel the operation.; Close
- Page 8 – Step 2: Retrieving the Disk Images; to locate and download the latest operating; Images
- Page 9 – Select the second option called; Default
- Page 10 – Main Menu
-
Page 13 – Enter the base location of the network share and press
. - Page 15 – Final Steps; Your thin client now boots with the new operating system.
- Page 16 – Writing the BIOS to the Thin Client; You will be asked if you wish to back up the current BIOS. Select; if you wish to keep a back up.
- Page 17 – to preserve the UUID of the; Specific Instructions for Backing up the BIOS; Use the arrow keys to select
- Page 18 – Other Uses of the Re-Imaging Utility; Running a Factory Reset
- Page 19 – Checking the System Information
- Page 20 – Zeroing the DOM; to continue. The process may take a few minutes to; Scanning the DOM for Errors
- Page 21 – Getting Help; Contacting Dell; Choose A Country/Region
Dell OptiPlex
FX130 and FX170
Re-Imaging Guide
"Loading the manual" means you need to wait until the file loads and becomes available for online reading. Some manuals are very large, and the time they take to appear depends on your internet speed.
Was this manual helpful?
About this manual
- Brand
- Dell
- Model
- OptiPlex FX170
- Document type
- User Manual
- Language(s)
- English
- Pages
- 21
- File size
- 745.2 KB
- Format
Summary
Contents | 3 C o n t e n t s How to Write Disk Images to Dell OptiPlex FX130 and FX170 Thin Clients ............................................................................ 4 Step 1: Creating the Re-Imaging Utility on a USB Flash Drive ..................4 Step 2: Retrieving the Disk Images ........
4 | Dell OptiPlex FX130 and FX170 Re-Imaging Guide How to Write Disk Images to Dell OptiPlex FX130 and FX170 Thin Clients This document describes how to create a re-imaged utility on a USB Flash drive and use it to write a disk image to your Dell OptiPlex FX130 and FX170 thin clients. The following ...
Dell OptiPlex FX130 and FX170 Re-Imaging Guide | 5 Once the EXE file has been downloaded, follow these steps to create your bootable USB key: 1. Run the executable as an administrator. 2. In the User Account Control dialog box, select Yes . 3. Click I Agree in the EULA screen to continue.
Ask a question
Related manuals
Popular Dell Other
More Dell Other models
 Dell OptiPlex 9010 User Manual
 Dell OPTIPLEX 9010 ALL-IN-ONE User Manual
 Dell OptiPlex 9020 User Manual
 Dell OptiPlex 9020 AIO User Manual
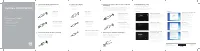 Dell OptiPlex 9020M User Manual
 Dell OptiPlex 9030 User Manual
- Dell OptiPlex G1 User Manual
 Dell OptiPlex GX1 Installation Manual
 Dell OptiPlex GX50 User Manual
- Dell OptiPlex GX60 User Manual
 Dell OptiPlex GX110 User Manual
- Dell OptiPlex GX150 User Manual