Dell Latitude 100L - User Manual

Dell Latitude 100L – User Manual, read for free online in PDF format. We hope this helps you resolve any issues you may have. If you have further questions, please contact us through the contact form.


Table of Contents:
- Page 2 – Before You Begin; Recommended Tools
- Page 3 – Before Working Inside Your Computer
- Page 4 – Computer Orientation
- Page 7 – System Components
- Page 9 – Memory; Removing the Memory Modules
- Page 10 – Installing the Memory Modules
- Page 11 – CD or DVD Drive; Removing the CD or DVD Drive
- Page 12 – Installing the CD or DVD Drive; Modem; Removing the Modem
- Page 14 – Installing the Modem; Mini PCI Card; Removing the Mini PCI Card
- Page 15 – Installing the Mini PCI Card
- Page 17 – Hard Drive; Removing the Hard Drive
- Page 18 – Installing the Hard Drive
- Page 19 – Keyboard; Removing the Keyboard
- Page 20 – Installing the Keyboard
- Page 22 – EMI Shield
- Page 23 – Display; Display Assembly
- Page 25 – Display Bezel
- Page 26 – Display Panel; Removing the Display Panel
- Page 27 – Installing the Display Panel
- Page 28 – Display Latch Assembly; Removing the Display Latch Assembly; Installing the Display Latch Assembly
- Page 30 – Palm Rest
- Page 32 – Microprocessor Thermal-Cooling Assembly; Removing the Microprocessor Thermal-Cooling Assembly
- Page 33 – Installing the Microprocessor Thermal-Cooling Assembly
- Page 34 – Microprocessor Module; Removing the Microprocessor Module
- Page 35 – Installing the Microprocessor Module
- Page 37 – Speakers; Removing the Speakers
- Page 38 – Installing the Speakers
- Page 39 – System Board; Removing the System Board
- Page 43 – Installing the System Board
- Page 44 – Flashing the BIOS; Flashing the BIOS From a Floppy Disk or a CD
- Page 46 – Base Plastics
- Page 47 – Pinout Assignments for I/O Connectors; USB Connector
- Page 49 – Mini Recommended Spares List
Dell Latitude 100L Service Manual
file:///C|/Work%20Area%20-%20A/E%20DOC%20Posting/latc100l/en/Service%20Manual/index.htm[2/4/2013 3:00:54 PM]
Dell™ Latitude™ 100L Service Manual
Before You Begin
System Components
Memory, CD or DVD Drive, Modem, and Mini PCI Card
Hard Drive
Keyboard
EMI Shield
Display
Palm Rest
Microprocessor Thermal-Cooling Assembly
Microprocessor Module
Speakers
System Board
Flashing the BIOS
Base Plastics
Pinout Assignments for I/O Connectors
Mini Recommended Spares List
Notes, Notices, and Cautions
NOTE:
A NOTE indicates important information that helps you make better use of your computer.
NOTICE:
A NOTICE indicates either potential damage to hardware or loss of data and tells you how to avoid the
problem.
CAUTION:
A CAUTION indicates a potential for property damage, personal injury, or death.
Abbreviations and Acronyms
For a complete list of abbreviations and acronyms, see the Tell Me How help file.
If you purchased a Dell™ n Series computer, any references in this document to Microsoft® Windows® operating systems are
not applicable.
Information in this document is subject to change without notice.
© 2004 Dell Inc. All rights reserved.
Reproduction in any manner whatsoever without the written permission of Dell Inc. is strictly forbidden.
Trademarks used in this text: Dell , the DELL logo, TrueMobile, and Latitude are trademarks of Dell Inc.; Intel , Pentium, and Celeron are registered
trademarks of Intel Corporation; Microsoft and Windows are registered trademarks of Microsoft Corporation.
Other trademarks and trade names may be used in this document to refer to either the entities claiming the marks and names or their products.
Dell Inc. disclaims any proprietary interest in trademarks and trade names other than its own.
Model PP08L
March 2004 Rev. A00
"Loading the manual" means you need to wait until the file loads and becomes available for online reading. Some manuals are very large, and the time they take to appear depends on your internet speed.
Was this manual helpful?
About this manual
- Brand
- Dell
- Model
- Latitude 100L
- Document type
- User Manual
- Language(s)
- English
- Pages
- 51
- File size
- 1008.9 KB
- Format
Summary
Before You Begin: Dell Latitude 100L Service Manual file:///C|/Work%20Area%20-%20A/E%20DOC%20Posting/latc100l/en/Service%20Manual/begin.htm[2/4/2013 3:00:58 PM] Back to Contents Page Before You Begin Dell™ Latitude™ 100L Service Manual Recommended Tools Turning Off Your Computer Before Working Insid...
Before You Begin: Dell Latitude 100L Service Manual file:///C|/Work%20Area%20-%20A/E%20DOC%20Posting/latc100l/en/Service%20Manual/begin.htm[2/4/2013 3:00:58 PM] Before Working Inside Your Computer Use the following safety guidelines to help protect your computer from potential damage and to help ens...
Before You Begin: Dell Latitude 100L Service Manual file:///C|/Work%20Area%20-%20A/E%20DOC%20Posting/latc100l/en/Service%20Manual/begin.htm[2/4/2013 3:00:58 PM] 1 battery see Mini RSL 2 battery-bay latch release 7Y032 9. Remove any installed modules, including a second battery, if installed. 10 . Re...
Ask a question
Related manuals
Popular Dell Other
More Dell Other models
 Dell Laptop E5430 User Manual
- Dell Laptop N5110 User Manual
 Dell Laptop Precision User Manual
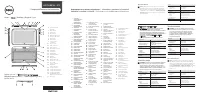 Dell Latitude 10 User Manual
-User-Manual/webp/1.webp) Dell Latitude 14 Rugged Extreme (7404, Mid 2014) User Manual
Dell Latitude 14 Rugged Extreme (7404, Mid 2014) User Manual Dell Latitude 14 Rugged Extreme 7404 User Manual
 Dell Latitude 110L User Manual
 Dell Latitude 131L User Manual
 Dell Latitude 2100 User Manual
 Dell Latitude 2110 User Manual
 Dell Latitude 3330 User Manual
 Dell Latitude ATG D620 Troubleshooting Guide