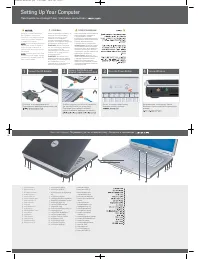
Page 2 - A Tour of Your Computer; Front View
A Tour of Your Computer: Dell Inspiron 2600 and 2650 Back to Contents Page A Tour of Your Computer Dell™ Inspiron™ 2600 and 2650 Front View Left Side View Right Side View Back View Bottom View Front View file:///F|/Service%20Manuals/Dell/Inspiron/2600-50/tour.htm (1 of 13) [2/28/2004 6:51:59 AM]
Page 7 - Left Side View
A Tour of Your Computer: Dell Inspiron 2600 and 2650 Left Side View 1 audio connectors (2) 2 network connector 3 PC Card slot 4 floppy drive Audio Connectors Attach headphones or speakers to the connector. Attach a microphone to the connector. file:///F|/Service%20Manuals/Dell/Inspiron/2600-50/tour....
Page 8 - Right Side View
A Tour of Your Computer: Dell Inspiron 2600 and 2650 Network Connector (Optional) HINT: The network connector is slightly larger than the modem connector. Do not plug a telephone line into the network connector. Connects the computer to a network. The lights next to the connector indicate activity f...
Page 10 - Back View
A Tour of Your Computer: Dell Inspiron 2600 and 2650 Fixed Optical Drive Compartment — Accommodates devices such as a CD drive, DVD drive, CD-RW drive, or a CD-RW/DVD combo drive. Back View NOTICE: To avoid damaging the computer, wait 5 seconds after turning off the computer before you disconnect an...
Page 13 - Bottom View
A Tour of Your Computer: Dell Inspiron 2600 and 2650 CAUTION: The AC adapter works with electrical outlets worldwide. However, power connectors and power strips vary among countries. Using an incompatible cable or improperly connecting the cable to the power strip or electrical outlet may cause fire...
Page 15 - Solving Problems; Accessing Help
Solving Problems: Dell Inspiron 2600 and 2650 Back to Contents Page Solving Problems Dell™ Inspiron™ 2600 and 2650 Accessing Help Power Problems Error Messages Video and Display Problems Sound and Speaker Problems Printer Problems Modem and Internet Connection Problems Scanner Problems PC Card Probl...
Page 16 - Power Problems
Solving Problems: Dell Inspiron 2600 and 2650 Guides . 2. Click Tell Me How . To access Help in Windows XP 1. Click the Start button and then click Help and Support . 2. Type a word or phrase that describes your problem and then click the arrow icon. 3. Click the topic that describes your problem. 4...
Page 17 - Error Messages
Solving Problems: Dell Inspiron 2600 and 2650 Check the battery status light — If the battery status light flashes orange or is a steady orange, the battery charge is low or depleted. Connect the computer to an electrical outlet. If the battery status light is off, the battery is too hot to charge. ...
Page 19 - Video and Display Problems; If the display is blank
Solving Problems: Dell Inspiron 2600 and 2650 2. Double-click the Add/Remove Programs icon. 3. Select the program that you want to remove. 4. Click Change or Remove Programs and follow the prompts on the screen. 5. See the program documentation for installation instructions. x:\ is not accessible. T...
Page 20 - If the display is difficult to read
Solving Problems: Dell Inspiron 2600 and 2650 Check the AC adapter — Check the AC adapter cable connections. If the AC adapter has a light, ensure that it is on. Connect the computer directly to an electrical outlet — Bypass power protection devices, power strips, and the extension cable to verify t...
Page 21 - If only part of the display is readable; Sound and Speaker Problems; If you have a problem with integrated speakers; If you have a problem with external speakers
Solving Problems: Dell Inspiron 2600 and 2650 3. Try different settings for Colors , Screen area , and Advanced Settings . See "Error Messages" — If an error message appears, see " Error Messages ." If only part of the display is readable Connect an external monitor 1. Turn off your ...
Page 22 - Printer Problems
Solving Problems: Dell Inspiron 2600 and 2650 HINT: The volume control in some MP3 players overrides the Windows volume setting. If you have been listening to MP3 songs, make sure that you did not turn the player volume down or off. Check the speaker cable connections — See the setup diagram supplie...
Page 23 - Modem and Internet Connection Problems
Solving Problems: Dell Inspiron 2600 and 2650 Verify that Windows® recognizes the printer Windows XP 1. Click the Start button. 2. Click Control Panel . 3. Click Printers and Other Hardware . 4. Click View installed printers or fax printers . If the printer model is listed, right-click the printer i...
Page 26 - PC Card Problems; Touch Pad or Mouse Problems
Solving Problems: Dell Inspiron 2600 and 2650 Check the power cable connection — Ensure that the scanner power cable is firmly connected to a working electrical power source and that the scanner is turned on. If the device is plugged into a surge protector, try plugging it directly into an electrica...
Page 27 - External Keyboard Problems
Solving Problems: Dell Inspiron 2600 and 2650 Check the touch pad settings Windows ® XP 1. Click the Start button, click Control Panel , and then click Printers and Other Hardware . 2. Click Mouse . 3. Try adjusting the settings. Windows 2000 1. Click the Start button, point to Settings , and then c...
Page 28 - Unexpected Characters
Solving Problems: Dell Inspiron 2600 and 2650 Check the keyboard cable — Shut down the computer. Disconnect the keyboard cable and check it for damage. For PS/2 cables, check the cable connector for bent or broken pins. Firmly reconnect the cable. If you are using a keyboard extension cable, disconn...
Page 29 - Drive Problems; If you cannot save a file to a floppy disk drive
Solving Problems: Dell Inspiron 2600 and 2650 Drive Problems HINT: For information on saving files to a floppy disk, see the Tell Me How help file (see " Accessing Help "). If you cannot save a file to a floppy disk drive Ensure that Windows® recognizes the drive — In Windows XP, click the S...
Page 31 - If you have problems with a hard drive
Solving Problems: Dell Inspiron 2600 and 2650 tray 1. Ensure that the computer is turned off. 2. Straighten a paper clip and insert one end into the eject hole at the front of the drive; push firmly until the tray is partially ejected. 3. Gently pull out the tray until it stops. If you hear an unfam...
Page 32 - Network Problems; General Program Problems; A program crashes
Solving Problems: Dell Inspiron 2600 and 2650 Check the drive for errors 1. In Windows XP, click the Start button and click My Computer . In Windows 2000, d ouble-click My Computer . 2. Right-click the drive letter (local disk) that you want to scan for errors, and then click Properties . 3. Click t...
Page 33 - A program stops responding; A solid blue screen appears; Error messages appear
Solving Problems: Dell Inspiron 2600 and 2650 See the software documentation — Many software manufacturers maintain websites with information that may help you solve the problem. Ensure that you properly installed and configured the program. Reinstall the program if necessary. A program stops respon...
Page 34 - If Your Computer Gets Wet
Solving Problems: Dell Inspiron 2600 and 2650 Ensure that you are connected to the Internet — With the Outlook Express e-mail program open, click File . If Work Offline has a check mark next to it, click the check mark to remove it and connect to the Internet. Be sure that you have subscribed to an ...
Page 35 - If You Drop or Damage Your Computer
Solving Problems: Dell Inspiron 2600 and 2650 NOTICE: Do not use artificial means, such as a hair dryer or a fan, to speed the drying process. CAUTION: To help prevent electrical shock, verify that the computer is thoroughly dry before continuing with the rest of this procedure. 10. Ground yourself ...
Page 36 - Resolving Other Technical Problems
Solving Problems: Dell Inspiron 2600 and 2650 If the computer does not start, or if you cannot identify the damaged components, contact Dell for technical assistance (see "Contacting Dell" in the Dell Owner's Manual that came with your computer). Resolving Other Technical Problems Go to the ...
Page 37 - Overview
Reinstalling Drivers and Utilities: Dell Inspiron 2600 and 2650 Back to Contents Page Reinstalling Drivers and Utilities Dell™ Inspiron™ 2600 and 2650 Overview Reinstalling Drivers and Utilities Resolving Software and Hardware Incompatibilities Using Microsoft® Windows System Restore Overview Dell p...
Page 39 - Installing the Modem or Network Adapter Driver
Reinstalling Drivers and Utilities: Dell Inspiron 2600 and 2650 The CD automatically scans your hardware to detect drivers and utilities used by your computer. After the CD completes the hardware scan, you can also detect other drivers and utilities. Under Search Criteria , select the appropriate ca...
Page 40 - Using Windows XP Device Driver Rollback
Reinstalling Drivers and Utilities: Dell Inspiron 2600 and 2650 6. Click Device Manager . Click Action and click Update Driver . 7. Click Install from a list or specific location (Advanced) and click Next . 8. Verify that Search removable media is selected, and then click Next . 9. When the name of ...
Page 41 - Resolving Software and Hardware
Reinstalling Drivers and Utilities: Dell Inspiron 2600 and 2650 use Device Driver Rollback: 1. Click the Start button and right-click My Computer . 2. Click Properties . 3. Click the Hardware tab and click Device Manager . 4. In the Device Manager window, right-click the device for which the new dri...
Page 43 - Using Microsoft® Windows System Restore
Reinstalling Drivers and Utilities: Dell Inspiron 2600 and 2650 8. Double-click the malfunctioning device type in the Device Manager list. 9. Double-click the icon for the specific device in the expanded list. The Properties window appears. If an IRQ conflict exists, the Device status area in the Pr...
Page 44 - Creating a Restore Point; Using the System Restore Wizard
Reinstalling Drivers and Utilities: Dell Inspiron 2600 and 2650 NOTICE: It is important to make regular backups of your data files. System Restore does not monitor changes to or recover your data files. If the original data on the hard disk is accidentally erased or overwritten, or if it becomes ina...
Page 45 - Restoring the Computer to an Earlier Operating
Reinstalling Drivers and Utilities: Dell Inspiron 2600 and 2650 4. Type a name for the new restore point in the Restore point description field. The present date and time are automatically added to the description of the new restore point. 5. Click Create . 6. Click OK. Restoring the Computer to an ...
Page 46 - Undoing the Last System Restore
Reinstalling Drivers and Utilities: Dell Inspiron 2600 and 2650 NOTICE: Save and close all open files and exit all open programs. Do not alter, open, or delete any files or programs until the system restoration is complete. 5. Click Next . The Restoration Complete screen appears after System Restore...
Page 48 - Reinstalling Microsoft® Windows®; Reinstalling Windows® XP
Reinstalling Microsoft® Windows® Operating Systems: Dell Inspiron 2600 and 2650 Back to Contents Page Reinstalling Microsoft® Windows® Operating Systems Dell™ Inspiron™ 2600 and 2650 Reinstalling Windows® XP Reinstalling Windows 2000 Reinstalling Windows® XP Before reinstalling the Microsoft® Window...
Page 53 - System Setup Program; System Setup Overview; Viewing the System Setup Screens
System Setup Program: Dell Inspiron 2600 and 2650 Back to Contents Page System Setup Program Dell™ Inspiron™ 2600 and 2650 System Setup Overview Viewing the System Setup Screens System Setup Screens System Setup Overview The system setup program contains the standard settings for your computer. NOTI...
Page 54 - System Setup Screens
System Setup Program: Dell Inspiron 2600 and 2650 System Setup Screens HINT: To see information about a specific item on a system setup screen, highlight the item and refer to the Help area on the screen. The system setup screens display the current setup information and settings for your computer. ...
Page 56 - Power Management; Management Tips; Power Management Modes; Standby Mode
Power Management: Dell Inspiron 2600 and 2650 Back to Contents Page Power Management Dell™ Inspiron™ 2600 and 2650 Management Tips Power Management Modes Power Options Properties Battery Performance Management Tips ● Connect the computer to an electrical outlet when possible because the battery life...
Page 57 - Hibernate Mode
Power Management: Dell Inspiron 2600 and 2650 To enter standby mode: ● In the Microsoft ® Windows ® XP operating system, click the Start button, click Turn off computer , and then click Standby. In Windows ® 2000 , click the Start button, click Shutdown , click Standby , and then click OK . or ● Dep...
Page 58 - Power Options Properties; In Windows XP
Power Management: Dell Inspiron 2600 and 2650 ● Press . HINT: Some PC Cards may not operate correctly after the computer exits hibernate mode. Remove and reinsert the card, or simply restart (reboot) your computer. To exit hibernate mode, press the power button. The computer may take a short time to...
Page 59 - Power Schemes Tab; Alarms Tab; Power Meter Tab
Power Management: Dell Inspiron 2600 and 2650 Power Schemes Tab The Power schemes pull-down menu displays the selected preset power scheme. Depending on your operating system, typical power schemes are: ● Portable/Laptop ● Home/Office ● Always On ● Presentation ● Minimal Power Management ● Max Batte...
Page 61 - Battery Performance
Power Management: Dell Inspiron 2600 and 2650 mode. ● Maximum Performance — The processor runs at its highest possible speed even if the computer is running on battery power. ● Battery Optimized Performance — Processor speed is optimized for battery power even if the computer is connected to an elec...
Page 63 - Using the Dell Diagnostics; When to Use the Dell Diagnostics; Features of the Dell Diagnostics
file:///F|/Service%20Manuals/Dell/Inspiron/2600-50/diag.htm Back to Contents Page Using the Dell Diagnostics Dell™ Inspiron™ 2600 and 2650 When to Use the Dell Diagnostics Features of the Dell Diagnostics Starting the Dell Diagnostics Advanced Testing Confirming the System Configuration Information ...
Page 64 - Starting the Dell Diagnostics
file:///F|/Service%20Manuals/Dell/Inspiron/2600-50/diag.htm by yourself, the diagnostic tests can provide you with important information you will need when talking to Dell's service and support personnel. If you are experiencing a problem with your computer, Dell recommends that you perform the chec...
Page 66 - Diagnostics Menu
file:///F|/Service%20Manuals/Dell/Inspiron/2600-50/diag.htm 14. To select an option from this menu, highlight the option and press , or press the key that corresponds to the highlighted letter in the option you choose. Diagnostics Menu Option Function Test All Devices Performs extensive diagnostic t...
Page 67 - Advanced Testing; Advanced Testing Main Screen; Advanced Testing Help Menu
file:///F|/Service%20Manuals/Dell/Inspiron/2600-50/diag.htm test(s). Advanced Testing When you select Advanced Testing from the Diagnostics Menu , the Advanced Testing screen appears, listing the diagnostic test device groups and devices of the selected device group, and the screen allows you to sel...
Page 68 - Advanced Testing Help Categories
file:///F|/Service%20Manuals/Dell/Inspiron/2600-50/diag.htm 2. Highlight the Help category and press , or press the key that corresponds to the highlighted letter in the category you choose. Advanced Testing Help Categories Help Category Description Menu Provides descriptions of the main menu screen...
Page 69 - Confirming the System Configuration
file:///F|/Service%20Manuals/Dell/Inspiron/2600-50/diag.htm Test Provides a thorough explanation of the test procedure of each highlighted test group subtest. An example of the Diskette subtest floppy drive Seek Test is as follows: Diskette Drive A - floppy drive Seek Test This test verifies the dri...
Page 71 - Specifications
Specifications: Dell Inspiron 2600 and 2650 Back to Contents Page Specifications Dell™ Inspiron™ 2600 and 2650 Microprocessor System Information PC Card Memory Ports and Connectors Communications Video Display Touch Pad Battery AC Adapter Physical Environmental Microprocessor Microprocessor type: In...
Page 80 - Pin Assignments for I/O Connectors; USB Connector
Pin Assignments for I/O Connectors: Dell Inspiron 2600 and 2650 Back to Contents Page Pin Assignments for I/O Connectors Dell™ Inspiron™ 2600 and 2650 USB Connector PS/2 Connector Video Connector Parallel Connector USB Connector Pin Signal 1 USB5V+ 2 USBP– 3 USBP+ 4 GND file:///F|/Service%20Manuals/...
Page 81 - Video Connector
Pin Assignments for I/O Connectors: Dell Inspiron 2600 and 2650 PS/2 Connector Pin Signal 1 KBDATA 2 PS2DATA 3 GND 4 VCC 5 KBCLK 6 PS2CLK Video Connector file:///F|/Service%20Manuals/Dell/Inspiron/2600-50/pinouts.htm (2 of 4) [2/28/2004 6:52:07 AM]
Page 84 - Removing and Replacing Parts
Removing and Replacing Parts: Dell Inspiron 2600 and 2650 Removing and Replacing Parts Dell™ Inspiron™ 2600 and 2650 Before You Remove or Replace Parts System Components Hard Drive Back-Panel Fan (Inspiron 2650 Only) Memory Module, Modem, Optical Drive, and Floppy Drive Keyboard Display Assembly and...
Page 85 - Battery Latch Assembly; Removing the Battery Latch Assembly
Battery Latch Assembly: Dell Inspiron 2600 and 2650 Back to Contents Page Battery Latch Assembly Dell™ Inspiron™ 2600 and 2650 Removing the Battery Latch Assembly Replacing the Battery Latch Assembly Removing the Battery Latch Assembly NOTICE: Disconnect the computer and any attached devices from el...
Page 86 - Replacing the Battery Latch Assembly
Battery Latch Assembly: Dell Inspiron 2600 and 2650 11. Remove the system board . 12. Remove the M2 x 4-mm screw from the battery latch assembly. 13. Remove the latch spring and plate from the bottom case. 1 M2 x 4-mm screw (1) 2 latch plate 3 latch button 4 bottom case 5 latch spring 6 latch spring...
Page 88 - Before You Remove or Replace Parts; Preparing to Work Inside the Computer
Before You Remove or Replace Parts: Dell Inspiron 2600 and 2650 Back to Contents Page Before You Remove or Replace Parts Dell™ Inspiron™ 2600 and 2650 Preparing to Work Inside the Computer Recommended Tools Computer Orientation Screw Identification Preparing to Work Inside the Computer CAUTION: Only...
Page 90 - Recommended Tools
Before You Remove or Replace Parts: Dell Inspiron 2600 and 2650 10. To dissipate any static electricity while you work, use a wrist grounding strap or periodically touch an unpainted metal surface. 11. Handle components and cards with care. Do not touch the components or contacts on a card. Hold a c...
Page 96 - Hard Drive; Removing the Hard Drive
Hard Drive: Dell Inspiron 2600 and 2650 Back to Contents Page Hard Drive Dell™ Inspiron™ 2600 and 2650 Removing the Hard Drive Replacing the Hard Drive Removing the Hard Drive CAUTION: If you remove the hard drive from the computer when the drive is hot, do not touch the metal housing of the hard dr...
Page 97 - Replacing the Hard Drive
Hard Drive: Dell Inspiron 2600 and 2650 NOTICE: When the hard drive is not in the computer, store it in protective antistatic packaging. 1 bottom of computer 2 M2.5 x 5-mm screw 3 hard drive door 4. Lift the hard drive door to release it, and slide the hard drive out of the computer. Replacing the H...
Page 99 - Drive, and Floppy Drive; Removing the Memory Module/Modem Cover
Memory Module, Modem, Optical Drive, and Floppy Drive: Dell Inspiron 2600 and 2650 Back to Contents Page Memory Module, Modem, Optical Drive, and Floppy Drive Dell™ Inspiron™ 2600 and 2650 Memory Module Modem Optical Drive Floppy Drive Memory Module Removing the Memory Module/Modem Cover NOTICE: Dis...
Page 103 - Modem
Memory Module, Modem, Optical Drive, and Floppy Drive: Dell Inspiron 2600 and 2650 1 M2.5 x 5-mm screw 2 memory module/modem cover 3 arrows (2) 4 lines (2) 5. Insert the battery into the battery bay, or connect the AC adapter to your computer and an electrical outlet. 6. Turn on the computer. As the...
Page 107 - Optical Drive; Removing an Installed Optical Drive
Memory Module, Modem, Optical Drive, and Floppy Drive: Dell Inspiron 2600 and 2650 1 M2.5 x 5-mm screw 2 memory module/modem cover 3 arrows (2) 4 lines (2) Optical Drive Removing an Installed Optical Drive NOTICE: To avoid ESD, ground yourself by using a wrist grounding strap or by touching an unpai...
Page 109 - Installing an Optical Drive
Memory Module, Modem, Optical Drive, and Floppy Drive: Dell Inspiron 2600 and 2650 1 M2.5 x 8-mm screw 2 optical-drive release button 3 optical drive Installing an Optical Drive 1. Slide the optical drive into the bay until the optical drive is fully seated. 2. Replace and tighten the M2.5 x 8-mm sc...
Page 111 - Floppy Drive; Removing an Installed Floppy Drive
Memory Module, Modem, Optical Drive, and Floppy Drive: Dell Inspiron 2600 and 2650 1 M2.5 x 5-mm screw 2 memory module/modem cover 3 arrows (2) 4 lines (2) Floppy Drive Removing an Installed Floppy Drive NOTICE: To avoid ESD, ground yourself by using a wrist grounding strap or by touching an unpaint...
Page 113 - Installing a Floppy Drive
Memory Module, Modem, Optical Drive, and Floppy Drive: Dell Inspiron 2600 and 2650 NOTICE: Release the securing tab before you disconnect the flex cable from the ZIF connector. Failure to do so can damage the ZIF connector. 3. Disconnect the flex cable from the ZIF connector: a. Pull the securing ta...
Page 117 - Keyboard; Removing the Keyboard
Keyboard: Dell Inspiron 2600 and 2650 Back to Contents Page Keyboard Dell™ Inspiron™ 2600 and 2650 Removing the Keyboard Replacing the Keyboard Removing the Keyboard NOTICE: Disconnect the computer and any attached devices from electrical outlets, and remove any installed battery. NOTICE: To avoid E...
Page 121 - Replacing the Keyboard
Keyboard: Dell Inspiron 2600 and 2650 1 keyboard securing tabs (4) 2 keyboard flex cable 3 keyboard connector 4 interface connector on system board 7. Remove the keyboard from the bottom case. Replacing the Keyboard file:///F|/Service%20Manuals/Dell/Inspiron/2600-50/keyboard.htm (5 of 7) [2/28/2004 ...
Page 124 - Display Assembly and Display Latch; Display Assembly
Display Assembly and Display Latch: Dell Inspiron 2600 and 2650 Back to Contents Page Display Assembly and Display Latch Dell™ Inspiron™ 2600 and 2650 Display Assembly Display Latch Display Assembly NOTICE: You must remove the display assembly before you remove the palm rest. NOTICE: Disconnect the ...
Page 128 - Removing the Display Bezel; Removing the 14-Inch Display Panel
Display Assembly and Display Latch: Dell Inspiron 2600 and 2650 1 screw covers (5) 6 M2 x 3-mm screws (4) 2 M2.5 x 5-mm screws (5) 7 M2.5 x 5-mm screw (1) 3 display bezel 8 display-feed flex cable 4 display panel 9 flex-cable retention bracket 5 M2.5 x 5-mm screws (2) 10 top cover Removing the Displ...
Page 133 - Removing the 15-Inch Display Panel
Display Assembly and Display Latch: Dell Inspiron 2600 and 2650 4 display panel 9 flex-cable retention bracket 5 M2.5 x 5-mm screws (2) 10 top cover Removing the 15-Inch Display Panel NOTICE: Disconnect the computer and any attached devices from electrical outlets, and remove any installed battery. ...
Page 135 - Replacing the 15-Inch Display Panel; Display Latch; Removing the Display Latch
Display Assembly and Display Latch: Dell Inspiron 2600 and 2650 1 pull tabs 2 inverter connector on system board 3 bottom flex-cable connector 10. Pull the top flex-cable connector down and away to remove it from the display panel connector. Replacing the 15-Inch Display Panel 1. Reconnect the top f...
Page 136 - Replacing the Display Latch
Display Assembly and Display Latch: Dell Inspiron 2600 and 2650 2. Remove the display assembly . 3. Remove the display bezel . 4. Remove the two M2.5 x 5-mm screws that secure the display latch and bracket to the top cover. 5. Lift the display latch, bracket, and spring up and out of the top cover. ...
Page 138 - EMI Shield
EMI Shield, Video Card, and Palm Rest: Dell Inspiron 2600 and 2650 Back to Contents Page EMI Shield, Video Card, and Palm Rest Dell™ Inspiron™ 2600 and 2650 EMI Shield Video Card Palm Rest EMI Shield NOTICE: Disconnect the computer and any attached devices from electrical outlets, and remove any ins...
Page 139 - Video Card; Removing the Inspiron 2600 Video Card
EMI Shield, Video Card, and Palm Rest: Dell Inspiron 2600 and 2650 1 EMI shield 2 M2.5 x 12-mm screws (3) Video Card Removing the Inspiron 2600 Video Card NOTICE: Disconnect the computer and any attached devices from electrical outlets, and remove any installed battery. NOTICE: To avoid ESD, ground ...
Page 140 - Replacing the Inspiron 2600 Video Card
EMI Shield, Video Card, and Palm Rest: Dell Inspiron 2600 and 2650 4. Pull the video card by the edges toward the front of the computer to remove the video card from the bottom case. 1 M2.5 x 5-mm screw (1) 2 video card Replacing the Inspiron 2600 Video Card 1. Align the top-right corner of the vide...
Page 142 - Removing the Inspiron 2650 Video Card
EMI Shield, Video Card, and Palm Rest: Dell Inspiron 2600 and 2650 1 bottom of video card 2 video card connector 3 system board 4 interface connector 3. Reinstall the M2.5 x 5-mm screw that secures the video card to the bottom case. 4. Replace the EMI shield . 5. Replace the keyboard . Removing the ...
Page 144 - Replacing the Inspiron 2650 Video Card
EMI Shield, Video Card, and Palm Rest: Dell Inspiron 2600 and 2650 Replacing the Inspiron 2650 Video Card 1. Align the top-right corner of the video card with the guide on the system board, and slide the top edge of the video card under the palm rest. 1 M2.5 x 8-mm screw (1) 2 palm rest 3 top-right ...
Page 146 - Palm Rest
EMI Shield, Video Card, and Palm Rest: Dell Inspiron 2600 and 2650 Palm Rest NOTICE: Disconnect the computer and any attached devices from electrical outlets, and remove any installed battery. NOTICE: To avoid ESD, ground yourself by using a wrist grounding strap or by touching an unpainted metal su...
Page 149 - Removing the Microprocessor Thermal-
Microprocessor Thermal-Cooling Assembly: Dell Inspiron 2600 and 2650 Back to Contents Page Microprocessor Thermal-Cooling Assembly Dell™ Inspiron™ 2600 and 2650 Removing the Microprocessor Thermal-Cooling Assembly Replacing the Microprocessor Thermal-Cooling Assembly Removing the Microprocessor Ther...
Page 150 - Replacing the Microprocessor Thermal-
Microprocessor Thermal-Cooling Assembly: Dell Inspiron 2600 and 2650 1 microprocessor thermal- cooling assembly 2 captive screws (4) 3 fan power cable 5. Lift the microprocessor thermal-cooling assembly up toward the front of the computer and out of the system board. Replacing the Microprocessor The...
Page 152 - Speakers; Removing the Speakers
Speakers: Dell Inspiron 2600 and 2650 Back to Contents Page Speakers Dell™ Inspiron™ 2600 and 2650 Removing the Speakers Replacing the Speakers Removing the Speakers NOTICE: Disconnect the computer and any attached devices from electrical outlets, and remove any installed battery. NOTICE: To avoid E...
Page 155 - Replacing the Speakers
Speakers: Dell Inspiron 2600 and 2650 Replacing the Speakers 1. Slide the speakers down into the bottom case. NOTICE: Ensure that the speaker cables are under or between their routing clips, and route the left and right speaker cables properly beneath the die casting. HINT: Speakers face out in the ...


 Dell Inspiron 1520 User Manual
 Dell Inspiron 1521 User Manual
 Dell INSPIRON 1525 User Manual
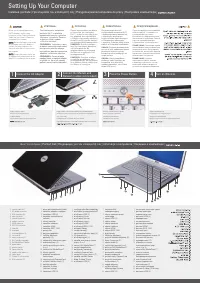 Dell Inspiron 1526 User Manual
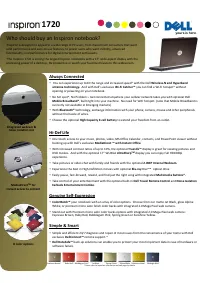 Dell Inspiron 1720 User Manual
 Dell Inspiron 1721 User Manual
 Dell Inspiron 2500 User Manual
 Dell Inspiron 3000 User Manual
 Dell Inspiron 3200 User Manual
 Dell Inspiron 3500 User Manual
 Dell Inspiron 3537 User Manual
 Dell Inspiron 3646 User Manual